Sorry For Everything And Confessions Of A Cardmaker

by Joanne James14. June 2017 20:00

Wednesday already - where is the week going?! I'm late posting my card today as whilst I had it made, I am behind with photographing and have had a busy day today getting ready for a special birthday in the James household - more on that tomorrow! Today I'm sharing a card that I made for the sketch challenge over at TGIF Challengestake a look:


This is one of those layouts that can be used in so many ways - I decided that it was the perfect sketch for me to send a message - take a look:


Here's the low-down on today's card:

Sorry For... Everything - Today's sketch is perfect for a split sentiment, especially one that has an extra-large element such as the 'sorry' here. So here's the thing: I might be a cardmaker, but I am one of the world's worst at getting cards sent on time. It's not for a shortage of cards - I always have lots! - rather, it's because I never have the 'right' card and like to make something specifically with the recipient in mind. Trouble is, my cards then often arrive late or the special card never gets made and a belated card is in order. So this stamp set was made for me! I love the large 'sorry' greeting and then a whole range of additional sentiments that work on a wide range of cards when an apology or sympathy is required. I stamped my 'Sorry' in Cherry Cobbler, then inked up the second part of the greeting with my Cherry Cobbler and Pacific Point Stampin' Write markers and stamped it onto my Blushing Bride Banner. I also added the 'forgive me?' sentiment to the inside, that you can see above at the start of my post.

Birthday Memories - I chose the bold red and white birthday patterned paper from the Birthday Memories designer series paper pack for the background to my card. This paper is bright and has a busy pattern so is the perfect background for my white sentiment panel. 

Make Framelits Your Friend - I added a little birthday present instead of a bow to finish my card - take a close look at my and you'll see it's not stamped though. Fussy cut? No - I used my Birthday Friends Framelits to crop this adorable gift from a sheet of Birthday Memories designer series paper. I love how a number of the framelits cut out not only the images from the 'Birthday Delivery' stamp set but the painted image from the designer series paper. This is the ultimate in co-ordinating suites!

Here is the visual summary of the key products used on today's project for you to pin for easy reference:


You can see all of my 'How To' summaries on my 'How To - Tips and Techniques' Pinterest board in case you've missed any. 

That's all from me - I'll be back tomorrow with another project. Until then, happy stampin'!


Stampin' Up! Supplies Used:

Table built using Product Table Builder by The Crafty Owl - Independent Stampin' Up! Demonstrator.

Glamper Greetings Meets Pick A Pattern

by Joanne James13. June 2017 07:00


I've a quick post today to share a card I made for a friend of mine using another of the Pick A Pattern papers take a look:


Here's the low-down on today's card:

The Glamper Greetings cute caravan set was an annual catalogue carryover from the Autumn-Winter seasonal catalogue. I'm glad it made the cut as I hadn't inked mine up yet - and it pairs beautifully with the new Pick A Pattern designers series paper. I added a little sunshine and grass to my caravan scene, but this just scratches the surface of what can be done with this set - there are so many sweet little images: bunting, pies, flamingoes, bats and balloons with which to decorate your little caravan and a host of sentiments to boot - glamper greetings indeed!

As I went to write my post today I had an 'oops' moment; I had originally made this card with the sketch over at As You See It in mind - then realised I had stuck everything down minus the banner! Too late to rectify and since it's integral to the sketch I'm not going to link up but I'm sharing with you anyway - here's the link to the AYSI sketch so that you can see what I mean. On the upside, it means you get to see more of the patterned paper - yay!

Here is the visual summary of the key products used on today's project for you to pin for easy reference:


You can see all of my 'How To' summaries on my 'How To - Tips and Techniques' Pinterest board in case you've missed any. 

Enjoy your day and I'll be back tomorrow with another project. Until then, happy stampin'!


Stampin' Up! Supplies Used:

Table built using Product Table Builder by The Crafty Owl - Independent Stampin' Up! Demonstrator.

Pick A Pattern Floral Hello Card

by Joanne James12. June 2017 07:00

Happy Monday everyone - a fresh start to a new week! Today I'm sharing a card for this week's challenge over at Freshly Made Sketches:


I kept my card simple with a showcase of some new designer series paper - take a look:


Here's the low-down on today's card:

Pick A Floral Pattern - There are some great patterns in the Pick A Pattern designer series paper pack - an eclectic mix of everything from dinosaurs to mushrooms, cameras to this lovely floral pattern. The thing I love most about this pattern is that the white flowers, with the accents of green and yellow, really balance the brightness of the Flirty Flamingo, which I sometimes find a little intense. Framing in white and Emerald Envy green also helps to tone down the pink too.

Patterns and Pieces - I used the simple 'hello there' sentiment from the co-ordinating stamp set, Patterns and Pieces, for the centre of my floral accent, although I cropped it to a regular circle with my 1 3/8" circle punch rather than the slightly more fluid circle of the stamp itself.

May Flower - I decided that instead of a standard layered circle for my accent, i wanted to create something more in keeping with the flower pattern of the designer series paper. A quick sort through my framelits decided me on one of the framelits in the May Flowers set: whilst not an even-petalled flower, I think it still works to create a flower to ground my sentiment and tie in with my overall clean design. What do you think - does it work for you? I'd be interested to hear your thoughts - do leave me a comment below.

Here is the visual summary of the key products used on today's project for you to pin for easy reference:


You can see all of my 'How To' summaries on my 'How To - Tips and Techniques' Pinterest board in case you've missed any. 

Enjoy your day; I have time at my desk and housework planned. I'll be back tomorrow with another project. Until then, happy stampin'!


Stampin' Up! Supplies Used:

Table built using Product Table Builder by The Crafty Owl - Independent Stampin' Up! Demonstrator.

Label Me Pretty Birthday Card For PP348

by Joanne James11. June 2017 10:00

It's Sunday and time for this week's new challenge over at The Paper Players! It's my wonderful friend LeAnne's turn to host this week and she has a fun colour challenge for us to work with:


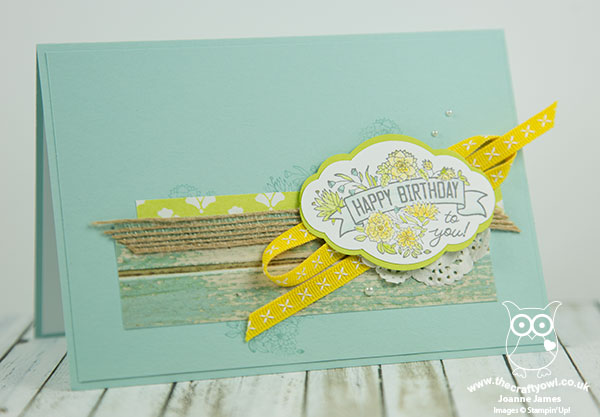
I love these summery colours this week! I almost went with something 'beachy' but instead cased a layout from page 18 of the new annual catalogue for my card and used the Pretty Label bundle - take a look:


Here's the low-down on today's card:

Label Me Pretty - The detailed florals on my Label Me Pretty label were perfect for today's colour scheme; mostly bright yellows and greens, with a single stem of bluebells to tie in with my card base. i also inked the floral sections of my stamp with my Pool Party Stampin' Write Marker and stamped them directly onto my card base for a little tone-on-tone interest. 

Pretty Label Punch Trick - Did you know the Pretty Label Punch can also be used to create mat layers for your label? Here I punched a second label in Lemon Lime Twist cardstock, cut it in half horizontally and added it to the base edges of your label to give a mat border edge. Neat, right?

Ribbons and Pearls - I added lots of 'pretties' to my card today and couldn't resist a twist of new bright yellow double stitched ribbon; the Daffodil Delight seems to tone down the brightness of the Lemon Lime Twist on this card too.  

Here is the visual summary of the key products used on today's project for you to pin for easy reference:


You can see all of my Product and 'How To' summaries on my 'How To - Tips and Techniques' Pinterest board in case you've missed any. 

Before you reach for your ink and papers, check out what our amazing team has created to inspire you this week:

The Paper Players Design Team
 
 
Here's a quick recap of our challenge rules:
 
1.  Create a new paper project
2.  Upload your creation to your blog with a link back to us and provide a direct link to the post featuring your challenge submission.
3.  Please link your card to no more than four challenges, TOTAL.
4.  Have FUN! 

I look forward to seeing what you create with this week's colour palette. Enjoy the rest of your weekend as it will be over all too quickly; we are all out and about today, with one of the James Juniors singing in a choir performance all day and the other headed to his school summer fete, complete with classic car show and bouncy castles and hopefully time for a cream tea!

I'll be back tomorrow with another project; until then, happy stampin'!


Stampin' Up! Supplies Used: 

Table built using Product Table Builder by The Crafty Owl - Independent Stampin' Up! Demonstrator.

Daisy Delight And The Daisy Punch Bundle - A No Brainer!

by Joanne James7. June 2017 07:00

Today I've a couple more daisy cards for you - both the same design, just using alternative colourways. Here's the first one, featuring Pool Party, Calypso Coral, Emerald Envy and Gold:


Here's the second card I created using exactly the same stamps and layout, simply changing the colour palette - this time Peekaboo Peach, Wisteria Wonder, Old Olive and Silver:


 Here's the low-down on today's card:

Take A Strip Of Paper - Believe it or not, today's cards started out as a few designer series paper offcuts; literally leftovers from another project! I had been busy creating a bunch of customer thank you cards with full size cardfronts featuring the gorgeous patterns in the Delightful Daisies designer series paper packs to go out with this month's customer orders, and had a whole bunch of narrow strips leftover. I could have thrown them away - instead I used them to create the horizontal lines for my punched flower to rest on and to inspire the colour combinations for the rest of my card. Waste not, want not and all that!

Buy The Bundle - As my blog post title suggests, you could but the Daisy Punch alone - why would you though when you can get the Daisy Delight stamp set with it as a bundle with 10% off into the bargain? For me the bundle really is a no brainer: it has this lovely daisy stamp that I've used here to add detail and colour to your daisy petals and centres and it also comes with a number of other pretty florals that can be coloured or used for a tone-on-tone look as I have here to create my background. There's a couple of thank you sentiment combinations too. So many more creative possibilities and a great price point at £27.75. 

Add A Gem - In addition to some ribbon, I've also added one of the new faceted gems to the centre of each of my daisies - I love the sparkle these add to a card!

Here is the visual summary of the key products used on today's project for you to pin for easy reference:


You can see all of my 'How To' summaries on my 'How To - Tips and Techniques' Pinterest board in case you've missed any. 

Enjoy your day and I'll be back tomorrow with another project. Until then, happy stampin'!


Stampin' Up! Supplies Used:

Table built using Product Table Builder by The Crafty Owl - Independent Stampin' Up! Demonstrator.

Two Ways To Create Clean and Simple Cards Using Stampin' Up's Daisy Punch

by Joanne James6. June 2017 20:00

I've been busy preparing samples for my forthcoming open house using one of my favourite suites from the new catalogue: the Delightful Daisies Suite. Today I'm sharing two clean and simple cards featuring the new Daisy Punch and just two of the ways it can be used.

My first card was inspired by one made recently by Mary Fish - you can see her original card here - a simple trio of punched daisies with banner sentiment greeting from the Happy Birthday Gorgeous stamp set:


I chose to use Night of Navy for my accent colour - I love how the simple yellow middles of the daisies - punched with a 1/2" circle punch - really pop with this crisp, fresh colour combination. My second card uses the daisy punch to make a feature of the negative space:


Here the daisies still take centre stage, however this time instead of punching out the flowers and attaching them to the cardfront, I punched the flowers out of my topmost navy card layer to 'reveal' the white daisies in the negative space below, then I added my yellow flower centres to each negative flower. I am a big fan of using negative space to make your punches and framelits work harder for you and I love the contrast that using the negative space provides with this classic colour combination. 

Here is the visual summary of the key products used on today's project for you to pin for easy reference:


You can see all of my 'How To' summaries on my 'How To - Tips and Techniques' Pinterest board in case you've missed any. 

Enjoy your evening and I'll be back tomorrow with another project. Until then, happy stampin'!


Stampin' Up! Supplies Used:

Table built using Product Table Builder by The Crafty Owl - Independent Stampin' Up! Demonstrator.

Happy Birthday Thinlits Brights

by Joanne James5. June 2017 12:00

I'm a little later posting today as I had the first of this month's technique classes this morning and I wasn't quite organised enough to post beforehand. Anyway, I'm here now with a bright and colourful card to cheer your day! I have another birthday card for you - this time one that uses the current sketch over at the Fab Friday Challenge:


This circle could be so many things, but I really felt it needed words - in fact, two big ones! Take a look:


 Here's the low-down on today's card:

Happy Birthday - It's big, it's bold and says it all right there: the Happy Birthday Thinlits Die really does make a big impact! Whether you pair it with flowers or balloons (the bundled stamp set 'Happy Birthday Gorgeous' has both), this die makes a statement when used on a card front or birthday packaging. Here I've layered it and offset both diecuts, for added impact. This is one die that is going to get lots of use, for sure.

Reversing Birthday Memories - The paper I've used on my card today is from the Birthday Memories designer series paper from the product suite of the same name. You will no doubt like me swoon over this fabulous paper and it's adorable hand painted colourful children's illustrations, however the reverse side should also not be overlooked - it includes some great repeat patterns, along with a wonderful rainbow striped pattern and the dotty pattern that I've used on my card today. 

Blue With A Touch Of Citrus - My choice of patterned paper inspired my colour choices today, although I switched out the Soft Sky for Pool Party as I wanted a warmer blue to balance my zingy citrus colours of Lemon-Lime Twist and Pumpkin Pie. Here's today's colour combination for you to save to inspire your future creations too:

Here is the visual summary of the key products used on today's project for you to pin for easy reference:


You can see all of my 'How To' summaries on my 'How To - Tips and Techniques' Pinterest board in case you've missed any. 

Enjoy your day and I'll be back tomorrow with another project. Until then, happy stampin'!


Stampin' Up! Supplies Used:

Table built using Product Table Builder by The Crafty Owl - Independent Stampin' Up! Demonstrator.

Rose Garden Happy Birthday Card

by Joanne James4. June 2017 10:00

It's Sunday and time for this week's new challenge over at The Paper Players! It's the Jaydee's turn to host this week and she has a fun theme for us to work with:

       Paper Craft Crew Card Sketch 246. Play along at www.papercraftcrew.com #sketchchallenge #pcc2017

So many possibilities! I actually made several birthday cards with Jaydee's challenge in mind and couldn't decide which one to share; I loved the colour combo over at The Colour Throwdown and since Jaydee is also guest designer over at CTD this week that decided it! I also used the Paper Craft Crew Sketch and my Rose Garden Thinlits to come up with my card today - take a look:


Here's the low-down on today's card:

There's not much to say about today's card; I stencilled some roses onto my panel with some powder pink ink and a sponge brayer, then added layers of gold foil, acetate and ribbon before finishing with my layered pink and gold foil-edged rose. A sentiment in navy and a few metallic enamel shapes complete my card. Whilst simple I think the gold elements make this seem more fancy than usual. One thing's for sure - I love it!

Here is the visual summary of the key products used on today's project for you to pin for easy reference:


You can see all of my Product and 'How To' summaries on my 'How To - Tips and Techniques' Pinterest board in case you've missed any. 

Before you reach for your ink and papers, check out what our amazing team has created to inspire you this week:

The Paper Players Design Team
 
 
Here's a quick recap of our challenge rules:
 
1.  Create a new paper project
2.  Upload your creation to your blog with a link back to us and provide a direct link to the post featuring your challenge submission.
3.  Please link your card to no more than four challenges, TOTAL.
4.  Have FUN! 


I look forward to seeing what you create with this week's theme. I have more birthday cards to share with you this week, so be sure to pop buy for more birthday inspiration using some of my new catalogue products. Enjoy the rest of your weekend as it will be over all too quickly; we are hoping for another day of sunshine before the kiddies return to school tomorrow for the final half-term of this academic school year. I'll be back tomorrow with another project; until then, happy stampin'!


Stampin' Up! Supplies Used: 

Table built using Product Table Builder by The Crafty Owl - Independent Stampin' Up! Demonstrator.

Lovely Words To A Great Friend

by Joanne James3. June 2017 20:00

Hello everyone! I hope you're enjoying your weekend; I had a 'day off' yesterday and went cycling with the rest of the James clan and have spent today creating more samples for my open house catalogue launch on Thursday - here's a reminder of those details:

I would love to see you there! One of the cards I made today uses this week's sketch over at Mojo Monday:


I've been having fun with my new goodies and have used three on my card today:


Here's the low-down on today's card:

Colour Theory - I decided to go monochrome today with the new Berry Burst in-colour balanced with white to create definition in my layers. My card features two of the contrasting crackle-glaze patterned papers from the Colour Theory DSP stack too - they add good visual interest without texture.

Lovely Words - The Lovely Words Thinlits dies set that the 'friend' centrepiece on my card comes from were one of the first things that made it into my pre-order basket. What can I say - I'm a sucker for word dies and I love that these can be used with or without the shape that they are set in and offer lots of creative possibilities for layering and using the negative space too. Expect to see lots more of these!

A Little Repetition - The Lovely Words Thinlits are available in a discounted bundle with the Lovely Inside & Out stamp set too. This is a fun set with some basic background pattern stamps along with large and small font greetings, that can be mixed and matched and used with or without the thinlits. I've used one of the sentiments to create a background panel, using my stamp-a-ma-jig to align the words to create my own DSP. It took a little time, but it was worth it for this fun effect.

Here is the visual summary of the key products used on today's project for you to pin for easy reference:


You can see all of my 'How To' summaries on my 'How To - Tips and Techniques' Pinterest board in case you've missed any. 

I'll be back tomorrow with another project for this week's new challenge over at The Paper Players. Until then, happy stampin'!


Stampin' Up! Supplies Used:

Table built using Product Table Builder by The Crafty Owl - Independent Stampin' Up! Demonstrator.

The Wait Is Over - The New 2017 Stampin' Up! Annual Catalogue Is Here!

by Joanne James1. June 2017 07:00

The wait is over - it's June 1st and the new 2016-17 Stampin' Up! Annual Catalogue is here! I have updated my links on the right hand side of my blog and you will find a permanent link to the new catalogue there, but for today you need look no further than the picture below which will take you straight to the new catalogue:

BROWSE THE CATALOGUE

The catalogue is fantastic, with so many great new products to choose from. The new catalogue is posted above and will be permanently linked via my blog on the right hand side if you don’t have a paper copy and wish to browse. If you have your paper copy and just want to go straight to the shop to place your order, click here. Don't forget to add the hostess code for June B3C3DUB6 if your order is less than £150 and ensure your preferences are set to 'contactable' to receive a thank you in the post from me.

I'll be sharing my favourite items in a blog post later this week, but for now I have news of another very important promotion to share with you:

  • Earn Additional Stampin' Rewards with a single order or qualifying party sales  You can earn an additional £30 in Stampin' Rewards when you place an individual order for or reach qualifying party sales of £300 or more during the month of June. Here is a reminder of the rewards you can earn when you host a party, along with the details of the promotion:


Don't forget these Stampin' Rewards can also be used towards a starter kit if you choose to join Stampin' Up! as a demonstrator - making the starter kit even better value! I still have some calendar dates free in June so if you would like to host your own Stampin' Up! party and take full advantage of the extra rewards, then please do get in touch! 


  • Want To Get Hands On With New Products? Save The Date - I will be holding my Annual Catalogue Open House Launch next week on Thursday 8th June - if you live in or around Northampton this is a great opportunity for you to see some of the products up close, take advantage of my BOGOF sale of retired stamp sets, do a make and take and more! If you would like to put your name down for this exclusive event then do get in touch!

That's a lot of information for one post; if I were you I would put the kettle on, put your feet up and get comfy and settle down with your new catalogue for a browse and start creating that all-important wish list!

Back tomorrow with a new project; until then, happy shopping!

Mini Catalogue

BROWSE THE CATALOGUE

The mini catalogue is now live! Read and download your copy here.

Shop Online

Access my online shop 24 x 7, 365 days of the year:

Current April hostess code:

VDKNV7BH

Shop Online

Join My Team

It's always a great time to join Stampin’ Up! New team members can get £130 worth of products for only £99 + free business supplies + free shipping + all the fun being a part of Stampin’ Up! Stampin' Up! has something for everyone: join my growing team and benefit from my support to enjoy Stampin' Up! however you choose.

If you're interested, call me for a chat to understand how I can help you realise your goals. Alternatively, if you have already decided to sign up and you just can't wait, please click here for the link to the online form where you can sign up and order your starter kit right away! 

Latest Kit!

Stampin Cut and Emboss

The Rock Legend Kit has all you need to make 8 cards with coordinating envelopes. Along with the new Panda Friends Kit, both are available from January 4th for just £14 each - get yours here!

2023-24 Annual Catalogue

BROWSE THE CATALOGUE

Click on the catalogue for a full list of current SU! supplies - if you would like to order any of the items featured, please drop me a line at [email protected] or give me a call on 07773 421446 - I'd be happy to help.

New Online Exclusives

There are new products available exclusively in the online store from 5 March - check them out here.

About Me

Hi I'm Joanne and live in Northampton and when I'm not looking after my husband and two beautiful children, am an avid crafter with a passion for all things Stampin' Up!

I must confess that I have never been a big rubber stamper - until I discovered Stampin' Up! that is. I love the fact that I can get such great results with co-ordinating stamps, inks, papers and punches - the possibilities are endless! Join me on my stamping journey as I share the things I love and be inspired to create amazing things yourself!

Follow Me

Monthly Newsletter

Box Builder

Click the button above to use Box Buster to create your custom box design using the Envelope Punch Board!

Kits Collection Now Available!

Stampin Cut and Emboss

The new Kits Collection from Stampin' Up! is now available!

Click here to see the current kits available and order yours online today.

I Design For


Stampin' Up Stuff

This is my personal blog and is not endorsed by Stampin’ Up! I hope you find it a plentiful source of ideas and personal inspiration but please don't copy my designs for contest submission or use for classes, publication or sale without express permission.