by Joanne James8. November 2015 09:00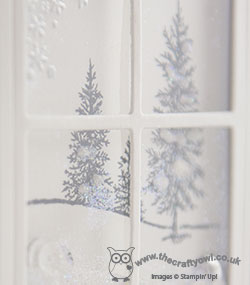
It's Sunday and time for a new challenge over at The Paper Players! This week it's my turn to host and I have a festive colour scheme to get your creative juices flowing this week:
I'm not generally a big fan of black and white, but I am fascinated by the idea of black and white with pops of colour and a little sparkle - I find this can completely change the look and feel of a card. I've been spending lots of time this week playing with my Hearth and Home framelits and co-ordinating Happy Scenes stamp set, as this is what my November technique classes will be using. We are also learning how to make shaker cards so I couldn't resist making one to share with you today:
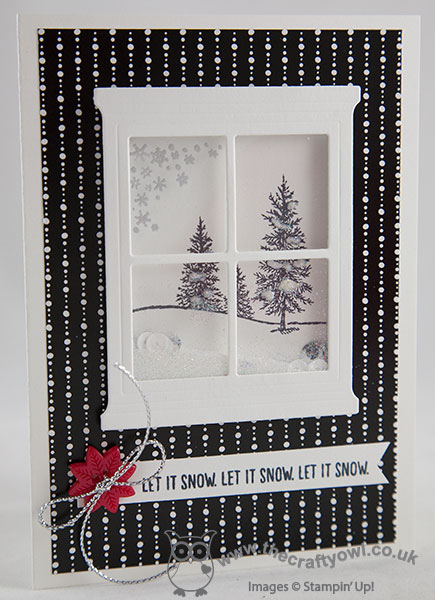
For my card base and window frame, I used extra thick Whisper White and covered the front with a piece of striking black and white patterned paper from the Winter Wonderland Specialty Designer Series Paper - this paper has a lovely sheen to it and looks really luxurious so was the perfect choice for my 'wallpaper'. I stamped my insert using the winter image from the 'Happy Scenes' stamp set in Memento Black on Whisper White, and I used some Tombo Glue, Dazzling Diamonds and White embossing powder to create some dimensional snow on my trees in the same way as I did on my card last Thursday. I also stamped the corner snowflakes on my window in Versamark and heat embossed in silver before adding my foam tape and filling my window with a combination of white and silver sequins and some Dazzling Diamonds. I stamped my sentiment on a simple banner beneath my window and anchored it to my card with a red poinsetta button from the Home For Christmas Designer Button set threaded with silver cord trim. The button is the only spot of additional colour on my card - and I love it!
There's something so special about a shaker card - I guarantee if you give someone a card you can shake it will make them smile!
Before you reach for your ink and papers, check out what our amazing team has created to inspire you this week:
The Paper Players Design Team
Here's a quick recap of our challenge rules:
1. Create a new paper project
2. Upload your creation to your blog with a link back to us and provide a direct link to the post featuring your challenge submission.
3. Please link your card to no more than three challenges, TOTAL.
4. Have FUN!
I look forward to seeing what you make with my colour palette this week. I'm off for a morning of basketball and then lunch and something fun with the children in the afternoon - we might make a start on their Christmas cards for their classmates, who knows?
Back tomorrow with another project; until then, happy stampin'!
Stampin' Up! Supplies Used:
183fcf6d-7021-4985-92f7-f74296d8eb55|0|.0|96d5b379-7e1d-4dac-a6ba-1e50db561b04
Tags: Stampin' Up, Stampin' Up Card, Stampin' Up Card ideas, Stampin' Up Supplies, The Paper Players, Shop online, Shop Stampin' Up online, Hearth and Home, Happy Scenes, Winter Wonderland, Shaker cards
Cards | Shop Online | Stamping
by Joanne James7. November 2015 22:34
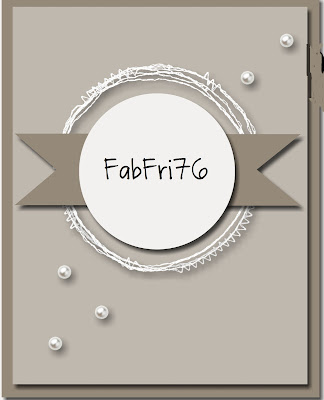
A quick blog post from me today to share a card I made for the current Fab Friday Challenge where this have a great sketch to work with:
I decided that green was the order of the day today and decided to create a calming wreath in greens and silvers using the Peaceful Wreath stamp set:
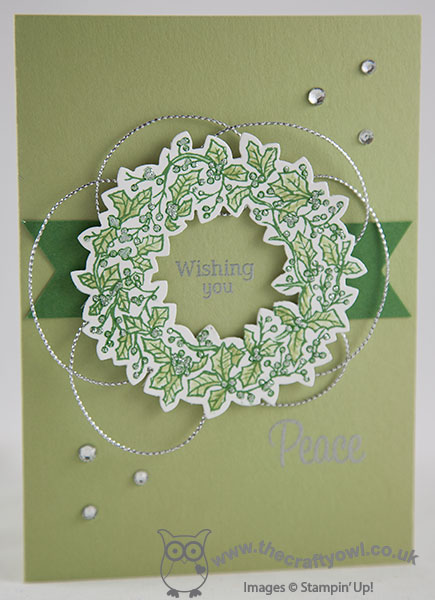
I stamped the beautiful Peaceful Wreath in Garden Green on Whisper White and coloured it loosely with an aquapainter and Pear Pizzazz ink, highlighting each of the berries with some silver Dazzling Details, before cutting it out using my Wonderful Wreath framelits . I stamped my sentiment in Versamark and heat embossed them in silver, added a split banner, some silver cord trim and some rhinestones for a little extra sparkle.
I love greens - and with the hustle and bustle of the last couple of days, their calming influence is just what need.
I'll be back tomorrow with a new challenge over at the Paper Players; until then, happy stampin'!
Stampin' Up! Supplies Used:
by Joanne James5. November 2015 08:05
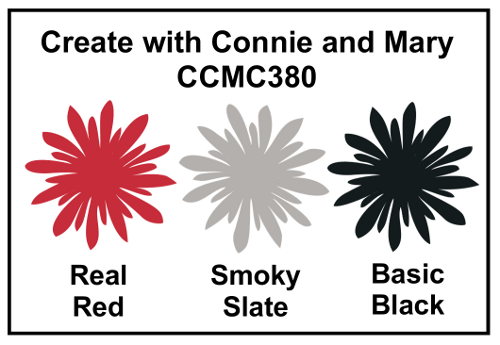
Today it's time for a new challenge over at Create With Connie and Mary and this week we have a great colour challenge for you:
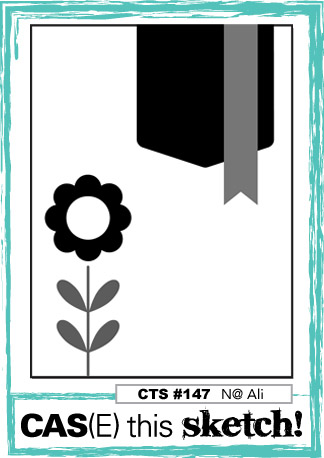
I used the sketch over at CAS(E) This Sketch as the basis for my card today - a largely one layered card, except for the banners and it also showcases a fun new technique:
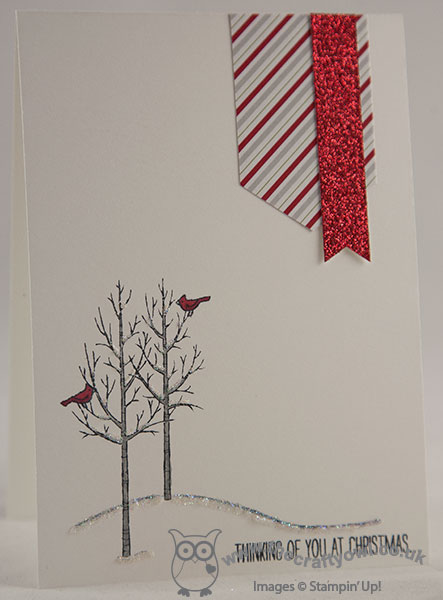
I used extra thick Whisper White cardstock for my base and stamped two of the three trees from the White Christmas stamp set onto the bottom corner of my card in Memento Black. I coloured the trees in with my Smoky Slate Stampin' Write marker and added a couple of cardinals, coloured in Real Red for a little colour. Now for the fun technique! This was shown to me recently by the lovely Monica Gale who used it on a card stamped with the Wonderland set. for the snow on my trees and on the ground, I added a thin line of Tombo glue, then sprinkled this with Dazzling Diamonds glitter and then white embossing powder, then heated it gently with my heat tool. This causes the glue to puff up and produce wonderfully textured and sparkling snow - such a neat effect. To finish my card, I cut a reverse banner using my Triple Banner Punch - I simply fed the paper in from the underside of the punch and used the piece which normally you would throw away - from a scrap of Merry Moments designer series paper that has Real Red and Smoky Slate stripes. Finally to add a little extra sparkle, I added a thin banner of red glimmer paper - I just love this stuff!
I spent ages working up different cards for this week's colours and eventually settled on this one. It's very pretty in real life and has lots of texture for a predominantly white card, but it was incredibly difficult to photograph and I'm not sure that the picture really does it justice.
Do visit the other Design Team members to see how they used this week's challenge colours; there's lots of inspiration over on their blogs too!
Enjoy your day and I'll be back tomorrow with another project; until then, happy stampin'!
Stampin' Up! Supplies Used:
- White Christmas Photopolymer Stamp Set
- Embossing Buddy
- White Stampin' Emboss Powder
- Heat Tool (Uk)
- Dazzling Diamonds Stampin' Glitter
- Multipurpose Liquid Glue
- Merry Moments Designer Series Paper
- Tuxedo Black Memento Ink Pad
- Banner Triple Punch
- Whisper White A4 Thick Cardstock
- Red Glimmer Paper
- Smoky Slate Stampin' Write Marker
- Real Red Stampin' Write Marker
by Joanne James4. November 2015 09:00It's Wednesday and you know what that means: a new collection of Wednesday Weekly Deals! These offers are valid for one week only. As always, a new collection of deals will be announced next Wednesday.
If you want to take advantage of any of the deals on offer, you can support my business by placing your order online by clicking here or using the link to my store on the right hand side of my blog page where it says 'Shop Online' or with me in person. Don't forget to add the new Hostess Code for November SHRENCSC if your order is under £150 and be sure to make sure that you don't check the 'no contact' box if you'd like to be kept updated with the progress of you order and receive a little thank you in the post from me.
Here's a summary of this week's one-week only Wednesday deals - click on each item to go to the online store to purchase:
Four things on offer this week - and a couple of Christmas products to boot, along with the flower medallion punch that co-ordinates with the large snowflake in the Flurry of Wishes stamp set.
Back later with today's creative project; until then, happy shopping!
by Joanne James3. November 2015 14:45
Today is a special day - I received my badge and pass for Stampin' Up's Onstage Live Event in the post today and I am SOOO excited; only 8 more sleeps to go! I'm looking forward to spending some quality time with some of my teamies, getting a sneak peek at lots of new SU! product and attending my first Centre Stage Live.
Today's card is another on the theme of thankfulness, but with something of a twist! I was documenting some Project Life at the weekend and decided to use one of my cards from the 2015 Project Life Seasonal Snapshot kit to make a card. This is something I do rarely, as I usually want to use everything in my PL documenting, but decided it was a good idea so that you can see the sheer versatility of the Project Life product range. So here is my card:
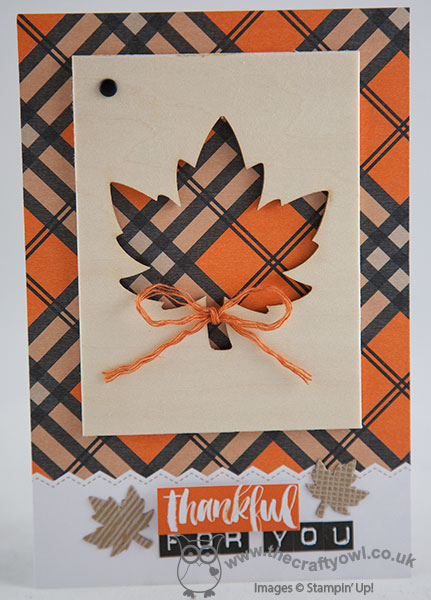
I'd like to say this card took me ages, but that would be so untrue! It uses a PL card for the cardfront, with one of the wooden embellishments from the Seasonal Snapshot accessory kit adhered to the front with glue dots, and the words and letters and little leaves are all self-adhesive elements from the accessory pack that I adhered directly to my base, popping the 'thankful' up on a couple of dimensionals for a little lift. I added a black candy dot and some SAB Tangelo Twist thick baker's twine from my stash and my card was complete! So easy and yet so effective - I love the rich colours of the plaid and the negative space leaf really draws you in. The leaf itself made it into my Project Life folder with my photos - bonus! Project Life sets are great for cardmakers too - if you can bear to part with them of course!
It's remix week over at TGIF Challenges so I decided to use their theme - thankful - and sketch for my card, which I am also linking up to SUO Challenges as it fits with their theme too and the inspiration over at Curtain Call where my background looks just like their rug!


I am thankful for many things, but today I am mostly thankful that the carbon monoxide detector that set off its alarm this morning is nothing serious and that our relatively new gas boiler has not sprung an unexplained leak. The National Grid engineer that came out on the emergency call determined it was simply a blip - at least we know the alarm is working!
I'm off to get some jobs done before heading out on the school run and then to take one of my little pianists for a piano exam - wish Rebecca luck! Back tomorrow with another project - Christmas this time! Until then, happy stampin'!
Stampin' Up! Supplies Used:
by Joanne James2. November 2015 09:00 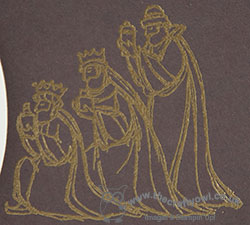
Good morning everyone - happy Monday to you! This morning I have a Christmas card using this week's sketch over at Freshly Made Sketches:
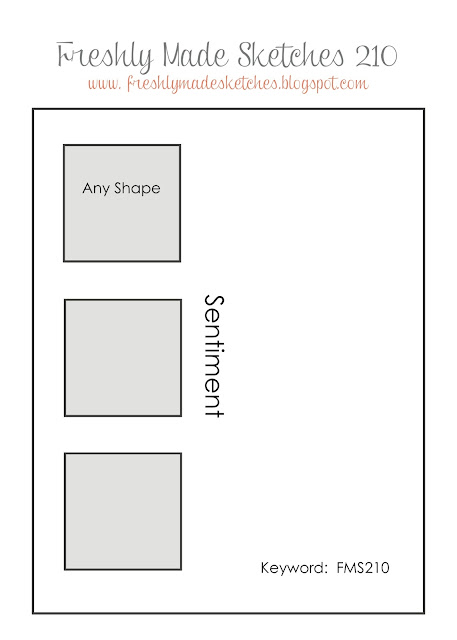
Now I looked at this sketch and loved the layout and almost went with it 'as is' using the square as my shape - such a classic layout - but decided since Cindy was ok with 'any shape' I would actually go with a much less literal interpretation. So without further ado, here's my card:
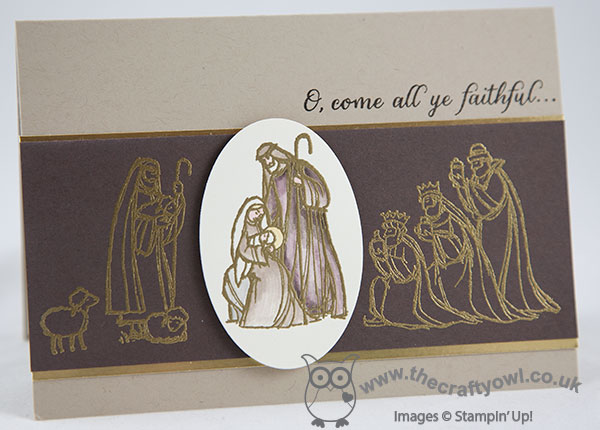
I used Crumb Cake for my base, then stamped the shepherds and wise men from the 'All Ye Faithful' stamp set onto a strip of Early Espresso cardstock and heat embossed them in gold and matted this panel with gold foil cardstock before adhering to my card base. I then did the same to my holy family onto a piece of Very Vanilla cardstock and coloured it with my inks and a blender pen before cutting out with the smallest of the Ovals Framelits and my Big Shot. I then popped this up on dimensionals between the stamped images on the Early Espresso piece. To finish, I stamped my sentiment in Early Espresso directly onto the Crumb Cake base layer.
So as you can see, a less than literal interpretation of the sketch but each of the key elements is present. I adore this stamp set and these images are beautiful whether used individually or as a set.
That's all from me today; I'll be back tomorrow with another project. Until then, happy stampin'!
Stampin' Up! Supplies Used:
by Joanne James1. November 2015 17:48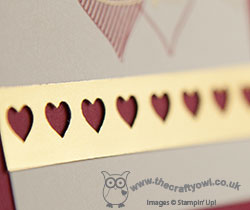
Another quick post from me today! I managed to get a little time yesterday to create a clean and simple wedding card for a couple of challenges today:

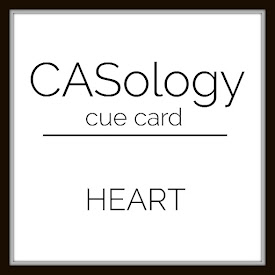
I was fortunate enough to be a winner over at The Challenge last week (you can see that card here -thank you ladies!) and I didn't want to miss the opportunity to join in again this week. The Challenge have a theme of weddings this week and CASology have a cue card of 'heart'; I thought I would make a card in warm Winter reds with a touch of gold using my 'Hello Life' stamp set and hearts border punch:
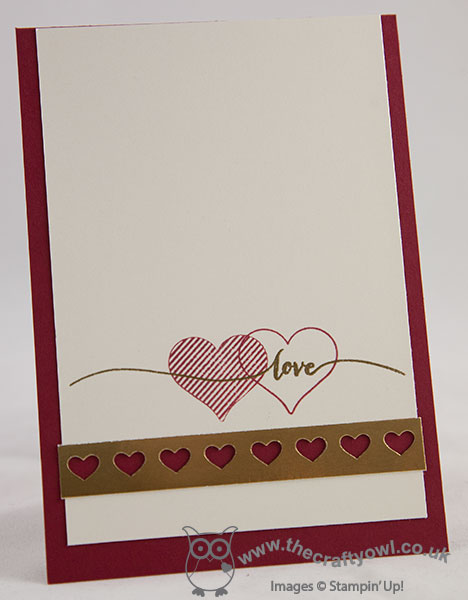
I used a card base of Cherry Cobbler with a split top panel of Very Vanilla, stamped with two overlaying hearts and heat embossed in gold with my 'love' sentiment and joined with a piece of gold foil cardstock punched with the hearts border punch to allow the red to show through the negative space.
Super simple but rather pretty and perfect for a winter wedding when regal colours often feature.
That's all from me; back tomorrow with a festive project once more. Until then, happy stampin'!
Stampin' Up! Supplies Used:
by Joanne James1. November 2015 09:00
It's Sunday and time for a new challenge over at The Paper Players! This week it is the turn of my good friend Claire to host and she has a seasonal theme to get our creative juices flowing this week:


For today's challenge I just had to use the fabulous scrolled 'Thankful' in the hostess set 'Six Sayings'. That's where I started out - here's where I finished up:
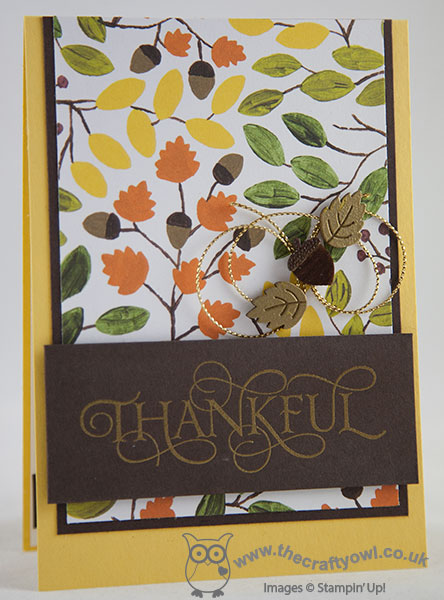
I also used the sketch over at The Friday Mashup and used leaves, so completed both elements of their challenge this week. Isn't that sentiment just fabulous? I decided that I would get a flavour of fall with the patterned leaf paper from the 'Into The Woods' designer series paper, layered on some Early Espresso and a base of Daffodil Delight. This allowed my gold embossed sentiment to really stand out against the Early Espresso banner. I also added a trio of Into The Woods Elements and some gold cord trim: I stamped the leaves in Versamark then heat embossed them in gold and coloured an acorn in with my Early Espresso Stampin' Write marker and stamped the acorn cap in Versamark and heat embossed that with some retired Early Espresso to give a little shine.
This is such a colourful card and I love the Thankful sentiment - I for one have much to be thankful for and what better time to let others know how much they are appreciated. I'm also linking up with SUO challenges where their current theme is thank you cards.
Before you reach for your ink and papers, check out what our amazing team has created to inspire you this week:
The Paper Players Design Team
Here's a quick recap of our challenge rules:
1. Create a new paper project
2. Upload your creation to your blog with a link back to us and provide a direct link to the post featuring your challenge submission.
3. Please link your card to no more than three challenges, TOTAL.
4. Have FUN!
I look forward to seeing your thankful fall-themed creations this week. We are having a sport-free weekend for a change, with a lie-in following our trick-or-treat exploits yesterday and a quiet day before returning to school tomorrow. Amen to that!
Back tomorrow with another project; until then, happy stampin'!
Stampin' Up! Supplies Used:
by Joanne James31. October 2015 22:29
A late post from me today - too much trick-or-treat fun earlier on this evening! Anyway without further ado, today I made a couple of cards using the sketch from Mojo Monday this week, the second of which is also for this week's challenge over at Merry Monday:
Both my cards feature papers from the Season of Cheer designer series paper, along with the Christmas Greetings Thinlits with the Holly Jolly Greetings stamp set - one of the great bundle offers in the current seasonal catalogue. Here's the first card I made in traditional festive colours with the holly paper:
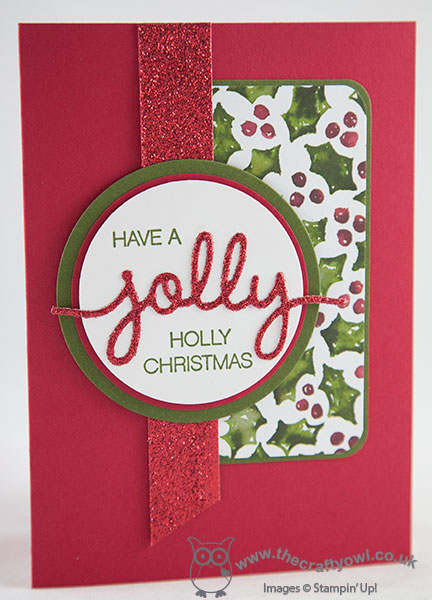
I went with a simple base layer of Real Red, then for the panel layered the holly paper with some Mossy Meadow and added a banner of red glimmer paper before adding my layered circles featuring my sentiment, a combination of stamped elements from the 'Holly Jolly Greetings' stamp set and a glimmer die cut using the Christmas Greetings Thinlits. I really liked this card, so decided to make a second one with a slightly different sentiment combination from the same sets, this time featuring the Christmas lights paper from the same DSP pack and a slightly less traditional colour scheme. Here it is:
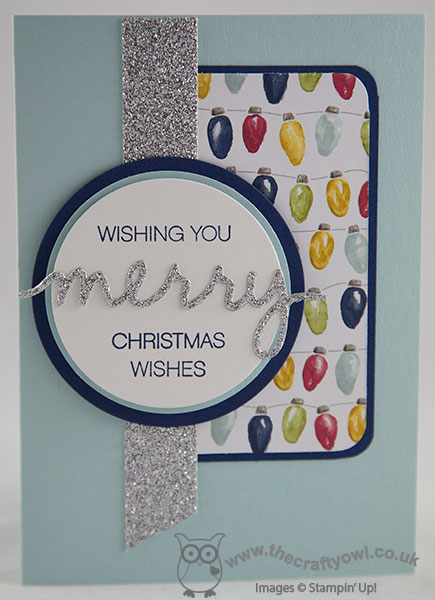
I just love the glimmer paper on both of these cards; I'm not a fan of loose glitter, but glimmer paper is the best! So which one do you prefer - traditional or contemporary colour scheme? They are both great, although I think I'm veering towards the holly - I'm a sucker for red and green at Christmas time! I'd love to hear your thoughts - do leave me a comment below.
Back tomorrow with this week's new challenge over at The Paper Players; until then, happy stampin'!
Stampin' Up! Supplies Used:
1aa2e683-a079-4780-b72d-885d34e72039|0|.0|96d5b379-7e1d-4dac-a6ba-1e50db561b04
Tags: Big Shot, Greetings Thinlits, Holly Jolly Greetings, Season Of Cheer, circle punch, Circles Framelits, Christmas, Shop online, Shop Stampin' Up online, Stampin' Up, Stampin' Up Card, Stampin' Up Card ideas, Stampin' Up Supplies
Cards | Shop Online | Stamping
by Joanne James29. October 2015 08:05
Today it's time for a new challenge over at Create With Connie and Mary and this week we have a great sketch challenge for you:
I saw this sketch layout and immediately thought 'snowflakes' so dug out my 'Festive Flurry' stamp set and some Lost Lagoon cardstock, a colour that I haven't used much this season. Here's my card:
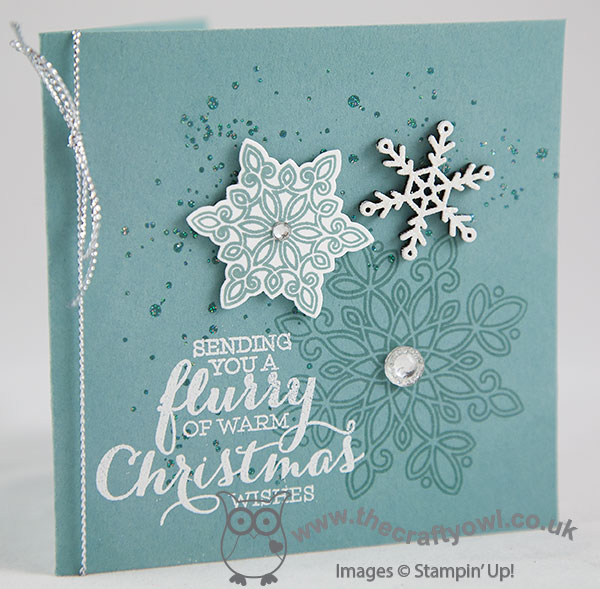
I decided to go with a square card today and worked directly onto my card base, as I wanted my snowflakes to add the layers. I stamped my first snowflake in Lost Lagoon directly onto my card base and centred it with an iced rhinestone , then stamped my sentiment in Versamark overlapping this and heat embossed it in white. Before adding my punched snowflakes, I also stamped the splatter stamp from Gorgeous Grunge in Versamark onto the background and heat embossed this in Iridescent Ice; it looks quite dark in the photo but is actually really sparkly. For the remaining circular elements of the sketch, I stamped one of the smaller snowflakes in Lost Lagoon on Whisper White, added a rhinestone to the centre and punched it out using the co-ordinating punch, then for the remaining circle I used one of the natural snowflake elements that I stamped in versamark and heat embossed in white, then stamped it again in versamark and heat embossed it in Iridescent Ice so that it is super-sparkly. lastly, I added some silver cord trim to the folded edge.
I just love this card - so very sparkly and Christmassy, all rolled into one! I love the combination of snowflakes to add a little flavour of collage to my card today.
Do visit the other Design Team members to see how they used this week's challenge sketch; there's lots of inspiration over on their blogs too!
Enjoy your day and I'll be back tomorrow with another project; until then, happy stampin'!
Stampin' Up! Supplies Used:
- Flurry Of Wishes Photopolymer Bundle
- Gorgeous Grunge Clear-Mount Stamp Set
- Snowflake Elements
- Iced Rhinestone Embellishments
- Silver Cording Trim
- Embossing Buddy
- Versamark Pad
- White Stampin' Emboss Powder
- Heat Tool (Uk)
- Iridescent Ice Stampin' Emboss Powder
- Whisper White A4 Cardstock
- Lost Lagoon Classic Stampin' Pad
- Lost Lagoon A4 Cardstock