by Joanne James18. July 2014 15:53Apologies for my blog absence yesterday - I spent most of the day icing biscuits for teacher thank you gifts as today is the last day of the academic year for my James Juniors. I promise my self I'll start earlier every year, but what always seems to happen is I squeeze in a few more commissions and then also a few extra names get surrepticiously added to the list of thank yous by the children which means even more baking and icing!
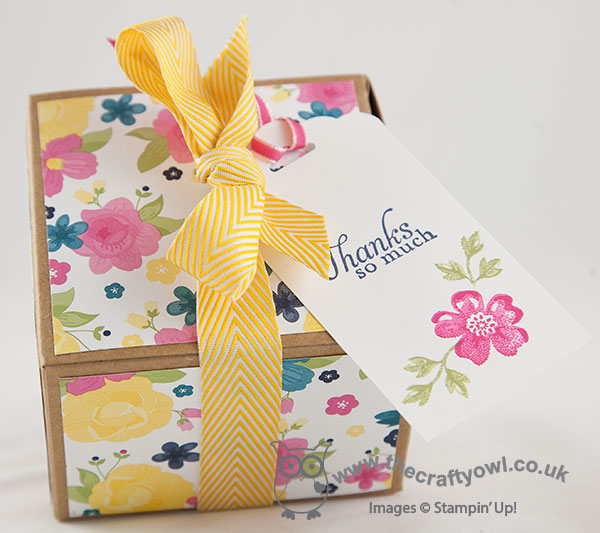
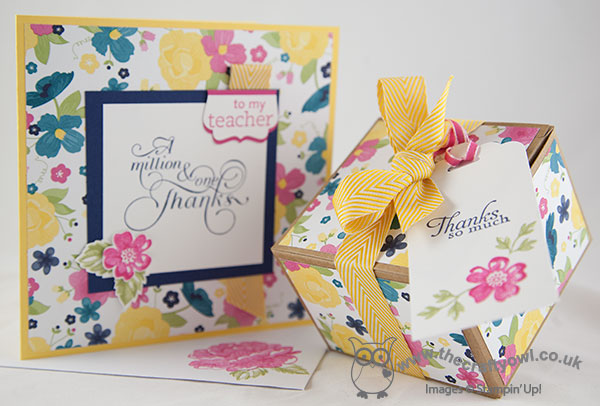
I've shared my teachers gifts on my blog previously - you can check them out here if you would like to be reminded - so today I thought I would share a matching card and gift box commission that I made for someone else to give to their teacher. So here is my card:
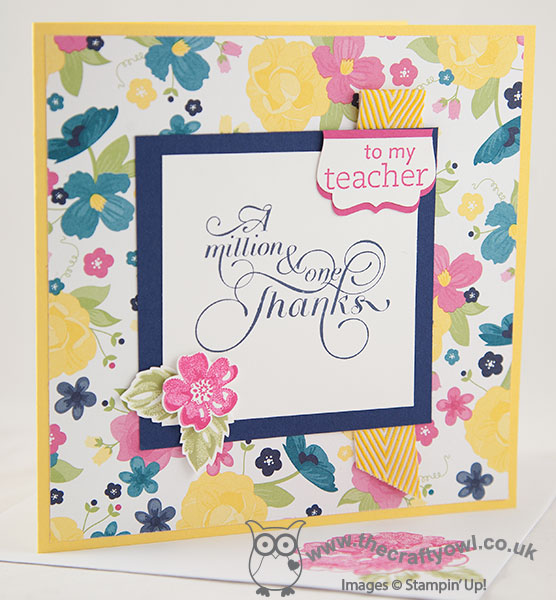
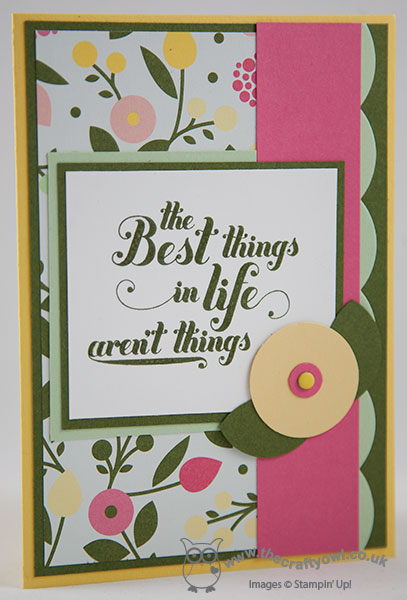
For my card I used the retired Gingham Garden DSP (this was requested - lucky I still have a pack!) however most of the other product is current and you could easily create this set in an alternative paper without the teacher tag as a thank you gift for someone special. The star of the show is definitely the 'Million and One' sentiment stamp - perfect to show your appreciation of someone special.
Here is the matching gift box - I love these kraft boxes, they are so useful and very sturdy, and at £2.75 for 4 represent great value. I'm doubly pleased that the Extra-Large Gift Boxes have returned and made it into the annual catalogue as a stock item - these are great for larger gifts.
Right, I've a few more jobs to do before I go and pack a picnic - we're off to see an outdoor theatre production of Peter Pan and The Lost Boys this evening. I've seen this theatre company perform the Railway Children previously, so I'm expecting great things - I'll report back tomorrow! Until then, happy stampin'!
Stampin' Up! Supplies Used:
b2c764e4-ee3d-4662-a516-9667d67d1b95|1|5.0|96d5b379-7e1d-4dac-a6ba-1e50db561b04
Tags: boxes, Gingham Garden, Million & One, Kraft Gift Boxes, Decorative Label Punch, For My Family, Scalloped Tag Topper Punch, Shop online, Stampin' Up, Stampin' Up Card, Stampin' Up Card ideas, Stampin' Up Supplies, Stamp-a-ma-jig, Stippled Blossoms
Boxes | Cards | Stamping
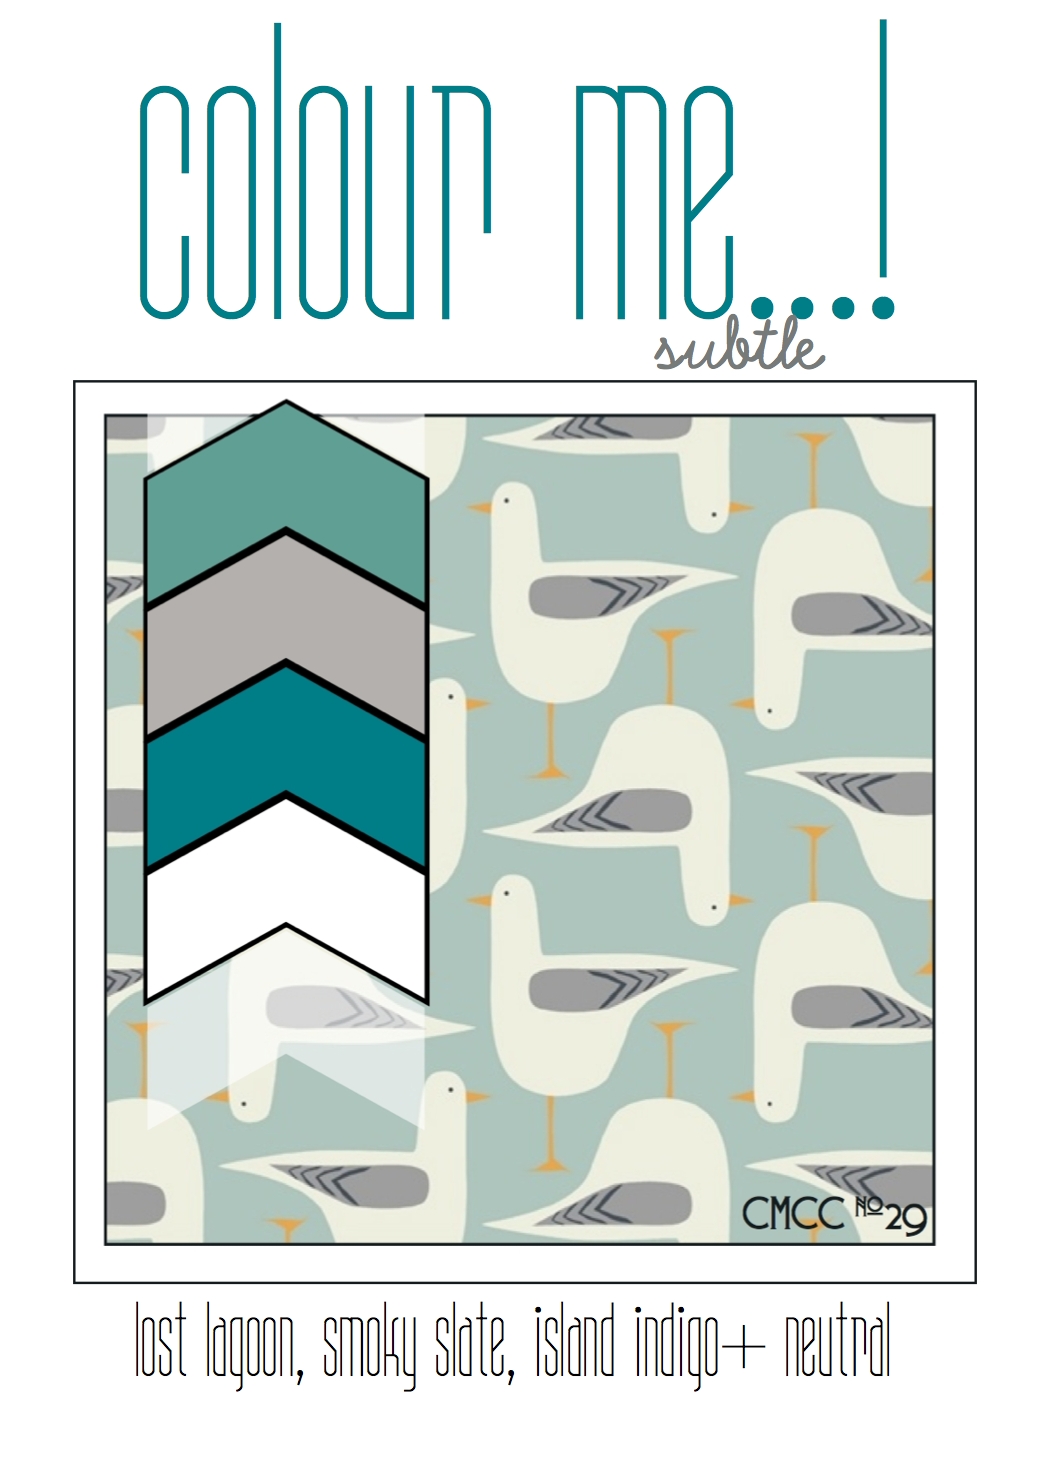
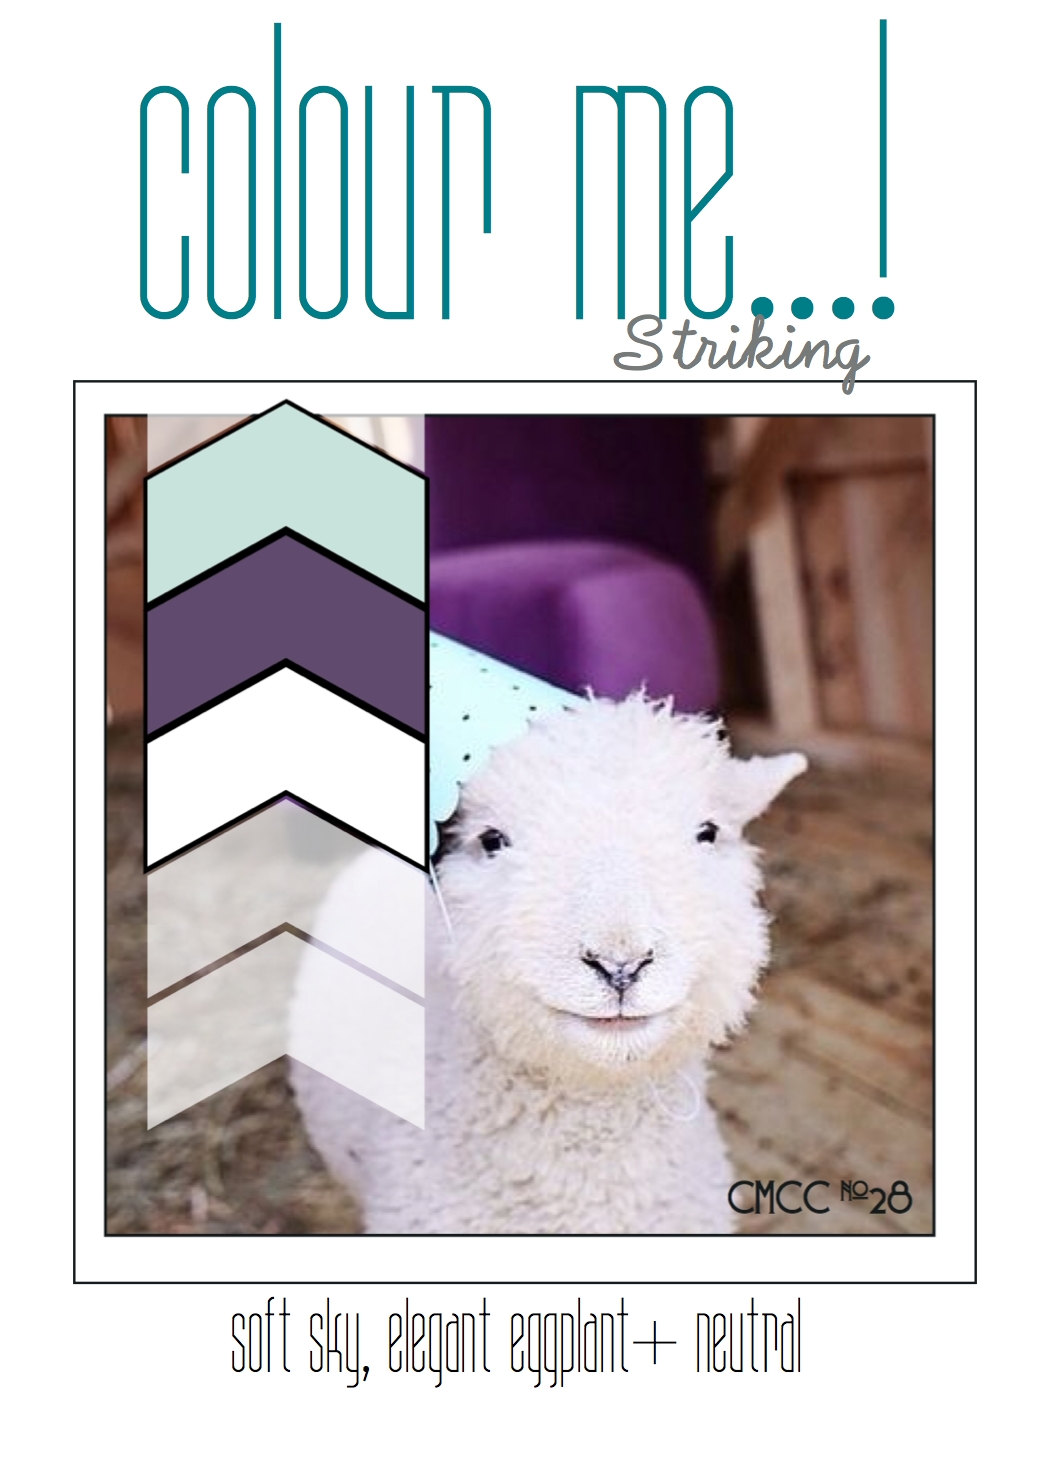
by Joanne James16. July 2014 08:00Good morning blog readers - it's Wednesday so today I am definitely prepared and 'on the ball'! Today I'm sharing my Design Team card for this week's challenge over at Colour Me...!, where this week's colour palette is Subtles, featuring Lost Lagoon, Smoky Slate and Island Indigo:
I decided these colours would make a nice baby card, as they are quite masculine and a change from traditional powder blue and got to work with my Zoo Babies stamp set and the above sketch layout from Seize the Sketch:
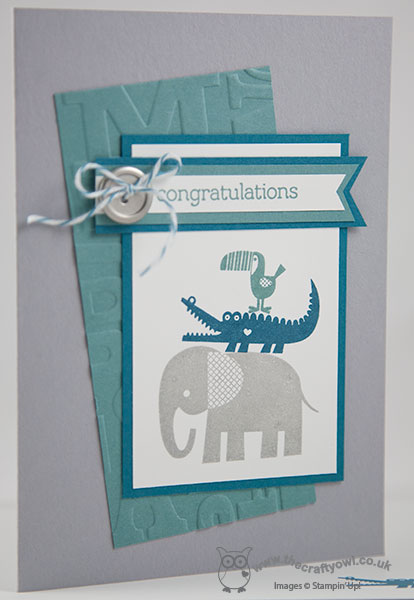
I used Smoky Slate for my card base and having stamped my animals on Whisper White in each of the challenge colours (I love how you can build little towers with them!) I mounted my animal panel on Island Indigo and for my offset layer I used a piece of Lost Lagoon cardstock which I embossed with the Alphabet Press embossing folder. Lastly, I stamped 'congratulations' from the Zoo Babies stamp set in island Indigo onto Whisper White and created a layered banner flag, finished off with a Basic Metal Buttton tied with retired Island Indigo baker's twine.
So that's what I chose to do with the colours. Why not pop over to the Colour Me...! blog for more colour inspiration and see what Hayley, Tara, Sherrie, Claire, Julia and Anja have done with these colours.
Back later with this week's Wednesday Weekly Deals; until then, happy stampin'!
Stampin' Up! Supplies Used:
by Joanne James15. July 2014 22:24No blog post yesterday and a late one today - so much going on at the moment as the end of the school year draws ever closer! I've been busy finishing commissions for teacher cards and gifts today and popped by the Less is More blog to see what the current challenge is, as I haven't managed to fit in the last couple due to other commitments. This week it's One Layer Challenge combined with a theme - and when I saw what it was I just had to have a go! Yes - it's doodle fingerprints:
I've made these with my children many times and we have a Christmas tradition of painting a plate with a picture made out of hand or fingerprints each year, but never thought I'd be using my Stampin' Up! inks to create a challenge card no less! Given that I've had teacher thank yous on my mind all week, I knew exactly what I wanted to make - a fingerprint caterpillar:
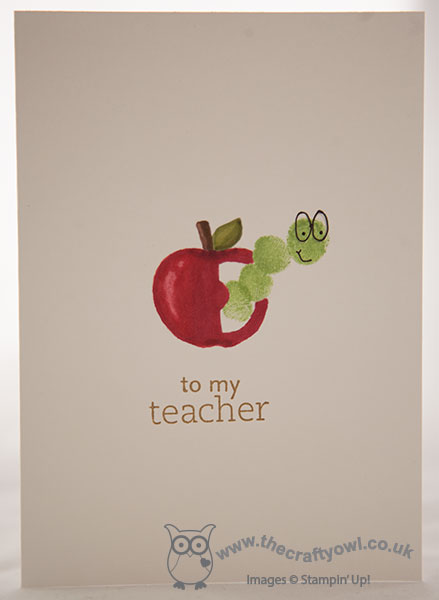
Isn't he cute?! I used one of the apple embellishments from the Project Life Playground kit as a stencil for my apple and had my first public attempt at colouring in with my Blendabilities (still more practice required!), then using Wild Wasabi ink fingerprinted my caterpillar book worm into place using Wild Wasabi ink. I doodled his face with my Project Life journaling pen and added a 'to my teacher' sentiment (from the retired set 'for my family').
Not the most time consuming of cards to be fair, but jolly good fun - I could have spent all afternoon doodling and fingerprinting, with so many ideas for more cards if only time allowed! This is also the kind of card you could easily create with little ones - great if they want to make their own teacher thank you cards.
That's me done for today; back tomorrow with my Design Team card for the Colour Me...! Challenge and the new Wednesday Weekly Deals. Until then, happy stampin'!
Stampin' Up! Supplies Used:
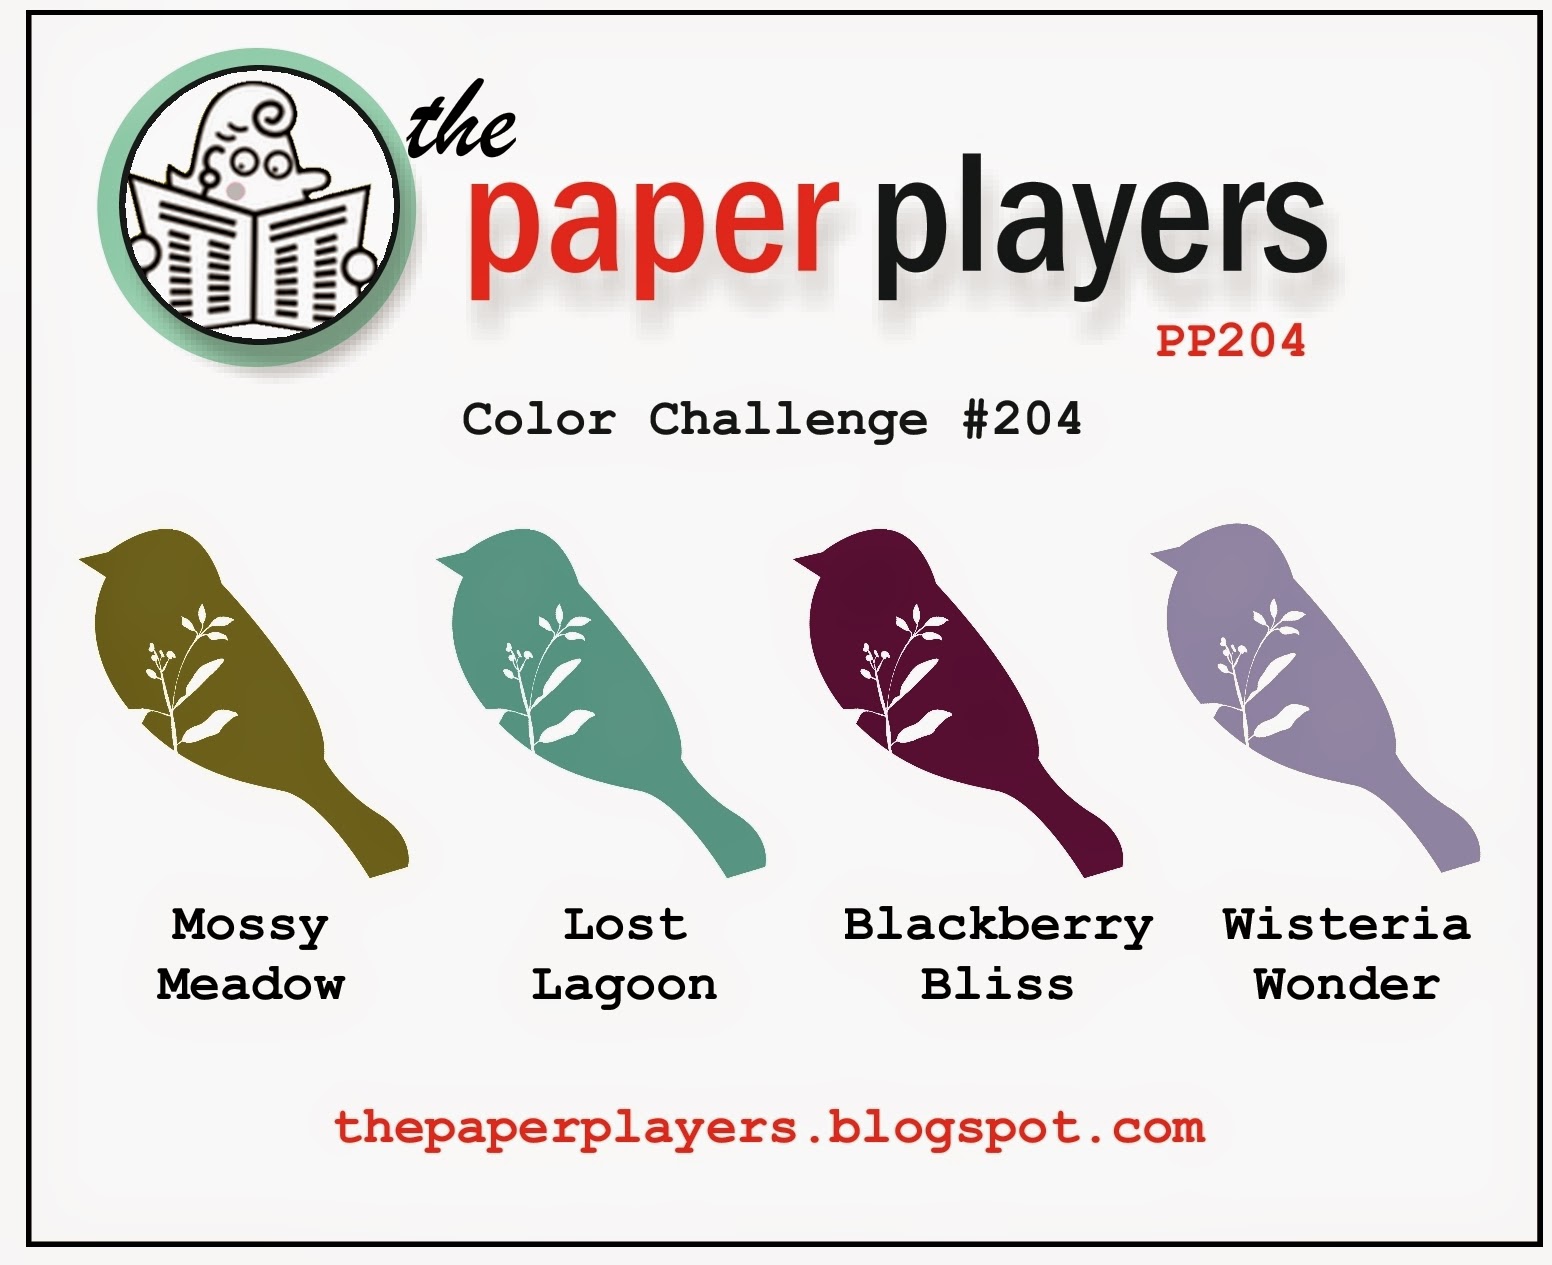
by Joanne James13. July 2014 08:00It's Sunday and today I'm sharing my weekly card designed for this week's challenge over at The Paper Players, where I'm a Guest Designer for the next few months. This week we LeAnne is hosting and she has a colour challenge for us using the following colour palette:
I also used the sketch over at The Paper Craft Crew this week for the layout of my card. I chose to make the new In-Colours of Blackberry Bliss and Lost Lagoon the focus of my card, but the other two colours also feature - take a look:
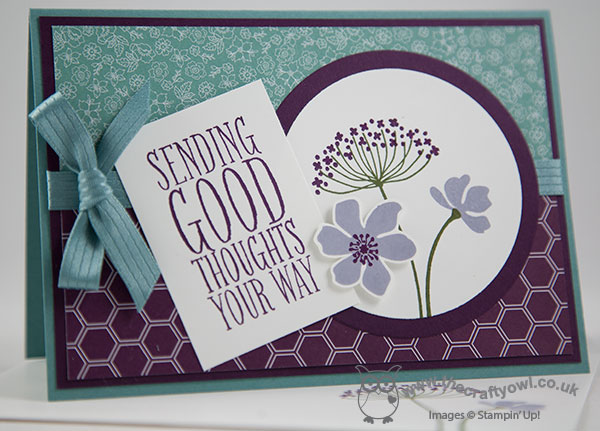
I used two pieces of DSP for the background of my card - the honeycomb from the Midnight DSP stack and the tiny blue flowers from the All Abloom DSP stack and I used a piece of the lovely Lost Lagoon satin ribbon to cover the join and create a statement bow. As these papers both have quite busy patterns, I decided to go with a fairly simple stamped focal point, with a sentiment from the 'Perfect Pennants' alongside a simple floral circle using Summer Silhouettes in Mossy Meadow, Blackberry Bliss and Wisteria Wonder. Lastly, I fussy cut one of the Wisteria Wonder flowers and mounted it onto a dimensional for extra interest.
I hope you like my card today and that it inspires you to hop on over to the Paper Players challenge blog to join in and upload your challenge creations. The Paper Player challenge takes place weekly, opening on a Sunday at 8am (PST) and closes at noon on Friday (PST). Here's a quick recap of our challenge rules:
1. Create a new paper project
2. Upload your creation to your blog with a link back to us and provide a direct link to the post featuring your challenge submission.
3. Please link your card to no more than three challenges, TOTAL.
4. Have FUN!
We look forward to seeing your colourful creations! Right I'm off to a ballet exam today (chauffeur not dancer, of course!). Back tomorrow with another project; until then, happy stampin'!
Stampin' Up! Supplies Used:
by Joanne James12. July 2014 22:43Well what a day! The highlight has definitely been Ben's birthday party with his class mates at Bugtopia, an insect and reptile centre near here. He had the most amazing time, holding everything from stick insects and tarantulas to chameleons and crickets! I will share some photos with you when I've had a chance to download them from my camera, but for today thought I would share the cards I made for Ben's two fellow 'birthday boys' with whom he shares his special day and some of the sweet treats that made it into the party bags. So first up, one of Ben's frineds is currently dinosaur mad, so I made a card using the new retired 'Dinoraur' stamp set (with a soon to be 7 year old son, I couldn't possibly part with my set, retired or otherwise!). I decided to create a fun card with a removable dinosaur bookmark made with the Scalloped tag Topper punch. Here is the card with the bookmark in its little pocket:
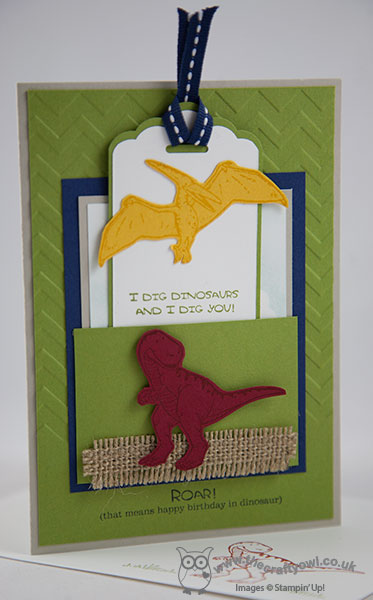
And here is the bookmark when removed, showing Triceratops on the bottom too:
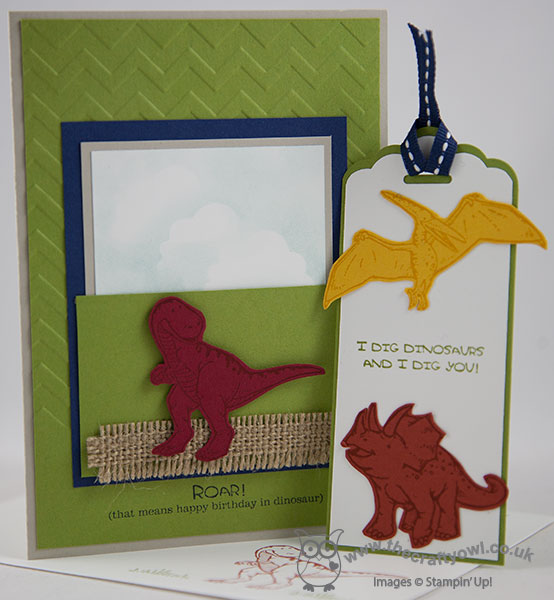
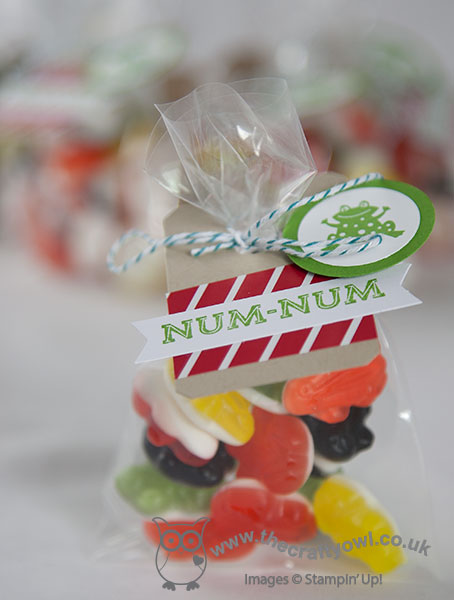
This card was such fun to make and perfect for a would-be palaeontologist. I have a bonus share for you today too: given the theme of our party, I used the Goodie Gear Simply Created Treat Kit for some suitably themed sweet treats - take a look:
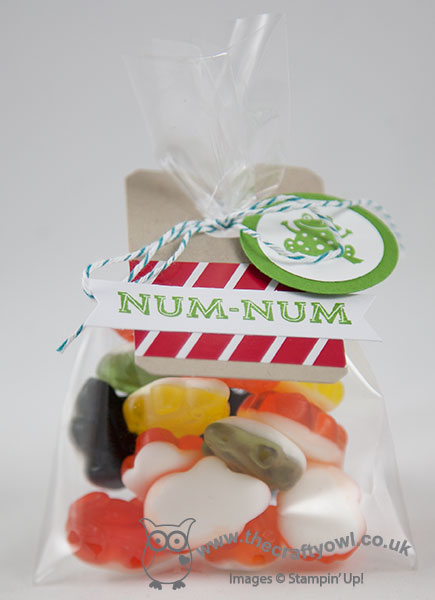
I bought a box of jelly frogs and tied them into the kit bags, decorated the labels and made a little stamped frog button (this is also from the retired 'Spring Sampler' stamp set). I thought I would share these with you as these bag kits are currently available on the Clearance Rack for just £1.79, and the Pumpkin Pie versions too - bargain or what?! Go and snap up a few to add a little 'wow' factor to your party treats! We also gave each child their very own butterfly garden to enable them to hatch their own caterpillar eggs into Painted Lady butterflies - a perfect project for the forthcoming long school summer holidays!
I'll be back tomorrow nice and early with my Paper Players post for the week; until then, happy stampin'!
Stampin' Up! Supplies Used:
faa5a1ce-954f-46e4-84e7-ac0ed448c20c|0|.0|96d5b379-7e1d-4dac-a6ba-1e50db561b04
Tags: Big Shot, Chevron Textured Embossing Folder, Dinoroar, Goodie Gear Simply Created Kit, Scalloped Tag Topper Punch, Stampin' Up Supplies, Stampin' Up Card ideas, Stampin' Up Card, Stampin' Up, Shop online, Clearance Rack
by Joanne James12. July 2014 21:19Well what a day! The highlight has definitely been Ben's birthday party with his class mates at Bugtopia, an insect and reptile centre near here. He had the most amazing time, holding everything from stick insects and tarantulas to chameleons and crickets! I will share some photos with you when I've had a chance to download them from my camera, but for today thought I would share the cards I made for Ben's two fellow 'birthday boys' with whom he shares his special day and some of the sweet treats that made it into the party bags. So first up, one of Ben's frineds is currently dinosaur mad, so I made a card using the new retired 'Dinoraur' stamp set (with a soon to be 7 year old son, I couldn't possibly part with my set, retired or otherwise!). I decided to create a fun card with a removable dinosaur bookmark made with the Scalloped tag Topper punch. Here is the card with the bookmark in its little pocket:
And here is the bookmark when removed, showing Triceratops on the bottom too:
This card was such fun to make and perfect for a would-be palaeontologist. I have a bonus share for you today too: given the theme of our party, I used the Goodie Gear Simply Created Treat Kit for some suitably themed sweet treats - take a look:
I bought a box of jelly frogs and tied them into the kit bags, decorated the labels and made a little stamped frog button (this is also from the retired 'Spring Sampler' stamp set). I thought I would share these with you as these bag kits are currently available on the Clearance Rack for just £1.79, and the Pumpkin Pie versions too - bargain or what?! Go and snap up a few to add a little 'wow' factor to your party treats! We also gave each child their very own butterfly garden to enable them to hatch their own caterpillar eggs into Painted Lady butterflies - a perfect project for the forthcoming long school summer holidays!
I'll be back tomorrow nice and early with my Paper Players post for the week; until then, happy stampin'!
Stampin' Up! Supplies Used:
11817e7b-5a4d-4100-9a43-b4ab2fe39fd2|0|.0|96d5b379-7e1d-4dac-a6ba-1e50db561b04
Tags: Big Shot, Chevron Textured Embossing Folder, Dinoroar, Goodie Gear Simply Created Kit, Scalloped Tag Topper Punch, Stampin' Up Supplies, Stampin' Up Card ideas, Stampin' Up Card, Stampin' Up, Shop online, Clearance Rack
3D Projects | Cards | Children's Parties | Stamping
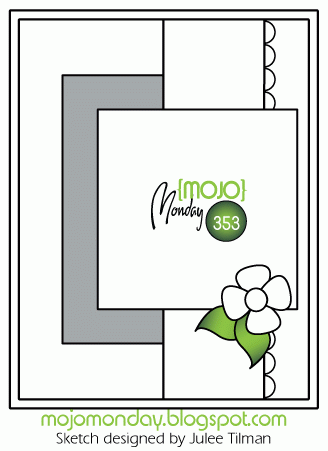
by Joanne James11. July 2014 21:54I've had another busy week and whilst it's great that it's Friday, boy do I have a busy weekend ahead of me! But before I get into my weekend, check out this card I made today for this week's Mojo Monday challenge; I haven't participated in this challenge for a while, but I really liked this week's sketch so thought I would use it for today's card. Here is the sketch:
And here's my card, featuring some of the scrummy new paper in the All Abloom Designer Series Paper Stack:
I followed the sketch but I have been a little liberal with the relative dimensions of the various elements, as I wanted to use this particular sentiment from the 'Feel Goods' set and show off as much of the bold paper pattern as possible. Taking the inspiration for my colour scheme from the DSP, I matted a piece of Mossy Meadow onto a Daffodil Delight card base, then positioned the DSP on the left and bordered the right hand side with a strip of Strawberry Slush edged in Pistachio Pudding, cut with the large scallop edgelit. I stamped my sentiment in Mossy Meadow and matted it on a piece of the same colour cardstock, with a small partial mat of Pistachio Pudding as I didn't want to obscure too much of the pattern. I finished with a simple circular flower, to echo those in the paper design, punched out with a couple of circle punches and finished with a candy dot.
I made this card with a friend of mine in mind and I'm really pleased with how it turned out. Above all, I'm loving this new paper stack - the patterns in it are lovely and I can guarantee you'll be seeing lots more of this!
So that's me for today. And so to the weekend: tomorrow Rebecca has an extra ballet lesson before her exam on Sunday, we are holding Ben's birthday party for his school classmates tomorrow afternoon (more on that tomorrow!) and we are also hoping to squeeze in a visit to our local fire station open day and drop in on a church fete that a friend of mine has been working very hard to prepare for to show our support. That is all in addition to the usual homework and swim squad sessions - wish me luck!
Back tomorrow with another project; until then, happy stampin'!
Stampin' Up! Supplies Used:
by Joanne James9. July 2014 08:00Happy Wednesday everyone! Double delights today: new weekly Wednesday Deals - I'll be back with the details on those later -and more importantly for me my second Colour Me...! Card Challenge Design Team post! This week we are using the striking colour combination of Elegant Eggplant and Soft Sky:
This is an unusual colour combination for me, but I had a clear idea of how I was going to use these contrasting colours - here's the card I came up with this week:
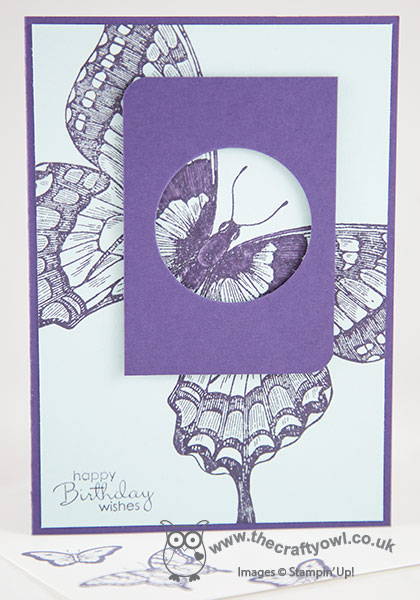
I decided to use Elegant Eggplant for my base card and then stamped the large Swallowtail stamp in Elegant Eggplant onto Soft Sky cardstock. I then took a rectangular piece of Elegant Eggplant cardstock and punched a circular hole out of the centre and rounded alternating corners with my Project Life corner rounder. I then strategically placed this over my butterfly to include its head and adhered it to my card using dimensionals, having first coloured the portion of the butterfly visible through the circular hole using Elegant Eggplant ink and a blender pen. The top layer is used to create a 'spotlight' onto the butterfly and almost magnify its detail. I finished with a small birthday sentiment from Petite Pairs as I didn't want anything that would overshadow my butterfly, and stamped the inside of the card and the envelope too with the smaller swallowtail from the coordinating Papillion Potpourri stamp set.
I hope you like today's card - please do pop along to the 'Colour Me...!' challenge page this week to check out the work from the other talented designers that I'm working with and to upload your own creations.
Back tomorrow with another project; until then, happy stampin'!
Stampin' Up! Supplies Used:
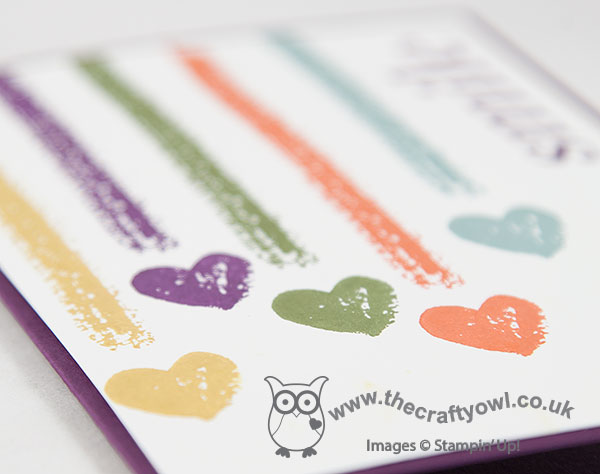
by Joanne James8. July 2014 21:21I've had a fun day today with my monthly card class. Classes take a lot of thought and preparation, but I can honestly say I laugh so much with this fun bunch of ladies it so makes it all worthwhile! Today's class was all about getting to know new stamp sets, colours and tools from the new catalogue and I thought I would share one of the cards we made using the Work of Art stamp set and the new 2014-16 in-colours. Here is the card in question:
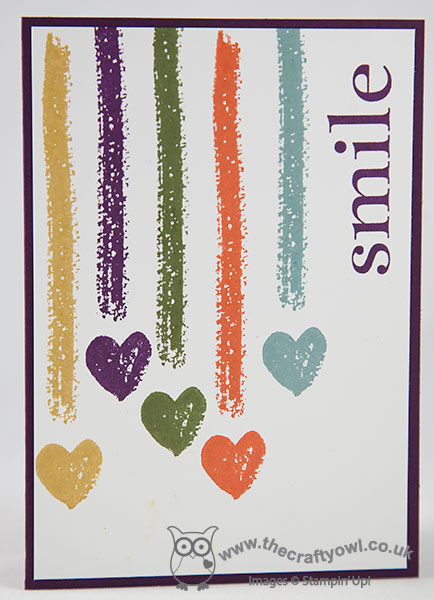
I based the design for my card on one I'd seen on Pinterest using the Gorgeous Grunge stamp set (I didn't pin it though and now can't find the link - apologies!) and coupled the stripe and heart from the Work of Art set with one of my favourite vintage 'Happy Day' stamps (I have a new catalogue 'replacement' for this on order, but I'm not ready to part with this one yet!) Quite a simple design but tricky to line up and make everything look even without loosing the natural 'swiped' look; the main reason I'm sharing it though is because of all the cards we made today, this one not only raised a smile - it had us in stitches! I wish I had taken my camera as there were some lovely variations on the basic idea and everyone using a different colour of base card.
If you live in or around Northampton and would like to join my monthly classes, do get in touch. I am currently looking at expanding my class schedule further, so would love to hear from you if this is something that interests you.
Back tomorrow with this week's Colour Me...! design team card and the Wednesday Weekly Deals; until then, happy stampin'!
Stampin' Up! Supplies Used:
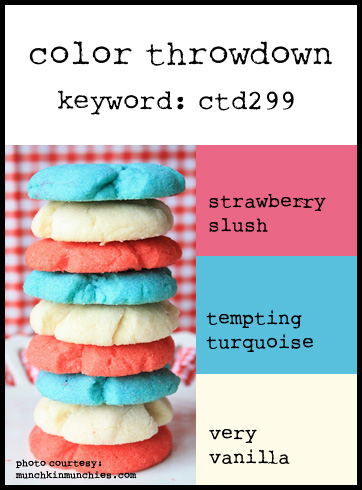
by Joanne James7. July 2014 08:00It's Monday and the start of a busy week for me, beginning with sports day for both James juniors today. So a nice early post is in order and today I'm sharing a card inspired by the colours over at Color Throwdown this week:
I thought these colour would make a fun baby card, but which way to go - girl or boy? In the end I decided to have some fun and use a little of both - take a look and see what I mean:
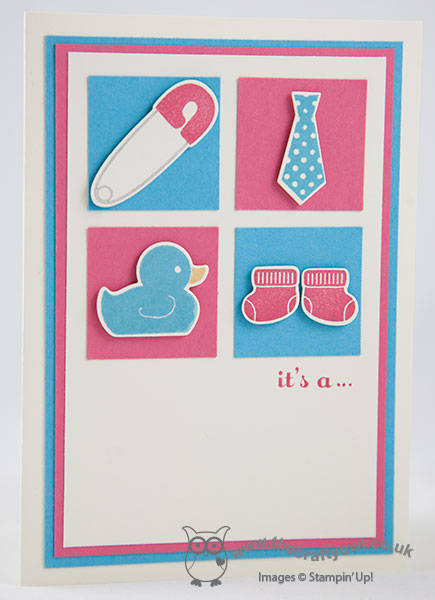
I decided to create a fun 'gender reveal' card that could be handed out to guests at a baby shower or similar, when the baby's gender has been kept a secret but it's time for the big reveal. I used Very Vanilla as my card base and created mats in Tempting Turquoise, Strawberry Slush and Very Vanilla, then punched 4 squares using my retired 1 1/4" square punch (you could cut these by hand), 2 blue and 2 pink, and attached one of the cute images from the 'Something for Baby' set, stamped in alternating pink and blue, and cut out with the co-ordinating framelits and mounted on dimensionals on the coloured squares. I then took one of the baby sentiments from the 'A Dozen Thoughts' stamp sets and partially inked it up so that the start of the sentiment was on the front, with the final 'reveal' on the inside. So what did I choose for my card - well, here's the inside where the truth is out:
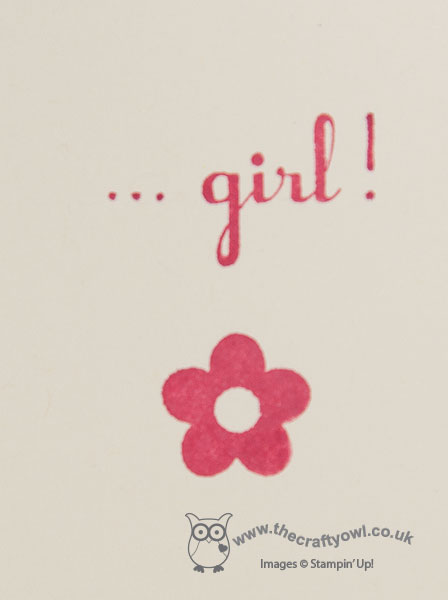
I made mine for a little girl, adding in the leading dots and the exclamation mark with my Strawberry Slush marker pen. You could just as easily create a similar card with alternate wording for a boy - cute, eh?!
We are making a card similar to this one in my monthly card class which is being held this week, which is featuring lots of products from the new Stampin' Up! 2014-15 Annual Catalogue. If you live in Northampton and are interested in attending card, home decor or Project Life classes, do get in touch - new faces are always welcome!
Right, I'm off to avoid being attacked by a javelin or alternative sporting object! Back tomorrow with another project; until then, happy stampin'!
Stampin' Up! Supplies Used: