by Joanne James19. January 2015 11:26I have another card to share with you today - a double-post day, woohoo! You can see my earlier card here. This one is quite different!
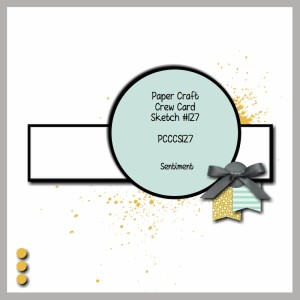
It started out as my card for this week's challenge over at Less is More, where the challenge this week is 'friends'; I started out thinking of something cutesy or animal-themed, then remembered a stamp set I have that I've used only one stamp from (the #Ijustloveyou stamp I used a couple of times last week) and thought it was about time to ink up a couple more stamps in this set. This also resulted in a complete change in design direction! Since this definitely counts as 'NBUS' (never before used schtuff!), I'm also going to link up with CASology and the lovely Darnell with her third NBUS challenge (go Darnell! Thanks for encouraging us to actually use ALL of the stamps we buy!!). I also used this week's sketch over at The Paper Craft Crew as my inspiration (check out Justin's awesome card this week - you are definitely going to want to CASE it!!). Edited to add: At Sarah's suggestion over at LIM, I am also linking up with Uniko Studio's current challenge where the theme is 'love and friendship'. So five challenge links in total, which is something of a record and entirely unplanned, given that I already made today's card and this one was supposed to be for Thursday! So here are all the badges:
After all that - if you're still with me! - I'm guessing you might like to see my card!! Well, here it is:
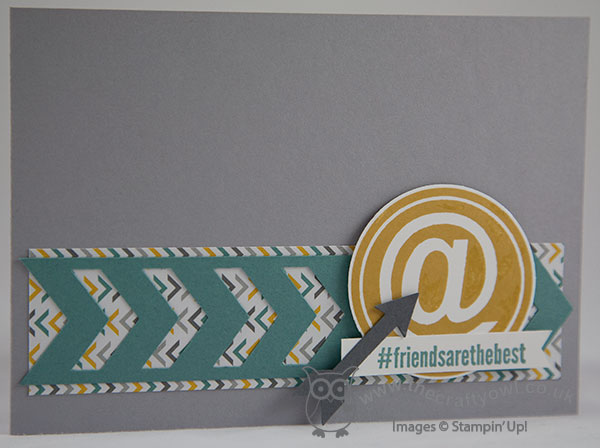
A very clean and simple card, with a slightly masculine feel to it I think due to the colour scheme, which I took from the Moonlight DSP which is peeking through under the Chevron border punched piece. I popped the ampersand up on dimensionals and layered with the hashtag sentiment and arrow to finish. Super simple - easy enough to recreate for a friend, male or female, just to let them know you care. Better still, both the chevron border punch and What's Up arrow punch are on this week's Wednesday Weekly Deals, so you can pick them up even more cheaply than usual!
That really is all from me today; back tomorrow with another project. until then, happy stampin'!
Stampin' Up! Supplies Used:
1336ab55-f27c-4208-8bfc-b1d289c29388|0|.0|96d5b379-7e1d-4dac-a6ba-1e50db561b04
Tags: #Hello, Chevron Border Punch, Moonlight, circle punch, What's Up Punch, Wednesday Weekly Deals, Stampin' Up, Stampin' Up Card, Stampin' Up Card ideas, Stampin' Up Supplies, Shop online, Promotions
Cards | Promotions | Stamping
by Joanne James19. January 2015 10:45It's Monday and I am filled with the enthusiasm of a new week! I managed to get some quality crafting time yesterday afternoon, so I'm hoping to tick off a few 'back burner' jobs this week. Today I'm sharing a card using this week's sketch over at Freshly Made Sketches, where Jen Timko has this sketch for us (and a great interpretation of it - you should really check out both her card and those of the other FMS designers):

I stuck with the circle for my shape and decided to go with a pink and pretty card today using the fab 'Sheltering Tree' stamp set from the new Spring-Summer catalogue. Here is my card:

I used Crumb Cake for my base and adhered a layer of Crumb Cake DSP with polka dots from the Neutrals DSP stack to the front. I stamped my tree on Whisper White in Crumb Cake, and the leaves twice, once in Pink Pirouette and once in Blushing Bride, then added some tiny pink hearts punched with my Confetti Heart Border Punch. The swing and sentiment are stamped in Chocolate chip for a little contrast and I embossed the top layer with the large polka dot embossing folder before adhering to my card with dimensionals. A small punched heart and tiny pearl complete the look. This stamp set offers so many possibilities; it was one of those sets that I bought 'for me' as I know I will get lots of use out if it. It's also photopolymer, so aligning the images is a doddle - no stamp-a-ma-jig required.
I am also linking today's card up with SUO Challenges where the current theme is dots; mine are subtle, but they are definitely there! This card would make a lovely Valentine's card or even a birthday or other occasion for a special little girl - I know my daughter would love it, although her fascination with the little bicycle that comes with this stamp set may require me to change out the swing with a two-wheeler!
Back tomorrow with another project; until then, stay warm (it's cold in the UK today!) and happy stampin'!
Stampin' Up! Supplies Used:
801d300b-0083-456a-81e4-1fa611a96514|0|.0|96d5b379-7e1d-4dac-a6ba-1e50db561b04
Tags: Sheltering Tree, Big Shot, Circles Framelits, Large Polka Dot TIEF, Confetti Hearts Border Punch, Heart Punch, Shop online, Stampin' Up, Stampin' Up Card, Stampin' Up Card ideas, Stampin' Up Supplies
Cards | Stamping
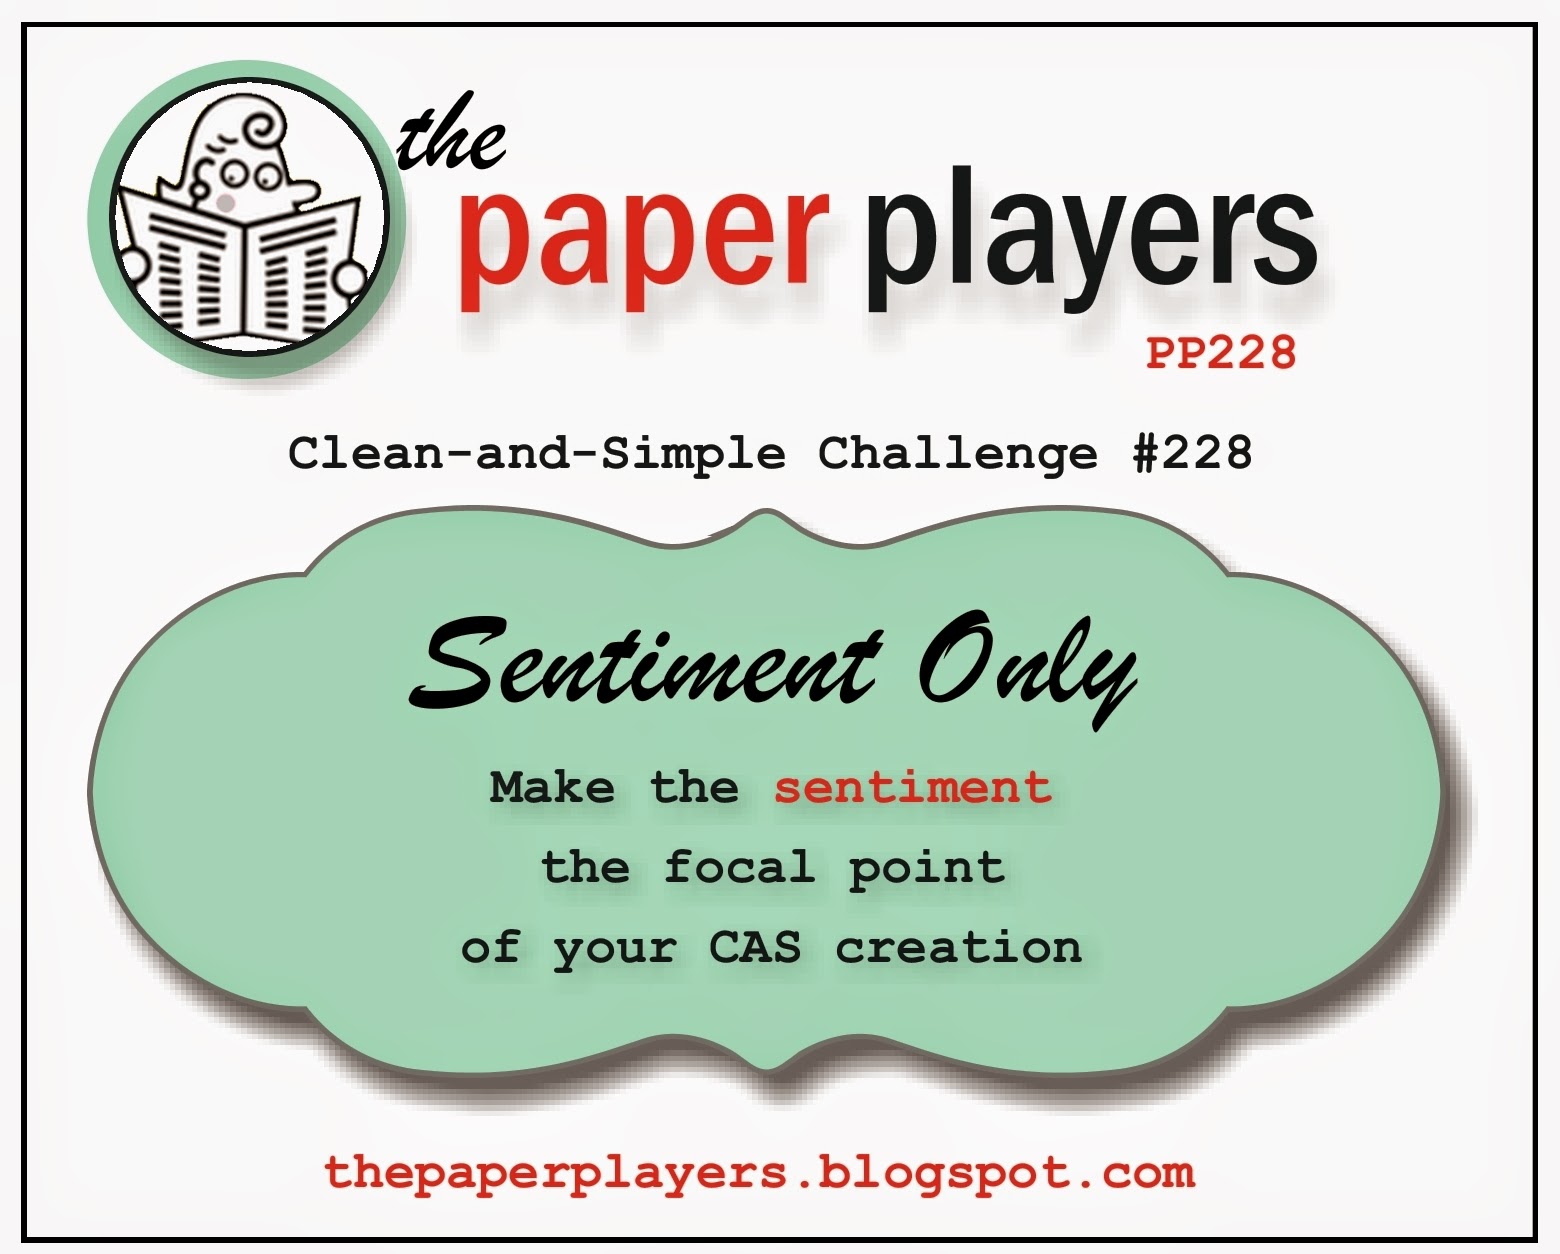
by Joanne James18. January 2015 07:00It's Sunday and time for a new challenge over at The Paper Players, where this week LeAnne has a fun CAS challenge for us:
There are lots of great sentiment sets in the Stampin' Up! range; I have lots of birthdays coming up so this was a great opportunity to use the new 'it's your day' stamp from the 'Big On You' set in the Spring-Summer catalogue and create a fun birthday card. Here's my clean and simple card:
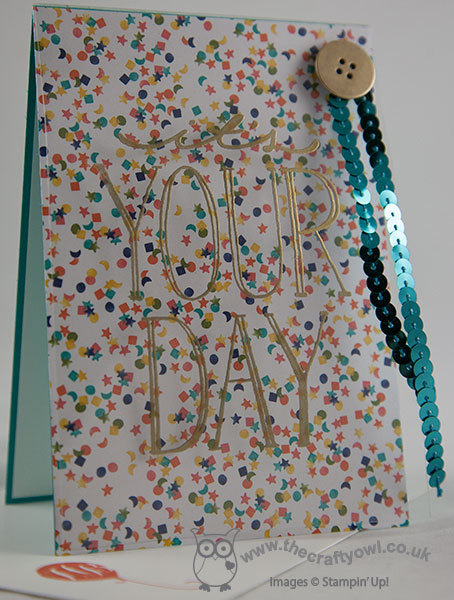
I used Bermuda Bay for my card base and covered my entire card front in a piece of confetti-patterned paper from the 'Birthday Bash' DSP range. I then took a piece of acetate window sheet, cut slightly longer than the front of my card, stamped my stamp on it in versamark and heat embossed it in gold. I then scored across the top and adhered it to the back of my card and folded it over the front. I like the effect of the floating sentiment and the fact that you get to see the whole of the DSP underneath. I almost finished my card at this point, but decided to add a string of Bermuda Bay sequins and a gold button to add to the party feel of my card - minimal embellishments are ok for this type of card and sometimes can add a nice touch.
I even did a little stamping on the inside of my card and better still, remembered to photograph it so that I could share it with you:

I hope you like today's card - rather glitzy yet at the same time clean and simple and easy to re-create. Before you reach for your ink pads, do visit the other design team members to see what interesting ideas they've had this week:
The Paper Players Design Team
I look forward to seeing your projects in the gallery this week. Back tomorrow with another project; until then, happy stampin'!
Stampin' Up! Supplies Used:
by Joanne James17. January 2015 20:44Today's card is for this week's challenge over at Mojo Monday where this week's sketch has encouraged me to cut into my Painted Blooms DSP for the first time! Here's the sketch:
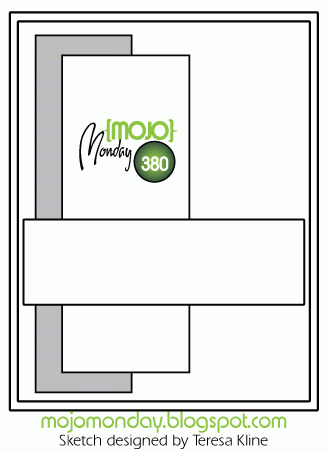
I thought this sketch was perfect to showcase some DSP and what better than 'Painted Blooms'; I've spent long enough stroking it and it's time to start cutting it! Here is my card:
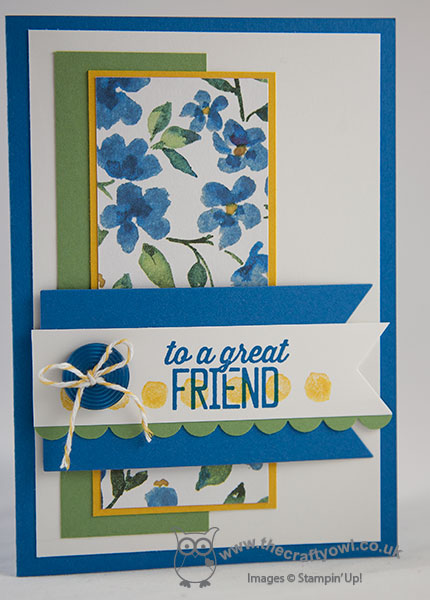
I decided to go with the blue flowers, so used Pacific Point for my card base and matted with Whisper White. I used the floral panel for the main vertical section and backed this with Crushed Curry and an offset panel of Wild Wasabi. For the sentiment banner, I stamped off the row of dots in Crushed Curry once, then stamped my sentiment on top. A scallop edge trim, button and twine finish my card.
The papers in the 'Painted Blooms' DSP pack are some of the most beautiful I've ever seen and are works of art in their own right. Having started cutting now, I'll be sure to use more of them and share with you in the coming weeks.
Back tomorrow with my post for this week's challenge over at The Paper Players. Until then, happy stampin'!
Stampin' Up! Supplies Used:
b4fd7060-d5ee-49b7-9538-4998b3d5d28f|0|.0|96d5b379-7e1d-4dac-a6ba-1e50db561b04
Tags: Painted Petals, Painted Blooms, Sale-A-Bration 2015, Shop online, Simply Wonderful, Stampin' Up, Stampin' Up Card, Stampin' Up Card ideas, Stampin' Up Supplies, Banners Framelits, Big Shot
Cards | Stamping
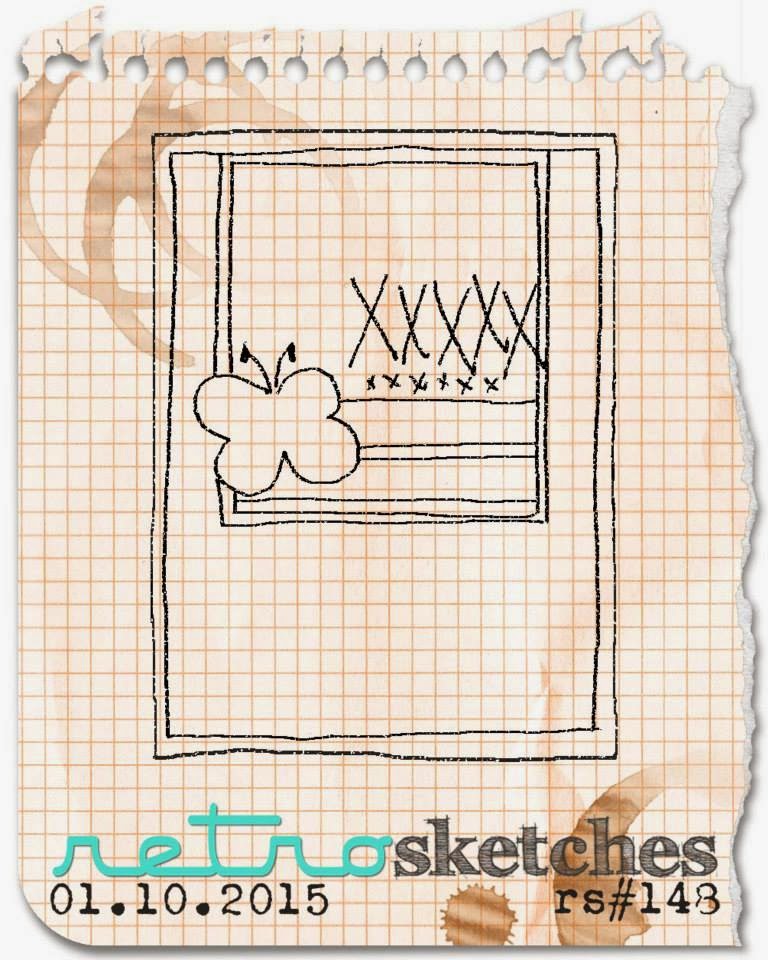
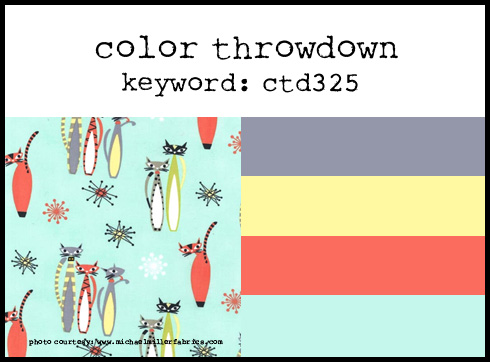
by Joanne James16. January 2015 09:00It's Friday - always a great day of the week! Today I'm sharing a card made with this week's sketch layout over at Retrosketches and I also used the colour palette over at Color Throwdown:
I love the colour palette above and the fun pattern that inspired it; I have lots of birthdays coming up, so I decided to go with something less whimsy and combined with the sketch ink up my Butterfly Basics stamp set for the first time and create a birthday card:
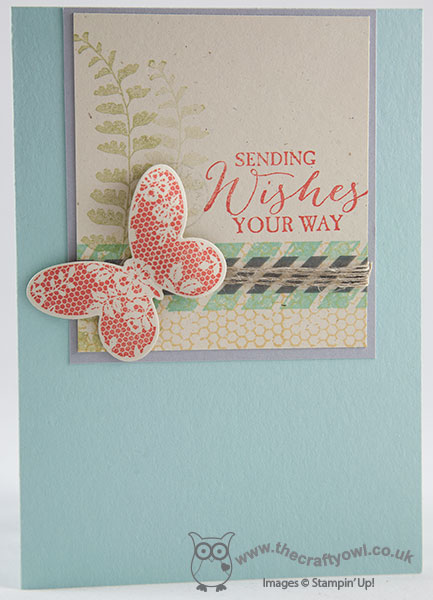
I just love this stamp set and judging by the samples I've seen on Pinterest, I'm not the only one. You can create some amazing big and bold images with this set, particularly if you use the large intricate butterfly thinlit dies that come with it. For my card today though, I decided to create a smaller collage-style panel, layering the various images and adding a strip of washi tape and and linen thread for interest and to bring the whole thing together. For my stamped panel I used naturals ivory cardstock, as I wanted to create a more natural feel that was less stark than standard vanilla. I also used a little Pear Pizzazz for my fern; not a colour on the palette, but since Tammy over at Color Throwdown did the same and gave permission as it does appear in the inspiration photo, I thought I would take advantage (thank you Tammy!) Lastly, I stamped my butterfly in Calypso Coral onto some naturals ivory cardstock before adhering to my card. I left my Pool Party card base clean, although after putting the whole thing together did think I'm going to make another version of this card with a more detailed background (I'm all about ringing the changes - one to share another time!)
My February technique stamp class is going to feature the Butterfly Basics stamp set and will feature tips, tricks and techniques to get the most out of your thinlit dies. If you live in Northampton or the surrounding Northants/Bucks/Beds area, you are more than welcome to join me. You can find my full class schedule here - just contact me for more details and to book your place.
I hope you all have fun weekends planned - mine will no doubt be a busy one, as usual. Back tomorrow with another project; until then, happy stampin'!
Stampin' Up! Supplies Used:
by Joanne James14. January 2015 22:48Thursday already - the week is whizzing by! Today I'm sharing I card I made for this week's challenge over at Less Is More, where the challenge this week is one layer cards with a theme of 'new beginnings'. So many possibilities here, but I decided to go with the obvious 'new home' choice, as having never had any new home stamps I suddenly find myself spoilt for choice with three different ones, so I thought it time the newest one saw some ink. My card also uses the 'What's Up' punch to create the house shape, which you can find on Wednesday Weekly Deals this week. Here is my card:
Ok, so this is a beautiful 'clean' card in real life, but in order to add interest to my one layer card, having stamped the sentiment on the front I punched out my house shape from the front of the card, then stamped the house image through the hole onto the inside of the card. Therein lies the problem though - this kind of card is incredibly difficult to photograph! The photo above shows the sentiment and you can just about see the house through the hole; the photograph below has a more close-up shot of the house visible through the house shape, with the front of the card out of focus.

The house is stamped in Bermuda Bay and coloured with Bermuda Bay and Cherry Cobbler Blendabilities, with the door frame in Crushed Curry. To finish, I wrapped a Bermuda Bay baker's twine bow around the top of my card. In hindsight, I'm thinking I should maybe have taped the card shut and photographed it completely flat - hopefully you can see enough to get the gist of things.
Back tomorrow with another project; until then, happy stampin'!
Stampin' Up! Supplies Used:
by Joanne James14. January 2015 21:23Back again with another quick card for this week's challenge over at As You See It, where we are playing along with this sketch for inspiration:
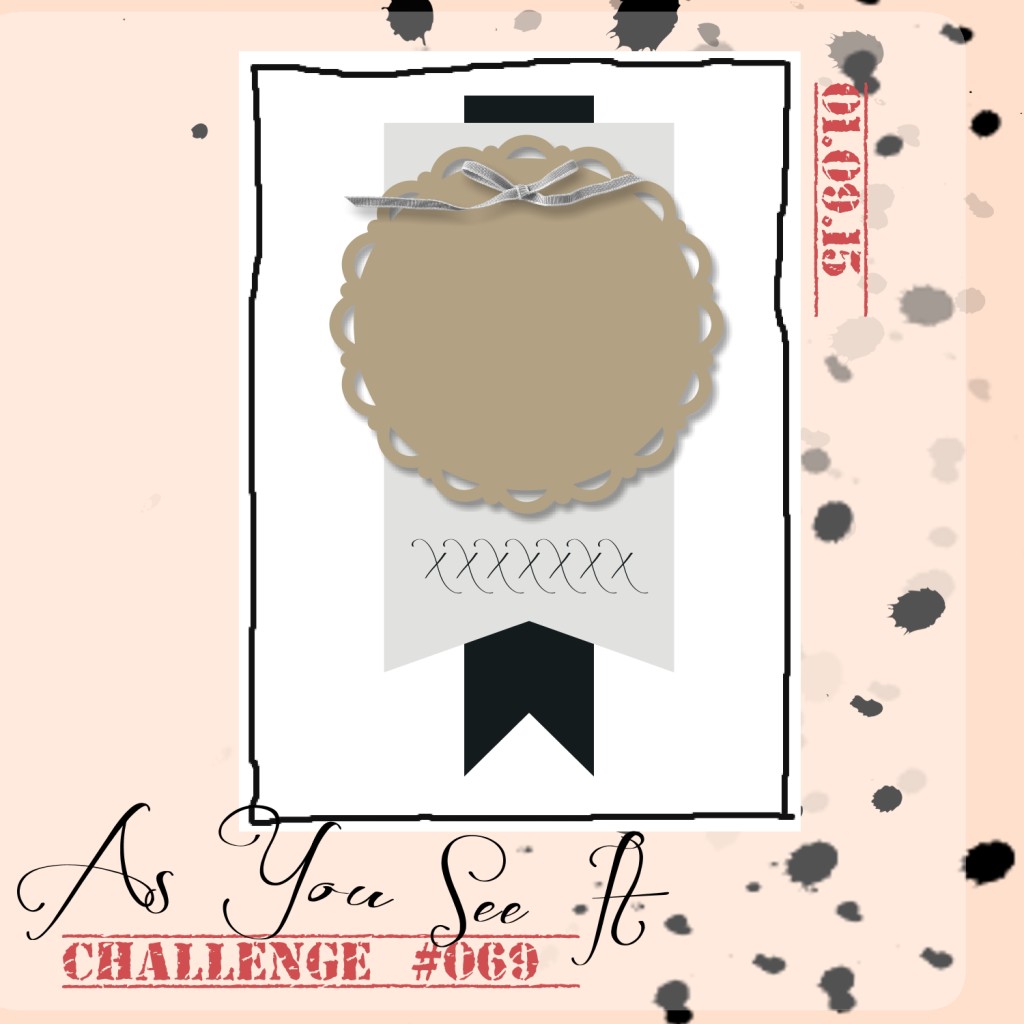
I was lucky enough to be chosen as the ASYI Featured Artist for my entry last week - thank you ladies! You can see that card here. For this week's entry I couldn't resist using that little Bow Builder punch again - take a look:
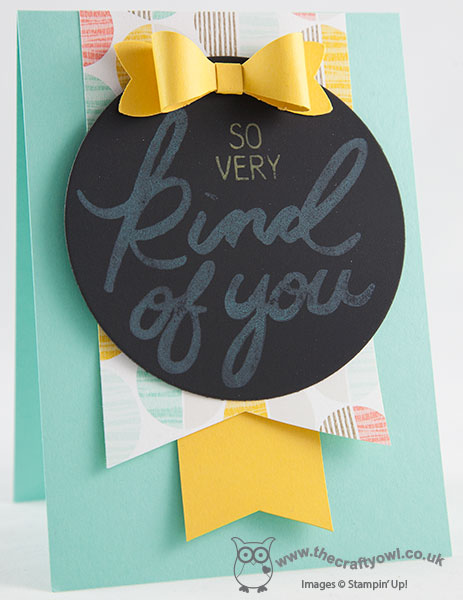
I went with a really simple layout with a couple of banners, one of which features some of the gorgeous 'Best Day Ever' Sale-A-Bration DSP and instead of adding my sentiment to the banner, I chose to allow it to take centre stage with a two-tone chalkboard sentiment in aquamarine and yellow citrus, finished with a Crushed Curry punched bow. Wouldn't that make a nice thank you card for someone?
Back tomorrow with another project. Until then, happy stampin'!
Stampin' Up! Supplies Used:
a344c3e7-f662-400b-a0f9-c742d1b1b542|0|.0|96d5b379-7e1d-4dac-a6ba-1e50db561b04
Tags: Bow Builder Punch, Chalk ink, Chalkboard, Big on You, Best Day Ever, Sale-A-Bration 2015, Shop online, Stampin' Up, Stampin' Up Card, Stampin' Up Card ideas, Stampin' Up Supplies
Cards | Stamping
by Joanne James14. January 2015 12:01I haven't managed to blog the last couple of days as there's just been too much going on. Whilst I was intending to blog later today, I thought I would just share with you a card that I made with the ladies in my Technique Card Class this week, as it features two if the punches that are available on Wednesday Weekly Deals this week. My card was heavily inspired by this one by Inge Groot that a saw a couple of weeks ago. Here is my altered version, in the colourway that we made in our class:
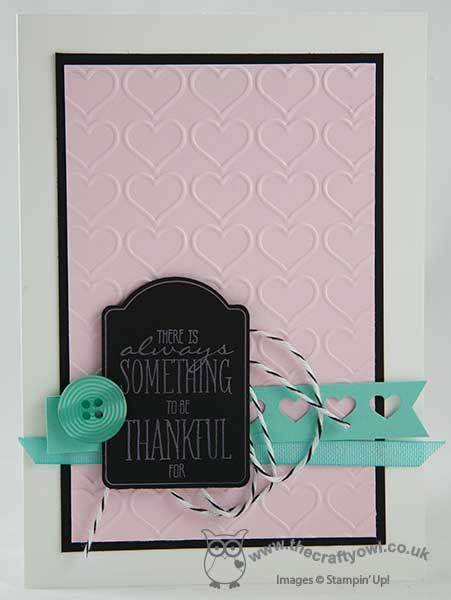
The technique class featured the new Chalkboard paper and all the different ways in which you can use the lovely new chalk inks that are now available in the Spring-Summer catalogue. These inks have a fabulous soft chalk effect on the new Chalkboard paper; here we used it to stamp the tag from the 'You Brighten My Day' stamp set, yours free with a £45 spend during Sale-A-Bration, and behind this added some black and white baker's twine, some of the Best Year Ever ribbon and buttons (another Sale-A-Bration freebie) and a strip of cardstock punched with the Hearts Border Punch. All of this was mounted on a feature mat in Pink Pirouette that we embossed with the new Happy Heart embossing folder. I also made two more cards to the same design, but in two alternative colourways. This one is Aquamarine chalk in on Coastal Cabana, with Crushed Curry accessories:
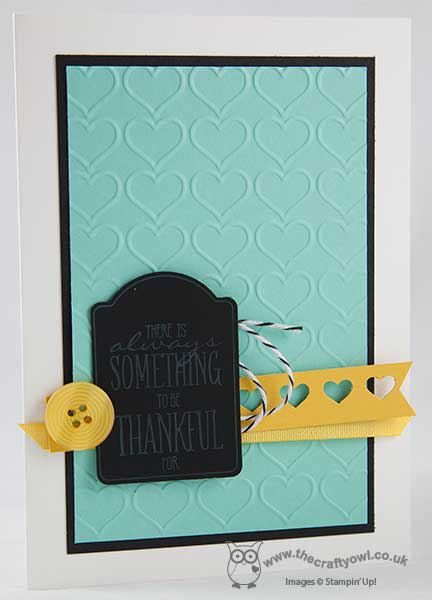
Lastly, Yellow Citrus chalk ink and So Saffron, with Calypso Coral accessories:
I like that these cards are quite subtle, despite the bright appearance of the chalk ink in the pad itself - it's quite deceiving. Both the Note Tag punch and the Hearts Border Punch are on offer this week as part of the Wednesday Weekly Deals, as is the What's Up punch that also co-ordinates with the house stamp in the 'You Brighten My Day' stamp set. If this stamp set appeals to you and you would like to be able to create today's card, the following product bundle costs £47.87, includes both punches and would enable you to acquire the key supplies and get the stamp set for free:
All you need to add is the cardstock in the colours of your choice, a button and some ribbon from your stash. For everyone that buys this bundle from my online store this week and uses the hostess code 44JKUBHY, I will send you a separate little thank you gift from me in the post.
Back soon with another creative post; until then, happy stampin'!
f25fa6a7-e439-425d-8d13-eff4a3eb93cc|0|.0|96d5b379-7e1d-4dac-a6ba-1e50db561b04
Tags: You Brighten My Day, Stampin' Up Supplies, Stampin' Up Card ideas, Stampin' Up, Stampin' Up Card, Shop online, Promotions, Sale-A-Bration 2015, Happy Heart TIEF, Note Tag Punch, Hearts Border Punch, Wednesday Weekly Deals, Chalk ink, Chalkboard, Big Shot
Cards | Classes | Promotions | Stamping
by Joanne James11. January 2015 07:00It's Sunday and time for this week's challenge over at The Paper Players, where today Anne has a great colour challenge for us:
.jpg)
I also used the current sketch over at The Deconstructed Sketch as the basis for the layout of my card. So for my card today I've had the first opportunity to play with one of my most favourite products from the new Spring-Summer catalogue: the new 'Hello You' thinlits. I loved the Expressions thinlits we had previously and I still use mine and would never part with them, so I was delighted to see a whole new set of word thinlits in the new catalogue, and the fabulous 'Crazy About You' stamp set that co-ordinates with them. The number of sentiment possibilities are endless! Anyway, using Anne's colour choice today, this is what I came up with:
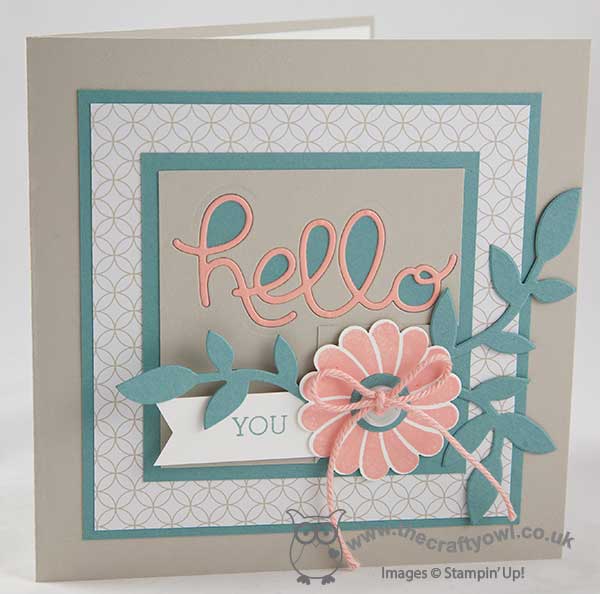
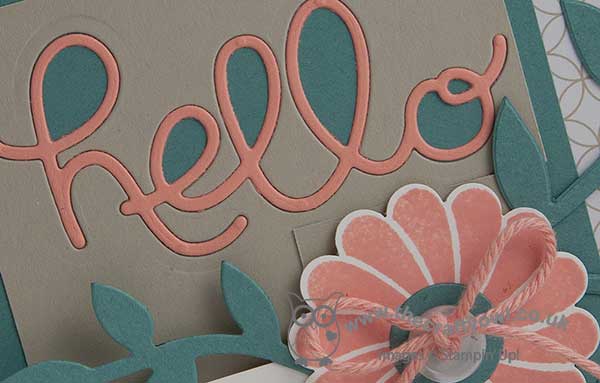
I went with a square card and lots of layers. The layers are Sahara Sand and Lost Lagoon, with the Sahara Sand DSP from the 'Moonlight' DSP paper stack. I die cut the word 'hello' from my central Sahara Sand square, then inlaid this with another 'Hello' diecut in Crisp Cantaloupe, allowing the Lost Lagoon from the layer below to show through into the negative space. I finished my sentiment with a 'you' stamped in Lost Lagoon on a banner of Whisper White, that I tucked under my Crisp Cantaloupe stamped flower. I diecut some leaves and a centre for my flower from Lost Lagoon cardstock using my Flower Frenzy Bigz Die, then finished it with a white button threaded with Crisp Cantaloupe thick baker's twine. I love how the 'Hello You' thinlit dies can be used in so many ways. Just look at the detail on this close-up:
I hope you like this card and are as crazy about the new thinlits dies as I am. Watch this space for lots more ideas from me!
We are back to hockey and rugby following the Christmas break today; no rest for the parents of sporty ones, it seems! At least dinner is prepared and will be in the slow cooker waiting for us on our return. Before you reach for your ink pads, do visit the other design team members to see what interesting ideas they've had this week:
The Paper Players Design Team
I look forward to seeing your projects in the gallery this week. Back tomorrow with another project; until then, happy stampin'!
Stampin' Up! Supplies Used:
3c5476e4-da79-44d6-b1b0-9d6e2ca30362|0|.0|96d5b379-7e1d-4dac-a6ba-1e50db561b04
Tags: Crazy About You, Hello You Thinlits Dies, scallop circle punch, Moonlight, Flower Frenzy Bigz Die, Shop online, Stampin' Up, Stampin' Up Card, Stampin' Up Card ideas, Stampin' Up Supplies, The Paper Players
Cards | Stamping
by Joanne James10. January 2015 20:12Today I have another card using the moustache stamp from Well Worded. It was still out on my desk from this card that I made with it the other day, so I took the opportunity to use it again for today's card for this week's Freshly Made Sketches challenge; I also used the colours over at The Color Throwdown this week, where they are really suited to another Valentine's or anniversary card:
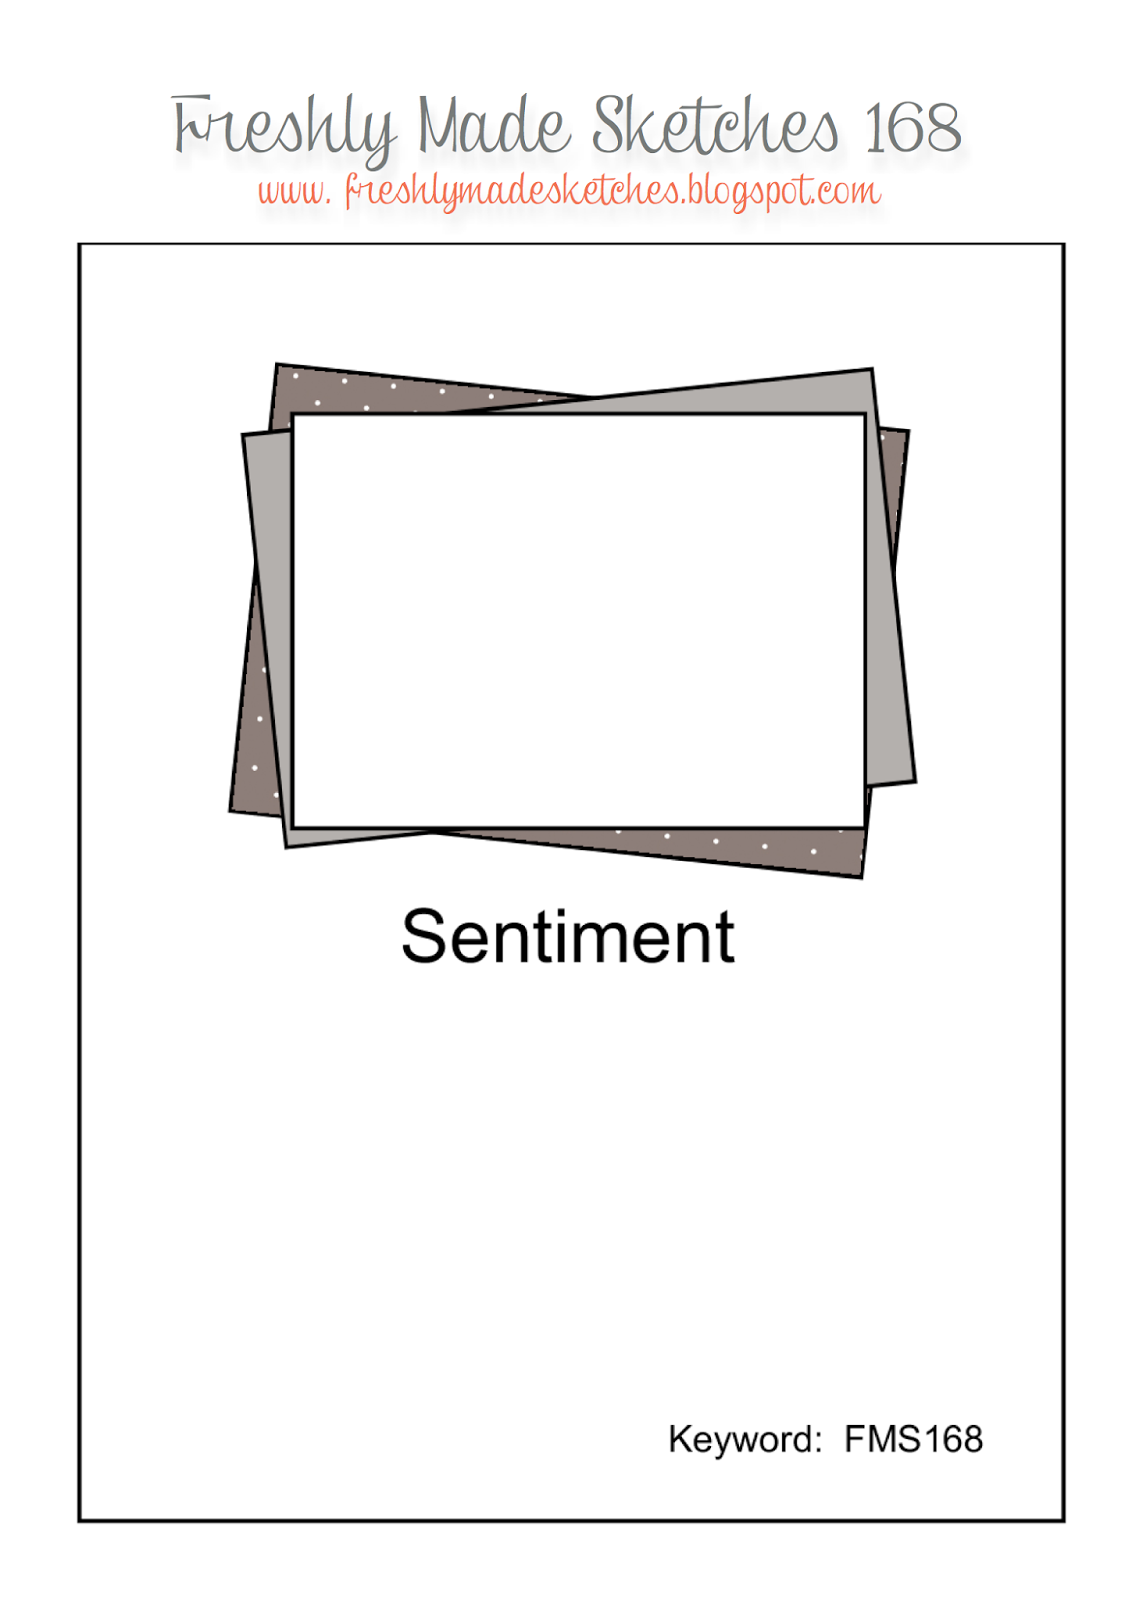
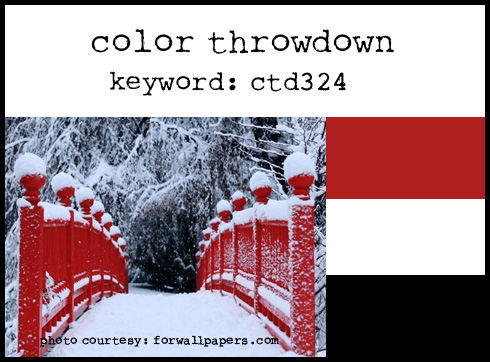
This one is definitely made with a man in mind - here is my card:

I layered a couple of rectangles of paper from the 'Stacked with Love' DSP paper stack onto a base of Basic Black cardstock (I am so making the most of my 'Stacked with Love' DSP!), then a Real Red heart cut out with my Hearts framelits and a moustache stamped in Memento Black onto Whisper White, which I then cut out with my mustache framelit and popped up on a couple of dimensionals. To finish, I stamped my hashtag sentiment in Versamark and heat embossed it in white.
Another simple, modern card that would work well for Valentine's Day, a wedding anniversary or just to say 'I love you' card.
I'm also linking up with the 4 Crafty Chicks, where the theme this week is anniversary cards.
Back tomorrow with this week's card for a new challenge over at The Paper Players; until then, happy stampin'!
Stampin' Up! Supplies Used:
019ae52a-2943-4e5f-a799-a3a1a590db2b|0|.0|96d5b379-7e1d-4dac-a6ba-1e50db561b04
Tags: #Hello, Well Worded, Shop online, Stacked With Love, Stampin' Up, Stampin' Up Card, Stampin' Up Card ideas, Stampin' Up Supplies, Mustache Framelit, Hearts Framelits, Valentines, Valentine's, Anniversary
Cards | Stamping