Rustic Share What You Love Card

by Joanne James7. May 2018 20:00

Happy Monday everyone! Today it's a Bank Holiday and therefore a national holiday here in the UK so we have enjoyed a long weekend along with some wonderful sunshine to boot! Today I'm sharing a card using Jen's sketch over at Freshly Made Sketches that also works for the 'O' challenge over at Just Add Ink - I've been so busy out enjoying the sunshine I didn't make time to photograph my card in time to link up at FMS, despite hoping that I was going to manage to play along with these 2 challenges for the second week running as they are a couple of my favourites. You should definitely check them out, their Design Teams are awesome! Here are this week's challenge badges:


I was intrigued by Jen's sketch this week as whilst a simple oval it occurred to me that I rarely use ovals in my card making, so I thought I would give it a go. I've included the photo inspiration for last week's challenge over at StampInkPaper because although I'm not linking up there, it was this inspiration photo that led me to create today's style of card that I am ultimately going to link up over at Just Add Ink with my 'o' for 'oval' - take a look:


Here's the low-down on today's card:

Sharing What You Love - I have been busy making lots of samples with the fabulous 'Share What You Love' set that is on early release to customers this month using the products and colours in the bundles, so wanted to make something a little different. This card is all about the textures and so I kept my colour palette neutral: wood, white, vanilla, linen and a little Old Olive. Another way to share what I love!

A Rustic Theme - I don't use my Wood Textures papers anywhere near enough and decided to use them both for the background and my heat-embossed flowers. I added a little linen thread and the texture of my oval surround along with a little fussy cutting and a few pearls adds to the rustic feel of my card.

Delightfully Detailed Ovals - I have a new paper love: the Delightfully Detailed Laser-cut Specialty Paper is just beautiful! For my card, I used one of the oval pieces and used it to frame my focal point - it's just so pretty.

Here is the visual summary of the key products used on today's project for you to pin for easy reference:


You can see all of my 'How To' summaries on my 'How To - Tips and Techniques' Pinterest board in case you've missed any. 

This card is a little different for me but it's nice to experiment once in a while and step outside of my comfort zone. What do you think - did it work? I'd love to hear your thoughts below.

I hope you've all had wonderful days and that the weather is as glorious where you are! I'll be back tomorrow with another project. Until then, happy stampin'!


Stampin' Up! Supplies Used:

Table built using Product Table Builder by The Crafty Owl - Independent Stampin' Up! Demonstrator.

Just Add Color Card and Tea Bag Holder For The Paper Players PP392

by Joanne James6. May 2018 09:00

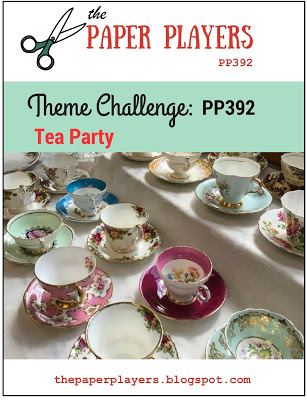
It's Sunday and time for this week's new challenge over at The Paper Players! It's the turn of our fearsome leader, the fabulous Nance, to host this week and she has a rather pretty theme challenge for you to work with:


This challenge was made for me as I am a dedicated tea drinker! Coffee not so much, but I can drink as many as 10 cups of tea a day on average - definitely my drink of choice! I don't have much current product with a tea theme though, so wondered how I was going to tackle Nance's challenge this week, when I remembered the colouring paper in the current catalogue and voila - both my card and an accompanying little tea-related gift were created! First up, my card:


Here's the low-down on today's card:

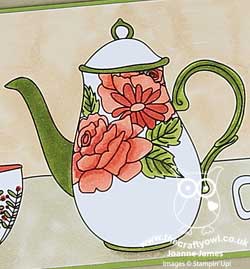
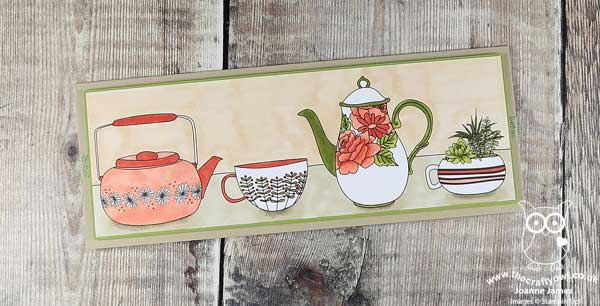
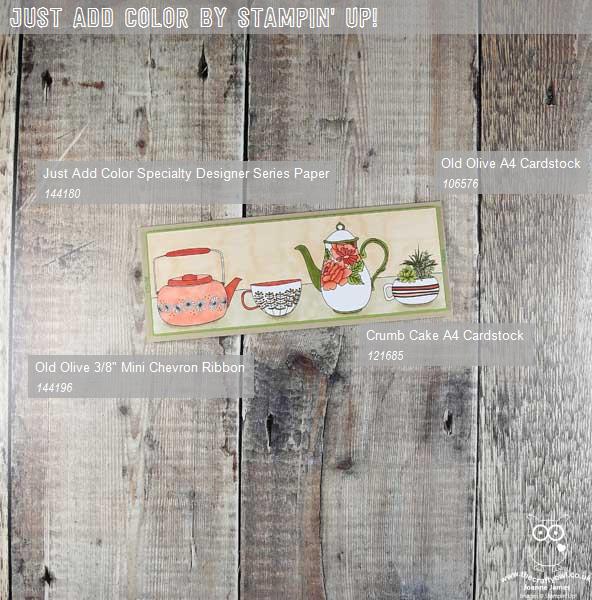
Just Add Color - One of the patterns in the Just Add Color Specialty Designer Series Paper pack is a sheet covered in all kinds of tea cups and teapots, so I cut a strip from the top of a sheet of paper, grabbed my Stampin' Blends and got to work. I went for a longer, thinner card this week and allowed the DSP pattern to dictate the dimensions for my card base.

Get Blending - Given that some of the teacups contain succulents rather than tea, this week's colour palette over at The Color Throwdown was perfect for my project. I used my Calypso Coral, Old Olive and Crumb Cake Blends, with the top portion coloured in Ivory. This paper is both very thick and matt, so alcohol markers do not blend quite as well as they do on Whisper White. This is particularly noticable on the larger areas such as the table and wall behind the teaset, however I quite like the effect - it gives an almost chalk effect, like rough plaster, so certainly works on my card.

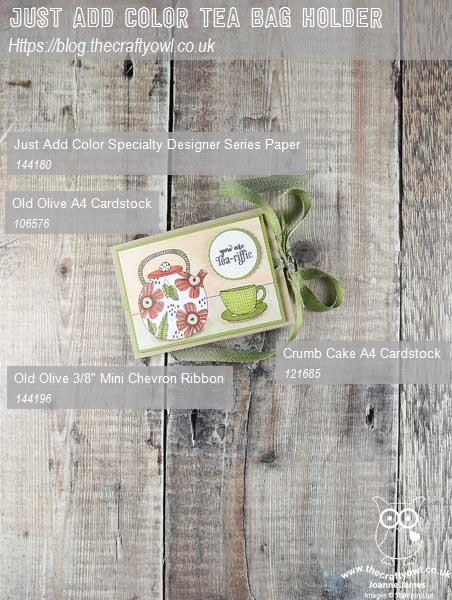
Anyone For Tea? - Having completed my card, I was left with an offcut of DSP with a teapot and teacup. Rather than put this in my scrap box never to be seen again, I decided to use it up so coloured it and made a little tea bag holder containing a few wrapped tea bags that I could gift with my card. I also added a sentiment from the retired set 'Have A Cuppa', mounted on a punched scallop circle - here it is:


I cut my tea bag holder larger than was actually needed to accommodate the tea bags, as I didn't want to cut down the DSP; I just made my wrap and tea bag envelope holders, made with the Envelope Punch Board, slightly larger too. This is what it looks like on the inside - I used some Whole Lot of Lovely designer series paper for my little tea bag envelope pockets:


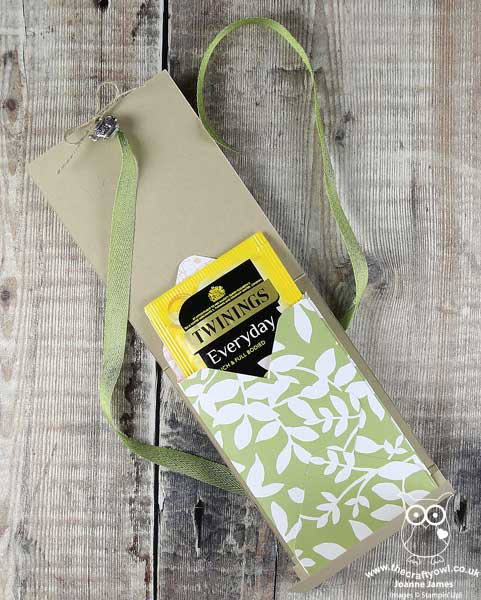
Did you spot the little tea pot trinket embellishment too? This is retired but it's at times like this I'm so glad I hoard these bits and pieces, as it finished off my package a treat :-) I love this fun set - I think I might send it to my Mum, as she is a keen tea drinker too.

Here is the visual summary of the key products used on today's project for you to pin for easy reference:


You can see all of my Product and 'How To' summaries on my 'How To - Tips and Techniques' Pinterest board in case you've missed any. 

Before you reach for your ink and papers, check out what our amazing team has created to inspire you this week:

Here's a quick recap of our challenge rules:
 
1.  Create a new paper project
2.  Upload your creation to your blog with a link back to us and provide a direct link to the post featuring your challenge submission.
3.  Please link your card to no more than four challenges, TOTAL.
4.  Have FUN!

I can't wait to see how you interpret this week's theme and look forward to visiting your blogs this week! Enjoy the rest of your weekend - we have a 3 day weekend here in the UK as it's a national Bank Holiday on Monday and for once the weather is glorious, so I will definitely be outside making the most of it. I'll be back tomorrow with another project; until then, happy stampin'!


Stampin' Up! Supplies Used: 

Table built using Product Table Builder by The Crafty Owl - Independent Stampin' Up! Demonstrator.

Love What You Do Friend Card

by Joanne James3. May 2018 20:00

It's clear many of you are enjoying the early release of the Share What You Love Suite (if you missed it, you can read all about it in Tuesday's post here) so today I thought I would share a card that I made as one of my make and takes at Stampin' Up!'s recent Onstage event featuring lots of the products in this fabulous suite - take a look:


The card base is the returning Mint Macaron with a little tone-on-tone stamping, then there is layering of vellum, Share What You Love Designer Series Papers and embellished with a pearlised doily, velvet ribbon and the Share What You Love Artisan Pearls. Finished with one of the sentiments from the Love What You Do stamp set, this card shows just how easy it is to create fresh, beautiful cards with this suite and the Gotta Have It All bundle.

Here is the visual summary of the key products used on today's project for you to pin for easy reference:


You can see all of my 'How To' summaries on my 'How To - Tips and Techniques' Pinterest board in case you've missed any. 

Enjoy your day and I'll be back tomorrow with another project. Until then, happy stampin'!


Stampin' Up! Supplies Used:

Table built using Product Table Builder by The Crafty Owl - Independent Stampin' Up! Demonstrator.

Share What You Love Suite Early Release Available From Today!

by Joanne James1. May 2018 09:00


We know that a new catalogue is always a highly anticipated event, so the lovely people at Stampin' Up! have decided to offer a little something to whet your appetite and is releasing the Share What You Love Suite in advance of the catalogue going live and better still - it can be yours from today!


The Share What You Love Suite has been designed to celebrate Stampin' Up!'s 30th anniversary and is a tribute to all of the people who have made - and continue to make - Stampin' Up! what it is today: employees, demonstrators and you our customers. Featuring delicate florals and a pearl theme throughout, the suite contains two stamp sets and lots of co-ordinating embellishments and accessories. For those who choose to join us in celebrating the good times during the month of May and the early release, there is also the opportunity to receive your very own exclusive Statement Of My Heart single stamp, detailing the Stampin' Up! mission statement:

The Share What You Love Suite Early Release will be available as three exclusive bundles, suitable for every crafter. This is what each of the bundles looks like in more detail:


The Just Getting Started Bundle is aimed at the new crafter - it contains an acrylic block, stamps, ink and paper and some free envelopes - everything you need to get started and create beautiful, simple projects. You can purchase it by clicking on the link to my online store below:

Table built using Product Table Builder by The Crafty Owl - Independent Stampin' Up! Demonstrator.
 
The second bundle is called 'A Little More, Please':


If you're the kind of crafter that likes to add a little something extra to your projects, then The A Little More Please bundle is for you. Containing not one but two stamp sets, additional coloured cardstock and some beautiful embellishments to enable you to 'step up' your projects. In addition to a free pack of envelopes, you will receive the Share What You Love Embellishment kit for free too, containing a ton of extra bits and pieces and contained in a beautiful presentation box that you can reuse too. You can purchase it by clicking on the link to my online store below:

Table built using Product Table Builder by The Crafty Owl - Independent Stampin' Up! Demonstrator.


And finally we have the 'Gotta Have It All' bundle:

Last but by no means least we have the ultimate crafter's companion - if you really do need to have it all, then this bundle is for you: in addition to the items above you will also receive the beautiful Share What You Love Designer Series Paper with pearlescent detail, an embossing folder and that Statement of My Heart stamp set as an additional free gift. You can purchase it by clicking on the link to my online store below:

Table built using Product Table Builder by The Crafty Owl - Independent Stampin' Up! Demonstrator.


This bundle costs £118.75, but could be yours for just £99 if you join my team. This suite of products has everything you need to get started with classes, parties and workshops if that's your thing, or perhaps you just like the idea of being in crafting heaven with lots of beautiful new items to craft with and would like to enjoy an ongoing discount on future product purchases. 

If you would like to see each of these bundles in more detail, Stampin' Up! have created this great video for you:


I am excited to be creating with this fabulous new bundle of products and look forward to sharing lots of samples with you in the near future. If you have any questions or would like to chat with me about how to obtain the Gotta Have It All Bundle as part of a starter kit, then do get in touch - I would love to hear from you.

Enjoy your day and I'll be back tomorrow with another project. Until then, happy stampin'!

Let The Good Times Roll Extended Rollercoaster Card

by Joanne James30. April 2018 07:00

Happy Monday everyone! I have the first of this month's technique classes today so my day will be a busy one but I'm early with today's post - yay! I'm sharing a card for this week's challenge over at Freshly Made Sketches where Amy has the following sketch:

I needed a couple of birthday cards for young boys, so decided to break out my 'Let The Good Times Roll stamp set and create a fun rollercoaster scene - take a look:


 Here's the low-down on today's card:

A Thrilling Ride - The wide central panel of Amy's sketch allows for lots of options and what could be better for a child's birthday card than a brightly coloured rollercoaster with presents and balloons? The space allowed me to create a fun little scene and whilst I haven't used the pop-up elements that make these thinlits unique, I did pop the rollercoaster and a couple of clouds up on dimensionals for a little extra lift. 

The Longest Rollercoaster EVER! - Having had the idea for my card, I wanted the rollercoaster to extend across the entire width of my cardfront, whereas the actual stamp covers only about two-thirds of the card. I overcame this by masking off the left edge and base, and then having stamped the rollercoaster stamp once in its entirety on the right-hand side, I inked it again and matched up the top of the largest curve with the left-hand edge to continue it across the page. I then drew in the closing edge and baseline with my Crumb Cake Stampin' Write marker. This sounds more complicated than it was to execute, especially as the stamp is photopolymer so easy to line up.

Birthday Memories Stripes - I used the rainbow stripes of the retiring Birthday Memories designer series paper for the background panel and as the inspiration for the bright colour scheme for the rest of my card, picking out 4 key colours for my rollercoaster. I also added a sentiment and another rollercoaster car complete with gift to the inside of my card too, just to finish off:


Here is the visual summary of the key products used on today's project for you to pin for easy reference:


You can see all of my 'How To' summaries on my 'How To - Tips and Techniques' Pinterest board in case you've missed any. 

Enjoy your day and I'll be back tomorrow with another project and news of a fabulous new suite that is on early release from the new annual catalogue - exciting stuff! Until then, happy stampin'!


Stampin' Up! Supplies Used:

Table built using Product Table Builder by The Crafty Owl - Independent Stampin' Up! Demonstrator.

Flying Home Baby Card For The Paper Players PP391

by Joanne James29. April 2018 09:00

It's Sunday and time for this week's new challenge over at The Paper Players! It just so happens there are 5 Sundays in April, so we have an extra challenge week! It's my turn to host and as it's tic-tac-toe week there really are so many creative possibilities. Check out my board: 


Choices, choices! I decided to use this week's sketch over at Just Add Ink for my layout and grabbed my Blends again for a spot of colouring to share with the teams at Stamp Ink Paper and SUO Challenges and went across the bottom of my board - yellow, circle, bird (my card also works for the central column of die-cut, ribbon, circle too) - for a sweet baby card, take a look:


Here's the low-down on today's card:

Flying Home - I love the bird house designs in this set and will be sad to see this set retire next month. Perfect for welcome cards - new home, new baby or even new team member - the selection of images are perfect for colouring too. This is the first time I've used this sweet mama bird and her babies; I went with bright yellow for a unisex baby card and coloured with my Blends; I actually made a whole batch of these so that I have some blanks and can colour the other birds specifically pink or blue too if I need something a little more tailored. 

Circles, Circles - There are lots of different circle elements to my card: the Picture Perfect Party background paper has a fun circle pattern and my main image has been cut out with the largest of my Stitched Circle Framelits. Even the sprinkle of Pool Party sequins add to the theme.

What No Bear? - My sentiment comes from the 'Baby Bear' stamp set. split between the little front banner and finished on the inside of my card. No bears, just birds on today's baby card ;-). Here's a look at the inside, finished off with a couple of yellow birdies too:


Here is the visual summary of the key products used on today's project for you to pin for easy reference:


You can see all of my Product and 'How To' summaries on my 'How To - Tips and Techniques' Pinterest board in case you've missed any. 

Before you reach for your ink and papers, check out what our amazing team has created to inspire you this week:

Here's a quick recap of our challenge rules:
 
1.  Create a new paper project
2.  Upload your creation to your blog with a link back to us and provide a direct link to the post featuring your challenge submission.
3.  Please link your card to no more than four challenges, TOTAL.
4.  Have FUN!

I can't wait to see what you create with this week's board - there really are so many different combinations! I'm so looking forward to visiting your blogs this week! Enjoy the rest of your weekend as it will be over all too quickly. I'll be back tomorrow with another project; until then, happy stampin'!


Stampin' Up! Supplies Used: 

Table built using Product Table Builder by The Crafty Owl - Independent Stampin' Up! Demonstrator.

Bring On The Sunshine #GDP135

by Joanne James28. April 2018 19:30

Well, the brief visit of warm weather here in the UK last week was short-lived; we are back to the cold and wet, with it having rained pretty much for two days straight! If this continues I think I'm going to have to issue my poor chickens with arm bands (aka water wings for my American readers!) In the hopes of willing a change in the forecast, I thought I'd play along today with the challenge over at Global Design Project, using the layout over at CAS Colours and Sketches too:


My card also fits the middle column of the board over at TicTacToe Challenge: metallic, free, stripes. I went bold, with a nice bright yellow and some crisp white for my clean and simple card - take a look:


Here's the low-down on today's card:

Bring Me Sunshine - This cute little 'button' from the A Good Day stamp set works perfectly for a 'Show Me The Sunshine' theme. I stamped it in Tuxedo Memento Black on Whisper White and again on Smoky Slate cardstock, then fussy cut and paper-pieced the clouds back in place. This gives a little detail without too much dimension and provides contrast to my ombre yellow sun behind, which I coloured with my Stampin' Blends.  

Deckchair Stripes - This yellow and white striped paper is from the Tutti Frutti designer series paper stack, which I bought primarily for the non-fruity designs. It works perfectly for my bright, sunny card - it reminds me of stripy deckchairs on the beach!

Raindrop Sparkles - To finish my card, I added some of the teardrop-shaped clear epoxy shapes to my raindrops; they are bigger than the stamped raindrops, but I like the added interest this gives to my focal point.

Here is the visual summary of the key products used on today's project for you to pin for easy reference:


You can see all of my 'How To' summaries on my 'How To - Tips and Techniques' Pinterest board in case you've missed any. 

Here's hoping today's card brings back Spring here, even if we have to wait a while for summer - I'm not sure it will be enough to do the trick though, the weatherman was prediciting icy temperatures again with an outside chance of snow again early next week - yuk!

Enjoy your evening and I'll be back tomorrow with another project. Until then, happy stampin'!


Stampin' Up! Supplies Used:

Table built using Product Table Builder by The Crafty Owl - Independent Stampin' Up! Demonstrator.

Sweet Soiree 18th Birthday Card

by Joanne James26. April 2018 20:30

I've had a few cards to make of late for milestone birthdays so thought I'd share one of them today, that uses last week's Freshly Made Sketches layout as inspiration - take a look:


I decided to use up some of the leftover bits and pieces from my Sweet Soiree Embellishment Kit (I just love this - it really does keep on going!) and layer a cake with some of the flowers, along with a silver doily, a circle of silver spotted acetate and a proper sparkly die cut sentiment  - so glad these 'Celebrate You' thinlits from this year's Sale-A-Bration offering are carrying over to the new annual catalogue. A background of co-ordinating Sweet Soiree paper and no stamping - well not on the front of my card anyway! I did stamp on the envelope and on the inside of my card:


I also added some numbers from the kit and a strip of foil washi tape to the inside of my card just to finish things off. Suitably special without being too over the top, I think - I'd love to hear your views, do feel free to leave me a comment below!

Here is the visual summary of the key products used on today's project for you to pin for easy reference:


You can see all of my 'How To' summaries on my 'How To - Tips and Techniques' Pinterest board in case you've missed any. 

I'll be back tomorrow with another project. Until then, happy stampin'!


Stampin' Up! Supplies Used:

Table built using Product Table Builder by The Crafty Owl - Independent Stampin' Up! Demonstrator.

Magical Mermaid for CTS268

by Joanne James25. April 2018 20:30

Another busy day today catching up on household admin today, but just time to share a card for this week's challenge over at CAS(E) This Sketch:

For some reason I had lots of ideas for this sketch, which is a pretty good job since the first card I made featured a couple of pens from the Crafting Forever set and a 'Just a Note' sentiment and my lovely Paper Players teamie and friend LeAnne posted one that was almost identical! You can see her card here; I decided that instead of posting my card that was so similar, I would work up one of my other ideas and got out my Magical Mermaid stamp set for some aquatic fun - take a look:


I stamped the seaweed twice and added my sentiment below as per the sketch, creating an ombre effect by sponging the sentiment stamp with Melon Mambo, Bermuda Bay and Tranquil Tide before stamping and fussy cutting a gold embossed starfish. The real star of this card though is the mermaid: I stamped her in Versamark and heat embossed in gold, then coloured her by sponging ink and blending lots of pinks and aquas to create her tail, before covering with a liberal does of clear Wink of Stella, fussy cutting and popping her on some dimensionals for extra lift. I also allowed her to sit slightly off the edge of the card for added interest.

This really is one of those cards where the photo doesn't do my card justice - it is so shimmery and sparkly in real life and the blended tail colour so pretty. Try as I might though I could capture the effect on film, so you'll just have to take my word for it! I did take a quick picture of the inside too, with its seaside border:


I think this is the first time I've blogged a card using this set, but it is actually getting lots of use as I've recently decorated Rebecca's room and one of her bed sets has mermaids on it, so we are in the process of using this set to create some fun wall art and home decor pieces. 

Here is the visual summary of the key products used on today's project for you to pin for easy reference:


You can see all of my 'How To' summaries on my 'How To - Tips and Techniques' Pinterest board in case you've missed any. 

I'll be back tomorrow with another project. Until then, happy stampin'!


Stampin' Up! Supplies Used:

Table built using Product Table Builder by The Crafty Owl - Independent Stampin' Up! Demonstrator.

A Little Wild Elephant Baby Boy Congratulations Card

by Joanne James24. April 2018 17:00

With the birth of a Royal baby yesterday, a second son and third child for the Duke and Duchess of Cambridge, it seemed only fitting today to share a card to welcome the arrival of a baby boy to the world that fits perfectly for the following challenges: 


I used both the sketch and photo inspiration over at Fusion and coloured my sweet baby elephant with my Smoky Slate Stampin' Blends for the challenge over at StampInkPaper - take a look:


 Here's the low-down on today's card:

A Little Wild Elephant - The little animals in the 'A Little Wild' stamp set are just the cutest and so perfect for a card to welcome a new arrival. Today's card just had to feature the elephant, given the Fusion photo inspiration; I also used a strip of retired designer series paper (from the A Little Foxy DSP stack) for my horizontal strip as it was perfect to tie my colours in together. 

It's All In The Curve - I decided to curve my sentiment to follow the line of my layered circle, so chose to use the 'congratulations' stamp from the Beautiful Bouquet set. It's photopolymer which means that even though it is a straight stamp, it is flexible enough to be moulded to an alternative shape.  

Fun On The Inside - One of the cute features of the 'A Little Wild' animal stamps is that as they are designed to work as a gift tag, they include both front and back of the animals. This doesn't preclude them from being used on cards - in fact, it's a fun way to decorate both the front and back of your envelope and the inside of your card. I added a sentiment from the same stamp set, a strip of left over DSP and a cute enamel heart  - and for once, I remembered to take a photograph to share it with you! Here it is:

How sweet is that?! The blues could easily be switched out for pinks to make a girl card with the same details - an idea for another day, perhaps!

Here is the visual summary of the key products used on today's project for you to pin for easy reference:


You can see all of my 'How To' summaries on my 'How To - Tips and Techniques' Pinterest board in case you've missed any. 

Enjoy your evening and I'll be back tomorrow with another project. Until then, happy stampin'!


Stampin' Up! Supplies Used:

Table built using Product Table Builder by The Crafty Owl - Independent Stampin' Up! Demonstrator.

Mini Catalogue

BROWSE THE CATALOGUE

The mini catalogue is now live! Read and download your copy here.

Shop Online

Access my online shop 24 x 7, 365 days of the year:

Current April hostess code:

VDKNV7BH

Shop Online

Join My Team

It's always a great time to join Stampin’ Up! New team members can get £130 worth of products for only £99 + free business supplies + free shipping + all the fun being a part of Stampin’ Up! Stampin' Up! has something for everyone: join my growing team and benefit from my support to enjoy Stampin' Up! however you choose.

If you're interested, call me for a chat to understand how I can help you realise your goals. Alternatively, if you have already decided to sign up and you just can't wait, please click here for the link to the online form where you can sign up and order your starter kit right away! 

Latest Kit!

Stampin Cut and Emboss

The Rock Legend Kit has all you need to make 8 cards with coordinating envelopes. Along with the new Panda Friends Kit, both are available from January 4th for just £14 each - get yours here!

2023-24 Annual Catalogue

BROWSE THE CATALOGUE

Click on the catalogue for a full list of current SU! supplies - if you would like to order any of the items featured, please drop me a line at [email protected] or give me a call on 07773 421446 - I'd be happy to help.

New Online Exclusives

There are new products available exclusively in the online store from 5 March - check them out here.

About Me

Hi I'm Joanne and live in Northampton and when I'm not looking after my husband and two beautiful children, am an avid crafter with a passion for all things Stampin' Up!

I must confess that I have never been a big rubber stamper - until I discovered Stampin' Up! that is. I love the fact that I can get such great results with co-ordinating stamps, inks, papers and punches - the possibilities are endless! Join me on my stamping journey as I share the things I love and be inspired to create amazing things yourself!

Follow Me

Monthly Newsletter

Box Builder

Click the button above to use Box Buster to create your custom box design using the Envelope Punch Board!

Kits Collection Now Available!

Stampin Cut and Emboss

The new Kits Collection from Stampin' Up! is now available!

Click here to see the current kits available and order yours online today.

I Design For


Stampin' Up Stuff

This is my personal blog and is not endorsed by Stampin’ Up! I hope you find it a plentiful source of ideas and personal inspiration but please don't copy my designs for contest submission or use for classes, publication or sale without express permission.