Lighthearted Leaves And The Joys of Colouring!

by Joanne James17. August 2015 09:49

Happy Monday everyone! Today I have a card for a couple of challenges: Freshly Made Sketches and Colour Q:


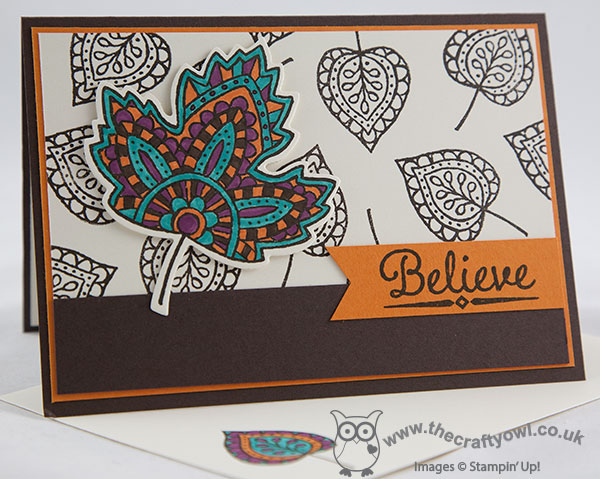
I love the Colour Q colours this week and I was inspired by the pattern in the inspiration photo and since this week's Freshly Made Sketch can be interpreted in so many ways, I decided to marry the two together with my Autumn-inspired cards. Yes, not one but two cards today - both similar but different and showcasing one of my favourite non-Christmas sets from the new seasonal catalogue - Lighthearted Leaves. Here is my first card:

So time for a confession: I have been mourning the loss of my Blendabilities for months now and as a result haven't done much colouring. However, this set made me decide I needed to snap out of it and revisit my Stampin' Write markers properly and get down to some serious colouring. I spent a pleasant few hours on Saturday just colouring in and was pleasantly reminded of just how relaxing it can be to just sit and colour.

Colouring in is a proven and recommended activity to de-stress (you can read an interesting article about the benefits of colouring as a method of relaxation here) and with our dual-tipped, refillable Stampin' Write markers, in a rainbow of 48 colours to choose from, it's not tricky to get amazing results! For the card above, I used a base of Early Espresso with a mat of Pumpkin Pie, followed by a mat of Very Vanilla which I background stamped with one of the small leaf designs from the set. The new permanent Basic Black and Basic Grey archival inks that are arriving with the seasonal catalogue are perfect for stamping images to colour in (especially if you want to watercolour - more on those another day!), however to tone in with my card I stamped the large maple leaf in Early Espresso on a separate piece of Very Vanilla cardstock and cut it out with my Big Shot and the co-ordinating Leaflets Framelits (gotta love co-ordinating framelits!) and coloured this leaf in each of the challenge colours. After adhering a panel of Early Espresso along the bottom of the panel, and my sentiment stamped onto a banner flag of Pumpkin Pie, I adhered my maple leaf with dimensionals to the front of my card.

I also created another card using the same set but with an alternative sentiment and a background created with one of the other leaves in the set:

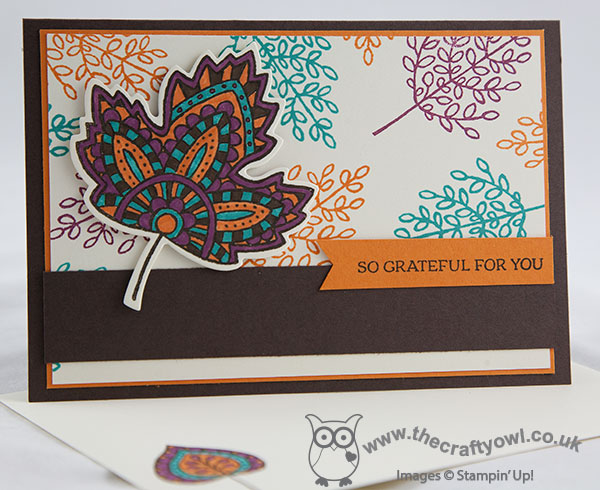
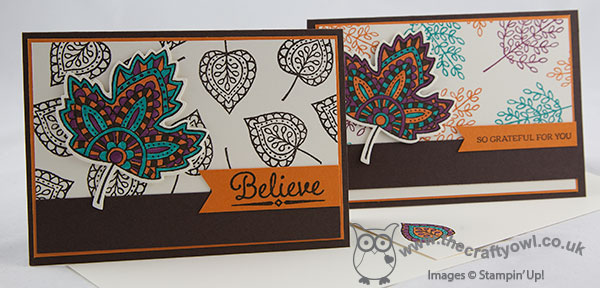
This was actually the first card I created and is slightly more inspired by the Colour Q photo, but I decided I wanted a background that was more neutral to allow my multi-coloured leaf to stand out more.  I so enjoyed myself, I even stamped and coloured the inserts and co-ordinating Very Vanilla envelopes for both cards - how about that?! Opinion in my house is divided though as to which one is preferred, with the card above proving slightly more popular than the one I'm entering for the challenges today. So what do you think? Which one is your favourite? Do let me know today in your comments below.

I am enjoying a week of child-free mornings this week, as both James Juniors are taking part in Basketball Camp each day, so hopefully this will mean nice early blog posts and that I can get ahead of myself a little for once. I'm making the most of a few hours of me-time each day - a rare thing during the summer holiday season!

Back tomorrow with another card and a sneak-peek of some great new Christmas products. until then, happy stampin'!


Stampin' Up! Supplies Used:

* Lighthearted Leaves - available September 1st

Table built using Product Table Builder by The Crafty Owl - Independent Stampin' Up! Demonstrator.


Beach Hut Punch Art Card For The Paper Players!

by Joanne James16. August 2015 11:00

It's Sunday and you know what that means: time for a new challenge over at The Paper Players! This week it is the turn of my good friend the super-talented LeAnne to host and she has a great clean and simple challenge for you:


With the arrival of my Autumn-Winter seasonal catalogue pre-order goodies last week I have been catapulted forwards into the festive season and this card was a challenge, especially since the weather in the UK has been anything but summery this week! In an effort to bring me back to summer, I got to thinking about what the beach means to me: on the one hand it conjures up memories of warm Carribean seas and scuba diving on coral reefs, but on the other hand where my children are concerned, it's all about paddling in the waves, sandcastles, stripy deckchairs and beach huts, so often found along UK beaches. So whilst my card doesn't feature sun, sand or sea this week, it does feature a couple of beach huts and some stripy paper reminiscent of old fashioned deck chairs. Here's my card, using the challenge sketch over at Fab Friday for my layout:


I used Pacific Point for my base, and used a piece of Schoolhouse DSP for my stripy layer (this so reminds me of deckchairs!) I followed this with a panel of Pool Party on which I placed my punch art paper-pieced beach huts: I punched two huts using the now-retired Arrows Punch (you could just as easily cut freehand though or combine square and triangle punch shapes) from the whitewashed woodgrain pattern in the Farmers Market DSP then added brightly coloured roofs and doors. A simple sentiment banner edged with some retired Epic Day washi tape and finished with a Daffodil Delight button and grey baker's twine finishes my card. My card does have a few more layers than I would like for a truly CAS card, but I kept my design simple with minimal embellishments, so I'm hoping I've more or less managed to meet the brief! 

Before you reach for your ink and papers, check out what our amazing team has created to inspire you this week:

The Paper Players Design Team
Anne Marie Hile - on leave
 
 
Here's a quick recap of our challenge rules:
 
1.  Create a new paper project
2.  Upload your creation to your blog with a link back to us and provide a direct link to the post featuring your challenge submission.
3.  Please link your card to no more than three challenges, TOTAL.
4.  Have FUN! 

For my international readers who may never have seen beach huts along the UK coast before, here's an old photo of mine at the seaside when my daughter was small - you can see the colourful little beach huts along the edge of the beach in the background:


Happy days! So what images does the beach conjure up for you? I look forward to seeing your clean and simple beach-themed creations in the gallery this week. I'm having a relaxing day at home today with the family. I'll be back tomorrow with another card (or two!). Until then, happy stampin'! 


Stampin' Up! Supplies Used:

Table built using Product Table Builder by The Crafty Owl - Independent Stampin' Up! Demonstrator.


Cup of Cheer Meets Home For Christmas Card

by Joanne James15. August 2015 22:14

Here's today's post - a little later than planned due to the activities of the day! - with a Christmas card I made for this week's Mojo Monday challenge:

Having unpacked my new seasonal pre-order goodies (demonstrator perks - let me know if you would like to know more!!), I have been keen to use some of new supplies. There's nothing like some new goodies to get you in the crafting mood! Here is my card, featuring the gorgeous holly pattern from the 'Home For Christmas' DSP and one of the stamps in the new 'Cup Of Cheer' stamp set:

I matted my paper with Mossy Meadow on a Real Red card base and in addition to a thin circle of Real Red cut with my Circle Framelits, I used my framelits to cut another circle of Mossy Meadow which I used to mat my focal sentiment - this gorgeous stamp from the 'Cup of Cheer' stamp set. I stamped this sentiment in two stages, firstly masking off the outer wreath and stamping the centre with Versamark, then removing the mask and colouring the outer wreath in Mossy Meadow using my Stampin' Write marker. I then heat embossed the centre using gold embossing powder and added a few tiny pearl berries that I coloured with my red copic marker to finish, before punching out with my 2 1/2" circle punch. This card looks so lovely in real life - the sentiment is so shiny and the wreath has a dusting of gold too where the green ink was also slightly wet still prior to embossing. The photo really doesn't do it justice! Did you notice my bow too? This is some of the new Gold Cording Trim (it comes in silver too!) - love this!

This is actually the second card I made using this sketch; having made the first one, when I went to upload it to the gallery I saw one that was very similar to it, so I decided to go back to the drawing board to come up with something different. I love my first card though - rest assured I will be sharing it with you later this week!

Back tomorrow with a new challenge over at The Paper Players - and not a Christmas card in sight! Until then, happy stampin'!


Stampin' Up! Supplies Used:

*Cup Of Cheer - available September 1st

*Home for Christmas Designer Series Paper - available September 1st

*Cording Trim - available September 1st

Table built using Product Table Builder by The Crafty Owl - Independent Stampin' Up! Demonstrator.


Football Circle Thinlit Birthday Card

by Joanne James14. August 2015 09:00

Today I'm sharing the birthday card I made for Ben to celebrate his 8th birthday. Basketball and football are his two sporting passions and lately he has been football mad. He also has a belief that pop-up cards are the best; whilst this isn't quite a pop-up, it does have a fun flip element with the Circle Thinlit card base - here's my card:

I used Soft Sky for my base and built my football out of a 2 1/2" circle punch and black and white hexagons and decorated my card with some grass cut with my fringe scissors and a bunting banner and greeting from Celebrate today, complete with personalisation using the Epic Alphabet set.

This card actually came together surprisingly quickly and Ben loved it - I'd forgotten quite how much fun a circle thinlit card could be! Here is a picture of the birthday boy blowing out the candles on his amazing birthday cake, made by one of my extended family, the super-talented Helen Vowles:


Ben declared his basketball cake the best ever and was mighty impressed. If you live in Northampton I would urge you to check out Helen's Facebook page here - she really does make the most amazing cakes! Here's another photograph of him in the garden trying out his new goalie gloves (don't look too closely at my lawn, it really doesn't appreciate being used as a football pitch!):


8 years old - my, where did those years go??!

That's all from me today; back tomorrow with another project - a Christmas card, no less! Until then, happy stampin'!


Stampin' Up! Supplies Used:

Table built using Product Table Builder by The Crafty Owl - Independent Stampin' Up! Demonstrator.


Cacti Galore!

by Joanne James13. August 2015 08:05

Today it's time for a new challenge over at Create With Connie and Mary and this week we have a great colour challenge for you:


I actually have two cards for you today. I saw this colour combination and immediately thought of cacti and deserts - yes, really! Here's the first card - can you guess what stamp I used to create my cactus plant?

To create my cacti I used a neat little trick that I saw on Becky Cowley's blog here - using one of the Watercolour Wings butterflies to stamp the cactus shape - isn't that clever?!

I placed my cactus in a flowerpot cut out of kraft cardstock with the Handpicked Framelits and topped it with flowers punched from the Itty Bitty Accents punch, with candy dot centres. To finish my card, I added some Tangerine Tango bakers twine that I had leftover from an old Tag-a-Bag accessory kit (you could use white as an alternative). I'm not sure my cactus on this card is quite as convincing as Becky's version, but I love the idea all the same. It's great when a stamp set offers the flexibility to do more with it than intended - and this one certainly does! 

This colour combination appealed to me more than I first thought it would, so having created the above card I then created another - still with my cactus theme, although this card uses the cactus from the 'Yee Haw' set which I understand is now sold out (boo hoo - I love this set!):

I used Cucumber Crush for my base and two of the co-ordinating DSP patterns in the Cherry on Top stack on my card - one for the mat and the other for my paper-pieced cactus, which is stamped using the 'Yee Haw' stamp set. My sky is stamped using 'Work of Art' in Pacific Point, with the sand in Tangerine Tango using one of the stamps in the Sheltering Tree set. To finish I fussy-cut my bright orange sun from the lovely hostess set, Silhouettes and Script, and popped it up on dimensionals.

Do visit the other Design Team members to see how they used this week's challenge colours; there's lots of inspiration over on their blogs too!

Enjoy your day and I'll be back tomorrow with another project; until then, happy stampin'!


Stampin' Up! Supplies Used:

  • Cherry On Top Designer Series Paper Stack
  • Cucumber Crush Classic Stampin' Pad
  • Cucumber Crush A4 Cardstock
  • Pacific Point Classic Stampin' Pad
  • Tangerine Tango Classic Stampin' Pad
  • Silhouettes & Script Wood-Mount Stamp
  • Whisper White A4 Cardstock
  • Sheltering Tree Photopolymer Stamp Set
  • Work Of Art Clear-Mount Stamp Set
  • A Dozen Thoughts Clear-Mount Stamp Set
  • Watercolor Wings Photopolymer Stamp Set
  • Punch Corner Project Life
  • Pacific Point A4 Cardstock
  • Handpicked Framelits Dies
  • Kraft 12" X 12" Cardstock


New Wednesday Weekly Deals Are Here!

by Joanne James12. August 2015 09:00

It's Wednesday and you know what that means: a new collection of Wednesday Weekly Deals! The same as last week there are more offers than usual, with increased reductions of up to 30% on Weekly Deals this month, although there are specific allocated quantities at the increased offer price; once they're gone, the price will revert to RRP, so don't delay in ordering if there is something on your wish list. Each week items are proving very popular and some are sold out within a couple of days of the offers being published. As always, a new collection of deals will be announced next Wednesday.

If you want to take advantage of any of the deals on offer, you can support my business by placing your order online by clicking here or using the link to my store on the right hand side of my blog page where it says 'Shop Online' or with me in person. Don't forget to add the new Hostess Code for August SCFAMEG2 if your order is under £150 and be sure to make sure that you don't check the 'no contact' box if you'd like to be kept updated with the progress of you order and receive a little thank you in the post from me. 

Here's a summary of this week's one-week only Wednesday deals - click on each item to go to the online store to purchase:

Table built using Product Table Builder by The Crafty Owl - Independent Stampin' Up! Demonstrator.

More great deals this week - the in-colour blossom accents and epoxy stickers are great deals for cute embellishments but my favourite weekly deal this week has to be the Scalloped Tag Topper Punch - this is my 'go to' tag punch and is perfect to get a headstart on Christmas gift tags, so at the reduced price of £15.75 it's one to snap up this week! 

That's all from me; back later with today's creative post. Until then, happy shopping!

Among The Branches Spooky Halloween One Layer Card

by Joanne James11. August 2015 09:00

Today is Ben's 8th birthday and after my technique class this morning, we will be celebrating for the rest of the day. I will share Ben's birthday card with you tomorrow; I didn't have much time for crafting yesterday, but having received my seasonal pre-order goodies the urge to play with new toys was strong, so I did manage to squeeze in a quick card for this week's one layer challenge over at Less Is More where they have a fun theme of 'the eyes have it' - here's my card:

My 'white space' today is Crushed Curry yellow as I really wanted the negative space for the eyes on my 'spooky' Halloween stamp from the new 'Among The Branches' stamp set to look like something fearsome - did it work?! I stamped my image on the inside of the card in Memento Black ink, then used my circle framelits and Big Shot to cut a hole in the front of my card, which I also embossed with the new Woodland textured Impressions Embossing Folder. I just love this embossing folder - this is one of those versatile items that I'm going to get lots of use from. I resisted the urge to add some ribbon or twine - I know how those lovely LIM ladies like their space - less, is after all more!

My box of pre-order goodies is just fantastic and has so many fabulous sets, for Autumn, Halloween and Christmas - I can hardly wait to get creating so that I can share more with you! I will be packaging my catalogues to be sent out to my local and online customers before the end of the month; if you don't already have a demonstrator and would like me to send you a seasonal catalogue get in touch with your contact details and I will add you to my mailing list.

Back tomorrow with Ben's birthday card and a peek at his birthday cake; until then, happy stampin'!


Stampin' Up! Supplies Used:

*Among The Branches - available September 1st

*Woodland TIEF - available September 1st

Table built using Product Table Builder by The Crafty Owl - Independent Stampin' Up! Demonstrator.


It's A Boy Sweet L'il Things Congratulations Card

by Joanne James10. August 2015 08:00

Happy Monday everyone! I am starting my week with a fun birth congratulations card for the challenges over at Freshly Made Sketches and Pals Paper Arts this week:

   Ppa262

I love the sketch but was initially perplexed when I saw the PPA colours this week as I wasn't sure I could make the Mint Macaron and Pool Party work together; I loved the colour combo though so thought I'd give it a bit more consideration and this is what I came up with:

With both Pool Party and Tip Top Taupe featuring in the Sweet L'il Things Designer Series paper pack, I decided to go with a new baby card - a boy of course! I just love the cloud pattern on the DSP sheet (it comes in the alternate colourway of Pool Party cloud outlines on Very Vanilla too) and whilst this is by no means only of use for a baby card, it provided the perfect backdrop for my little panel of 'zzzzz's' and my Very Vanilla panel with cute Pool Party babygro cut using my Baby's First Framelits. I paper-pierced the babygro to add interest and added a 3/4" Very Vanilla circle with a Mint Macaron punched heart, that I covered with one of the heart-shaped Itty Bitty Accents Epoxy Stickers - this looks so lovely in real life! The heart and banner were just enough Mint Macaron I think with the other two colours and I'm so pleased with my final card. It also made me realise just how much I love Tip Top Taupe - this isn't a colour I've used much at all to date, yet its soft tones work so well with pastels and paler colours, I must try and use it more often.

That's all from me; I am expecting a visit from my parents today, which is making Ben very excited since with his birthday tomorrow he is virtually assured of presents! - and I'm also expecting the arrival of my pre-order of SU! goodies from the new seasonal catalogue. I am beyond excited!!!

Back tomorrow with another project; until then, happy stampin'!


Stampin' Up! Supplies Used:

Table built using Product Table Builder by The Crafty Owl - Independent Stampin' Up! Demonstrator.


Sheltering Tree Swing Easel Card

by Joanne James9. August 2015 11:00

It's Sunday and you know what that means: time for a new challenge over at The Paper Players! This week it is the turn of my wonderful friend and talented crafter Claire, to host and she has a great colour challenge for you:


I immediately knew what stamp set I was going to use for my card this week - Sheltering Tree - and I wanted to have a go at making a swing easel card to showcase it. Here's my card:


The stamped panel is easy enough to create and uses all three of the challenge colours. I chose Old Olive as my main colour, with just a little Crumb Cake and Bermuda Bay to allow the latter to really stand out on the bicycle and border. I followed Amanda Bates tutorial here to make my swing easel card (there is a small correction required to the instructions - step 13 should say 'Line up at 5"' not 1"). She is a real whizz with fancy folds! I used two of the Old Olive patterns in the Pretty Petals DSP to decorate my card. The nice thing about this card is that it folds completely flat for mailing, so long as you keep the embellishments to a minimum as I have here:


I hope you like today's card. Before you reach for your ink and papers, check out what our amazing team has created to inspire you this week:

The Paper Players Design Team
Anne Marie Hile - on leave
 
 
Here's a quick recap of our challenge rules:
 
1.  Create a new paper project
2.  Upload your creation to your blog with a link back to us and provide a direct link to the post featuring your challenge submission.
3.  Please link your card to no more than three challenges, TOTAL.
4.  Have FUN! 

I look forward to seeing how you use Claire's chosen challenge colours on your cards in the gallery this week. This is a birthday weekend for us: the youngest of my James juniors will be 8 on Tuesday so following yesterday's birthday sleepover, today we will be continuing our birthday celebrations. 

Back tomorrow with another project; until then, happy stampin'!


Stampin' Up! Supplies Used:

Table built using Product Table Builder by The Crafty Owl - Independent Stampin' Up! Demonstrator.
 

Lots Of Joy Christmas Card

by Joanne James8. August 2015 22:11

I'm here with a quick post featuring the next Christmas card I promised featuring the Lots of Joy stamp set that can be found in the annual catalogue. I used this week's sketch over at The Paper Craft Crew as my starting point for this card:

PCCCS105-159-018-2

Again I combined the stamp set with some of the Merry Moments DSP, this time choosing the lovely plaid pattern that echoes the pattern of the tree:

I used the fun postage stamp-style stamp for two of my three squares down the side, so easily punched out with the 1" square punch, with the final one featuring the second part of my sentiment - I selectively inked the sentiment twice and then banner-cut the other piece and layered it underneath. Lovely traditional Christmas colours on this card and I think the plaid gives it quite a modern feel.

That's all from me today - come back tomorrow when we will have a new challenge over at The Paper Players and the lovely Claire will be the hostess. Until then, happy stampin'!


Stampin' Up! Supplies Used:

Table built using Product Table Builder by The Crafty Owl - Independent Stampin' Up! Demonstrator.


Mini Catalogue

BROWSE THE CATALOGUE

The mini catalogue is now live! Read and download your copy here.

Shop Online

Access my online shop 24 x 7, 365 days of the year:

Current April hostess code:

VDKNV7BH

Shop Online

Join My Team

It's always a great time to join Stampin’ Up! New team members can get £130 worth of products for only £99 + free business supplies + free shipping + all the fun being a part of Stampin’ Up! Stampin' Up! has something for everyone: join my growing team and benefit from my support to enjoy Stampin' Up! however you choose.

If you're interested, call me for a chat to understand how I can help you realise your goals. Alternatively, if you have already decided to sign up and you just can't wait, please click here for the link to the online form where you can sign up and order your starter kit right away! 

Latest Kit!

Stampin Cut and Emboss

The Rock Legend Kit has all you need to make 8 cards with coordinating envelopes. Along with the new Panda Friends Kit, both are available from January 4th for just £14 each - get yours here!

2023-24 Annual Catalogue

BROWSE THE CATALOGUE

Click on the catalogue for a full list of current SU! supplies - if you would like to order any of the items featured, please drop me a line at [email protected] or give me a call on 07773 421446 - I'd be happy to help.

New Online Exclusives

There are new products available exclusively in the online store from 5 March - check them out here.

About Me

Hi I'm Joanne and live in Northampton and when I'm not looking after my husband and two beautiful children, am an avid crafter with a passion for all things Stampin' Up!

I must confess that I have never been a big rubber stamper - until I discovered Stampin' Up! that is. I love the fact that I can get such great results with co-ordinating stamps, inks, papers and punches - the possibilities are endless! Join me on my stamping journey as I share the things I love and be inspired to create amazing things yourself!

Follow Me

Monthly Newsletter

Box Builder

Click the button above to use Box Buster to create your custom box design using the Envelope Punch Board!

Kits Collection Now Available!

Stampin Cut and Emboss

The new Kits Collection from Stampin' Up! is now available!

Click here to see the current kits available and order yours online today.

I Design For


Stampin' Up Stuff

This is my personal blog and is not endorsed by Stampin’ Up! I hope you find it a plentiful source of ideas and personal inspiration but please don't copy my designs for contest submission or use for classes, publication or sale without express permission.