Rose Wonder Wedding Wishes For Kylie Bertucci's International Blog Highlight LOVE

by Joanne James8. April 2016 09:30


Today the lovely Kylie Bertucci, an Australian Stampin' Up! demonstrator, is hosting an international blog highlight with the theme of 'love'. I am delighted to be taking part and since I have been working with the Rose Wonder stamp set and Rose Garden Thinlits a lot lately as they feature in one of my April Stamp technique Classes, I decided to use them to create a special wedding card to share with you today:

Whilst the photograph is lovely, I can't tell you just how pretty and sparkly this card is in real life! Every part of it shines. So here's the low down on today's card:

A White Wedding - Whilst white cards can be tricky to photograph, there is nothing more stunning for a special wedding card. I used shimmery white cardstock which has a wonderful subtle sparkle and lustre and is perfect for a special card. I also kept my roses white in colour, using Dazzling Diamonds glitter in its 'raw' state to add to the purity of my card. 

Roses, Roses - My regular blog followers will know that my style generally is very clean and layered and today's card is very typical of that. I decided to create an inset panel of roses using my Rose Garden Thinlits, cutting them to fit into a frame that I'd cut out using my Big Shot and Square Framelits. As an alternative to paper-piecing the outlines and centres, I decided to try something different: I backed my frame with acetate, turned it over and painted inside the rose outlines with Crystal Effects, then sprinkled it liberally with Dazzling Diamonds glitter and left it to dry. I then flipped it over again before adhering to my card. This creates a sparkle that will even outshine glimmer paper, but has the benefit of being contained within the frame so no worries about glitter shedding from the completed card. Bonus!

A Touch of Silver - The only colour other than white that I used on my card was silver, with silver foil for my background mat layer and for my heat embossed sentiment. Just enough to frame my card and enable my sentiment to stand out - well, you can't really read white-on-white can you?!  I did toy with adding some silver satin ribbon, but decided against it as it detracted from the clean lines of my frame. 

Here is the visual summary of the key products used on today's project for you to pin for easy reference:

You can see all of my 'How To' summaries on my 'How To - Tips and Techniques' Pinterest board in case you've missed any. 

Do check out the other cards in the blog hop for inspiration; I would love it if you could pop over and vote on my card in the gallery by clicking here - the designers of the cards with the most votes will get to participate in one of Kylie's monthly international blog hops, so your votes all count!

Back tomorrow with another project; until then, happy stampin'!


Stampin' Up! Supplies Used:

Table built using Product Table Builder by The Crafty Owl - Independent Stampin' Up! Demonstrator.

Sunburst Sayings and Thinlits Shine It's Your Day

by Joanne James6. March 2016 09:00

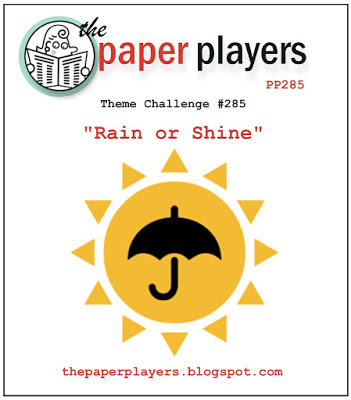
Firstly, happy Mothering Sunday to all UK mothers reading this - today is most certainly our day! It's also Sunday and time for a new challenge over at The Paper Players! It's the turn of the talented Sandy to host our challenge this week and she has a great theme for you to play along with:

    PPA-290-Mar03

I was all set to make a rainy day card for today's challenge but I couldn't get the idea in my head to work on paper - so some other time for that card! Instead I decided to use my Sunburst Thinlits and create a bright sunshine card which came together much more like my vision:


I used this week's sketch over at Pals Paper Arts for my layout and created a fun fold card, where the second part of my sentiment acted as a clasp to hold the left-hand panel closed. I used a panel of Daffodil Delight spotted Schoolhouse Designer Series Paper on the right-hand panel and on the left I stamped some sunshines in Versamark and heat embossed them with clear embossing powder. This sunshine is from one of the early limited edition Sale-A-Bration sets, 'Hello' and the good news is that availability of this stamp set has been extended while stocks last. You've still time to snap it up, but you'd better be quick!

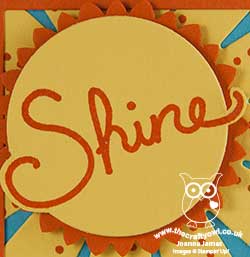
For my main square, I used a background of Tempting Turquoise to which I added a Daffodil Delight sunburst, edged with Tangelo Twist. For my sunshine centre, I stamped 'Shine' from the 'Sunburst Sayings' stamp set onto some Daffodil Delight cardstock and fussy cut the outer elements of the sentiment before cutting the remainder with a circle framelit, which allowed my sentiment to overhang. I backed this circle with a mat cut from a 1 3/4" scalloped circle punch, that I punched once then rotated and punched again to create the starburst effect - this is a neat little trick and perfect for this kind of design. It's also a great way to get a second shape from one punch. I then framed the whole square with a Tangelo Twist frame cut using my square framelits. The second part of my sentiment was cut with the washi tape thinlit from the Mini Treat Bag Thinlits set and I adhered this with a dimensional to the right so that it could serve to hold the fold shut. I just love the bright sunshine colours of today's card and the layering of all the elements within the focal square - this will certainly brighten someone's day. The 'Sunburst Sayings' stamp set and Sunburst Thinlit die are another of the great 'bundle and save' offers in the current seasonal catalogue, giving you a saving of 15% when you purchase them together - bonus!

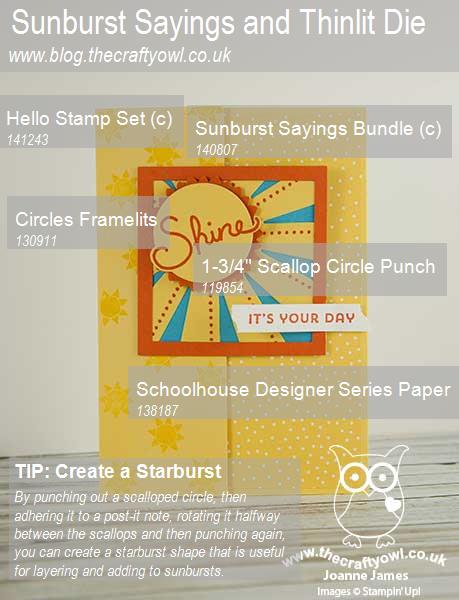
Here's today's visual summary for easy reference:


Thank you to everyone who has left me a sweet comment or feedback on these new graphics, which have been very well received; they make great Pins too!

Before you reach for your ink and papers, check out what our amazing team has created to inspire you this week:

The Paper Players Design Team
 
 
Here's a quick recap of our challenge rules:
 
1.  Create a new paper project
2.  Upload your creation to your blog with a link back to us and provide a direct link to the post featuring your challenge submission.
3.  Please link your card to no more than four challenges, TOTAL.
4.  Have FUN! 

I look forward to seeing what you create with our theme this week. We are off to basketball this morning with time for a special Mother's Day lunch before venturing out to a birthday party this afternoon. Not quite the restful Mother's Day I had in mind, but life goes on today as always and as my family frequently tell me "Every day is Mother's Day in the James Household!". I have been treated to cards, flowers and gifts today so I am feeling perhaps a little more loved than usual :-) 

I hope you all have an enjoyable Mothering Sunday, whether you are celebrating or are focused on other things today. Back tomorrow with another project; until then, happy stampin'!


Stampin' Up! Supplies Used:

Table built using Product Table Builder by The Crafty Owl - Independent Stampin' Up! Demonstrator.

Silhouettes & Script Sunny Day Card

by Joanne James21. January 2016 08:05

Today it's time for a new challenge over at Create With Connie and Mary and this week we have an interesting colour combination for you:


I struggled a little with this colour combo - having seen Lisa Martz, one of the other Design Team members, adorable chick card I couldn't see how to use these colours for anything else (does that ever happen to you when you see something that was in your mind's eye all along?!) Finally this week's sketch over at Retrosketches helped me out and I came up with this:


I used Lost Lagoon for my card base then covered this with a piece of the raindrop patterned paper from the Sale-A-Bration 'Wildflower Fields' designer series paper pack and a top layer of Whisper White, stamped with my 'hello' greeting in Memento Black. I added a bright red frame cut with my Big Shot and square framelits and a Hello Honey sun, also from the Silhouettes and Script' hostess stamp set, which I fussy cut and popped up on dimensionals. I added an epoxy heart, adhered to Real Red cardstock, as a little embellishment.

A super clean and simple card that brings these colours together in a slightly unconventional way; it might not be that chick, but I like it!

Do visit the other Design Team members to see what they did with this week's colours; there's lots of inspiration over on their blogs too!

Enjoy your day and I'll be back tomorrow with another project; until then, happy stampin'!


Stampin' Up! Supplies Used:

  • Silhouettes & Script Clear-Mount Stamp Set
  • Wildflower Fields Designer Series Paper
  • Squares Collection Framelits Dies
  • Big Shot
  • Whisper White A4 Cardstock
  • Tuxedo Black Memento Ink Pad
  • Lost Lagoon A4 Cardstock
  • Hello Honey Classic Stampin' Pad
  • Real Red A4 Cardstock
  • Itty Bitty Accents Epoxy Stickers

Nutcracker Christmas Greetings

by Joanne James4. December 2015 22:59

It's Friday and mine has been a busy one! I have another Christmas card for you today, this time using the sketch over at Mojo Monday where it's 'tall and skinny' week:

   SIP Any Challenge 25 800

I'm also linking up with the peeps over at Stamps, Ink and Paper since my card today uses a stamp from my current favourite set - Sparkly Season. Take a look:


I used the striped Home for Christmas designer series paper as the inspiration for the colour scheme for my card and chose Pacific Point blue as the dominant colour; an unusual Christmas colour, but combining it with red and a touch of green definitely makes it worthy. I coloured my little scene with my Stampin' Write markers and finished my framed image with a cute bow cut using my Big Shot from the Mini Treat Bag Thinlits set. I heat embossed my minimalist sentiment in black on one of my two banners and added a Mossy Meadow enamel dot to finish. 

My finished card measures 4" x 8 1/4" so of course needed a custom envelope, easily achieved with a sheet of red envelope paper, my trusty Envelope Punch Board and my Envelope Expert tool - a winner every time! If you haven't yet tried it or my Box Buster tool you should check them out - custom envelopes and boxes with perfect results every time!

I'll be back tomorrow with another project; until then, happy stampin'!


Stampin' Up! Supplies Used:

Table built using Product Table Builder by The Crafty Owl - Independent Stampin' Up! Demonstrator.


Sheltering Tree Swing Easel Card

by Joanne James9. August 2015 11:00

It's Sunday and you know what that means: time for a new challenge over at The Paper Players! This week it is the turn of my wonderful friend and talented crafter Claire, to host and she has a great colour challenge for you:


I immediately knew what stamp set I was going to use for my card this week - Sheltering Tree - and I wanted to have a go at making a swing easel card to showcase it. Here's my card:


The stamped panel is easy enough to create and uses all three of the challenge colours. I chose Old Olive as my main colour, with just a little Crumb Cake and Bermuda Bay to allow the latter to really stand out on the bicycle and border. I followed Amanda Bates tutorial here to make my swing easel card (there is a small correction required to the instructions - step 13 should say 'Line up at 5"' not 1"). She is a real whizz with fancy folds! I used two of the Old Olive patterns in the Pretty Petals DSP to decorate my card. The nice thing about this card is that it folds completely flat for mailing, so long as you keep the embellishments to a minimum as I have here:


I hope you like today's card. Before you reach for your ink and papers, check out what our amazing team has created to inspire you this week:

The Paper Players Design Team
Anne Marie Hile - on leave
 
 
Here's a quick recap of our challenge rules:
 
1.  Create a new paper project
2.  Upload your creation to your blog with a link back to us and provide a direct link to the post featuring your challenge submission.
3.  Please link your card to no more than three challenges, TOTAL.
4.  Have FUN! 

I look forward to seeing how you use Claire's chosen challenge colours on your cards in the gallery this week. This is a birthday weekend for us: the youngest of my James juniors will be 8 on Tuesday so following yesterday's birthday sleepover, today we will be continuing our birthday celebrations. 

Back tomorrow with another project; until then, happy stampin'!


Stampin' Up! Supplies Used:

Table built using Product Table Builder by The Crafty Owl - Independent Stampin' Up! Demonstrator.
 

New Wednesday Weekly Deals!

by Joanne James10. June 2015 12:04

It's Wednesday and you know what that means: a new collection of Wednesday Weekly Deals! This week's deals are included below - they will be available for one week only, before a new collection of deals is announced. 

As always, if you want to take advantage of any of the deals on offer, you can support my business by placing your order online by clicking here or using the link to my store on the right hand side of my blog page where it says 'Shop Online' or with me in person. Don't forget to add the Hostess Code for June UPCSWX2C and be sure to make sure that you don't check the 'no contact' box if you'd like to be kept updated with the progress of you order and receive a little thank you in the post from me. 

Here's a summary of this week's one-week only Wednesday deals - click on each item to go to the online store to purchase:

Table built using Product Table Builder by The Crafty Owl - Independent Stampin' Up! Demonstrator.
 
Lots of great products on offer this week: 'Be the Star' is a great stamp set with many uses, there is a great border punch and piercing templates (including stars - a great pairing for the stamp set!), ribbon, epoxy stickers, scoring plate and my absolute favourite the square framelits - useful for frames, shaker cards, Project Life - and so much more!
 
Back later with today's creative post; until then, happy stampin'!


Be The Star You Are Shaker Card

by Joanne James1. June 2015 11:49

Happy Monday everyone! I have a busy week ahead so I'm starting it with a quick post for this week's Freshly Made Sketches challenge that also features the current colours over at Fab Friday:


The FMS sketch has been designed by the super-talented Karren Johnson, currently guesting with us over at The Paper Players, so I just had to play along. I decided to make a little 'encouragement' card today - with a fun shaker twist too:

I used Marina Mist for the base of my card and created a frame of Night of Navy using my big Shot and Square Framelits, which I backed with a piece of acetate window sheet. I wanted a 'flat' shaker for this card, so having punched some stars in each of the challenge colours and some gold glimmer paper using my Confetti Stars Border Punch, I stamped my 'be the star' sentiment in navy onto Whisper White, laid the stars on top, then attached this to the back of the window. To finish, I added a trio of stars in Hello Honey, two stamped in Hello Honey and the larger one stamped in Night of Navy, from the 'Be The Star' stamp set, attaching the larger one with dimensionals for added lift and adding some gold glimmer stars to the star centres.

I chose to feature the blues primarily on my card, as Hello Honey is not a favourite of mine and is not a colour I am immediately drawn to, however I think the Fab Friday crew settled upon a great colour combo here as the yellow looks really quite nice with the blue; I may well use this colour combo again!

That's all from me today; I'm off to prepare more goodies for my Open House sessions later this week (you can read full details here). Back tomorrow with another project; until then, happy stampin'!


Stampin' Up! Supplies Used:

Table built using Product Table Builder by The Crafty Owl - Independent Stampin' Up! Demonstrator.


Tags: , , , , , , , ,

Cards | Stamping

#Birthdaysrock Masculine Birthday Card

by Joanne James1. April 2015 14:07

Time for today's creative post and I have a fun masculine card, using this week's layout over at CAS(E) This Sketch and the current challenge over at Less Is More, where the task is to combine any 3 previous challenges:

I haven't managed to play along with the lovely ladies over at Less is More for a few weeks, so today's card was a great opportunity to combine some of their previous challenges for my card - I chose:

  • Week 7 - theme - masculine
  • Week 121 - recipe - humour
  • Week 127 - colour - 50 shades of grey

Here's the card I came up with:


I decided the sketch was perfect to use a small piece of DSP, something I don't often use on my LIM cards, but this card has sufficient 'white space' that I can get away with it. I love the natural patterned papers in the 'Adventure Bound' DSP stack and having seen so many with a fun 'play on words' with those pebbles, I thought it was about time I shared my version. My card really is quite simple: a base of Smoky Slate and an aperture cut using my Big Shot and the Squares Framelits - on offer as one of this week's Wednesday Weekly Deals for just £17.21, bargain! - and backed with a piece of the pebble-patterned paper (there must be at least 50 shades of grey in there!) and a simple sentiment consisting of an '@' stamped in Versamark and heat embossed in Pewter embossing powder, punched out with a 2" circle punch and popped up on some dimensionals and paired with the '#birthdaysrock' sentiment from the same #Hello stamp set, also heat embossed in pewter. 

A simple yet fun card, perfect for a man with a sense of humour!

Back tomorrow with this week's card for the new Thursday Challenge over at Create With Connie and Mary. until then, happy stampin'!


Stampin' Up! Supplies Used:

Table built using Product Table Builder by The Crafty Owl - Independent Stampin' Up! Demonstrator.


Tags: , , , , , , , , ,

Cards | Stamping

New Wednesday Weekly Deals Are Here!

by Joanne James1. April 2015 11:50

It's Wednesday so that means a new collection of Wednesday Weekly Deals! This week's deals are included below - they will be available for one week only, before a new collection of deals is announced. 

As always, if you want to take advantage of any of the deals on offer, you can support my business by placing your order online by clicking here or using the link to my store on the right hand side of my blog page where it says 'Shop Online' or with me in person. Don't forget to add the Hostess Code for April DBJFM4DG and be sure to make sure that you don't check the 'no contact' box if you'd like to be kept updated with the progress of you order and receive a little thank you in the post from me. 

Here's a summary of this week's one-week only Wednesday deals - click on each item to go to the online store to purchase:

Table built using Product Table Builder by The Crafty Owl - Independent Stampin' Up! Demonstrator.

You may be disappointed that Sale-A-Bration has ended, but today's weeky deals have something of a silver lining for sure: framelit offers abound this week, along  with the gift box punch board and the fabulous extra large gift boxes and some Blushing Bride ribbon to tie them up in! This week's framelit offers include some of my most used framelits - come back later to see today's creative post, where I used the Square Framelits to create today's fun card.

Until then, happy shopping!

A Little Something Cute ... Baby Girl Card

by Joanne James27. June 2014 10:18

Yay it's Friday - what more is there to say?! Today I have another new catalogue sneak peek to share with you, this time a cute baby card that I made using this week's sketch layout over at The Papercraft Crew (I haven't managed to play along with these guys for a while and this week's sketch layout really appealed!) and I'm also linking up with The Card Concept, where the challenge is to create a baby-themed card (mine is in the 'clean and layered' style):


I wanted to use a set from the new catalogue called 'Something for Baby' - a lovely set with lots of baby motifs; not only that, it also has a set of matching framelits - perfect! My card is in fact stacked with new product - see if you can spot it all:

Did you get it all? My card base is Crisp Cantaloupe and I then matted two of the different patterns in one of the new DSP paper packs called 'Lullaby' onto a base of Baked Brown Sugar, and used a strip of the same colour to tie them together. I stamped the central strip with the heart stamp from the 'Something to Say' stamp set to echo the hearts on the bottom panel, although you can't really see them as they are obscured by the frame. I then created a frame using my Big Shot and square framelits and stamped the second half of my sentiment in the box. The first half I stamped in a contrasting colour onto a word bubble cut out with my framelits - I cut first and stamped second, which I don't usually do but I wanted my word bubble to 'hang' the opposite way (hope that makes sense!) - another sentiment from the 'Something To Say' set. I then embellished my card with a cute Crisp Cantaloupe babygro, complete with a Calypso Coral flower, and pair of booties, all popped up on dimensionals.

Hope you like my cute little baby girl card - lots of great sneak peeks there; only 5 more days to go until the new annual catalogue is here! And only 4 more days until my 2014-15 catalogue launch party: full details here and lots more to see so do come along!

Back tomorrow with a special project; until then, happy stampin'!

Stampin' Up! Supplies Used:

* Something for Baby stamp set and co-ordinating framelits - available 1st July

* Something to Say stamp set - available 1st July

* Lullaby Designer Series Paper - available 1st July

Table built using Product Table Builder by The Crafty Owl - Independent Stampin' Up! Demonstrator.


Mini Catalogue

BROWSE THE CATALOGUE

The mini catalogue is now live! Read and download your copy here.

Shop Online

Access my online shop 24 x 7, 365 days of the year:

Current April hostess code:

VDKNV7BH

Shop Online

Join My Team

It's always a great time to join Stampin’ Up! New team members can get £130 worth of products for only £99 + free business supplies + free shipping + all the fun being a part of Stampin’ Up! Stampin' Up! has something for everyone: join my growing team and benefit from my support to enjoy Stampin' Up! however you choose.

If you're interested, call me for a chat to understand how I can help you realise your goals. Alternatively, if you have already decided to sign up and you just can't wait, please click here for the link to the online form where you can sign up and order your starter kit right away! 

Latest Kit!

Stampin Cut and Emboss

The Rock Legend Kit has all you need to make 8 cards with coordinating envelopes. Along with the new Panda Friends Kit, both are available from January 4th for just £14 each - get yours here!

2023-24 Annual Catalogue

BROWSE THE CATALOGUE

Click on the catalogue for a full list of current SU! supplies - if you would like to order any of the items featured, please drop me a line at [email protected] or give me a call on 07773 421446 - I'd be happy to help.

New Online Exclusives

There are new products available exclusively in the online store from 5 March - check them out here.

About Me

Hi I'm Joanne and live in Northampton and when I'm not looking after my husband and two beautiful children, am an avid crafter with a passion for all things Stampin' Up!

I must confess that I have never been a big rubber stamper - until I discovered Stampin' Up! that is. I love the fact that I can get such great results with co-ordinating stamps, inks, papers and punches - the possibilities are endless! Join me on my stamping journey as I share the things I love and be inspired to create amazing things yourself!

Follow Me

Monthly Newsletter

Box Builder

Click the button above to use Box Buster to create your custom box design using the Envelope Punch Board!

Kits Collection Now Available!

Stampin Cut and Emboss

The new Kits Collection from Stampin' Up! is now available!

Click here to see the current kits available and order yours online today.

I Design For


Stampin' Up Stuff

This is my personal blog and is not endorsed by Stampin’ Up! I hope you find it a plentiful source of ideas and personal inspiration but please don't copy my designs for contest submission or use for classes, publication or sale without express permission.