Simple Stamping With Simply Fabulous CCS 493

by Joanne James25. October 2022 12:00

It's Tuesday and time for a new challenge over at CAS Colours & Sketches. This is our last challenge of the month and Michal is ending with a great sketch: 


Feel free to flip or rotate the sketch when making your card.

For my card today I thought I'd take the orange and green colours over at Color Hues and create a sunny and fresh clean and simple card using one of my all-time favourite stamp sets, 'Simply Fabulous' - take a look:


Here's the low-down on today's card:

I masked off the corner of my white card front and used Pumpkin Pie, Pale Papaya and Granny Apple Green inks to stamp flowers and leaves randomly across the corner of my card. I then removed my masking paper, and using my Take Your Pick tool, scored three lines on the reverse following the contour of my stamped panel, before finishing with a greeting from the same set:


All done - easy as that,#SimpleStamping at its best! This card would work in lots of different colour combos and with other images too - I love the way the scored lines add a finishing detail to the panel. Apologies for the rather ropey quality of today's photos - the lighting was very strange yesterday and the images are more grainy than I'd like - I think a recently re-inked Granny Apple Green ink pad might have something to do with that (oops!)

Here is the visual summary of the key products used on today's project for you to pin for easy reference:


You can see all of my 'How To' summaries on my 'How To - Tips and Techniques' Pinterest board in case you've missed any. 

Enjoy your day; it is half-term here and as one James Junior is visiting Alcatraz the other is revising a combination of Physics and 'An Inspector Calls' - delightful! It does mean that I managed to get a little extra creative time in yesterday so I have another card to share! I'll be back later with another post with that card. Until then, happy stampin'!


Stampin' Up! Supplies Used:

Table built using Product Table Builder by The Crafty Owl - Independent Stampin' Up! Demonstrator.

New Wednesday Weekly Deals!

by Joanne James10. June 2015 12:04

It's Wednesday and you know what that means: a new collection of Wednesday Weekly Deals! This week's deals are included below - they will be available for one week only, before a new collection of deals is announced. 

As always, if you want to take advantage of any of the deals on offer, you can support my business by placing your order online by clicking here or using the link to my store on the right hand side of my blog page where it says 'Shop Online' or with me in person. Don't forget to add the Hostess Code for June UPCSWX2C and be sure to make sure that you don't check the 'no contact' box if you'd like to be kept updated with the progress of you order and receive a little thank you in the post from me. 

Here's a summary of this week's one-week only Wednesday deals - click on each item to go to the online store to purchase:

Table built using Product Table Builder by The Crafty Owl - Independent Stampin' Up! Demonstrator.
 
Lots of great products on offer this week: 'Be the Star' is a great stamp set with many uses, there is a great border punch and piercing templates (including stars - a great pairing for the stamp set!), ribbon, epoxy stickers, scoring plate and my absolute favourite the square framelits - useful for frames, shaker cards, Project Life - and so much more!
 
Back later with today's creative post; until then, happy stampin'!


Sweet Ice Cream - Oh I Do Like To Be Beside The Seaside!

by Joanne James4. September 2014 22:14

Apologies for my late post today lovely blog readers - I have had a very busy 'making' day trying desperately to get ahead of myself for once, but as a result I'm late posting; I guess I just cant do it all!! So I'll keep today's post short and sweet - literally! - and share today's card that I made for this week's challenge over at Less Is More where there is a song theme again, using this week's colour scheme over at Pal Paper Arts:

The song theme over at Less is More is 'Oh I do like to be beside the seaside'. I almost didn't make a card this week (I wasn't sure you wanted to see another Sea Street crab or lobster card!) when I was musing about what the seaside means to me and I found myself thinking about ice cream; I mean, a cornet is an intrinsic part of any trip to the seaside, right? When I was at the seaside in Minehead a couple of weeks ago, I had the most delicious forest fruits ice cream in an Italian waffle cone, so with this in mind I thought I would use the above colours to create my ice cream. So, here is my card:

I had some Stampin' Up! notelets out on my desk for another project and decided to use one as the base for my card, as they are more sturdy than Whisper White so perfect for a CAS card like this. I simply added a strip of Hello honey striped DSP from the Moonlight DSP paper stack and made a punch art ice cream cone, first scoring a piece of Crumb Cake with my Simply Scored Scoring Tool and cutting out by hand. For the ice cream itself, I stamped the cream swirl from the Cupcake party stamp set in Versamark, once on Hello Honey and once on Blackberry Bliss, then heat embossed with white embossing powder and punched out with my Cupcake Builder Punch. I also punched out a little Blackberry Bliss cherry using the punch, and covered it in crystal effects to add shine and dimension - this looks so cool in real life! I finished my card with the 'Sweet!' sentiment from the 'Bravo' stamp set, which somehow seemed appropriate for something so delicious!

Hope you like today's card; back tomorrow with another project. until then, happy stampin'!


Stampin' Up! Supplies Used:

Table built using Product Table Builder by The Crafty Owl - Independent Stampin' Up! Demonstrator.


Undefined Take 1: In The Swim

by Joanne James16. March 2014 20:52

Good evening lovely readers! No blog post from me yesterday as I had a rare 'night off': James Juniors had a sleepover at Grannies' house and I was treated to a night at the movies (we saw 'Non Stop' with Liam Neeson - great action movie!) To make up for it, I have a whole set of cards to share with you today: my very first set of Undefined hand-carved stamps.

If you're a Facebook follower of The Crafty Owl, you may have seen today's thread that has been about what would you carve with yours followed by some guesses as to what I carved with mine. The Undefined Carving Kit is a great set with everything you need to cut and mount four stamps. This first set I carved was for Rebecca, who given her passion for swimming had a clear idea of what she wanted her stamps to feature - water, in a big way. So after much sketching and carving, this is what we came up with:

All of our stamps had something to do with swimming - the stamps themselves don't look that interesting, so I made a simple card to showcase each of the designs to give you a better idea of what they look like. So here's the first one, an abstract swimmer:

I simply mounted him with some paper pierced circles on a watery blue background. Here's a close up of the carved stamped image:


You can tell it's a hand carved stamp as it's nowhere near as sharp as a traditional SU! stamp, but then it's great fun to be able to create something unique that you carved yourself. Here is the second stamp - this time, a diver: 

 I used my Borders scoring plate and Large Scallop Edgelit to create my waves in the background. The next one was actually the first stamp I carved and it shows - take a tip from me, if you're carving words, which is quite tough, don't start with a curved letter such as 'S' - in hindsight I needed a little more practice before I started this one!

 I love the message of this card though - it was something I read on the internet as an inspirational quotation and I thought it was really apt; sometimes it's as much about the motivation and belief that you can achieve, as it is the winning itself. Our last stamp was a fun one - do you recognise this famous fish cameo? 

This is my take on Dory from the Disney movie 'Finding Nemo', a definite James family favourite and whilst it might look complicated, as the last of my stamps to carve I had had a little practice by this point, so think it turned out quite well.

I hope you like my first foray into the world of 'Undefined' - it really was fun and Rebecca LOVES her stamps, which is the main thing! I will have more to share with you another time as I still have Ben's set and mine to carve. if you would like more 'Undefined' inspiration, check out Stampin' Up!'s Undefined Pinterest page, where you will see lots of amazing creations!

Back tomorrow with another project; until then, happy stampin'!


Stampin' Up! Supplies Used:

Table built using Product Table Builder by The Crafty Owl - Independent Stampin' Up! Demonstrator.


Merry Monday - Deck The Halls

by Jason James22. October 2013 21:30

I'm having a fun week at home with the James juniors this week, but it isn't leaving much time for crafting! Once we've finished our holiday homework we should be able to do some crafting together, which will be nice; I have a few Halloween things planned which I should be able to share with you in due course.

This week's Merry Monday Challenge is #80 'Use Music or a Carol Inspired Card' and having seen the great inspiration cards, I was keen to have a go. Here's my card:

I made a simple card where I cut out a circle using my Circle Framelits to reveal the 'deck the halls' stamp on the inside of the card. I decorated simply with some punched holly tied with baker's twine. I finished the punch berries with some Crystal Effects to add a nice shine (it looks much nicer in real life!) and scored the centre of my card panel using my Simply Scored borders plate to add some texture and interest to the Baked Brown Sugar card front. A simple card, yet I have this urge to break into song: Deck the halls with boughs of holly, fa la la la la, la la la la! I love Christmas time.

With all of yesterday's news, I didn't get round to sharing the link to this week's new digital downloads, so here it is:

October 22, 2013

There are some fun autumn pocket cards and some recipe layouts, along with a variety of different Christmas stamps to take a look at. The free trial for MDS is still available to download, so if you haven't already why not take a look - it will open up a whole new avenue of crafting to you.

Back tomorrow with another card; until then, happy stampin'!


Stampin' Up Supplies Used:


It's A Boy!

by Joanne James28. August 2013 07:30

Today I'm sharing a recent commission card I made for a friend of mine who wanted to welcome the latest addition to her extended family, another in a long line of little boys! The brief was 'simple classic' and we agreed a bib style card would be perfect. I made a 6" square card, using the new Circles Framelits to create the bib: 

 I scored the central section on the reverse at 1/2" intervals and finished with tiny pearls for added detail. I added took the opportunity to create a layered label using my new baby Label Love stamp and co-ordinating Artisan Label punch - here's a close up:

How cute is this? I love how easy it is to create the background layer which in this instance added just enough colour to pop this off the front of this largely white card. I used some of my retired Bashful Blue card stock - I will miss this colour for baby boy cards, it's such a perfect shade. 

Back tomorrow with another project; until then, happy stampin'!


Stampin' Up Supplies:

Stamps: Label Love

Cardstock: Whisper White, Bashful Blue (retired)

Ink/Stampin' Write Markers: Bashful Blue (retired)

Tools: Artisan Label Punch, Circles Framelits, Simply Scored

Finishing Touches: Whisper White 5/8" Organza Ribbon, Basics Pearls

Tags: , , , , , , ,

Cards | Punch Art | Stamping

Look Who's Turning 40!

by Joanne James18. August 2013 20:08

Another 40th birthday card today, this one showcasing lots of new products. This was the birthday card from my children to their uncle, so I wanted it to fauna fun design; this is what I came up with:

I used the Birthday Basics Designer Series Paper as the inspiration for the colour scheme for this card - that and the fact that I already had Bermuda Bay out on my desk (I love this new colour!) I built the sentiment from my Simply Sketched Alphabet stamps and added a fun element by replacing the 'OO' with a pair of spectacles and googly eyes. I stamped the spectacles by inking up one pair on my 'Spectacular' single stamp - I have been having lots of fun with this stamp (as a specs wearer it really appealed to me!); this, and the other single stamps, are still available to purchase until the end of the month. See the box on the right of my blog page for more details and make sure you contact me before the end of the month if you'd like to order one.

My children thought this card was really funny, although I'm not sure that I would have got away with it as far as my specs-wearing brother-in-law is concerned, were I not a specs wearer myself!

Back soon with another project; until then, happy stampin'!


Stampin' Up Supplies:

Stamps: ABC-123 Sketch Alphabet and Numbers, Spectacular

Cardstock: Summer Starfruit, Bermuda Bay, Raspberry Ripple, Very Vanilla, Birthday Basics Designer Series Paper (SAB - retired)

Ink/Stampin' Write Markers: Bermuda Bay, Raspberry Ripple

Tools: Simply Scored, Big Shot, Typeset Alphabet Die, Stamp-a-ma-jig

Finishing Touches: Googly eyes (non SU)


Happy 40th Birthday Brother

by Joanne James15. August 2013 16:43

Another brother Birthday card today, but this time for my brother-in-law, who celebrated his 40th birthday recently. I took this card by LeeAnn Greff as my inspiration, changing the colours to use up some of my retired papers and incorporating the necessary changes of sentiment to produce the following card:

A great masculine card, with some Tangerine Tango and Bermuda Bay for pops of colour. Back in a couple of days with the card I made from the children for their uncle; I'll be posting every other day for the next couple of weeks, as I'm having a couple of weeks of dedicated family time before the children go back to school. 

Until then, happy stampin'!


Stampin' Up Supplies:

Stamps: Banner Greetings (hostess)

Cardstock: Basic Grey, Bermuda Bay, Coastal Cabana, Whisper White, Twitterpated DSP (retired), Sycamore Street Designer Series Paper (SAB - retired)

Ink/Stampin' Write Markers: Basic Grey, Tangerine Tango

Tools: Simply Scored, Big Shot, Chevron Textured Impressions Embossing Folder, Typeset Alphabet Die, Paper Piercing Essentials Pack

Finishing Touches: Sycamore Street Ribbon (SAB - retired)


Christmas Tea Lights

by Joanne James8. August 2013 09:44

Another week, another late post - I'm loving the summer holidays but when school's out it sure is tricky to keep everything else on track! So today I'm posting nice and early, so that I don't run out of time again!

Today I'm sharing another of the makes from my Christmas workshop that I held last weekend: a lovely set of four tea lights in a handmade box. This workshop was less about the stamping and much more about the scoring - if my ladies weren't proficient with their Simply Scored scoreboard beforehand, they sure are now! So here is our finished box:


We made a box with a sliding sleeve cover, from which we cut out an oval aperture with the Oval Framelits and backed with a window sheet, to allow a glimpse of our lovely hand-stamped candles inside. Here's a picture of the open box, with a peek at our 'dressed up' tea lights:

We edged each of them with a strip of DSP; I'll be making more of these when my festive washi tape arrives, as this is perfect for this kind of project. The candle stamping was really easy to achieve and as none of the ladies present had done this before, was a real 'wow' moment for them. I suspect lots of their friends and neighbours will be receiving stamped tea light gift sets for Christmas now that they've learned this clever technique!

I love this spotted star/snowflake paper from the retired 'Be of Good Cheer' paper set; with so many designs to choose from, we all made different ones though - here's one of the other finished sets made by Kathy during the workshop:

These papers are just so lovely, but don't be too sad that they are now retired; I have had a 'sneak peek' of the new Autumn-Winter seasonal catalogue and can honestly say, you will not be disappointed with this year's offerings!

All being well, I will be back tomorrow with the last of my Christmas workshop projects. I'm off to have a quick spot of making before meeting friends in the park for a picnic - lovely! Until then, happy stampin'!


Stampin' Up Supplies:

Stamps: Four Seasons (hostess - retired)

Cardstock: Cherry Cobbler, Be of Good Cheer Designer Series Paper (retired)

Ink/Stampin' Write Markers: Cherry Cobbler

Tools: Simply Scored, Big Shot, 1 1/4" Circle Punch, 1 3/4" Scallop Circle Punches, Oval Framelits

Finishing Touches: Creped Filter Paper, Window Sheet,  Cherry Cobbler 1/2" Scallop Dots Ribbon (retired)

Christmas Rosette Door Wreath

by Joanne James4. August 2013 19:36

As I mentioned earlier this week, yesterday I held an all-day Christmas workshop with a lovely bunch of ladies and we made a good start with our preparations for the festive season with a number of 3D projects. I'm going to share the first of these with you today: a door wreath made out of paper rosettes and featuring the sadly recently retired Be Of Good Cheer Christmas DSP. After much scoring, gluing and decorating, this was the finished article:

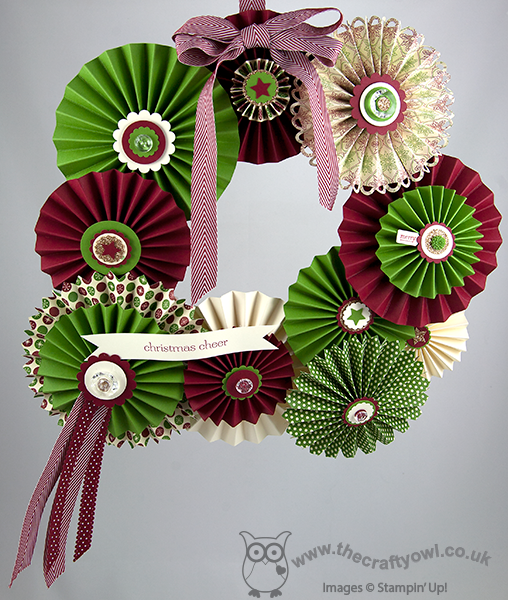
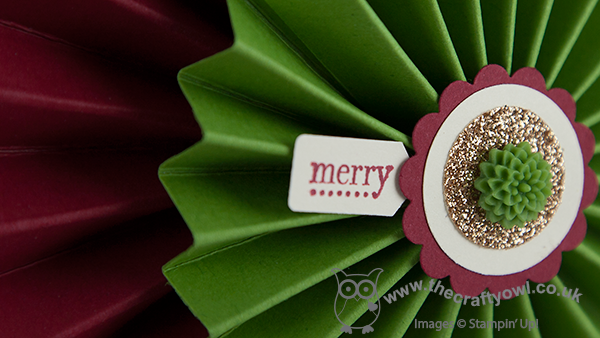
This picture shows my version of the wreath suspended. In hindsight, I should have photographed it in situ on my front door, although then my neighbours would have thought me completely mad (they already think I'm part way there, as I grow potatoes and pumpkins in my front garden, but that's a story for another time!!) The rosettes made from the patterned paper were cut using the Designer Rosette Bigx XL die, which is great for fast and easy cutting and scoring; unlike the ones made from the plain cardstock, which we scored using the Simply Scored scoreboard so they took a little longer. We used a variety of circle and scallop punches to create the centres; here's a close up of a couple of mine:

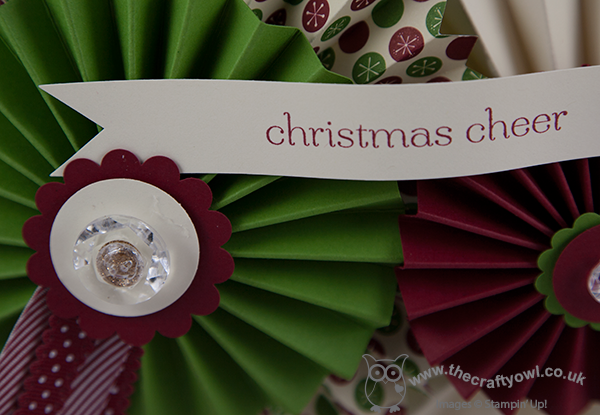
The one below was our focal point rosette, complete with ribbon trim - did you spot the lovely new Cherry Cobbler chevron ribbon in there? - and we also included a banner sentiment in keeping with the season:

The nice thing about a project like this though is that whilst everyone starts out with the same materials, each person has their own 'take' on what theirs should look like, so you end up with lots of similar but slightly different outputs. To illustrate, here is one of the finished wreaths of one of the ladies who attended:

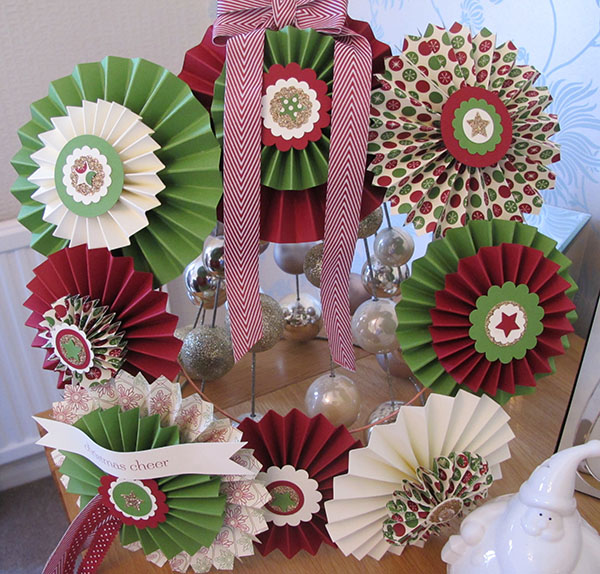
Isn't Maureen's wreath just lovely? I'll share the other projects we made with you later this week. I'm off now to recover from the party excesses of my day - my downline Barbara and I held a joint party for our 6 year old sons this afternoon: swimming party followed by birthday picnic in the park. I will share the invitations and thank you notes we made tomorrow; meanwhile, time for a nice quiet glass of wine and to put my feet up, I think!

Back tomorrow with another project; until then, happy stampin'!


Stampin' Up Supplies:

Stamps: Sweet Essentials, Tiny Tags (retired)

Cardstock: Very Vanilla, Gumball Green, Cherry Cobbler, Be of Good Cheer Designer Series Paper (retired)

Ink/Stampin' Write Markers: Cherry Cobbler

Tools: Simply Scored, Big Shot, Rosette Bigz XL Die, 1", 1 1/4", 1 3/8" Circle Punches, 7/8", 1 1/4" 1 3/4" Scallop Circle Punches, Itty Bitty Punches (circle), Merry Minis Punch Pack (star), Jewellery Tag Punch (retired)

Finishing Touches: Champagne Glimmer Paper, Vintage Faceted Designer Buttons, In Colour Dahlias, 3/4" Cherry Cobbler Chevron Ribbon,  Cherry Cobbler 1/2" Scallop Dots Ribbon


Mini Catalogue

BROWSE THE CATALOGUE

The mini catalogue is now live! Read and download your copy here.

Shop Online

Access my online shop 24 x 7, 365 days of the year:

Current April hostess code:

VDKNV7BH

Shop Online

Join My Team

It's always a great time to join Stampin’ Up! New team members can get £130 worth of products for only £99 + free business supplies + free shipping + all the fun being a part of Stampin’ Up! Stampin' Up! has something for everyone: join my growing team and benefit from my support to enjoy Stampin' Up! however you choose.

If you're interested, call me for a chat to understand how I can help you realise your goals. Alternatively, if you have already decided to sign up and you just can't wait, please click here for the link to the online form where you can sign up and order your starter kit right away! 

Latest Kit!

Stampin Cut and Emboss

The Rock Legend Kit has all you need to make 8 cards with coordinating envelopes. Along with the new Panda Friends Kit, both are available from January 4th for just £14 each - get yours here!

2023-24 Annual Catalogue

BROWSE THE CATALOGUE

Click on the catalogue for a full list of current SU! supplies - if you would like to order any of the items featured, please drop me a line at [email protected] or give me a call on 07773 421446 - I'd be happy to help.

New Online Exclusives

There are new products available exclusively in the online store from 5 March - check them out here.

About Me

Hi I'm Joanne and live in Northampton and when I'm not looking after my husband and two beautiful children, am an avid crafter with a passion for all things Stampin' Up!

I must confess that I have never been a big rubber stamper - until I discovered Stampin' Up! that is. I love the fact that I can get such great results with co-ordinating stamps, inks, papers and punches - the possibilities are endless! Join me on my stamping journey as I share the things I love and be inspired to create amazing things yourself!

Follow Me

Monthly Newsletter

Box Builder

Click the button above to use Box Buster to create your custom box design using the Envelope Punch Board!

Kits Collection Now Available!

Stampin Cut and Emboss

The new Kits Collection from Stampin' Up! is now available!

Click here to see the current kits available and order yours online today.

I Design For


Stampin' Up Stuff

This is my personal blog and is not endorsed by Stampin’ Up! I hope you find it a plentiful source of ideas and personal inspiration but please don't copy my designs for contest submission or use for classes, publication or sale without express permission.