
Painter's Palette For World Art Day F106

by Joanne James1. April 2022 09:00

Yay - the end of the week! Today I have my card for the new challenge over at Festive Friday:


The challenge that we are celebrating this week is 'World Art Day' which is on April 15th. Remember the fun thing is that at Festive Friday you do not need to actually celebrate the occasion; your goal is to simply use three or more items from the inspiration list on your project. This week I decided to go all-out with the theme of our challenge and used paint splats, easel, primary colours and a little masking and this is what I came up with:


Here's the low-down on today's card:

I delved into my collection of retired stamps for today's card - the retired 'Painter's Palette' set from a few years ago had everything I needed! I stamped a bunch of paint splats onto my white card base in primary colours (along with a little green for good measure) along with an easel, then stamped the easel along with a birthday sentiment and decorated with a few more paint splats (this is where the masking came in so that the dots stayed within the frame) and added this to my card base with dimensionals: 


A few retired enamel dots, along with some additional paint splats both inside my card and on the envelope completed my card - perfect for the budding artists amongst us!

How does our board inspire you? I can’t wait to see what YOU create! For more inspiration, be sure to visit the rest of the  Festive Friday Challenge Design team:

Ann Schach
Beth McCullough
Sharon Hashimoto Burkert
Melanie Hungerford
Helen Jennings
Stephanie Lanzalotto
Melva Peters
Jaydee
Diane Evans
Joanne James - that's me!

Enjoy your day and I'll be back tomorrow with another project. Until then, happy stampin'!


Stampin' Up! Supplies Used:

Table built using Product Table Builder by The Crafty Owl - Independent Stampin' Up! Demonstrator.

Every Chapter of Our Friendship is Peachy

by Joanne James30. March 2022 10:04

Today I'm sharing a card that uses blue, orange/peach and green from the current Color Dare challenge ( I used my closest matches) and the sketch over at Atlantic Hearts Sketch Challenge:


I had my as yet uninked 'Every Chapter' stamp set out on my desk as I was considering using it for last week's Fusion challenge but didn't get around to making a second card, so decided to pair it with some of the retiring 'You're A Peach' designer series paper and this is what I came up with:


Here's the low-down on today's card:

Every Chapter - The 'Every Chapter' stamp appealed to me straight away because it's a single image stamp that's great for colouring - pair with some white cardstock, black ink and a colouring medium such as pencils or Stampin' Blends and there's your card - done! 

Step It Up - Today's card is a stepped-up version of that simple concept though; I added a touch of flowered 'You're A Peach' paper (now discounted in the Last Chance product sale - grab it while you can!) and coloured my image with various colours of co-ordinating Blends, then fussy cut it and added it to my card with dimensionals, having scored between each book and used my bone folder to curve them slightly for added effect. I also added some ribbons in coordinating colours to edge my paper, along with a few enamel dots.

Finishing Touch - For a final flourish, I added a couple of tiny punched leaves and a Flowering Flourish in Pale Papaya in place of the stamped flower on one of the books; I think this adds a fun extra detail:


So what do you think? This is the perfect card to share with a book-loving friend - I think I might pop a note inside and put inside the next paperback that I recycle to one of mine! The image would also be great to decorate bookmarks with, or perfect to share with members of a book club. So many ideas - I will definitely be using again!

Here is the visual summary of the key products used on today's project for you to pin for easy reference:


You can see all of my 'How To' summaries on my 'How To - Tips and Techniques' Pinterest board in case you've missed any. 

Enjoy your day and I'll be back tomorrow with another project. Until then, happy stampin'!


Stampin' Up! Supplies Used:

Table built using Product Table Builder by The Crafty Owl - Independent Stampin' Up! Demonstrator.

Retro In Symmetry CCS463 Double

by Joanne James29. March 2022 12:00

It's Tuesday and time for a new challenge over at CAS Colours & Sketches. There are 5 Tuesdays in March so we are ending the month with the double: one of our previous sketches and a retired colour combination. For Jeanne's final challenge as hostess she chose the following:  


For my card today I went with a super simple single stemmed flower from the 'In Symmetry' stamp set - take a look:


Here's the low-down on today's card:

I thought the rather retro design of the 'In Symmetry' stamp set suited this bright, rather retro colour palette! I stamped my flower in Watermelon Wonder and Just Jade (my closest substitute to 'Taken With Teal' which is way before my time!) onto a white stitched rectangle and added a Pineapple Punch enamel dot before adding to my Pineapple Punch cardbase:

A sentiment heat embossed in white onto a piece of Watermelon Wonder cardstock completes the front of my card. I added another flower, coloured with my sponge daubers, to decorate the inside of my card:

And that's my card - done! The 'In Symmetry' stamp set is great for bright and colourful floral cards and I will miss having it in my collection when it retires. If you don't have it and it's still on your wishlist, why not hop over to my online store via the link below and pick it up at a 40% discount as part of the Last Chance Products Promotion whilst supplies last - a proper bargain!

Here is the visual summary of the key products used on today's project for you to pin for easy reference:


You can see all of my 'How To' summaries on my 'How To - Tips and Techniques' Pinterest board in case you've missed any. 

As a reminder, for our colour challenges, you must use all of the stated challenge colours. You may also use neutral colours; however, the challenge colours should be the most noticeable ones featured on your card. We use Stampin' Up! color names for reference, but you are welcome to use any other companies' products as long as you match the challenge colours as closely as possible.

Enjoy your day and I'll be back tomorrow with another project. Until then, happy stampin'!


Stampin' Up! Supplies Used:

Table built using Product Table Builder by The Crafty Owl - Independent Stampin' Up! Demonstrator.

Sweet Symmetry In Triplicate PP584

by Joanne James27. March 2022 08:00

Today it's Sunday and time for this week's new challenge over at The Paper Players! It's the turn of the fabulous LeAnne to host this week and she has my favourite, a sketch challenge, for you to work with:


LeAnne's sketch is so perfect for a showcase of patterned paper. I decided to go with one of my favourite bright and colourful paper packs, Sweet Symmetry, and used not one but two patterned papers on my card - take a look:


Here's the low-down on today's card:

I don't often pair patterned papers on my cards, but I loved the combination of the pattern with the shades of blue for the background, with a pop of bright colour from the paper I used for my three panels; the navy stems help tie the two patterns together. I used my Stitched Rectangle Dies to crop both my three vertical panels and my horizontal sentiment. I almost left my card there, but decided to upset the symmetry that I had worked so hard to create elsewhere with the near-perfect pattern alignment by fussy cutting a trio of flowers and using them to accent my sentiment, using colours lifted from the paper pattern:

I can't tell you how much I agonised over that trio of flowers, but I decided I liked the addition so left them in. What do you think - were they a good addition? Do leave me a comment below - I'd love to hear your thoughts! 

I love the colours and bright patterns of the products in the Sweet Symmetry suite and will be sad to see them retire. The good news though is that both the 'In Symmetry' stamp set and Sweet Symmetry designer series paper are currently on the Last Chance Products List, each with 40% off. If you don't have either now is the time to pick them up and grab yourself a bargain before they're gone! Follow the links at the bottom of this post to go straight to the Stampin' Up! store to order yours.

Here is the visual summary of the key products used on today's project for you to pin for easy reference:


You can see all of my Product and 'How To' summaries on my 'How To - Tips and Techniques' Pinterest board in case you've missed any. 

Before you reach for your ink and papers, check out what our amazing team has created to inspire you this week:

Here's a quick recap of our challenge rules:
 
1.  Create a new paper project
2.  Upload your creation to your blog with a link back to us and provide a direct link to the post featuring your challenge submission.
3.  Please link your card to no more than four challenges, TOTAL.
4.  Have FUN!

Enjoy your day; it's Mother's Day here in the UK today so I am looking forward to being spoiled and waited on all day long - here's hoping! I'll be back tomorrow with another project. Until then, happy stampin'!


Stampin' Up! Supplies Used: 

Table built using Product Table Builder by The Crafty Owl - Independent Stampin' Up! Demonstrator.

Make Way Clouds - Beautiful Rainbow Coming Through!

by Joanne James26. March 2022 12:12

Today I'm sharing a card using the sketch over at Fusion (rotated through 180 degrees):


No bookshelves though - as promised, I've another rainbow card for you - take a look:


Here's the low-down on today's card:

I thought the sketch really lent itself to a rainbow peeking through the clouds, so I added some Pool party patterned 'Sunshine and Rainbows' Sale-A-Bration patterned paper to my card base, then added a split panel with diecut stitched cloud edges cut with the Basic Border Dies. A diecut rainbow coming through the clouds bridges the gap:


A gold heat embossed sentiment and a few enamel raindrops complete my card.

Here is the visual summary of the key products used on today's project for you to pin for easy reference:


You can see all of my 'How To' summaries on my 'How To - Tips and Techniques' Pinterest board in case you've missed any. 

I made this card when I made my Thursday make - here's a photo of both cards together:


I hope you've been enjoying my rainbows in their various guises this week! 

Enjoy your day; I'm off to hockey this afternoon. I'll be back tomorrow with another project. Until then, happy stampin'!


Stampin' Up! Supplies Used:

Table built using Product Table Builder by The Crafty Owl - Independent Stampin' Up! Demonstrator.

In The Moment And A Quick Rainbow For AYSI271

by Joanne James25. March 2022 12:00

Today I'm sharing my design team card for our new challenge over at As you See It where the lovely Heather H had a speed stamping challenge for us:
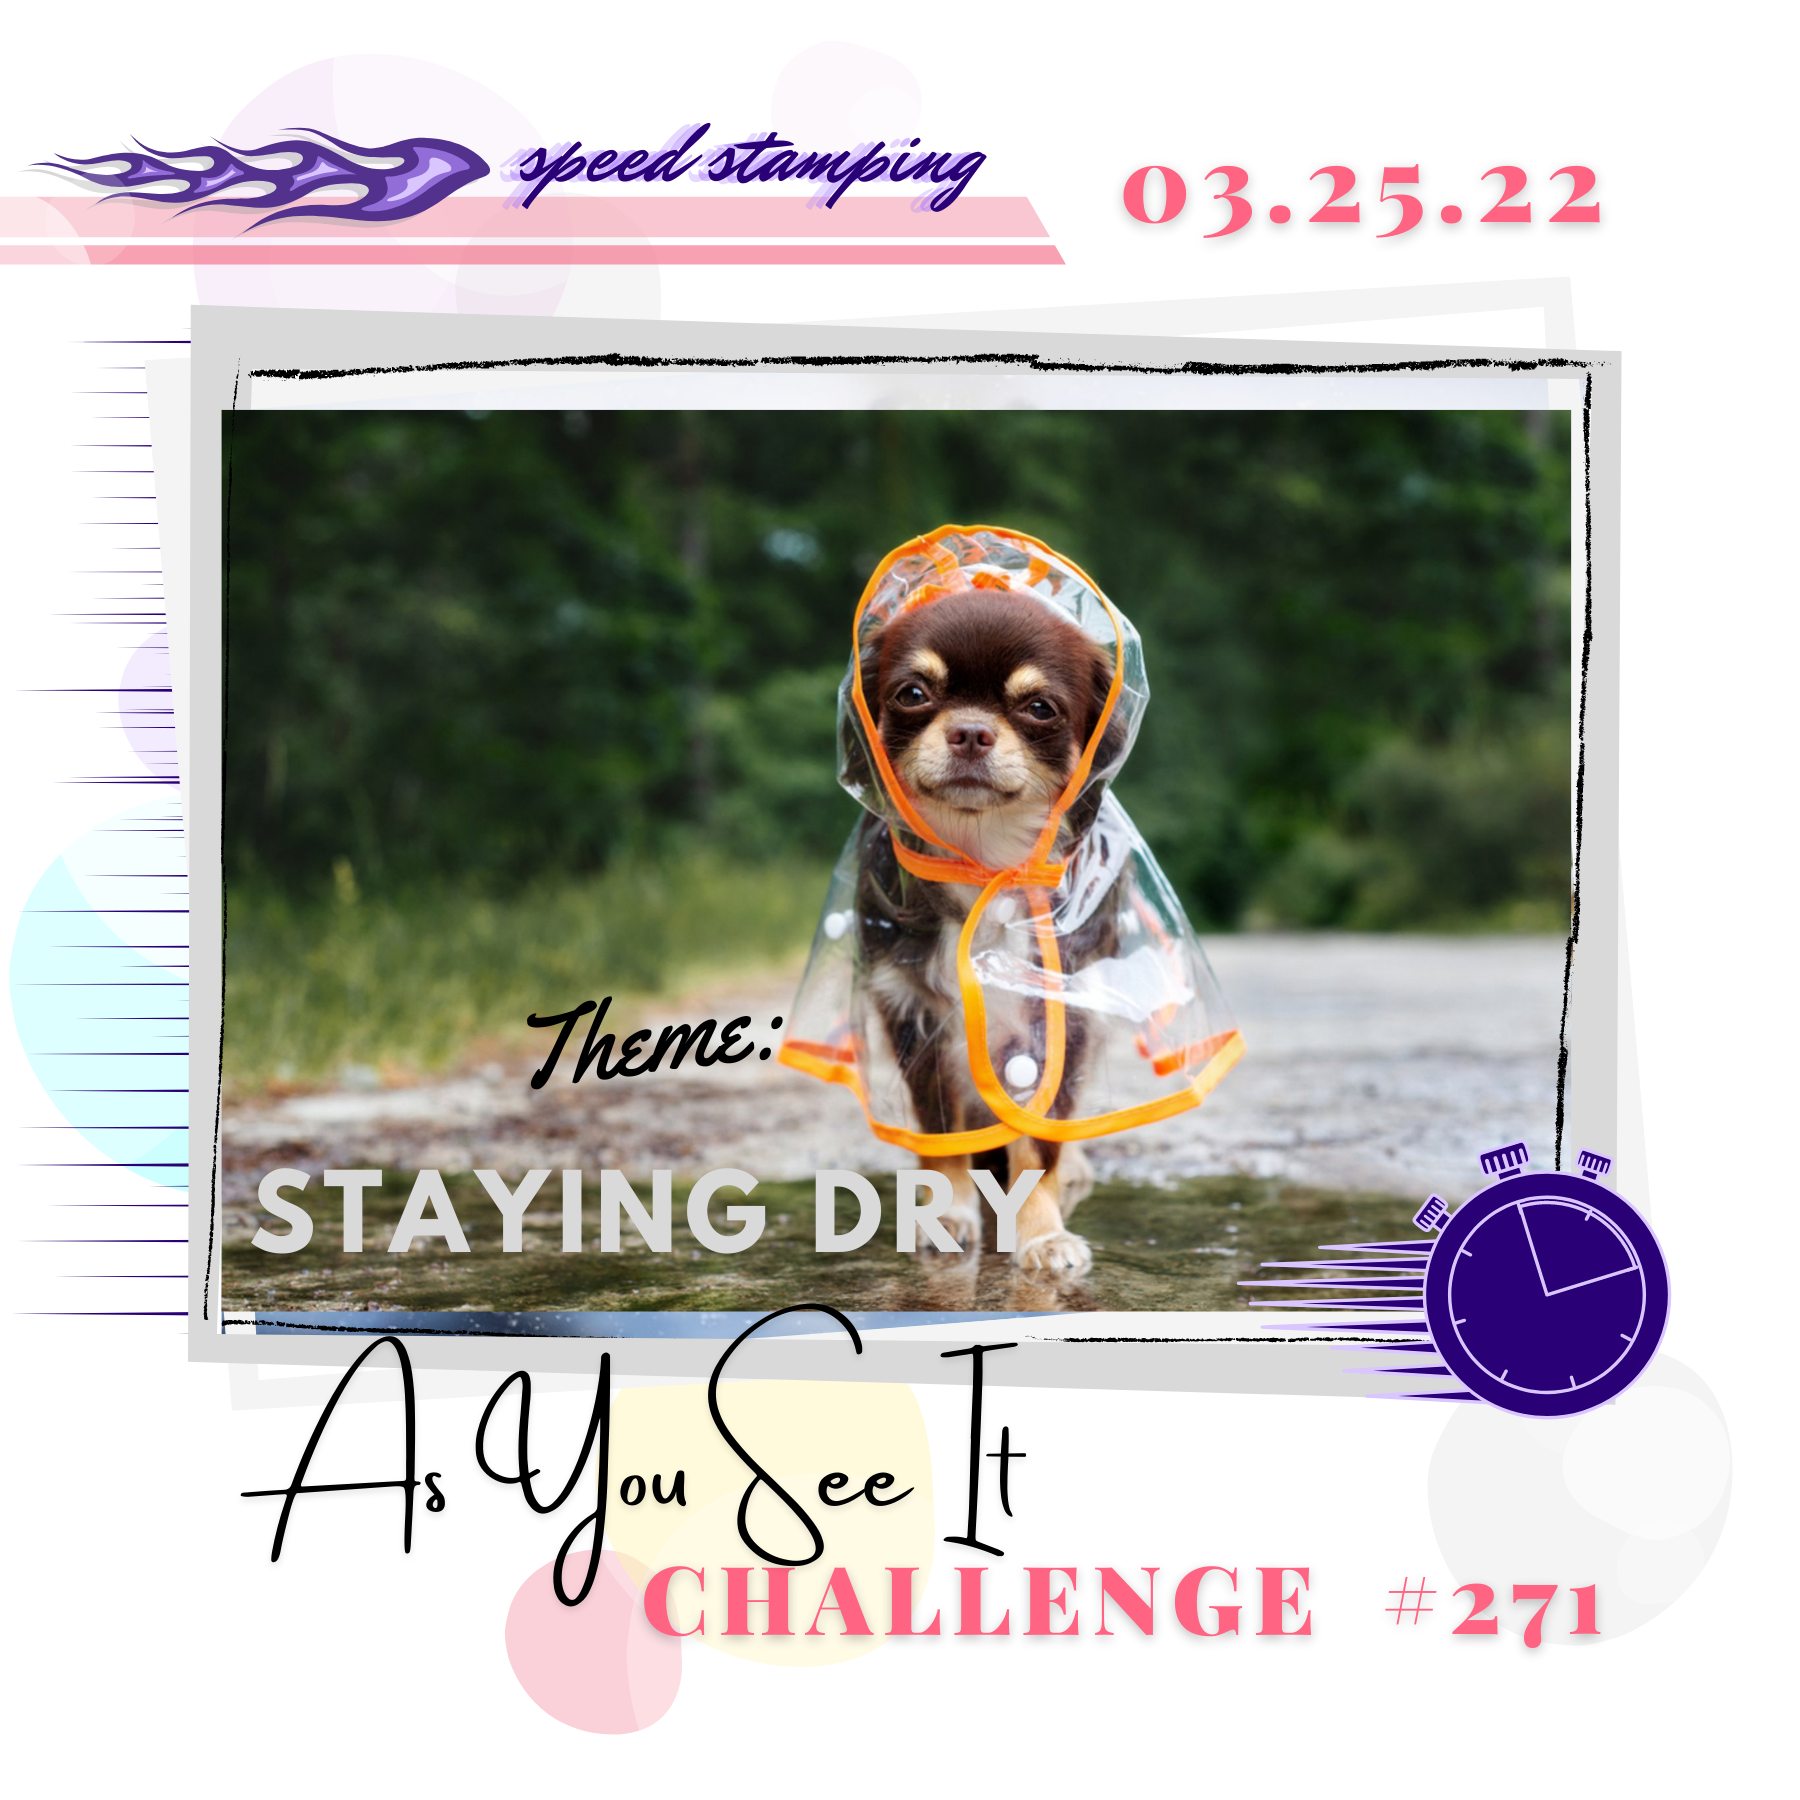
 

Heather's theme initially had me scratching my head this week, as I have no current stamps that are wellington boots or umbrellas; then I suddenly realised 'staying dry' can be as simple as taking the outside in! That thought led to another and I was away - take a look at what I came up with:
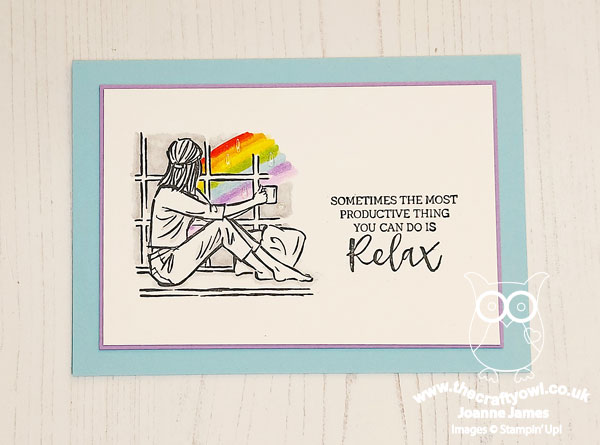
 

Here's the low-down on today's card:

Yes, another rainbow for you today! I still had the 'In The Moment' stamp set out on my desk having prepped for my class using this set earlier this week. In my class, we looked not only at how to colour with Stampin' Blends, along with pencils, Stampin' Write markers and blending tips for each medium, but also different ways in which you can use line drawn images, including ways of colouring beyond the obvious. This card is a 'bonus' for the ladies that attended my class as it looks at another way to colour an image that might not be immediately obvious: here I've focused less on the inside and more on the outside - what can be seen beyond the scene, which in this case is the stormy grey sky and a beautiful rainbow through the window itself.

I used all 10 minutes of my allotted time for this week's speed challenge, first cutting my card base, mat and white pieces and stamping the image and sentiment in Memento Black, using my Stamparatus to get a nice solid image, then I used the remainder of the time to colour my image. I went with a traditional rainbow and coloured it with my Blends, simply drawing in the arch of colour and blending between each to get a smooth-ish finish. I added some clear Wink of Stella to give my rainbow some sparkle and a few clear enamel raindrops to add to the effect:
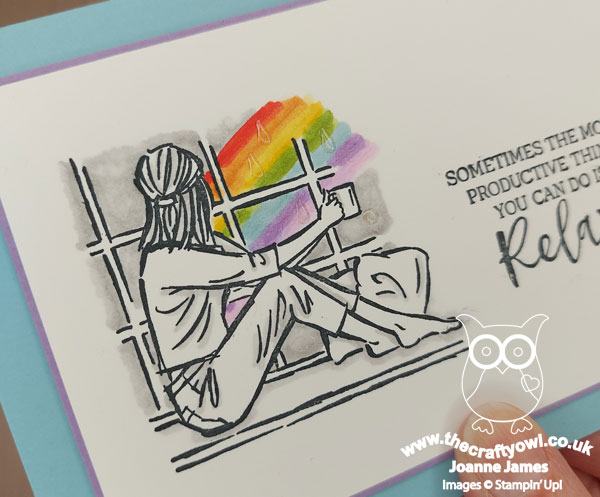
In the interests of time, I coloured the rest of my sky in Smoky Slate and added a few grey highlights to the image of lady, but that was all. I really like the effect - the lack of colour on the main image really draws the eye to the rainbow outside and the pop of colour it adds. 

Here is the visual summary of the key products used on today's project for you to pin for easy reference:
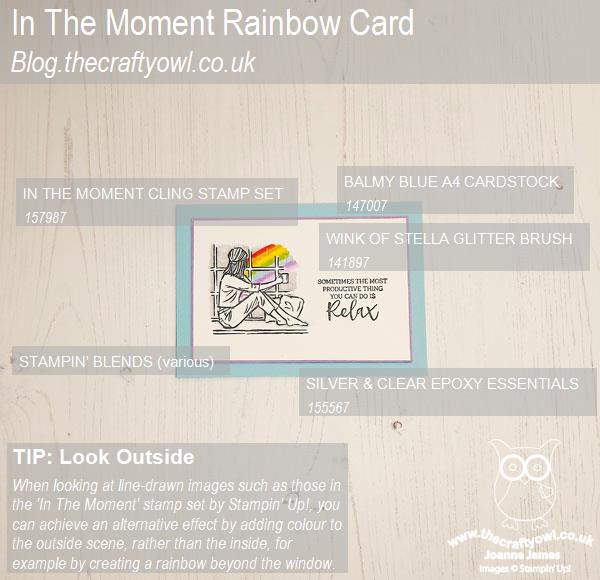
 

You can see all of my 'How To' summaries on my 'How To - Tips and Techniques' Pinterest board in case you've missed any. 

This is my second entry over at The Paper Craft Crew's rainbow colour challenge this week - traditional rainbow colours this time - and another entry for the rain/rainbow challenge over at Global Design Project #GDP335.


Here's a summary of our challenge rules:

  • Create any card, scrapbooking page, 3D project or packaging project that fits the challenge.
  • Please include the challenge graphic and link back to the challenge in your blog post. Turn off word verification so we can leave you lots of lovely comments. Make sure you link the post not the whole blog to the Linky. Use #AYSIXXX when uploading to a public gallery.
  • If you’re unsure about ‘the rules’, check the details under the Challenge Guidelines tab on the As You See It Challenge homepage.
  • In a speed stamping challenge, please time yourself and say in your post how long your card took to complete. 
We look forward to seeing your creations in the AYSI gallery.

I hope you're enjoying my rainbows in all of their various guises this week because - spoiler alert! - I have another rainbow card for you tomorrow! Enjoy your day and I'll be back tomorrow with another project. Until then, happy stampin'!


Stampin' Up! Supplies Used:

Table built using Product Table Builder by The Crafty Owl - Independent Stampin' Up! Demonstrator.

Brilliant Rainbow Dies Clean And Simple TTT154

by Joanne James24. March 2022 18:00

It's Thursday and time for a new challenge over at TicTacToe! It's the turn of Team X to host this week and I am the featured designer this week. This is the fun board that we are playing along with: 


I went across the top row with rainbow/green/diecut as my 3 options and using this week's Try Stamping On Tuesday sketch (no punny sentiment I'm afraid!) set to work and this is what I came up with:


Here's the low-down on today's card:

Sunshine and Rainbows - The colour scheme for today's rainbow card is taken from the (now retired) Sunshine and Rainbows designer paper that was free during Sale-A-Bration; I still have some left so don't be surprised to see it on my projects in the coming weeks/months - I'm hoping it will give you lots of inspiration as to how you can use the paper you earned free too! I love this colour mix; I also used the colours of the paper stripes for the die infills of my rainbow border too, mixing and matching as I went along.

Brilliant Rainbow Dies - I created a rainbow border across my card using the rainbow tag die in the Brilliant Rainbow Dies set; the actual rainbow border in the set was too small and didn't line up with the stripes of my paper, so instead I created my own, layering the tags across my card so that each rainbow covered four vertical stripes. I then added a plain white panel and stamped my sentiment at the very bottom, with a trio of pink hearts as an accent.

Ribbons of Colour - I decided to add a large and showy ribbon bow to my card, pulling colours from the rainbow paper and adding in some sparkly white too for an additional feminine touch. I also added some of the new iridescent rhinestones basic jewels from the mini catalogue. These are just so sparkly and pretty and I love the way they are faceted so take on some of the colour beneath them, which you can see closer on the photo below:


Since rainbows are very much a feature of today's card, I'm also linking up with the Paper Craft Crew (non-traditional colours) and over at Global Design Project #GDP355 where they also have rain/rainbows as their theme.

Here is the visual summary of the key products used on today's project for you to pin for easy reference:


You can see all of my Product and 'How To' summaries on my 'How To - Tips and Techniques' Pinterest board in case you've missed any. 

A tictactoe board offers so many creative possibilities - how does this week's board inspire you? Why not have a go? We would love to see you in the gallery and who knows - you might be selected for Designer's Choice and be eligible to be a guest designer on a future challenge. 

Enjoy the rest of your day; I'll be back tomorrow with another project for this week's new challenge over at As You See it. Until then, happy stampin'!


Stampin' Up! Supplies Used: 

Table built using Product Table Builder by The Crafty Owl - Independent Stampin' Up! Demonstrator.

Discounts on Last Chance Products From 7pm Today!

by Joanne James23. March 2022 09:00


It's nearly time to see all of the lovely items that will be retiring from the current 2021-22 Annual Catalogue!  I'm just popping by to let you know that the Last-Chance Products promotion will go live at 7pm this evening, UK time. All items retiring will be available for LAST CHANCE purchase, with some items that can be discounted by up to 50% - yay for a bargain!

As soon as the list is available, I will upload it here on my blog and share in to my Crafty Owl Creatives Facebook Group.

So set your alarms if you want to be at the front of the queue - there will be bargains to be had!

Artfully Layered CAS Slimline Birthday Card CCS462

by Joanne James22. March 2022 12:00

It's Tuesday and time for a new challenge over at CAS Colours & Sketches. This week's challenge is a sketch challenge and Jeanne has asked that we create a slimline card with the following layout: 


Feel free to flip or rotate the sketch when making your card. I chose to use this week's colours over at Just Us Girls for my card - I love the soft green and pink combination, with the added warmth of vanilla. You might have thought this would draw me to florals, but no - today's card is all about the leaves - take a look:


I decided to have my first outing with the beautiful 'Artfully Layered' stamp set and create a cluster of leaves on the corner of my slimline card. The leaves are quite large, so I went with a standard sized slimline (9.5cm x 21cm). I stamped two leaves in Soft Succulent directly onto my card base, one of these going off the edge and for this one I created a stencil and added some some soft Blushing Bride pink ink over the top. To finish I added a layered diecut leaf and a simple birthday sentiment from the same set, along with a trio of three pink enamel dots.

I love the variation in detail of all three leaves:

I also used a few of the other stamps in the set to add a little extra detail to the inside of my card:

And of course the new Slimline Envelopes in the mini catalogue also come in Soft Succulent,  so I had the perfect ready-made envelope all set to go too - bonus!

The Artfully Layered bundle is a new acquisition for me, having been persuaded by all of the wonderful cards I've seen with it, especially those created by my wonderful friend Jan Clothier - you can check out here blog here if you would like to see some of the amazing creations she has made with this set.

Here is the visual summary of the key products used on today's project for you to pin for easy reference:


You can see all of my 'How To' summaries on my 'How To - Tips and Techniques' Pinterest board in case you've missed any. 

Enjoy your day; It's only Tuesday and I am playing catch up already this week, having had my class day yesterday which is always busy. Add in an unscheduled hockey match today and the usual to-do list, piano lessons and the rest it is turning into a busy one! The sun is shining though and spirits are high, so I must get on. I'll be back tomorrow with another project. Until then, happy stampin'!


Stampin' Up! Supplies Used:

Table built using Product Table Builder by The Crafty Owl - Independent Stampin' Up! Demonstrator.

Flowering Tulips Clean And Simple PP583

by Joanne James20. March 2022 08:00

Today it's Sunday and time for this week's new challenge over at The Paper Players! It's the turn of the fabulous Laurie to host this week and she has a clean and simple challenge for us to work with showcasing 'Blooms':


I used the sketch over at Global Design Project #GDP334 for my layout and couldn't resist another tulip card! This one is super simple and all about the stamping so perfect for this week's TGIF Challenge too - take a look:


Here's the low-down on today's card:

I decided to move away from brights and pastels and create a dramatic purple tulip on today's card. I stamped a single tulip from the 'Flowering Tulips' stamp set in a combination of Blackberry Bliss and Rich Razzleberry, and added it to a Rich Razzleberry base using a couple of strips of Regals DSP in Blackberry Bliss at the top and bottom of my stamped panel to tie the two together. I resisted the urge to add anything else to my card - this is clean and simple week after all. Remember, we are looking for cards that:

  • Have minimal layers and embellishments
  • Have plenty of open space
  • Are simple and uncluttered


I also added a little additional stamping to the inside of my card to finish:


Here is the visual summary of the key products used on today's project for you to pin for easy reference:


You can see all of my Product and 'How To' summaries on my 'How To - Tips and Techniques' Pinterest board in case you've missed any. 

I love the deep purples on today's card, especially when paired with a pop of bright Granny Apple Green so I'm also linking today's card up over at The Alphabet Challenge where their current letter is 'Y for Your Favourite Colour Combination' - purple with green is definitely one of mine!

Before you reach for your ink and papers, check out what our amazing team has created to inspire you this week:

Here's a quick recap of our challenge rules:
 
1.  Create a new paper project
2.  Upload your creation to your blog with a link back to us and provide a direct link to the post featuring your challenge submission.
3.  Please link your card to no more than four challenges, TOTAL.
4.  Have FUN!

Enjoy your day; I'll be back tomorrow with another project. Until then, happy stampin'!


Stampin' Up! Supplies Used: 

Table built using Product Table Builder by The Crafty Owl - Independent Stampin' Up! Demonstrator.

Mini Catalogue

BROWSE THE CATALOGUE

The mini catalogue is now live! Read and download your copy here.

Shop Online

Access my online shop 24 x 7, 365 days of the year:

Current April hostess code:

VDKNV7BH

Shop Online

Join My Team

It's always a great time to join Stampin’ Up! New team members can get £130 worth of products for only £99 + free business supplies + free shipping + all the fun being a part of Stampin’ Up! Stampin' Up! has something for everyone: join my growing team and benefit from my support to enjoy Stampin' Up! however you choose.

If you're interested, call me for a chat to understand how I can help you realise your goals. Alternatively, if you have already decided to sign up and you just can't wait, please click here for the link to the online form where you can sign up and order your starter kit right away! 

Latest Kit!

Stampin Cut and Emboss

The Rock Legend Kit has all you need to make 8 cards with coordinating envelopes. Along with the new Panda Friends Kit, both are available from January 4th for just £14 each - get yours here!

2023-24 Annual Catalogue

BROWSE THE CATALOGUE

Click on the catalogue for a full list of current SU! supplies - if you would like to order any of the items featured, please drop me a line at [email protected] or give me a call on 07773 421446 - I'd be happy to help.

New Online Exclusives

There are new products available exclusively in the online store from 5 March - check them out here.

About Me

Hi I'm Joanne and live in Northampton and when I'm not looking after my husband and two beautiful children, am an avid crafter with a passion for all things Stampin' Up!

I must confess that I have never been a big rubber stamper - until I discovered Stampin' Up! that is. I love the fact that I can get such great results with co-ordinating stamps, inks, papers and punches - the possibilities are endless! Join me on my stamping journey as I share the things I love and be inspired to create amazing things yourself!

Follow Me

Monthly Newsletter

Box Builder

Click the button above to use Box Buster to create your custom box design using the Envelope Punch Board!

Kits Collection Now Available!

Stampin Cut and Emboss

The new Kits Collection from Stampin' Up! is now available!

Click here to see the current kits available and order yours online today.

I Design For


Stampin' Up Stuff

This is my personal blog and is not endorsed by Stampin’ Up! I hope you find it a plentiful source of ideas and personal inspiration but please don't copy my designs for contest submission or use for classes, publication or sale without express permission.