A New Kit and Online Exclusives Launch Today

by Joanne James1. March 2023 14:30

Happy Wednesday everyone! Sale-A-Bration may be over for another year, but the first day of a new month brings exciting news with two new announcements for you. First up - Online Exclusives!

Online Exclusives offer a great opportunity for new experiences! You won’t find these products in any catalogue; they are fresh, never-before-seen products to spark your creativity and expand your crafting collection - all from the convenience of the online store. You can see all of the items that have been launched today in my online store by clicking here.

Here are images of just some of the products available:


There will be a number of Online Exclusive product releases throughout the year so be sure to keep up to date!

Secondly, the latest addition to the Kits Collection by Stampin’ Up! also launches today and can be found in the online store.


The Colorful Kaleidoscope Kit is filled with geometric shapes and unique kaleidoscopic patterns. This kit includes 9 full-size cards, 3 each of 3 designs, measuring 4-1/4" x 5-1/2" (10.8 x 14 cm) and 9 coordinating envelopes and retails at £22. You can order yours in the online store by clicking here and here's a link to the unboxing video if you'd like a closer look:

That's all for today! Remember if you are shopping with me in the online store, remember to use the host code for March in order to receive a little thank you from me in the post.

Back soon with a creative post - until then, happy shopping!

Pretty Pop Up Dies Square Card PP629

by Joanne James26. February 2023 08:00

Today it's Sunday and time for this week's new challenge over at The Paper Players! It's the turn of the fabulous Jaydee to host this week and she has a sketch challenge for us to work with:

    May be an image of bird, nature and text that says '/sRATIN SPIRATION CHALLENGES #138 Daffodil Delight Granny Apple Green Tahitian Tide Highland Heather'

This is a great sketch from Jaydee this week and although we have the option to use any shape, I decided that the square format with a large central focal point would be a great opportunity to play with the largest of the Pretty Pop Up Dies which I haven't used for a while. So I grabbed the fresh colour palette over at Inkspirational and this is what I came up with:


Here's the low-down on today's card:

Have you seen the Pretty Pop Up Dies? They are another of those 'hidden gems' in the annual catalogue. You can find them on page 173 and they are a set of standalone dies without a co-ordinating stamp set. They consist of a range of shaped panels and individual pieces that have this amazing pop-up detail. The panel dies cut in one run through the die cutting machine - so easy! I cut mine on a piece of Whisper White, then coloured the individual pieces with my Stampin' Blends. I added some clear Wink of stella to my butterfly and dragonfly wings and added some (retired) Daffodil Delight pearls to the small flower centres:

I used a (retired) large circle die to cut out the panel and cut a circular frame in Tahitian Tide to tie it in to the background. I added in some foliage around my centre, made up by cutting the corner foliage piece from the Around the Bend Dies and creating a square (-ish) shape, layering four cut from Granny Apple Green cardstock and another four in Whisper White that I coloured with my light Granny Apple Green Blends marker and offsetting them to allow the colours to blend.

This is a completely no-stamping card; I just couldn't bring myself to cover up any of that pretty diecut detail, so I will make up for that on the inside. 

So what do you think of today's card? Do leave me a comment below, I'd love to hear your thoughts.

Here is the visual summary of the key products used on today's project for you to pin for easy reference:


You can see all of my Product and 'How To' summaries on my 'How To - Tips and Techniques' Pinterest board in case you've missed any. 

Before you reach for your ink and papers, check out what our amazing team has created to inspire you this week:

Here's a quick recap of our challenge rules:
 
1.  Create a new paper project
2.  Upload your creation to your blog with a link back to us and provide a direct link to the post featuring your challenge submission.
3.  Please link your card to no more than four challenges, TOTAL.
4.  Have FUN!

Enjoy your day; I am catching up today following my 2 day visit to Newcastle. Hopefully I'll be back tomorrow with another project. Until then, happy stampin'!


Stampin' Up! Supplies Used: 

Table built using Product Table Builder by The Crafty Owl - Independent Stampin' Up! Demonstrator.

Beautifully Happy Mother's Day Fancy Fold Card AYSI293

by Joanne James24. February 2023 12:00

Today I'm sharing my design team card for our new challenge over at As you See It where our leader and chief organiser, the lovely Heather C, has a recipe challenge for us with a distinctly feminine feel:


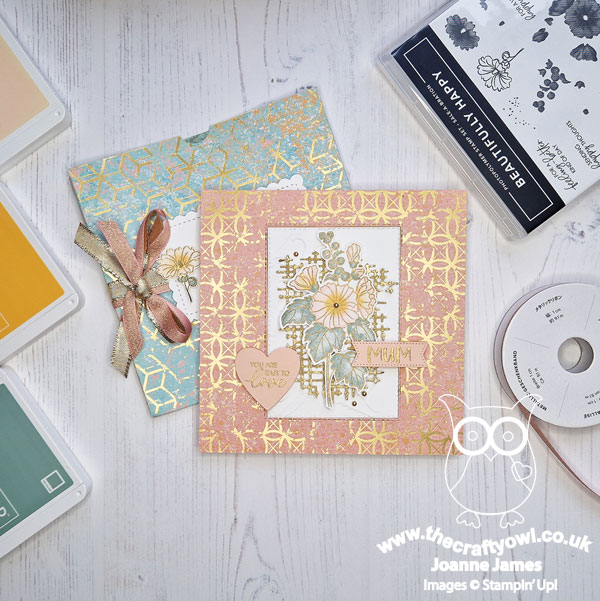
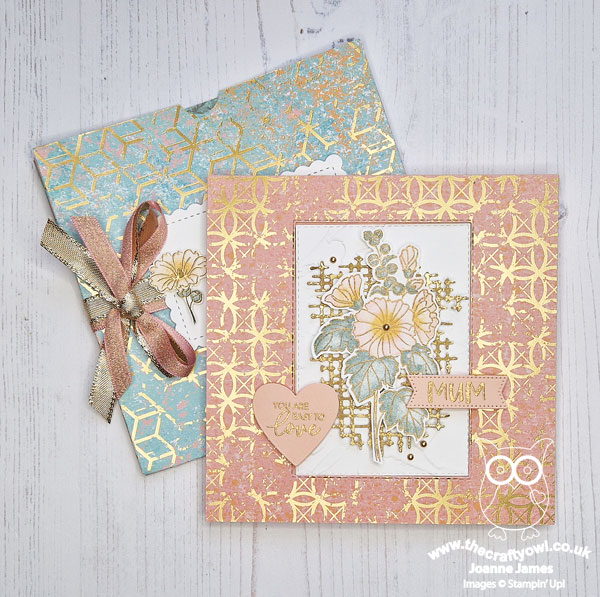
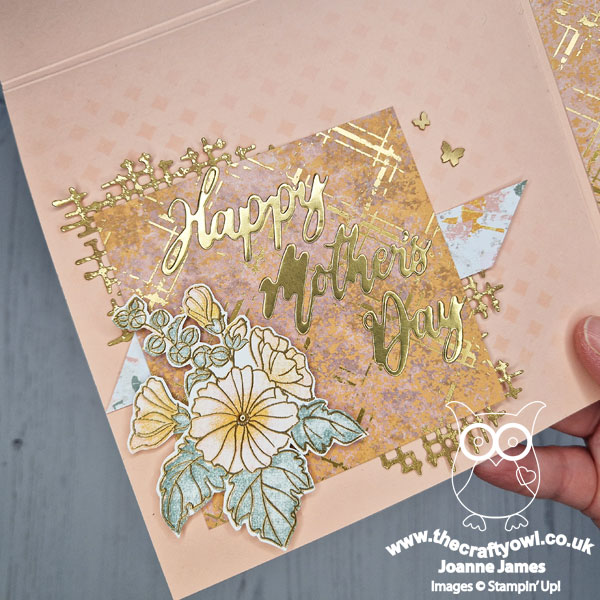
Recipe challenges usually send me into a bit of a spin, but this one actually worked out surprisingly well for me! I was inspired to have a go at a fancy fold card layout that was recently shared by Stampin' Up's CEO, Sara Douglas and decided to take the opportunity to make my Mother's Day card and use a new floral stamp set that will be available for just a few more days - take a look:


This is a photo-heavy post, so time to get comfy! Here's the low-down on today's card:

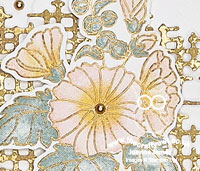
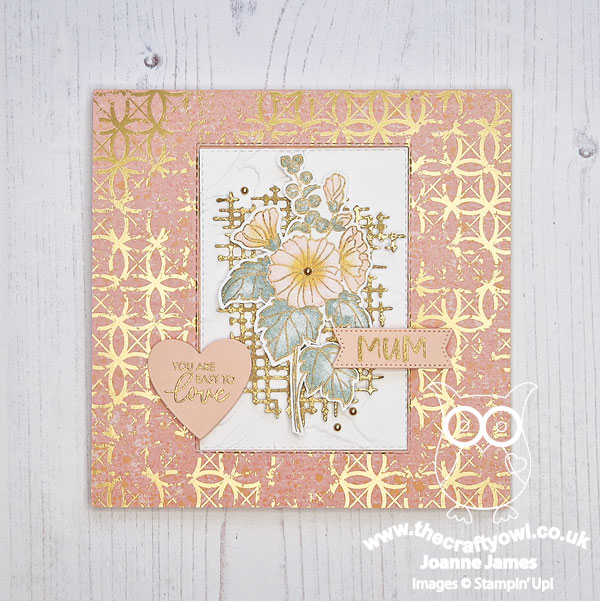
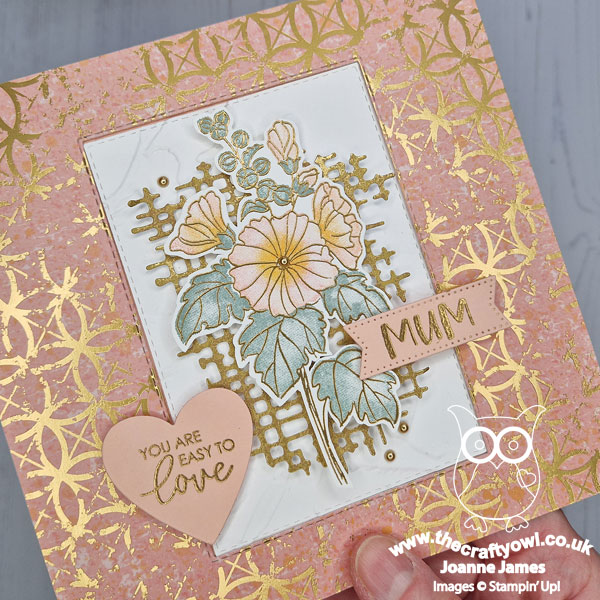
Beautifully Happy - The flower at the centrepiece of today's card is from the 'Beautifully Happy' stamp set - one of the items that can be yours FREE with a £90 purchase during the current Sale-A-Bration promotion. Can you believe I've had this set for almost 2 months and this is the first time I've used it?! So many stamp sets, so little time! Anyway, I digress - this is a two-step stamp set, with an outline that can be used along and coloured freehand, or alternatively used with the infill stamps. I wanted to heat-emboss my flower, so my Stamparatus was key here: I stamped the flower outline in Sahara Sand, then added the infills without removing from my Stamparatus, then stamped the outline again in Versamark and heat-embossed in gold. I fussy cut the main stem and added a gold pearl for the stamen and used this flower  as the centrepiece of my card:


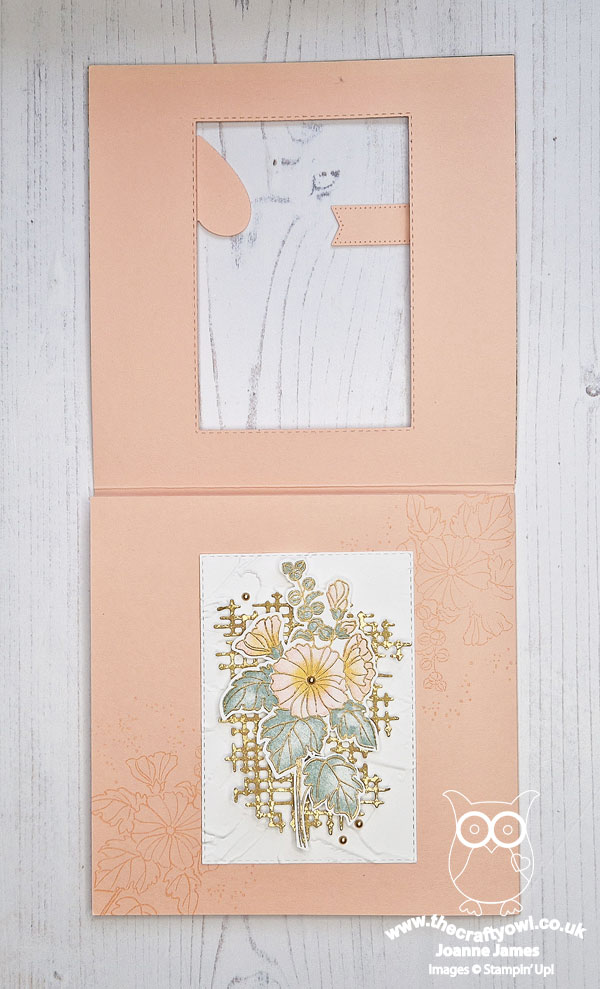
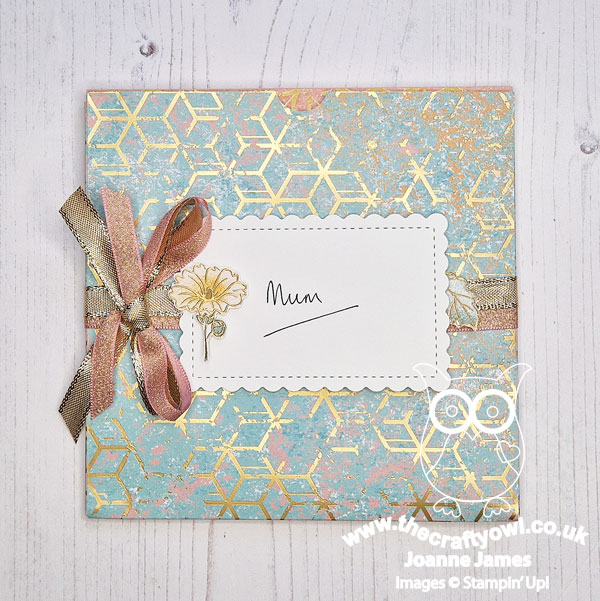
I also added a stemless version inside and a single bloom to my envelope label, and I used the outline for some tone-on-tone stamping on the first inside layer of my card - you can see below how the card opens:


The sentiment in the heart on the front of my card is also from this stamp set. If 'Beautifully Happy' is on your Sale-A-Bration wishlist, you have just 4 days to place your £90 order and receive this stamp set for free. Time to get shopping!

Texture Chic - The recipe ingredient of 'distressed paper' sent me immediately reaching for my Distressed Gold Specialty Paper and Texture Chic Specialty Designer Series Papers - both add a distressed look without any tearing or self-made grunge, neither of which are my style! The Texture Chic papers also include various shades of pink to compliment my Petal Pink stamped flower and lots of faux-texture. I also added actual texture with my Painted Texture Embossing Folder on the panel behind my fussy cut flower stem. 

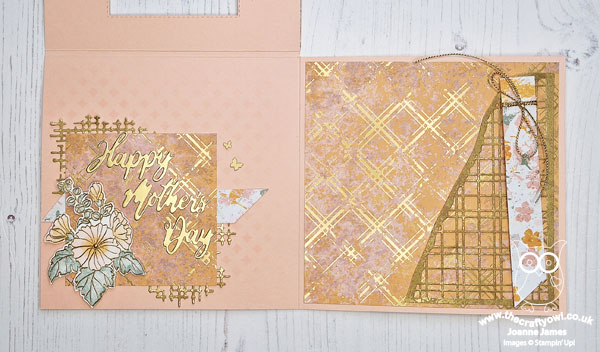
The Distressed Gold paper is just beautiful; I used it to add some hatched diecut details on both the front and left inside panels:


Here's a close-up of that detail on the left (the diecut sentiment uses the now retired Word Wishes Dies):


I also used the Distressed Gold Paper to create a pocket using the Split Textures Dies:


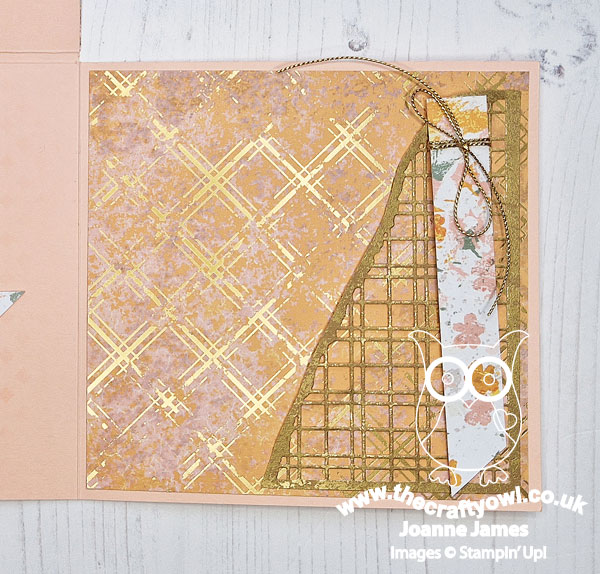
I handwrote my Mother's Day message, along with a poem, on a separate card that I tucked in here after photographing.

Fancy Inside and Out - A fancy card with a little bulk requires a fancy envelope too, so I created a simple file folder style, adding some retired ribbon and a scalloped address label. You can see in properly below:


Here is the visual summary of the key products used on today's project for you to pin for easy reference:


You can see all of my 'How To' summaries on my 'How To - Tips and Techniques' Pinterest board in case you've missed any. 

It's not Mother's Day here in the UK until next month (March 19th) but it pays to be organised! Equally, if you don't make or send Mother's Day cards, this could be easily adapted and used as a fancy birthday card for someone special. These kinds of card do take a long time to make, however for someone special it's totally worth it. I'm linking up today's card over at The Flower Challenge where they are asking us to use our newest flower stamps and dies - it looks like I'm getting there just in time!

Here's a summary of our challenge rules:

  • Create any card, scrapbooking page, 3D project or packaging project that fits the challenge.
  • Please include the challenge graphic and link back to the challenge in your blog post. Turn off word verification so we can leave you lots of lovely comments. Make sure you link the post not the whole blog to the Linky. Use #AYSIXXX when uploading to a public gallery.
  • If you’re unsure about ‘the rules’, check the details under the Challenge Guidelines tab on the As You See It Challenge homepage.
We look forward to seeing your creations in the AYSI gallery.

Enjoy your day. I'm off to the hairdressers first thing then am collecting the eldest of the James Juniors and a friend for a trip up north to Newcastle for a university offer day tomorrow, so that should be fun. I'll be back Sunday with my project for this week's Paper Players challenge so do join me then. Until then, happy stampin'!


Stampin' Up! Supplies Used:

Table built using Product Table Builder by The Crafty Owl - Independent Stampin' Up! Demonstrator.

Dainty Flowers For You At Easter TTT198

by Joanne James23. February 2023 16:00

It's Thursday and time for a new challenge over at TicTacToe! It's the turn of Team X to host this week and the lovely Felicita is our featured designer this week. This is the fun board that we are playing along with: 


I went across the middle row with Easter, free and floral and had some fun fussy cutting some of my Sale-A-Bration designer series papers - take a look:


Here's the low-down on today's card:

The Dainty Flowers designer series papers that are free with a £45 purchase during Sale-A-Bration are just lovely! I made a few different cards with these papers for my open house, but haven't gotten around to sharing them here. There is one sheet that has some beautiful oval frames of wildflowers and whilst you could use them as a simple frame for a stamped sentiment I had cut out some of them and wanted to show my customers how they can be used in different ways. I created a split panel using a sheet with a half oval and another half featuring one of the other patterns in the pack, and added a sentiment combining elements of the Love For You Dies with a retired Easter sentiment and added another staggered layer of fussy cut flowers: 


You do need to be a fan of fussy cutting to achieve this effect as these flowers are tiny, but I think it's worth it! The addition of a trio of brushed brass butterflies completes my Easter card.

The team over at TGIF Challenges are featuring Sale-A-Bration products so I'm linking today's card there - and remember, if you'd like to snap up these Dainty Flowers papers you have just 5 more days to do so, so head on over to my online store now!

Here is the visual summary of the key products used on today's project for you to pin for easy reference:


You can see all of my Product and 'How To' summaries on my 'How To - Tips and Techniques' Pinterest board in case you've missed any. 

A tictactoe board offers so many creative possibilities - how does this week's board inspire you? Why not have a go? We would love to see you in the gallery and who knows - you might be selected for Designer's Choice and be eligible to be a guest designer on a future challenge. 

Enjoy your day; I'll be back tomorrow with another project. Until then, happy stampin'!


Stampin' Up! Supplies Used: 

Table built using Product Table Builder by The Crafty Owl - Independent Stampin' Up! Demonstrator.

Favoured Flowers and Peaceful Moments

by Joanne James22. February 2023 13:30

Today I'm sharing a quick card that I made with the Favored Flowers designer series paper that is currently available free with a £45 purchase during Stampin' Up!'s Sale-A-Bration promotion:


Here's the low-down on today's card:

I used up a few more of my fussy cut flowers and this time I paired with a sentiment from the 'Peaceful Moments' stamp set and some co-ordinating banners using papers from the same pack.


These papers are bold and beautiful! The team over at TGIF Challenges are featuring Sale-A-Bration products this week so I'm linking today's card there - and remember, if you'd like to snap up these Favored Flowers papers you have just 6 more days to do so, so head on over to my online store now!

Here is the visual summary of the key products used on today's project for you to pin for easy reference:


You can see all of my 'How To' summaries on my 'How To - Tips and Techniques' Pinterest board in case you've missed any. 

Enjoy your day and I'll be back tomorrow with another project. Until then, happy stampin'!


Stampin' Up! Supplies Used:

Table built using Product Table Builder by The Crafty Owl - Independent Stampin' Up! Demonstrator.

Love Cats And Warm Quilts For CCS505

by Joanne James21. February 2023 13:00

It's Tuesday and time for a new challenge over at CAS Colours & SketchesThis week's challenge is a sketch challenge and I've designed a sketch with a split horizontal panel that offers lots of possibilities:


Feel free to flip or rotate the sketch when making your card. For my card today I wanted to try out an idea I've had brewing for a while - take a look:


Here's the low-down on today's card:

You know how much I love these 'Love Cats' and here I've used the lounging feline again; this time not on a ledge of designer paper though - I though the the background stencil in the Loveliest Layers Decorative Masks could be made to look like a quilted bedspread; I'm sure there are plenty of cat-lovers out there who allow their pets to lounge on their beds, so this card is for them! I stamped my cat in Basic Grey, masking the hearts and stamping separately in pink, then masked the whole cat with masking paper and added my stencil detail, using Tahitian Tide first, then rotating the stencil and filling in the gaps with Starry Sky to create my quilted effect. I added a scrap of stitched white cardstock to one end to suggest a folded sheet and my sentiment to finish my card. Here's a closer look at the stencilling:


So the question is - did you see what I saw with these stencils? I'm wondering if I should have added a scallop-edged 'pillow' with my sentiment to further add to the effect - maybe next time! I am thoroughly enjoying exploring with stencils - I'm also linking up for a second entry over at Inkspirational where they are focusing on stencils for their current challenge. If like me you are discovering the delights of stencils, do check out their design team cards and gallery too - lots of lovely stencil inspiration. 

Here is the visual summary of the key products used on today's project for you to pin for easy reference:


You can see all of my 'How To' summaries on my 'How To - Tips and Techniques' Pinterest board in case you've missed any. 

Enjoy your day and I'll be back tomorrow with another project. Until then, happy stampin'!


Stampin' Up! Supplies Used:

Table built using Product Table Builder by The Crafty Owl - Independent Stampin' Up! Demonstrator.

Waves of Inspiration Striped Birthday Card

by Joanne James20. February 2023 16:29

Today I've a quick post in between my housework to share a card I made for a few challenges:


I was intrigued by Kim's stripes on her Freshly Made Sketches layout this week and wanted to try and use them for a slightly different, slightly abstract card using the trio of blues over at Color Daretake a look:


Here's the low-down on today's card:

I added a panel of alternating stripes and used these as a backdrop for a pair of waves in white and (retired) night of Navy foil, cut with my Waves Dies - I thought these colours had quite a nautical feel to them. A simple birthday sentiment from the co-ordinating 'Waves of Inspiration' stamp set completed the front of my card:


I added a little decoration to the inside of my card, this time stamping the wave and adding a trio of stripes to extend it to the edge, along with another sentiment from the set:


A clean and simple card that will be perfect for a masculine birthday - so I'm linking up over at Sparkles too where they are creating for 'men only' this month and over at the Alphabet Challenge Blog where they are on 'W for Water'.

Here is the visual summary of the key products used on today's project for you to pin for easy reference:


You can see all of my 'How To' summaries on my 'How To - Tips and Techniques' Pinterest board in case you've missed any. 

Short and sweet from me today - dinner needs to be prepared and there is an overflowing ironing basket to be tackled! Enjoy the rest of your day and I'll be back tomorrow with another project. Until then, happy stampin'!


Stampin' Up! Supplies Used:

Table built using Product Table Builder by The Crafty Owl - Independent Stampin' Up! Demonstrator.

Cup Of Tea Get Well Soon PP628

by Joanne James19. February 2023 08:00

Today it's Sunday and time for this week's new challenge over at The Paper Players! It's the turn of the fabulous Claire to host this week and she has a clean and simple challenge for us to work with:


Isn't a cup of tea the cure for all ills? It is in my house, for sure! As such I reached for the 'Cup of Tea' stamp set and set about creating a soothing paper-based version for the perfect pick-me-up, using this week's Color Throwdown colours and the layout over at Hand Stamped Sentiments - take a look:


Here's the low-down on today's card:

Claire has chosen 'get well soon' as our theme however since it is clean and simple week, it's worth a reminder of what we at The Paper Players mean by Clean and Simple:

  • Minimal layers and embellishments
  • Plenty of open space, aka "white" space
  • Simple and uncluttered

I have taken a slight liberty with my card today - ordinarily I would have not included the dots & spots diecut layer, but I liked this additional detail, especially with the three panels, and it seemed a little too 'clean' without, so I decided to go with it! My card is otherwise simple and uncluttered, with minimal layers and embellishments, so that's all good.

I added a cup of tea, stamped and filled with flowers as the focal point for my card and added a couple of lemon slices and my fussy cut sentiment to finish:


If you are under the weather, I think this card would be the perfect way to send get well wishes.

Here is the visual summary of the key products used on today's project for you to pin for easy reference:


You can see all of my Product and 'How To' summaries on my 'How To - Tips and Techniques' Pinterest board in case you've missed any. 

Before you reach for your ink and papers, check out what our amazing team has created to inspire you this week:

Here's a quick recap of our challenge rules:
 
1.  Create a new paper project
2.  Upload your creation to your blog with a link back to us and provide a direct link to the post featuring your challenge submission.
3.  Please link your card to no more than four challenges, TOTAL.
4.  Have FUN!

Enjoy your day; I'll be back tomorrow with another project. Until then, happy stampin'!


Stampin' Up! Supplies Used: 

Table built using Product Table Builder by The Crafty Owl - Independent Stampin' Up! Demonstrator.

Hand-Penned Petals Feel Better Friend Card

by Joanne James18. February 2023 13:28


Today I'm sharing a card that I made using this week's colour palette over at Global Design Project #GDP381:


I love purples, but wasn't sure I could balance this colour combination. I decided I needed to balance it with a lot of white. I had also been considering which of the cards on page 5 of the Sale-A-Bration catalogue I was going to CASE for the current SUO Challenges challenge, and then I had an idea as to how I could bring the two together! I still had my Hand-Penned Petals bundle out on my desk from Thursday's card, so grabbed it and this is what I came up with:


Here's the low-down on today's card:

CASE Copy And Share Everything - Despite the rather literal definition, as a rule of thumb you should aim to alter the least three things on your card so that whilst the similarities to the original card are clear, you create something that is unique to you. So can you see from the photo below which card I CASE'd? 


Yes, it's the one with the bird's nest, coloured strips and spring sentiment. The layout is instantly recognisable - but the colours, stamp set, dies and sentiment are all different.

Make Your Own Background - The Hand-Penned Petal stamp set is a two-step set and has lots of Small stamps that can be used as infills for the flower and leaf outlines. Do you ever look at these stamps and consider how they could be used differently? Today's card is a good example. I used a different stamp for each of my coloured strips to create a unique tone-on-tone pattern. You can see each pattern more closely on the photo below:


What stamps do you have in your collection that could be used in this way?  

White on White - With those blocks of colour as my base, I wanted my diecut focal point to be white. I layered the large posy from the Penned Petal Dies, along with a few additional flowers and leaves, with just a single gem of colour. A trio of loose flower embellishments in Fresh Freesia and my get well soon sentiment complete my card.

Here is the visual summary of the key products used on today's project for you to pin for easy reference:


You can see all of my 'How To' summaries on my 'How To - Tips and Techniques' Pinterest board in case you've missed any. 

I've done double duty at the hockey pitch today covering home and away matches, so I am going to enjoy an evening with my feet up in front of the TV.  Enjoy your evening and I'll be back tomorrow with another project. Until then, happy stampin'! 


Stampin' Up! Supplies Used:

Table built using Product Table Builder by The Crafty Owl - Independent Stampin' Up! Demonstrator.

Have A Holly Jolly Christmas FF128

by Joanne James17. February 2023 09:00

Today I have my card for the new challenge over at Festive Friday Card Making and Paper Crafting Challenge


The challenge that we are celebrating this week is 'World Music Therapy Day' which is on March 2nd. Remember the fun thing is that at Festive Friday you do not need to actually celebrate the occasion; your goal is to simply use three or more items from the inspiration list on your project. This week I used the layout over at Sketch Saturday and notes, lyrics and twine from the inspo list and this is what I came up with:


Here's the low-down on today's card:

I went with a Christmas card for today's theme - I know it's February, but you can never start too early with festive preparations! I used the Merry Melody Embossing Folder for my background and continued my musical theme with the lyrics to a seasonal tune (apologies now if you end up singing along to Michael Buble for the rest of the day!), embellished with some stamped holly:


I finished the inside with a little additional co-ordinated stamping:

I think this might be my first Christmas card of 2023 - let's hope I can keep it up!

Here is the visual summary of the key products used on today's project for you to pin for easy reference:


You can see all of my 'How To' summaries on my 'How To - Tips and Techniques' Pinterest board in case you've missed any. 

How does our board inspire you? I can’t wait to see what YOU create! For more inspiration, be sure to visit the rest of the Festive Friday Card Making and Paper Crafting Challenge Design team:


Enjoy your day and I'll be back tomorrow with another project. Until then, happy stampin'!


Stampin' Up! Supplies Used:

Table built using Product Table Builder by The Crafty Owl - Independent Stampin' Up! Demonstrator.

Mini Catalogue

BROWSE THE CATALOGUE

The mini catalogue is now live! Read and download your copy here.

Shop Online

Access my online shop 24 x 7, 365 days of the year:

Current April hostess code:

VDKNV7BH

Shop Online

Join My Team

It's always a great time to join Stampin’ Up! New team members can get £130 worth of products for only £99 + free business supplies + free shipping + all the fun being a part of Stampin’ Up! Stampin' Up! has something for everyone: join my growing team and benefit from my support to enjoy Stampin' Up! however you choose.

If you're interested, call me for a chat to understand how I can help you realise your goals. Alternatively, if you have already decided to sign up and you just can't wait, please click here for the link to the online form where you can sign up and order your starter kit right away! 

Latest Kit!

Stampin Cut and Emboss

The Rock Legend Kit has all you need to make 8 cards with coordinating envelopes. Along with the new Panda Friends Kit, both are available from January 4th for just £14 each - get yours here!

2023-24 Annual Catalogue

BROWSE THE CATALOGUE

Click on the catalogue for a full list of current SU! supplies - if you would like to order any of the items featured, please drop me a line at [email protected] or give me a call on 07773 421446 - I'd be happy to help.

New Online Exclusives

There are new products available exclusively in the online store from 5 March - check them out here.

About Me

Hi I'm Joanne and live in Northampton and when I'm not looking after my husband and two beautiful children, am an avid crafter with a passion for all things Stampin' Up!

I must confess that I have never been a big rubber stamper - until I discovered Stampin' Up! that is. I love the fact that I can get such great results with co-ordinating stamps, inks, papers and punches - the possibilities are endless! Join me on my stamping journey as I share the things I love and be inspired to create amazing things yourself!

Follow Me

Monthly Newsletter

Box Builder

Click the button above to use Box Buster to create your custom box design using the Envelope Punch Board!

Kits Collection Now Available!

Stampin Cut and Emboss

The new Kits Collection from Stampin' Up! is now available!

Click here to see the current kits available and order yours online today.

I Design For


Stampin' Up Stuff

This is my personal blog and is not endorsed by Stampin’ Up! I hope you find it a plentiful source of ideas and personal inspiration but please don't copy my designs for contest submission or use for classes, publication or sale without express permission.