
Today I'm sharing my design team card for our new challenge over at As you See It where it's time for my favourite, a sketch challenge courtesy of the lovely LeAnne:
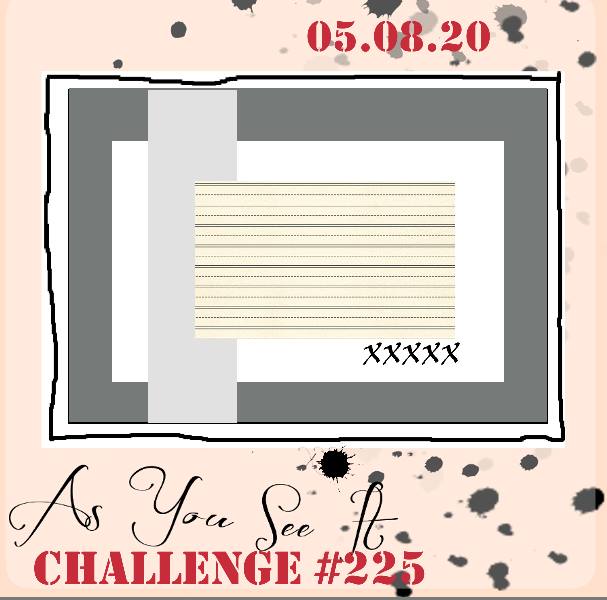

I have been trying to get some use out of sets that are about to retire and decided to pair today's sketch with the wedding theme over at Global Design Project and create a wedding card for the bride - take a look:
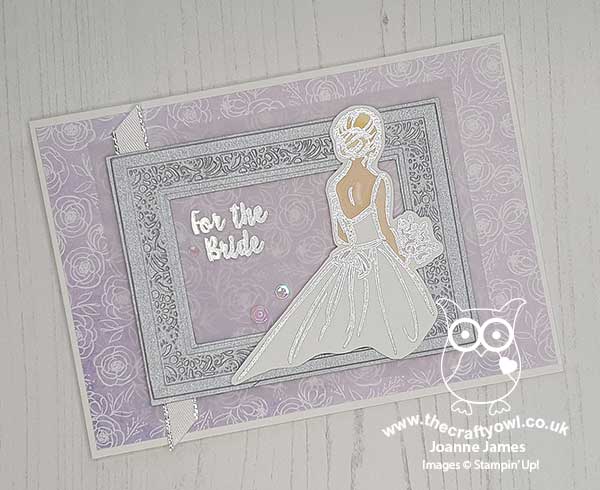
Here's the low-down on today's card:
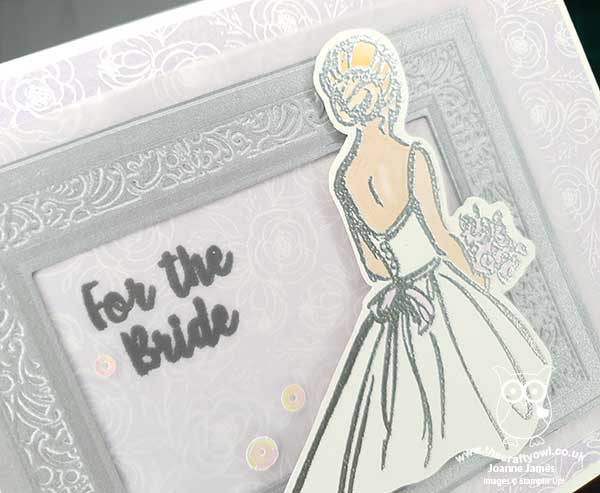
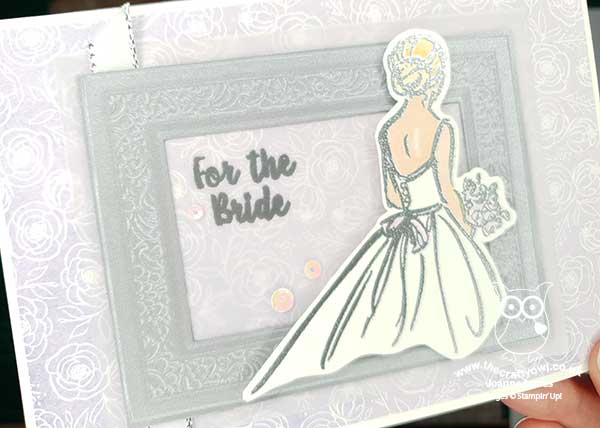
For The Bride - I bought the 'Wonderful Moments' set the minute it became available in the catalogue; I love the style of the artist - it's the same design as 'Beautiful You', 'Artfully Aware', 'A Good Man' and 'Beautiful Moments' - and in this particular set it was the bride image that sold it to me. That said - this is the very first time I've inked it up!! Clearly 'so many stamp sets, so little time' in my house!! For me though it is a keeper - the set has some great sentiments, and I adore this bridal image. I decide to heat emboss my image in silver which can be a little tricky to photograph, so I've added a couple of extra images so that you can appreciate the detail and shine:
Lovely In Lavender - I paired my silvers with one of my favourite and oft overlooked papers in the Best Dressed DSP stack - I love the subtle white roses on the variegated Purple Posy background and I couldn't resist using it for my background today. I have a friend who actually got married in a wedding dress that was this soft lilac colour and this card reminds me of that day.
Outside the Frame - I wanted to use an embossed rectangular frame for one of the layers on my card (I used some retired brushed silver cardstock) but rather than frame my image, I fussy cut the bride and positioned her outside the frame for maximum impact. I really like the finished effect:
I did take one or two liberties with LeAnne's sketch, especially with the sentiment placement, which I had to move and place inside my frame (I heat embossed it on vellum and used this as another of my layers) and I downplayed the vertical strip with a piece of metallic edged ribbon, but hopefully you can see the broad layout there. Either way, I LOVE this card and hope you do too! I had no-one in mind to send my card to when I made it and Rebecca popped her head around the door as I was photographing and asked me who it was for. Jokingly, as the bride has her colouring, I said "no-one in particular; maybe I'll keep it for you." She promptly said "Put it somewhere safe then - it will be at least 25 years before I get married!!" What can I say - a typical teenage girl with other things on her mind!
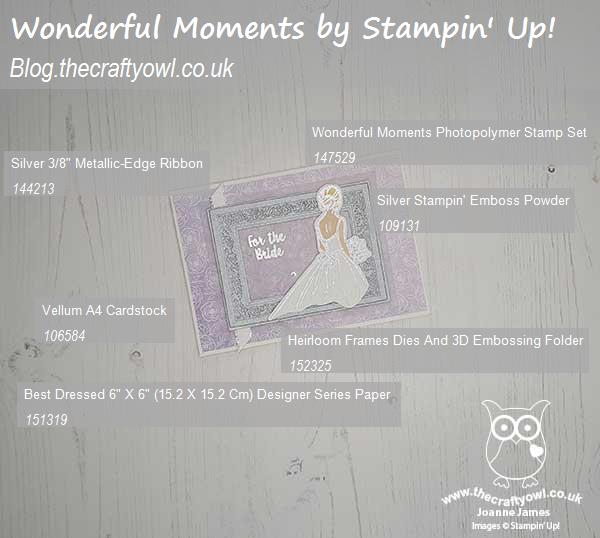
Here is the visual summary of the key products used on today's project for you to pin for easy reference:
You can see all of my 'How To' summaries on my 'How To - Tips and Techniques' Pinterest board in case you've missed any.
Before you put your creative thinking caps on, why not check out the blogs of the other As You See It team members:
Amy Jasper
Heather Cooper
Jan Clothier
Jane Knudsen
LeAnne Pugliese
Here's a summary of our challenge rules:
- Create any card, scrapbooking page, 3D project or packaging project that fits the challenge.
- Please include the challenge graphic and link back to the challenge in your blog post. Turn off word verification so we can leave you lots of lovely comments. Make sure you link the post not the whole blog to the Linky. Use #AYSIXXX when uploading to a public gallery.
- If you’re unsure about ‘the rules’, check the details under the Challenge Guidelines tab on the As You See It Challenge homepage.
- In a sketch challenge, you are welcome to rotate or flip a sketch. You can replace shapes used such as substituting a circle panel for a square panel. However, we must be able to still see the basis of the original sketch in your finished product.
We look forward to seeing your creations in the AYSI gallery.
Enjoy your day; we have a Bank Holiday here in the UK today to celebrate the 75th Anniversary of VE (Victory in Europe) day. There was a Red Arrows flypast during one of my online demonstration sessions this morning and one of the ladies on the call was lucky enough to see them fly overhead through her skylight as we crafted. I didn't see or hear them but one of the ladies in my choir snapped this rather good photo:
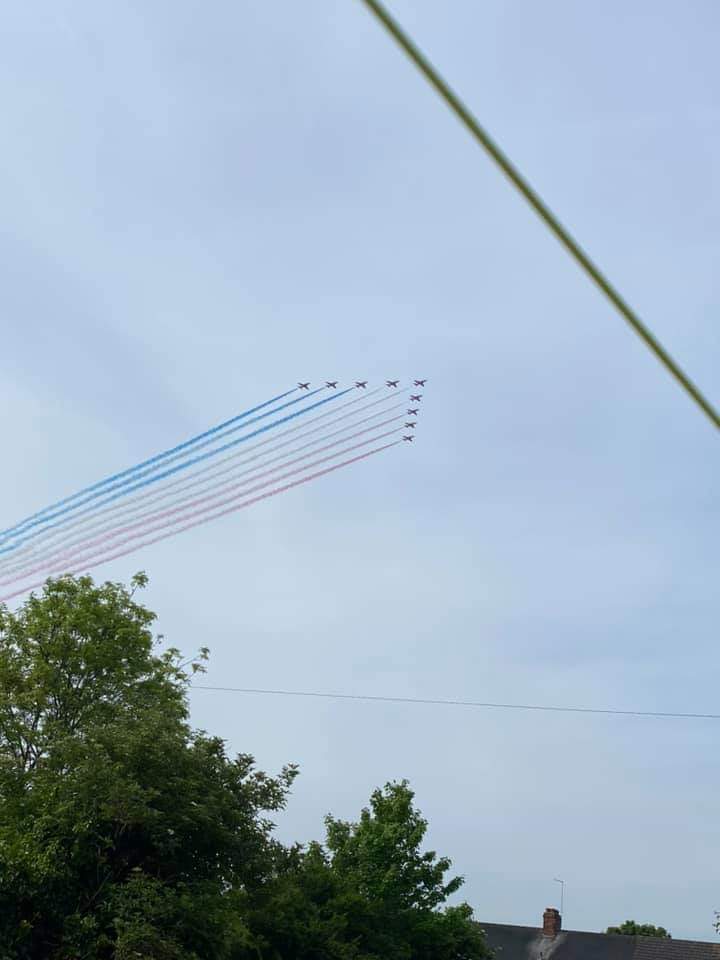
They fly by so fast it's quite tricky to catch a good photo. I hope you enjoy the rest of your day and I'll be back tomorrow with another project. Until then, happy stampin'!
Stampin' Up! Supplies Used: