Driving Home For Christmas Card

by Joanne James21. September 2017 05:00

Today I'm sharing a card for this week's TGIF Challenge and uses the sketch layout over at Fusion:


I'm back with a Christmas card today featuring another of the festive Christmas Around The World DSP patterns - take a look:


Here's the low-down on today's card:

Driving Home For Christmas - I'm still in Christmas mode as far as my card making is concerned, but that didn't stop me joining with the TGIF team this week - with sleighs, donkeys and so much more besides, there are festive transportation options a-plenty! I decided to have another crack at using the Christmas Around The World designer series paper and specifically another of the larger designs featuring festive cars and bicycles, all transporting Christmas trees and piles of luggage and festive gifts across the sheet. The design on this sheet of paper totally makes me think of the Christmas song made famous by Chris Rea called 'Driving Home For Christmas' - I made this card and was humming the tune for ages afterwards (apologies if that's you now having read today's post!) Whilst I used a smaller piece of the paper compared to my nutcracker card earlier this week (you can see that card here), I still made sure I cut a piece that fitted with the theme of my card so that the little cards and bikes  are clearly identifiable.  

And Hearts Too - I matched my paper with a sentiment from the 'Hearts Come Home' stamp set, which also fit perfectly with my theme. I stamped it on a stitched circle and added a couple of Real Red enamel hearts and a trio of snowflakes from the 'Hang Your Stockings' set across the bottom for additonal decoration. 

There's Always Room For  A Bow - Lastly, I added a wooden bow from the co-ordinating Christmas Around The World embellishment set. A nice finishing touch to bring the elements together. 

Here is the visual summary of the key products used on today's project for you to pin for easy reference:


You can see all of my 'How To' summaries on my 'How To - Tips and Techniques' Pinterest board in case you've missed any. 

I have another busy day today so enjoy your day and I'll be back tomorrow with another project. Until then, happy stampin'!


Stampin' Up! Supplies Used:

Table built using Product Table Builder by The Crafty Owl - Independent Stampin' Up! Demonstrator.

Seasonal Layers Autumn Leaves For The Color Throwdown #CTD461

by Joanne James20. September 2017 17:00

Today I have something a little different for you! Do you remember this card from a couple of week's ago? Well, it won me the honour of being Featured Stamper for Challenge #459 over at The Color Throwdown and resulted in me being invited to be their Guest Star Stamper this week - woo hoo!

Here is the colour palette that has been chosen for this week's challenge:


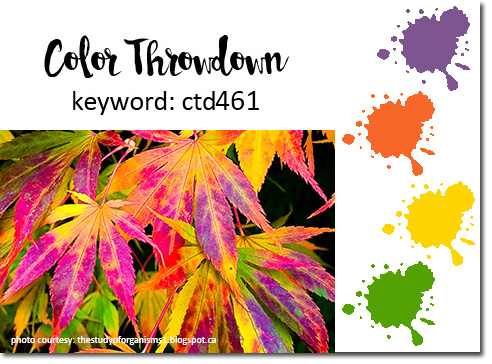
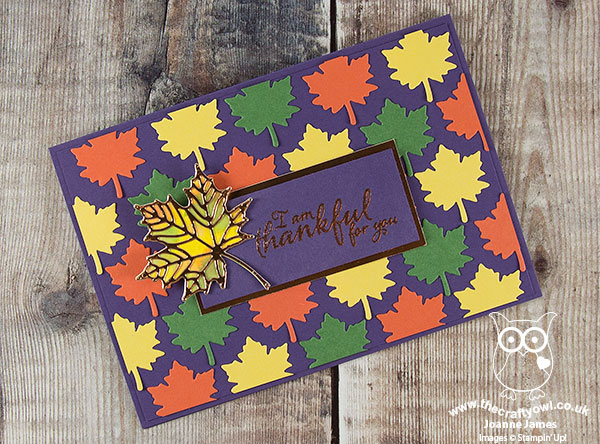
I love these colours but wasn't sure I could make them work with anything other than a Halloween card and I haven't bought any new Halloween stamp sets this year (shock horror!); it's more about treat packaging and home decor here in the UK rather than cards, however I loved that gorgeous inspiration photo with its colourful autumn leaves and decided to use that as my starting point instead. This is what I came up with:


Here's the low-down on today's card:

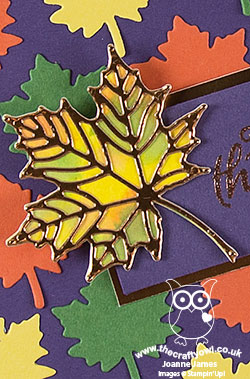
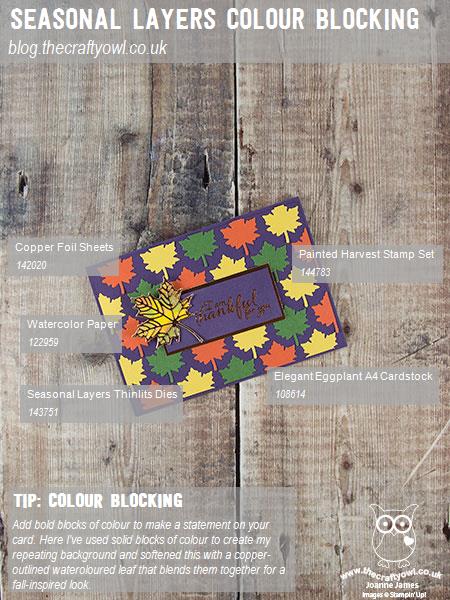
Colour Blocked Leaves - I decided to meet these colours head-on and go with bold blocks of colour to really make a statement. Using my Seasonal Layers thinlits I cut a whole bunch of brightly coloured leaves to create my repeat pattern and glued them to my purple card base. It's almost like faux-embossing, only with each of the leaves a different colour.

Touches of Copper - I knew I wanted a sentiment for this card, so decided to use one of my current favourites from the 'Painted Harvest' stamp set; so perfect for fall/autumn and the season of Thanksgiving. I heat embossed it in copper and backed my sentiment panel with gold foil too, so that along with my single detailed leaf outline it would add a little definition to my card and stand out against the bright colours.

A Watercolour Accent - I needed something else to accompany my sentiment that would work with my bold colours and patterns, so decided to create a layered leaf accent using the larger leaf dies from the Seasonal Layers Thinlits set. I used my green, yellow and orange re-inkers to watercolour a piece of watercolour paper using my aquapainter, then layered it with the skeleton leaf diecut out of copper foil. I love the contrast with the background blocks of colour and the interest and dimension this adds to my card.  

I'm also linking today's card up with the gals over at SUO Challenges where the theme is Autumn colours - my second one this week, it must be the season! Here is the visual summary of the key products used on today's project for you to pin for easy reference:


You can see all of my 'How To' summaries on my 'How To - Tips and Techniques' Pinterest board in case you've missed any. 

Thank you to all the ladies at The Color Throwdown for inviting me to guest with them this week - do check out their blogs to see how they interpreted this colour combination, there is lots of great inspiration there!

Enjoy your evening and I'll be back tomorrow with another project. Until then, happy stampin'!


Stampin' Up! Supplies Used:

Table built using Product Table Builder by The Crafty Owl - Independent Stampin' Up! Demonstrator.

Half Full Glasses of Red Friendship Card

by Joanne James18. September 2017 20:20

Happy Monday everyone! I've had a busy start to my week with some batch cooking but also managed some much-needed time in my craft room. I managed a few productive hours so I've lots to share with you this week! Today I'm sharing a quick card that I might just manage to squeeze in for this week's challenge over at CAS Colours and Sketches


I've not managed to play along with these ladies for a few weeks and this sketch almost had me foxed, when I had a flash of inspiration this afternoon and came up with this fun - and quick! - one-layer card:


Here's the low-down on today's card:

A Glass of Red (or 7!) - I decided to ink up my 'Half Full' stamp set for today's card. I loved this stamp set the moment I saw it and knew I would use it not only for Christmas cards but, as a wine drinker who enjoys a glass of red now and then, on lots of other occasions too. These stamps also make for easy tags to pretty up a bottle of wine for a party hostess - but more on that another day. 

A Touch Of Shine - To add a little shine to my wine glasses, I painted them with my fine tip glue pen so that they took on the appearance of glass. It's quite difficult to see on the photograph, but adds a lot to the finish in real life.

Can You See It? - Some may say I was a little loose in my interpretation of this week's sketch, but I can assure you it's there: three elements, getting wider as they extend down the card, with images above and below the central sentiment. I did exercise a little creative licence with the positioning of the first, larger glass, however I think it works well this way. What do you think - should sketches be interpreted literally or do they allow for a modicum of creative interpretation? Do leave me a comment below - I'd love to hear your thoughts. 

Here is the visual summary of the key products used on today's project for you to pin for easy reference:


You can see all of my 'How To' summaries on my 'How To - Tips and Techniques' Pinterest board in case you've missed any. 

That's me done for today; I'll be back tomorrow with another project. Until then, happy stampin'!


Stampin' Up! Supplies Used:

Table built using Product Table Builder by The Crafty Owl - Independent Stampin' Up! Demonstrator.

Christmas Around The World Square Card

by Joanne James16. September 2017 10:00

Today I'm sharing a card for this week's challenge over at Freshly Made Sketches where Amy has this great sketch for us:

I had lots of thoughts on how I could use this sketch but in the end it was a chance conversation with the ladies in my technique class this week that resulted in today's card:


Here's the low-down on today's card:

Take A Square Of Paper - The Christmas Around The World designer series paper has lots of great patterns in it, with some fabulous plaids but also some rather bold repeating patterns that can be difficult to use. This was the basis of the discussion I was having with my class ladies, who were struggling to imagine how they would use the busy patterns in this set: the wreaths, transport paper, sweet things and this pattern featuring the nutcrackers. I reflected on this conversation and decided that this sketch is a great way to demonstrate how such busy patterns can be used to great effect: use a large piece of paper and make it the focus of the card, with very little else to distract or clash with it. 

A Single Sentiment - To this end, I added nothing more to the front of the card than a couple of coloured background pieces behind my sentiment banner. I decided to heat emboss my sentiment from the 'Sugarplum Dreams' set in gold onto Basic Black cardstock for dramatic effect - I really like the finish.  

Don't Forget The Inside - The sentiment is the only stamping on the front of my card - I did however stamp the other word stamp from the 'Sugarplum Dreams' stamp set and a nutcracker, which I coloured with marker pens, onto the inside of my card. Whilst I didn't forget to stamp it, I did forget to photograph it to share with you - oops! I will do that tomorrow and come back and add the picture here for you to see - now edited to add:


And that's it - actually quite a simple card to make, I think I might make a few more of the same design with the remains of my sheet of DSP!

Here is the visual summary of the key products used on today's project for you to pin for easy reference:


You can see all of my 'How To' summaries on my 'How To - Tips and Techniques' Pinterest board in case you've missed any. 

Enjoy your day and I'll be back tomorrow with another project. Until then, happy stampin'!


Stampin' Up! Supplies Used:

Table built using Product Table Builder by The Crafty Owl - Independent Stampin' Up! Demonstrator.

Stepped Up Winter Wonder Embossed Snowflake Card and Coordinating Mini Pizza Gift Box

by Joanne James14. September 2017 21:00

Following yesterday's clean and simple embossed snowflake, I'm following up today as promised with a 'stepped up' version of that card, along with a co-ordinating mini pizza gift box. Let's take a look at today's card:


 Here's the low-down on today's card:

Step It Up If you have a bit more time and are feeling more adventurous, using a few extra tools and embellishments will allow you to 'step up' your card and create something with a little more depth and detail, whilst still relatively easy to make. Here I added a centrepiece of a stamped and silver embossed snowflake from the gorgeous new Snowflake Sentiments set, backed with a punched circle of silver glimmer paper, some metallic edged ribbon and a foil snowflake for some Christmas sparkle. 

Mini Pizza Anyone? - Have you noticed these fabulous little Mini Pizza Boxes on page 44 of the seasonal catalogue? These sturdy white boxes come flat packed for easy storage and are a great size for a few chocolates, notecards or even a cookie - they're foodsafe with a greaseproof lining and perfect for small gifts - and mini pizzas too! I decorated mine with the same embellishments as my card, along with a base of Year Of Cheer Specialty Designer Series Paper:


I also added a little tag made from the useful thinlit in the Swirly Snowflakes Thinlits Dies set, decorated with a diecut snowflake.

Here is the visual summary of the key products used on today's project for you to pin for easy reference:


You can see all of my 'How To' summaries on my 'How To - Tips and Techniques' Pinterest board in case you've missed any. 

Enjoy your day and I'll be back tomorrow with another project. Until then, happy stampin'!


Stampin' Up! Supplies Used:

Table built using Product Table Builder by The Crafty Owl - Independent Stampin' Up! Demonstrator.

Clean And Simple Winter Wonder Embossed Snowflake Card

by Joanne James13. September 2017 21:00

Wednesday already - where does the week go?! I had a technique class yesterday and was out on the rugby touchline for the first game of the season today (a narrow 8-7 defeat, but well-played all round) and have lots of makes to share so thought it was about time I squeezed in a quick blog post! Today I'm sharing a super quick and easy Christmas card that would be perfect for mass production - take a look:


Here's the low-down on today's card:

Winter Wonder - It's that snowflake again! Yes, the Winter Wonder Embossing Folder produces such great texture and dimension, it really is a centrepiece in itself. 

A White Christmas - A simple design in all-white can be really effective; here I've layered my embossed snowflake panel onto an extra-thick whisper white cardbase for a seamless design. 

A Simple Sentiment Banner - To finish, I added a simple sentiment banner, heat embossed in silver. This could just as easily be stamped in a colour of your choice. Equally, I used a sentiment from the 'Christmas Pines' stamp set, but this could be switched out for any similar one-line stamp. I stepped my banner, but it still pushes flat for posting - great for friends and family mailings in the run up to Christmas. A trio of rhinestones for a little festive sparkle complete my card.

Here is the visual summary of the key products used on today's project for you to pin for easy reference:


You can see all of my 'How To' summaries on my 'How To - Tips and Techniques' Pinterest board in case you've missed any. 

This card would be great if you want to make a whole bunch of cards in one go, so if you need to make a big dent on your Christmas card making, this could be the card for you!

Enjoy your day and I'll be back tomorrow with another project that also uses the snowflake embossing folder, but is a stepped up version with a matching gift box too. Until then, happy stampin'!


Stampin' Up! Supplies Used:

Table built using Product Table Builder by The Crafty Owl - Independent Stampin' Up! Demonstrator.

A Winter Wonder Joy Christmas Card

by Joanne James9. September 2017 16:30

Yay, it's the weekend! I've had a busy week and didn't manage to squeeze in yesterday's blog post following my open house event to celebrate the launch of the new Autumn-Winter catalogue - a big thank you to all the lovely ladies who attended - so I'm back today with the Christmas card I promised for this week's challenge over at Merry Monday - I need to get cracking on building my festive stash:

I had a marathon session this week creating cards using the new snowflake embossing folder and knew that this would be perfect for the challenge - take a look:


Here's the low-down on today's card:

Year Of Cheer - My card was inspired by the wonderful display of projects on page 36 of the seasonal catalogue featuring the Year Of Cheer Suite - the combination of whites and metallics and intricate foiled papers are perfect for seasonal wintry projects. I particularly love the papers in this suite - the foil patterns are gorgeous and work for lots of occasions, not just Christmas, The snowflake foiled pattern was just the right base for my wintry Christmas card.

A Winter Wonder - I'm generally not big into embossing folders, but there are a few in my collection that are absolute keepers and at this time of year are much loved and used. Two of my long-time favourites are the Woodland TIEF and my all-time favourite Softly Falling however I am pleased to report that the Winter Wonder Textured Impressions Embossing Folder will be completing my trio of festive favourites. This huge single snowflake measures 4" square and makes a real statement on a Christmas card, for sure.

JOY - The 'Cheers to the Year' stamp set that is part of the Year Of Cheer Suite includes the word 'Joy' - although as I don't have this stamp set I substituted with a little more retro rubber today and used a very similar stamp from last year's retired 'Holly Jolly Greetings' stamp set, heat embossed in silver on my folded banner. 

Here is the visual summary of the key products used on today's project for you to pin for easy reference:


You can see all of my 'How To' summaries on my 'How To - Tips and Techniques' Pinterest board in case you've missed any. 

I'll be back tomorrow with another project for this week's new challenge over at The Paper Players. Until then, happy stampin'!


Stampin' Up! Supplies Used:

Table built using Product Table Builder by The Crafty Owl - Independent Stampin' Up! Demonstrator.

Large Letters and Numbers Brother Football Birthday Card #GDP103

by Joanne James7. September 2017 20:30

Good evening lovely readers! I was tempted to share a Christmas card today but as it's my birthday I thought a birthday card was in order. Not one to me though - instead one that I made for Ben from Rebecca for his birthday recently - another masculine card to fit with the theme over at the Global Design Project this week which also happens to use this week's Color Throwdown colour palette too:


I decided to make another slightly larger card than usual as I wanted to be able to personalise it - take a look:


Here's the lowdown on today's card:

Recipe For Success - Every time I make a card with someone in particular in mind, I try to choose something personal or meaningful to that individual; after all, that has to be the biggest benefit of crafting your own. That is no more so than when it's a card for your nearest and dearest, and Rebecca was clear this card needed some key things: the number 10, the word 'brother', some form of birthday greeting and both a football and the colour red - the colour of Ben's beloved Manchester United football team. Armed with such clear requirements, it made the job of designing this card super easy.

Numbers and Letters - I used both my large letters and numbers today. My letters were stamped using 'Letters For You' again like yesterday's card and cut out with the Large Letters Framelits. I used my numbers to create a tone-on-tone repeating background pattern of the number 10; a good way to include it without having it front and centre. I also used the banner die from the Large Numbers Framelits for my happy birthday banner.

Retro Rubber - I substituted the 'O' in 'BROTHER' with a football, courtesy of a little 'retro rubber' from the long-retired stamp set, 'Great Sport'. I'm so glad I held on to this set - I have used the football and basketball in this set sooo many times!! A true blast from the past - so one for a link up with SUO Challenges too this week as this is their theme, how appropriate!

Here is the visual summary of the key products used on today's project for you to pin for easy reference:


You can see all of my 'How To' summaries on my 'How To - Tips and Techniques' Pinterest board in case you've missed any. 

What kinds of stamps have you held on to and would never part with? Do leave me a comment below - Id love to know!

I hope you enjoyed today's post; I'll be back tomorrow with another project - definitely for Christmas and with a little more retro rubber thrown in! Until then, happy stampin'!


Stampin' Up! Supplies Used:

Table built using Product Table Builder by The Crafty Owl - Independent Stampin' Up! Demonstrator.

High Tide Birthday Card For Dad #GDP103

by Joanne James6. September 2017 20:25

Good evening lovely readers! So today was the day that saw my precious James Juniors return to school - I got lots of work done, but boy was the house quiet! So we are about to return to our school routines and something close to normal working will resume. I've been busy making lots of Christmas samples in readiness for my open house on Friday however September is also a big birthday month for us, with several family members and friends celebrating birthdays (my good self included!) So today I'm sharing a card that I made for my Dad's birthday that fits perfectly with the theme over at the Global Design Project this week:

I decided to make a slightly larger card than usual as I wanted to be able to personalise it - take a look:


I decided to use the High Tide stamp set for my card - such a great set for masculine cards and one that you can use to make quite colourful masculine cards (they don't always have to be brown :-) ) I stamped my beach scene off to the left as I wanted it to act as something of a background for my sentiment, then paired the Happy Birthday from the 'Butterfly Basics' stamp set with my stamped and diecut 'DAD' - you know how much I love these letters and co-ordinating framelits! I'm not generally one for frills, especially on a masculine card, so pretty ribbon was a no-no for me, however I did add some burlap beneath my diecut letters for a little extra touch - I think it fits nicely with the beachy theme too.

If you like the High Tide set and live local to me, you might like to know that this is the set we will be using in one of my October Monthly Technique Classes - get in touch if you would like more information.

Here is the visual summary of the key products used on today's project for you to pin for easy reference:


You can see all of my 'How To' summaries on my 'How To - Tips and Techniques' Pinterest board in case you've missed any. 

I hope you enjoyed today's quick post; I'll be back tomorrow with another project. Until then, happy stampin'!


Stampin' Up! Supplies Used:

Table built using Product Table Builder by The Crafty Owl - Independent Stampin' Up! Demonstrator.

The New Autumn-Winter Stampin' Up! Catalogue Is Here And A Host Promotion Too!

by Joanne James1. September 2017 05:00

Happy 1st September everyone! Yes, this day has finally arrived! The new Autumn-Winter Seasonal Catalogue is here - you can download an electronic copy by clicking on the image below:


Physical catalogues have gone out in the post to my existing customers and anyone else who requested a copy; there will of course be a permanent link to the catalogue in the box on the right side of my blog page until 2nd January 2018 when the sales period ends. I've already shared a few sneak peeks and there is so much more to come! For today, put your feet up and browse the new catalogue in all its glory.

And there's more good news! Between now and the end of October, we have a fabulous promotion too - host a party with qualifying sales and you can earn the Merry Patterns stamp set for FREE in addition to your standard Stampin' Rewards that you will receive. Check it out here:


The Merry Patterns Stamp Set is a two-step stamp set exclusive to this promotion and, with its candles, holly, jolly deer and classic sentiments, reflects all the cosiness and warmth you associate with the season. As a party host you will get this set for free if your party sales reach the qualifying amount of £250. So why not gather some friends, get creative and earn rewards and a free stamp set into the bargain! I have both daytime and evening party slots available - either call me on 07773 421446 or email me via [email protected] to book yours.

The lovely people at Stampin' Up!'s home office have also produced a short video that shows the Merry Patterns stamp set in action along with some great samples - check it out:

Isn't that great?! Lots of creative possibilities for sure with this set. 

Please feel free to contact me with any questions or queries. Don't forget to use this month's current hostess code KJ9FSDMS if you are placing an order online to receive an extra thank you from me. Back soon with more creative inspiration for you. Until then, happy browsing and get writing that wish list! 


Mini Catalogue

BROWSE THE CATALOGUE

The mini catalogue is now live! Read and download your copy here.

Shop Online

Access my online shop 24 x 7, 365 days of the year:

Current April hostess code:

VDKNV7BH

Shop Online

Join My Team

It's always a great time to join Stampin’ Up! New team members can get £130 worth of products for only £99 + free business supplies + free shipping + all the fun being a part of Stampin’ Up! Stampin' Up! has something for everyone: join my growing team and benefit from my support to enjoy Stampin' Up! however you choose.

If you're interested, call me for a chat to understand how I can help you realise your goals. Alternatively, if you have already decided to sign up and you just can't wait, please click here for the link to the online form where you can sign up and order your starter kit right away! 

Latest Kit!

Stampin Cut and Emboss

The Rock Legend Kit has all you need to make 8 cards with coordinating envelopes. Along with the new Panda Friends Kit, both are available from January 4th for just £14 each - get yours here!

2023-24 Annual Catalogue

BROWSE THE CATALOGUE

Click on the catalogue for a full list of current SU! supplies - if you would like to order any of the items featured, please drop me a line at [email protected] or give me a call on 07773 421446 - I'd be happy to help.

New Online Exclusives

There are new products available exclusively in the online store from 5 March - check them out here.

About Me

Hi I'm Joanne and live in Northampton and when I'm not looking after my husband and two beautiful children, am an avid crafter with a passion for all things Stampin' Up!

I must confess that I have never been a big rubber stamper - until I discovered Stampin' Up! that is. I love the fact that I can get such great results with co-ordinating stamps, inks, papers and punches - the possibilities are endless! Join me on my stamping journey as I share the things I love and be inspired to create amazing things yourself!

Follow Me

Monthly Newsletter

Box Builder

Click the button above to use Box Buster to create your custom box design using the Envelope Punch Board!

Kits Collection Now Available!

Stampin Cut and Emboss

The new Kits Collection from Stampin' Up! is now available!

Click here to see the current kits available and order yours online today.

I Design For


Stampin' Up Stuff

This is my personal blog and is not endorsed by Stampin’ Up! I hope you find it a plentiful source of ideas and personal inspiration but please don't copy my designs for contest submission or use for classes, publication or sale without express permission.