by Joanne James14. August 2020 12:00 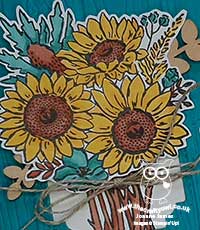
Today I'm sharing my design team card for our new challenge over at As you See It where it's time for a colour challenge:
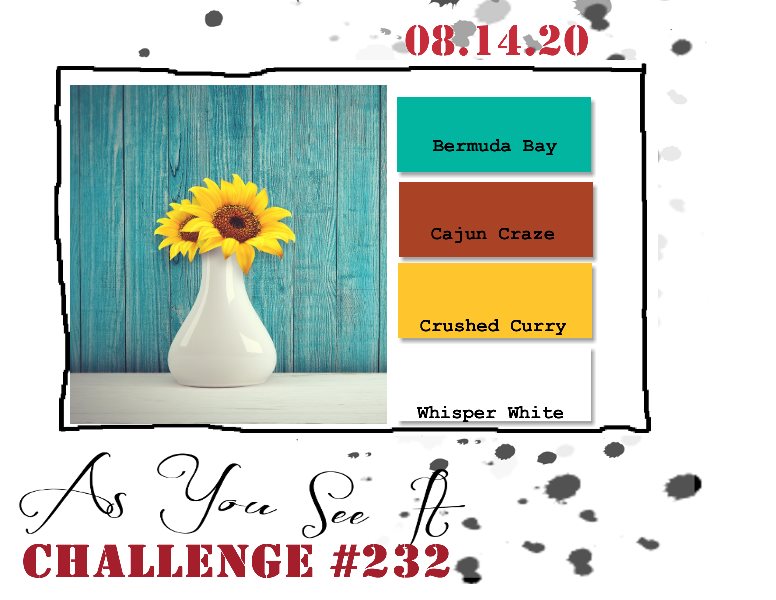
Whilst sunflowers are by no means mandatory for this week's colour challenge, my card today was totally inspired by this week's challenge badge - take a look:
Here's the low-down on today's card:
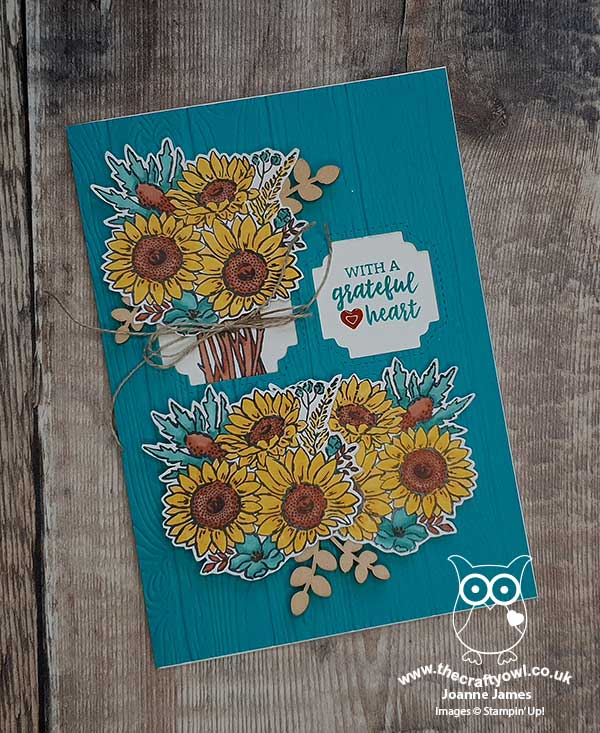
Not A Jar of Sunflowers - I used one one of the flower toppers featuring sunflowers from the Jar of Flowers set to create both a stemmed bunch and a layered group on today's card. For the layered bunch in the bottom window, I used my Stamparatus to stamp a mirror image, so that it would create a uniform display. I coloured them with my Blends (I used a combination of Dark Mango Melody and Dark Daffodil Delight to achieve a colour close to Crushed Curry) and fussy cut them, before popping them up on dimensionals. I tucked in some wooden stems and added a double-linen bow to my tied bunch for added decoration.
Peek A Boo Florals - My florals and sentiment are nestled in the apertures cut using one of the new Peek A Boo dies; co-ordinating with the fabulous 'Have A Hoot' stamp set, I decided to use this window die piece to create a focal point for my florals and sentiment instead of owls today. I also embossed this panel with the Pinewood Planks 3D embossing folder for added texture, again inspired by our challenge photo.
Banner Year Greeting - Finally the greeting on my card comes from the new 'Banner Year' stamp set. This will be a super useful set with lots of teeny tiny images and sentiments for this time of year. Again, this set is designed to co-ordinate with the new Banners Pick A Punch punch, but I decided to mask it to enable me to stamp the words one under each other to fit my square. A Cajun Craze enamel heart from my stash finished my card.
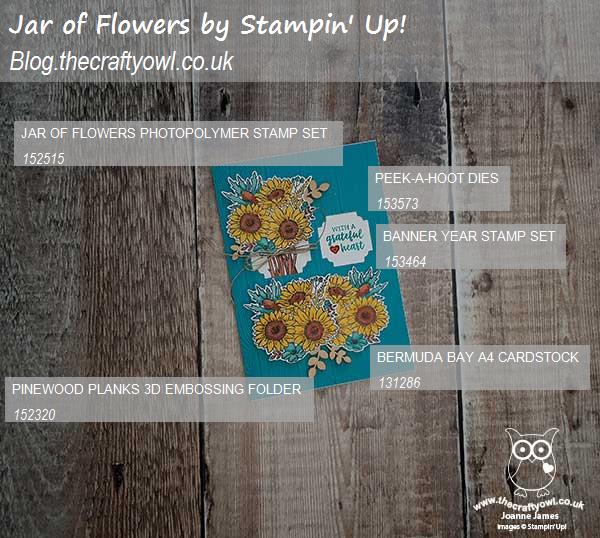
Here is the visual summary of the key products used on today's project for you to pin for easy reference:
You can see all of my 'How To' summaries on my 'How To - Tips and Techniques' Pinterest board in case you've missed any.

Here's a summary of our challenge rules:
- Create any card, scrapbooking page, 3D project or packaging project that fits the challenge.
- Please include the challenge graphic and link back to the challenge in your blog post. Turn off word verification so we can leave you lots of lovely comments. Make sure you link the post not the whole blog to the Linky. Use #AYSIXXX when uploading to a public gallery.
- If you’re unsure about ‘the rules’, check the details under the Challenge Guidelines tab on the As You See It Challenge homepage.
- In a colour challenge, black or other neutral can be used in outlines and sentiments but no other colours should be included. Stampin’ Up colours are used for reference but colours that are a close match are welcome.
We look forward to seeing your creations in the AYSI gallery.
Enjoy your day. The temperatures are blissfully cooler in the UK today and this can only mean one thing - no excuse now to not do the cleaning! I'll be back tomorrow with another project. Until then, happy stampin'!
Stampin' Up! Supplies Used:
3a2c7cce-75dc-4f00-9708-8ad7073d2ce2|0|.0|96d5b379-7e1d-4dac-a6ba-1e50db561b04
Tags: Stampin' Up, Stampin' Up Card, Stampin' Up Card ideas, Stampin' Up Supplies, Shop online, Shop Stampin' Up online, Shop Stampin' Up! Online, As You See It Challenge, Hardwood, Jar of Flowers, Peek A Hoot Dies, Banner Year
Cards | Shop Online | Shop Stampin' Up! Online | Stamping
by Joanne James12. August 2020 21:00
Today I'm sharing a card using the current Fab Friday sketch and this week's palette over at Color Throwdown:

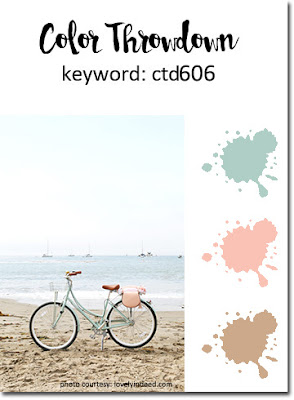
I procrastinated over this sketch for some time - should I showcase some patterned paper? In the end my need for a new home card led me to create a great #SimpleStamping card using nothing more than stamps, ink and paper - take a look:
Here's the low-down on today's card:
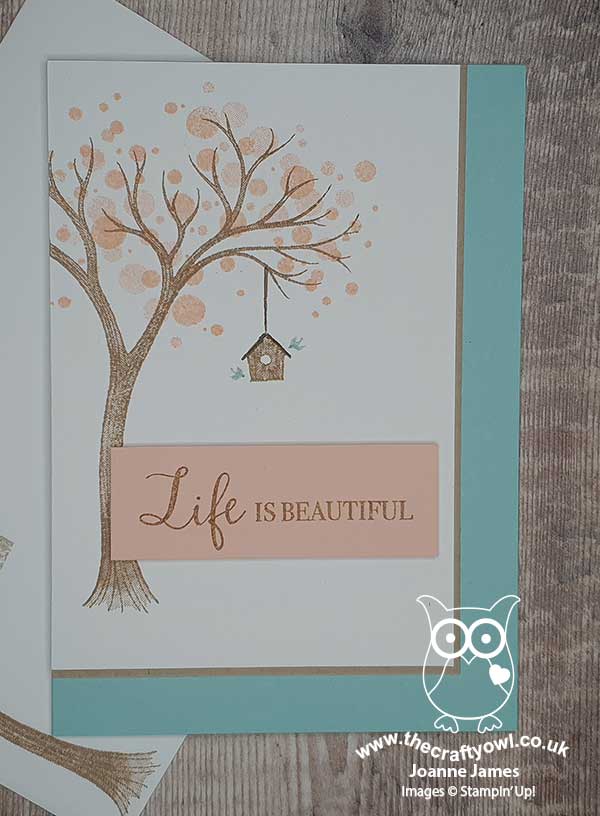
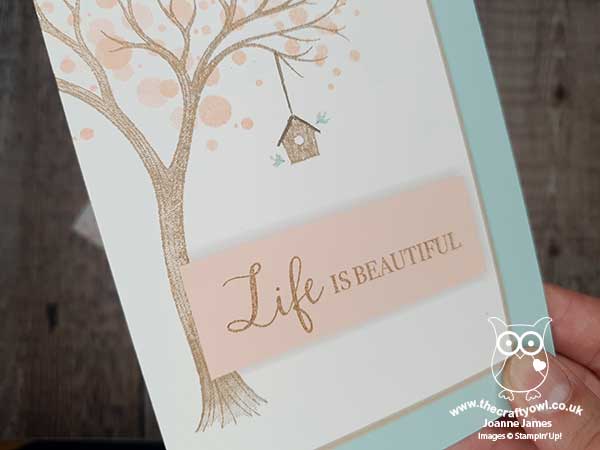
Life Is Beautiful - The tree and sentiment on today's card come from the new stamp set 'Life Is Beautiful', inspired by Million Sales Achiever LeeAnn Greff. This is a lovely set with the ability to dress the tree for all seasons. I chose to use the CTD fresh, summery colours along with the cute bird house and bird pair from the set for my card.
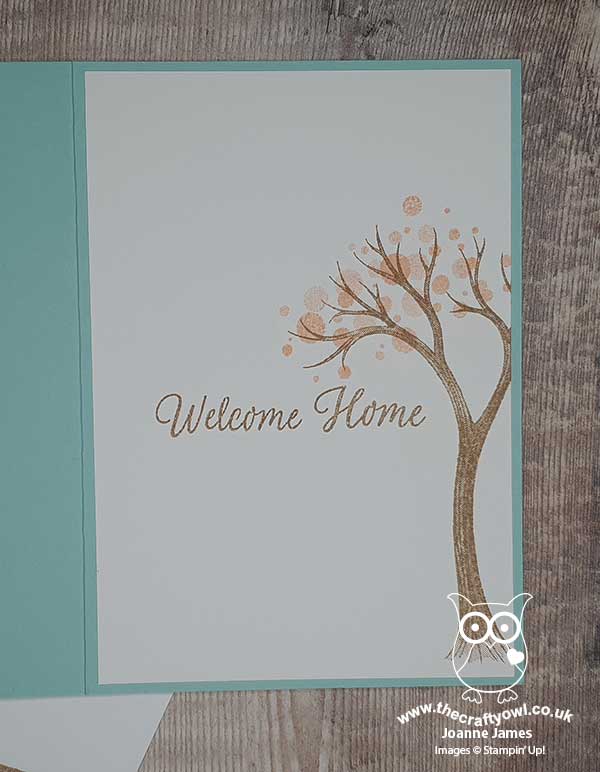
Welcome Home - I thought the bird house would make this a perfect set for a 'new home' card. I needed one for a dear friend of mine who has left her life in London where she has lived for some 20 years to return to Wales and the town where we grew up. I used a sentiment on the inside of my card from a retired set because 'welcome home' seemed appropriate:
#SimpleStamping - I decided not to use any framelits or diecuts on today's card as I wanted to give an example of #SimpleStamping with nothing more than stamps, ink and paper. I really love the result - sometimes less really is more!
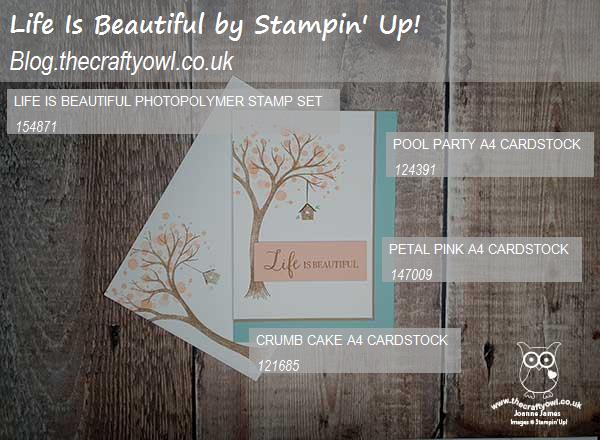
Here is the visual summary of the key products used on today's project for you to pin for easy reference:
You can see all of my 'How To' summaries on my 'How To - Tips and Techniques' Pinterest board in case you've missed any.
Enjoy your evening and I'll be back tomorrow with another project. Until then, happy stampin'!
Stampin' Up! Supplies Used:
by Joanne James11. August 2020 20:30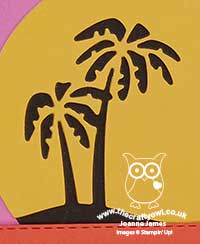
A super late post today as I have been busy celebrating - as of today I am officially the mother of not one, but two, teenagers! Lots of present opening, special meals, ice cream cake and candles and no time for crafting, but I wouldn't have it any other way! Luckily I made a card last week using the inspiration photo and sketch over at Inspired By so thought I'd share that with you today. Here's the inspiration photo and sketch:


It just so happens that I used the same dies, the Friendly Silhouettes Dies, that I used for my last Inspired By entry - here's a different take:
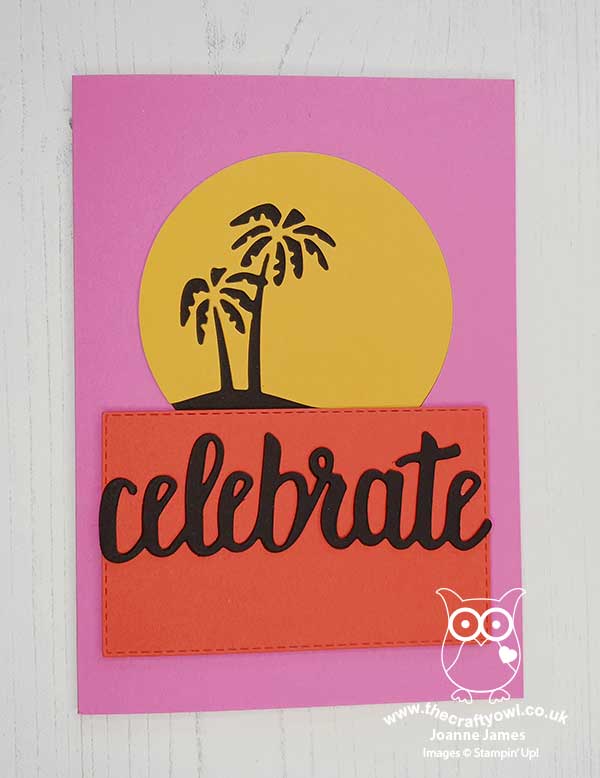
Some simple diecuts ( I used the retired 'Celebrate You' celebrate die for my sentiment) brought my card together in a jiffy, with a little stamping using the 'Friend like You' stamp set on the inside to finish:

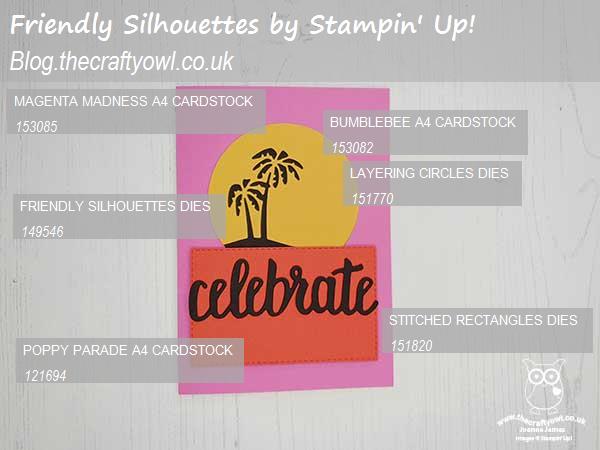
Here is the visual summary of the key products used on today's project for you to pin for easy reference:
You can see all of my 'How To' summaries on my 'How To - Tips and Techniques' Pinterest board in case you've missed any.
Enjoy your evening and I'll be back tomorrow with another project. Until then, happy stampin'!
Stampin' Up! Supplies Used:
by Joanne James10. August 2020 18:25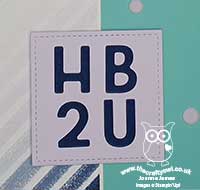
Today I'm sharing a couple of cards I made using this week's Freshly Made Sketches layout:
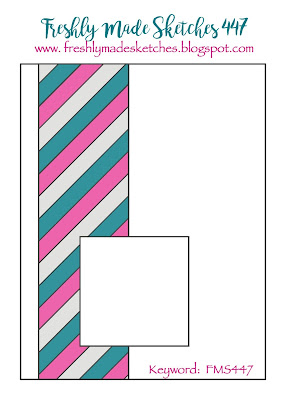
I thought Kim's sketch this week was great with so many possibilities, especially for a patterned paper lover like me! I decided that I would try and be faithful to the diagonal stripes too so reached for my Playful Patterns pack and created a teen-inspired birthday card - take a look:
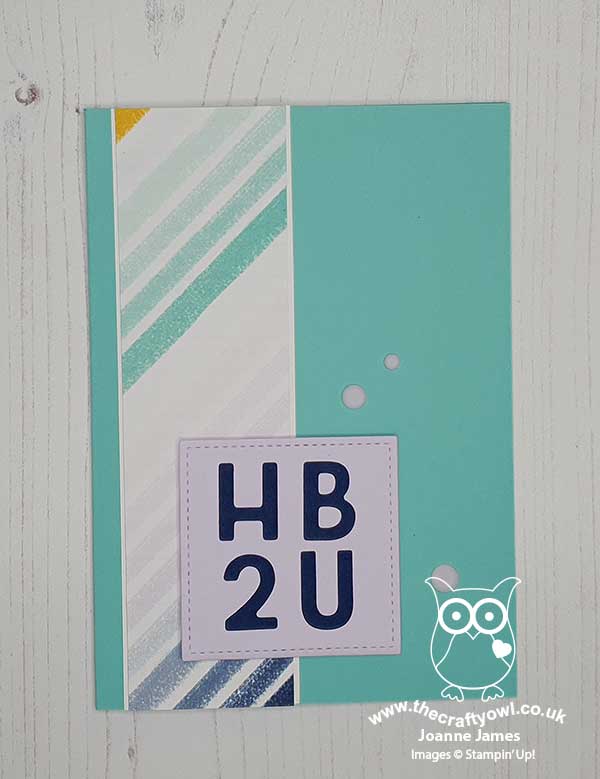
Here's the low-down on today's card:
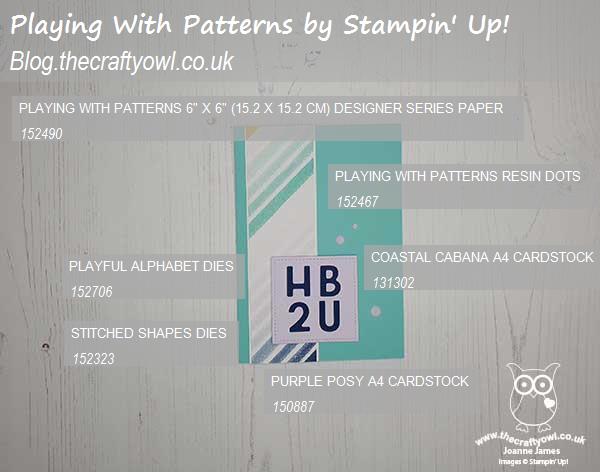
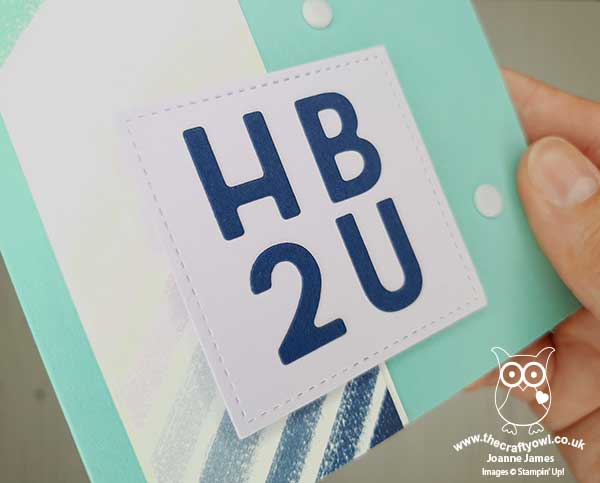
I used my Playful Alphabet Dies to create a 'text speak' birthday sentiment and layered them onto a stitched square, using the colours of the designer series paper to determine my colour choices. I then added some simple stamping to the inside of my card:

A few Playful Patterns resin dots complete my card. I liked this card so much, I made another one in a similar colourway using another strip of the same paper:

Here they are together - which colourway do you prefer?
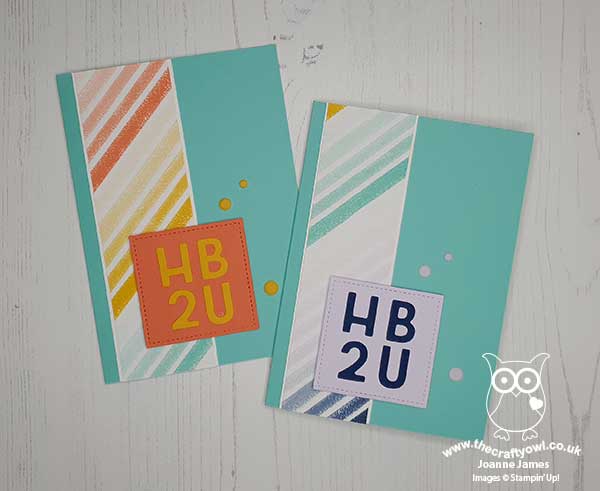
I know this kind of text speak isn't to everyone's taste, but as I find myself making more and more birthday cards for teenagers, I know this will be a top choice when the children go rifling through by box looking for a last-minute card! Here is the visual summary of the key products used on today's project for you to pin for easy reference:
You can see all of my 'How To' summaries on my 'How To - Tips and Techniques' Pinterest board in case you've missed any.
Another quick Monday post for me as I've been busy today preparing for a milestone birthday of one of the James Juniors tomorrow - more on that later in the week! Enjoy your envening and I'll be back tomorrow with another project. Until then, happy stampin'!
Stampin' Up! Supplies Used:
by Joanne James9. August 2020 09:00
Today it's Sunday and time for this week's new challenge over at The Paper Players! It's my turn to host this week and I have a colour challenge for you to work with:

I love a bright colour palette and my choices today were inspired by a one sheet wonder I made a little while ago. I loved the colours together so much I decided to see what you would make of my colour combination. For today's card I used the current Inspire.Create Challenge sketch for my layout and decided these colour would be perfect for a balloon-carrying hippo - take a look:
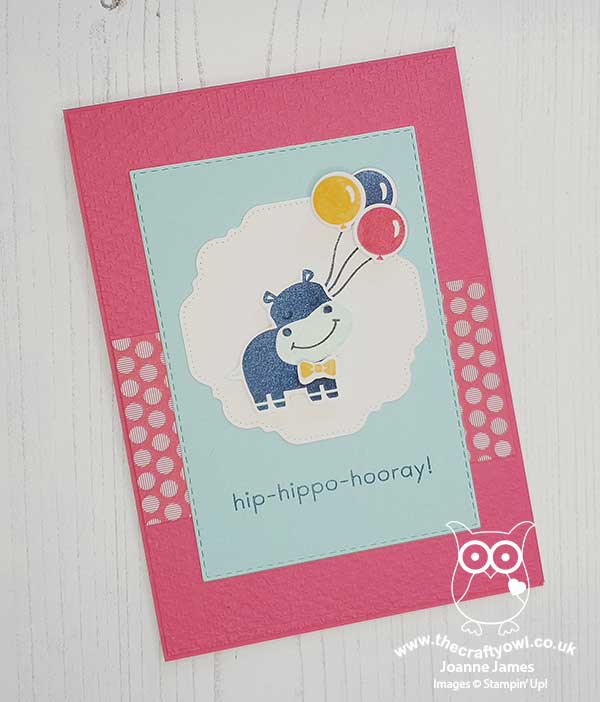
Here's the low-down on today's card:
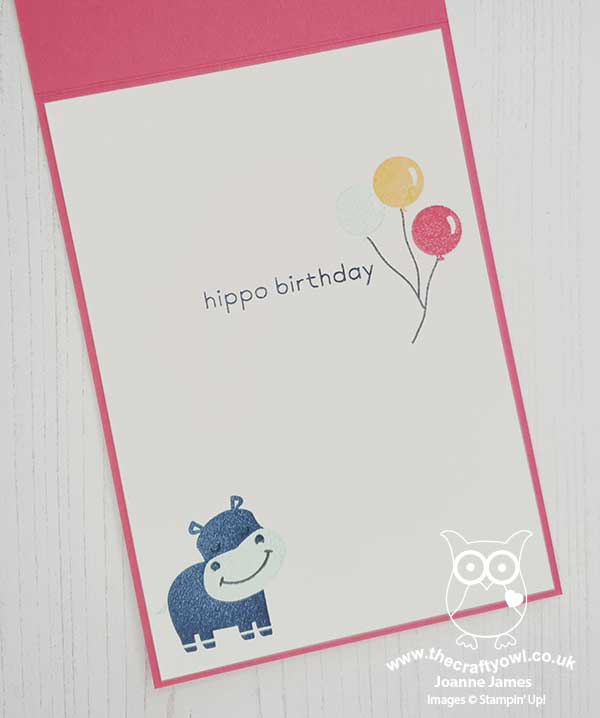
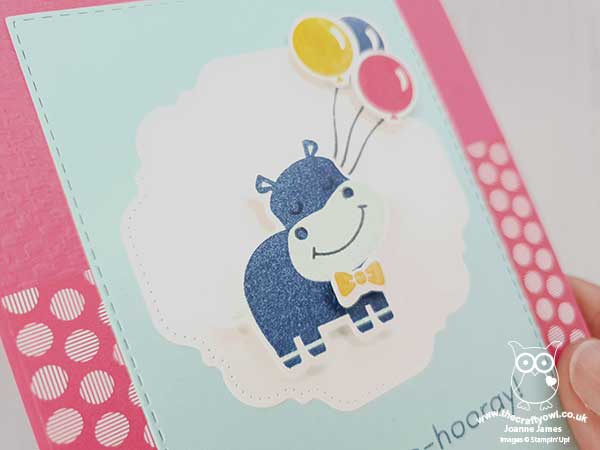
I used the 'Hippo Happiness' stamp set and co-ordinating Hippo & Friends Dies to stamp and cut out my cute hippo and balloons and mounted him on a stitched shaped panel that is also found in the Hippo & Friends die set. I mounted this on a stitched rectangle of Pool Party cardstock and added this to a Melon Mambo base, to which I'd added a Tasteful Textile embossed panel and strip of co-ordinating Brights DSP. I couldn't resist adding some co-ordinating decoration to the inside of my card along with the second part of my punny sentiment too:
The stamping for today's card was pretty straightforward, however I do have one top tip for you with regard to stamping the hippo: he is a two-step stamped image and I found it much easier to align the stamps if I stamped the uppermost stamp (i.e. the navy one on my card) first, with the full body (i.e. the one I stamped in Pool Party) second.
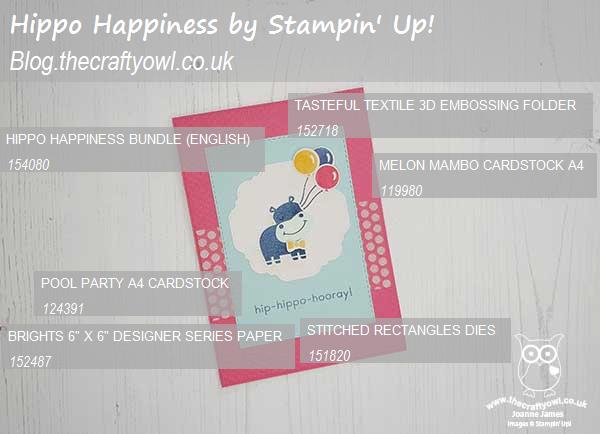
Here is the visual summary of the key products used on today's project for you to pin for easy reference:
You can see all of my Product and 'How To' summaries on my 'How To - Tips and Techniques' Pinterest board in case you've missed any.
Before you reach for your ink and papers, check out what our amazing team has created to inspire you this week:
The Paper Players Design Team
Here's a quick recap of our challenge rules:
1. Create a new paper project
2. Upload your creation to your blog with a link back to us and provide a direct link to the post featuring your challenge submission.
3. Please link your card to no more than four challenges, TOTAL.
4. Have FUN!
Enjoy your day; we enjoyed spending the day with friends yesterday, basking in the glorious weather we have been enjoying here in the UK. Today we shall be spending time in the garden and enjoying another BBQ before the weather breaks later this week! I'll be back later with another project. Until then, happy stampin'!
Stampin' Up! Supplies Used:
d03f5161-ec9f-4544-99ed-2f4fad7339c3|0|.0|96d5b379-7e1d-4dac-a6ba-1e50db561b04
Tags: Shop Stampin' Up! Online, Stamping Shop Stampin' Up online, Shop online, Stampin' Up, Stampin' Up Card ideas, Stampin' Up Supplies, Stampin' Up Card, The Paper Players, Hippo Happiness, Hippo And Friends Dies, Tasteful Textile, Rectangle Stitched Framelits Dies
Cards | Shop Online | Shop Stampin' Up! Online | Stamping
by Joanne James6. August 2020 18:00
It's Thursday and time for a new challenge over at TicTacToe! It's the turn of Team X to host this week and the lovely LeAnne is our featured designer. This is the fun board that we are playing along with:
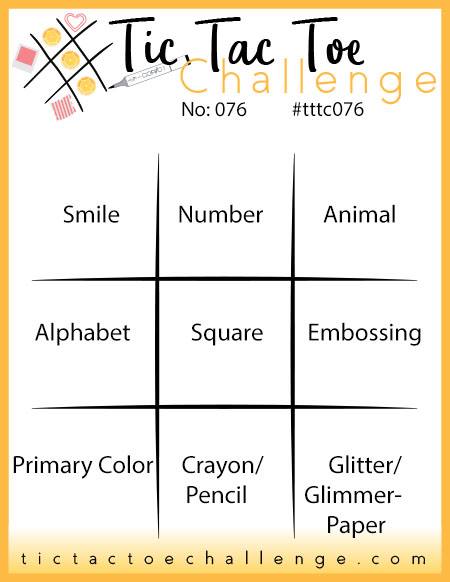
I went with the diagonal of primary colour (red or black), square and animal for today's card and paired some old papers with a fun new stamp set - take a look:
Here's the low-down on today's card:
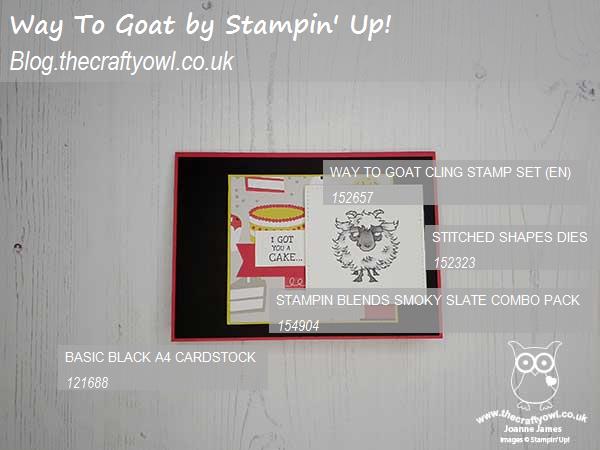
Today's card features the fun new stamp set 'Way To Goat'; I just love this set, I mean check out the expression on that goat's face - priceless! I stamped my goat and coloured him with Smoky Slate Blends, cut him out with a Stitched Square Framelit and paired him with some retired Broadway Birthday designer series paper. I couldn't stop there though - I had to add this cheeky soul to the inside too:

And I liked this card so much, I made a a few more for my box:
Here is the visual summary of the key products used on today's project for you to pin for easy reference:
You can see all of my Product and 'How To' summaries on my 'How To - Tips and Techniques' Pinterest board in case you've missed any.
A tictactoe board offers so many creative possibilities - how does this week's board inspire you? Why not have a go? We would love to see you in the gallery and who knows - you might be selected for Designer's Choice and be eligible to be a guest designer on a future challenge.
Enjoy your day; I'll be back tomorrow with another project. Until then, happy stampin'!
Stampin' Up! Supplies Used:
by Joanne James4. August 2020 09:00The wait is over but the day has finally arrived! The new Autumn-Winter Seasonal Catalogue is here - you can download an electronic copy by clicking on the image below:
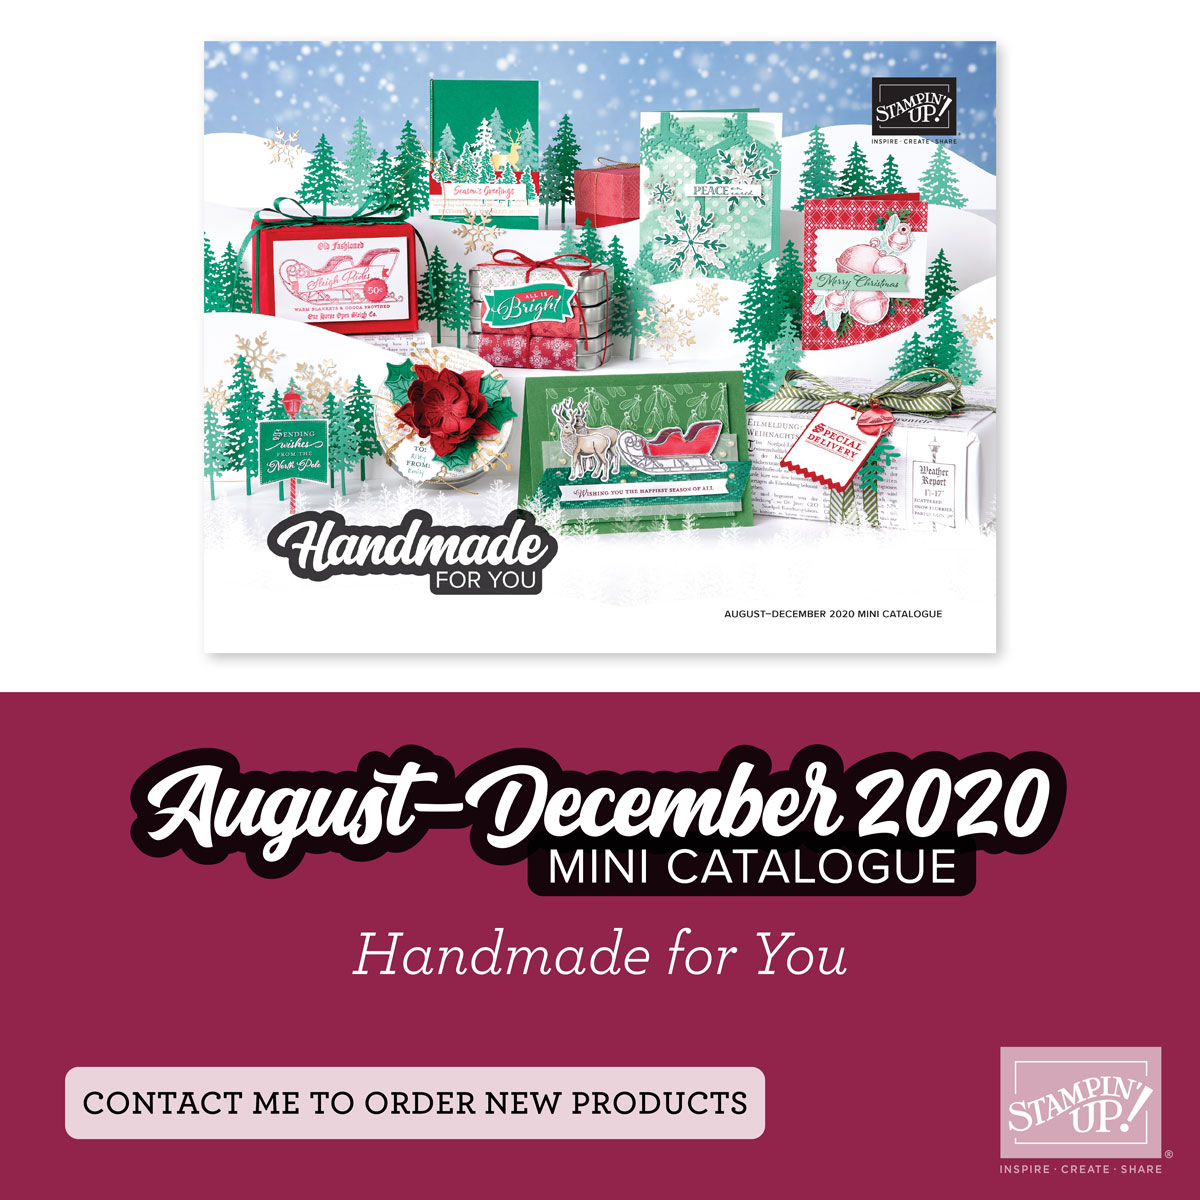
Physical catalogues have gone out in the post to my existing customers and anyone else who requested a copy; there will of course be a permanent link to the catalogue in the box on the right side of my blog page until 3rd January 2021 when the sales period ends. I've already shared a few sneak peeks and there is so much more to come! For today, put your feet up and browse the new catalogue in all its glory.
Please feel free to contact me with any questions or queries. Don't forget to use this month's current hostess code CVAQTGE2 if you are placing an order online to receive an extra thank you from me.

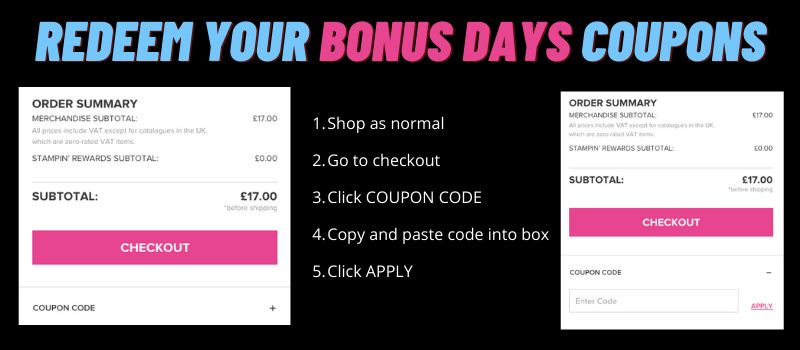
Remember too to add any Bonus Day codes that you earned last month - you have until 31st August to spend your £4.50 coupons. This is where you need to add them to your online order:
Alternatively, if you are placing your order with me by phone, please have them to hand so that I can take the details or forward me the email notification..
Back soon with more creative inspiration for you. Until then, happy browsing and get writing that wish list!
by Joanne James3. August 2020 16:33
Today I'm sharing a card - or 4! for this week's fun challenge over at Freshly Made Sketches:

Yes the talented Linda Callaghan has left this week's sketch very much open to interpretation - as long as our cards are slimline; how fun! Slimline cards are very much on trend right now and whilst I've created a few horizontal ones recently, I haven't created any vertical ones. So I decided that's where I would start today and in fact, ended up creating 4 - take a look:

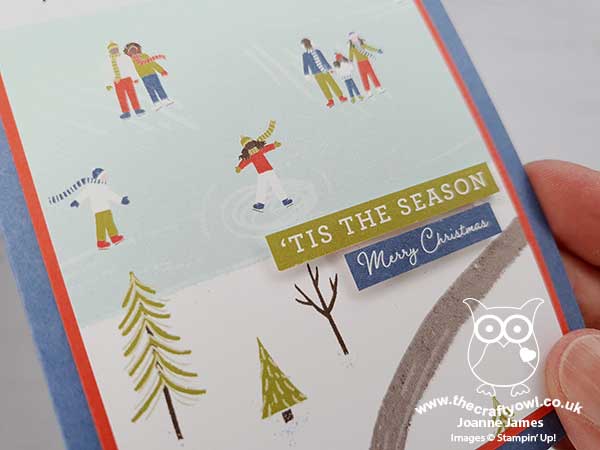
I decided to be brave and cut into this fabulous single sheet image from the new 'Trimming The Town' DSP pack that launches in the Autumn-Winter catalogue that launches tomorrow - here's the sheet I'm talking about:
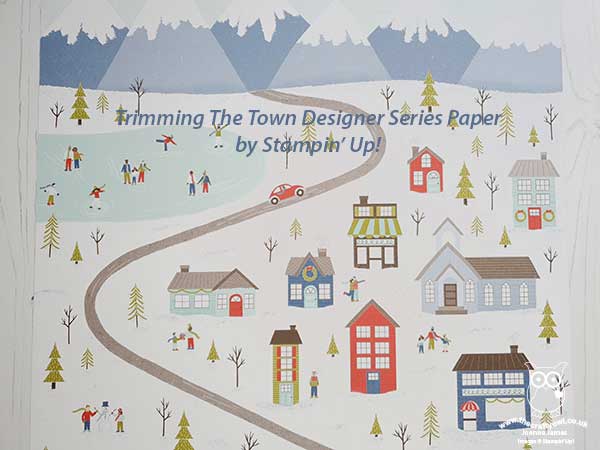
And this is how I cut it:
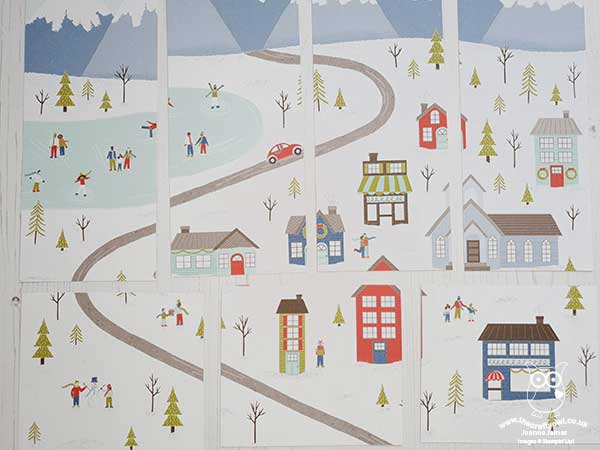
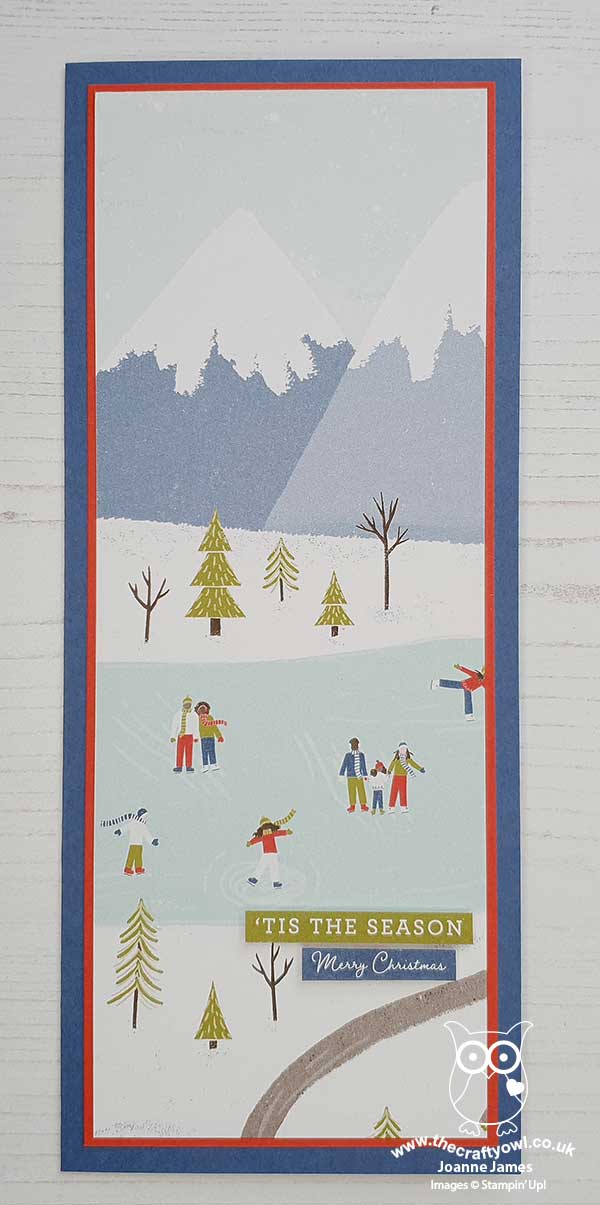
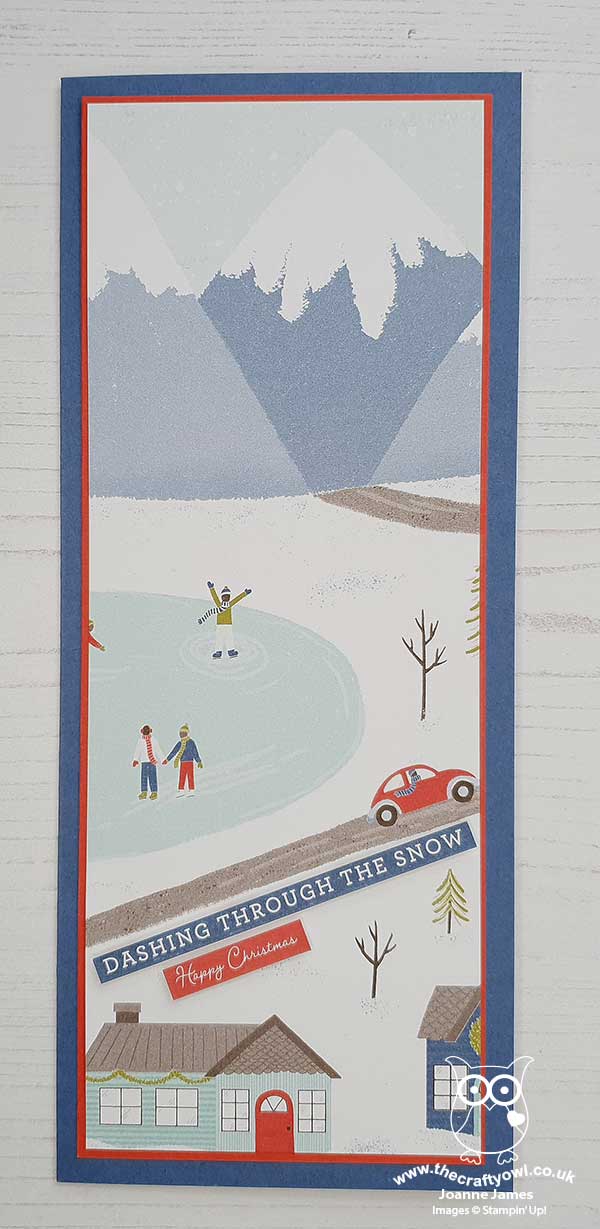
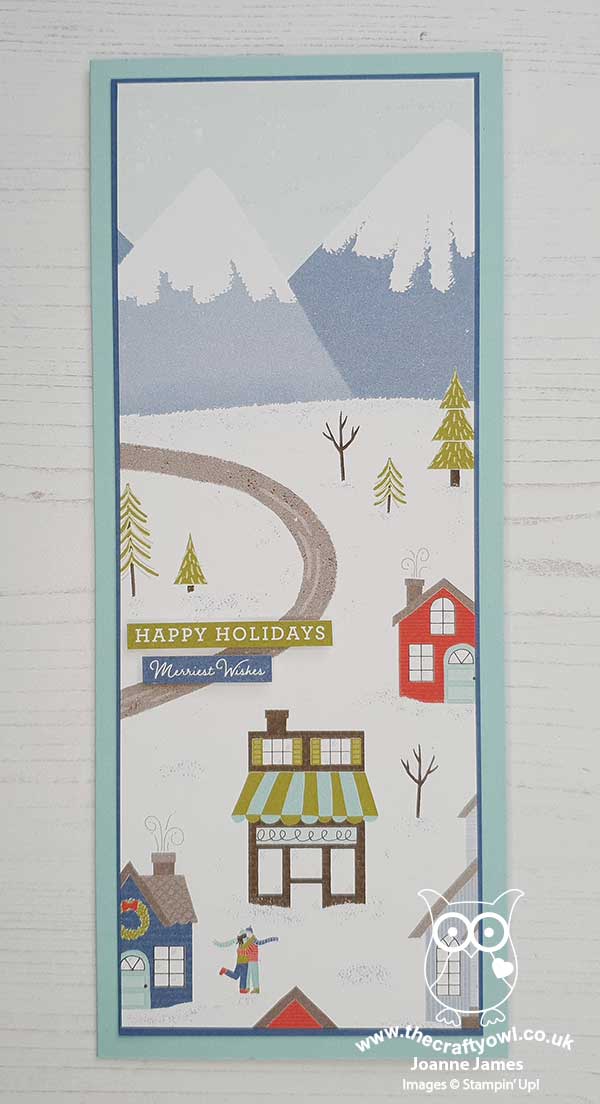
This gave me 4 vertical slimline pieces and 3 additional pieces from the bottom section, that I will make up and share with you another day. I mounted each of my paper pieces on either Poppy Parade with a Misty Moonlight base, or Misty Moonlight with a Pool Party base. Here is each of the finished cards:
Card one:
Card two:
Card three:
Card four:
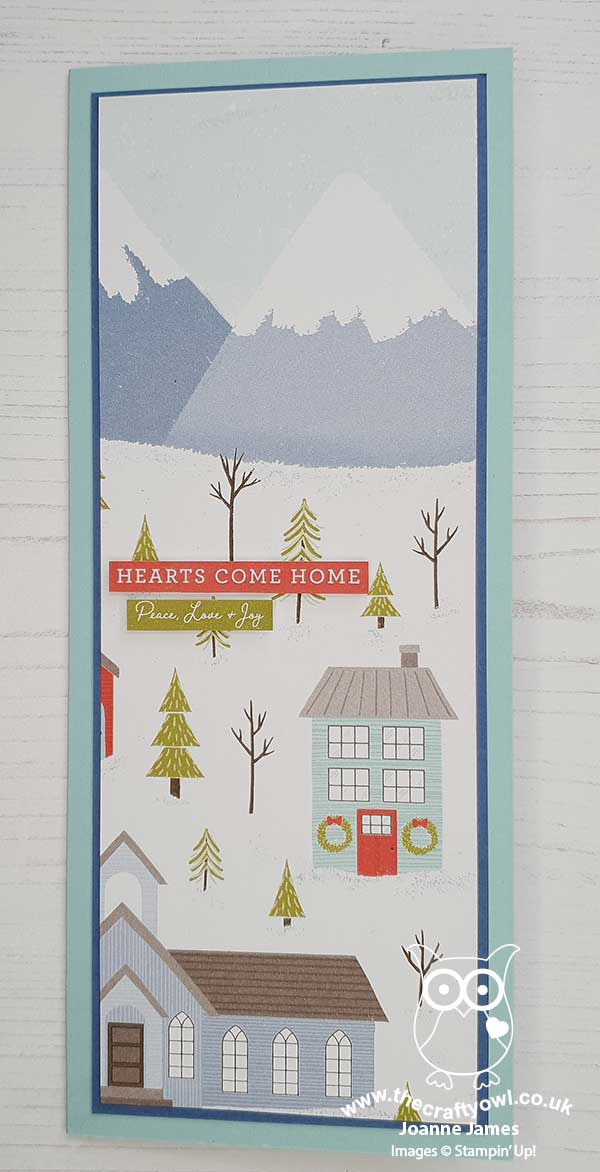
These cards are completely 'no stamping' (on the front at least) - I snipped the sentiments from another of the sheets in this DSP pack, and mounted them on dimensionals as you can see on the photo below:
And that, as they say, is that! The hardest thing was committing to cutting into the sheet of patterned paper! Four cards for my Christmas card stash - how excited are you that the new Autumn-Winter catalogue is launching tomorrow? Only one more sleep to go!
I've had a super busy day so am just squeezing today's post in between last-minute Stampin' up! orders to earn Bonus Days coupons - today is your last day! - and cooking dinner and fixing a bicycle tyre puncture - oh the life I lead! Enjoy your evening and I'll be back tomorrow with another project. Until then, happy stampin'!
by Joanne James2. August 2020 09:00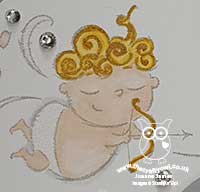
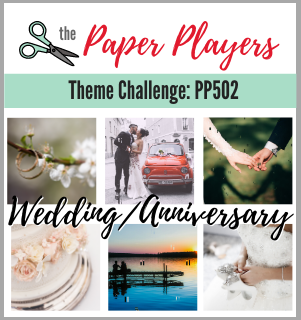
Today it's Sunday and time for this week's new challenge over at The Paper Players! It's the turn of the fabulous Laurie to host this week and she has a fun theme challenge for you to work with:

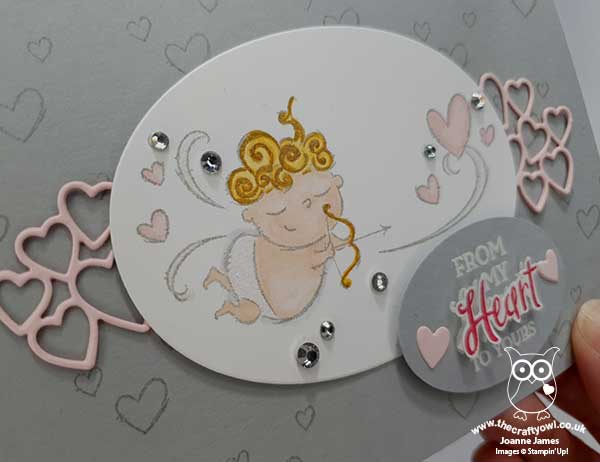
I struggled a little with today's card as I don't know anyone getting married and I just couldn't seem to get into the zone! In the end I decide to flip the Paper Craft Crew Sketch and make an anniversary card using a new stamp from the upcoming Autumn-Winter catalogue - take a look:
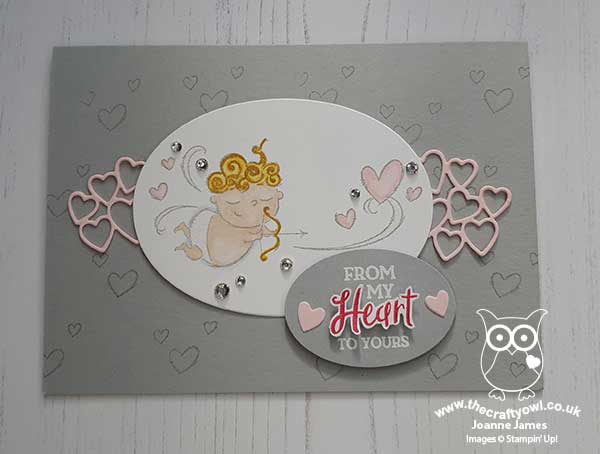
Here's the low-down on today's card:
This cute cupid comes from the new 'Flight of Fancy' set. The set also features a whimsical angel and a witch on a broomstick, and whilst I think this cupid may have been designed with Valentine's Day in mind, paired with this sentiment from the 'Heartfelt' stamp set and a row of Stitched Be Mine stacked diecut hearts, I think he makes a sweet anniversary card too. Simply coloured with Blends and a liberal dose of clear Wink of Stella, plus some (retired) gold Wink of Stella to highlight his curls and bow, along with a sprinkling of rhinestones, makes for quite the cherub, don't you think?
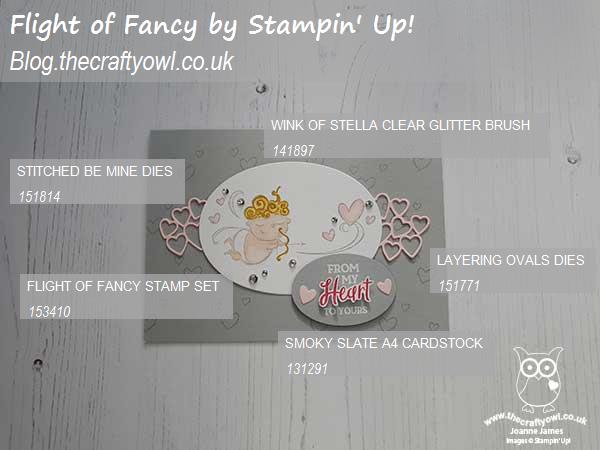
Here is the visual summary of the key products used on today's project for you to pin for easy reference:
You can see all of my Product and 'How To' summaries on my 'How To - Tips and Techniques' Pinterest board in case you've missed any.
Before you reach for your ink and papers, check out what our amazing team has created to inspire you this week:
The Paper Players Design Team
Here's a quick recap of our challenge rules:
1. Create a new paper project
2. Upload your creation to your blog with a link back to us and provide a direct link to the post featuring your challenge submission.
3. Please link your card to no more than four challenges, TOTAL.
4. Have FUN!
You can see all of my 'How To' summaries on my 'How To - Tips and Techniques' Pinterest board in case you've missed any.
Enjoy your day; I'll be back tomorrow with another project. Until then, happy stampin'!
Stampin' Up! Supplies Used:
328cf968-4fcb-4849-89dc-4163a66567d5|0|.0|96d5b379-7e1d-4dac-a6ba-1e50db561b04
Tags: Shop Stampin' Up! Online, Stamping Shop Stampin' Up online, Shop online, Stampin' Up, Stampin' Up Card ideas, Stampin' Up Supplies, Stampin' Up Card, The Paper Players, Flight of Fancy, Be Mine Stitched Framelits, Layering Ovals Framelits
Cards | Shop Online | Shop Stampin' Up! Online | Stamping
by Joanne James31. July 2020 12:00
Today I'm sharing my design team card for our new challenge over at As you See It where it's time for a sketch challenge:
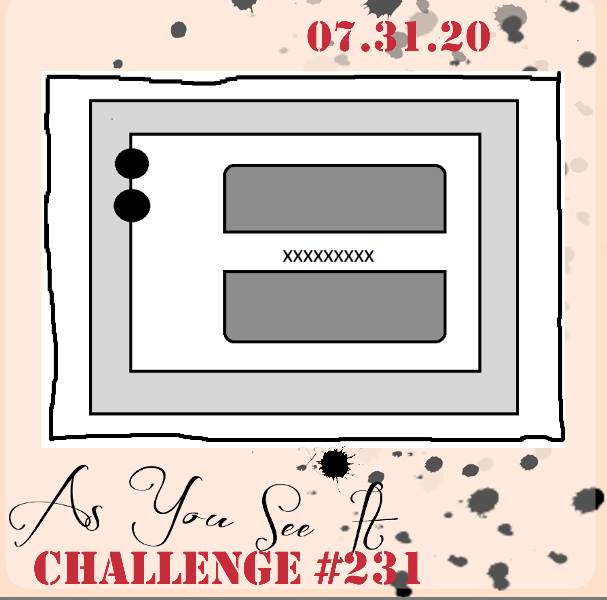
I designed this week's sketch and decided to use some of the new in-colours and make a blue card - take a look:
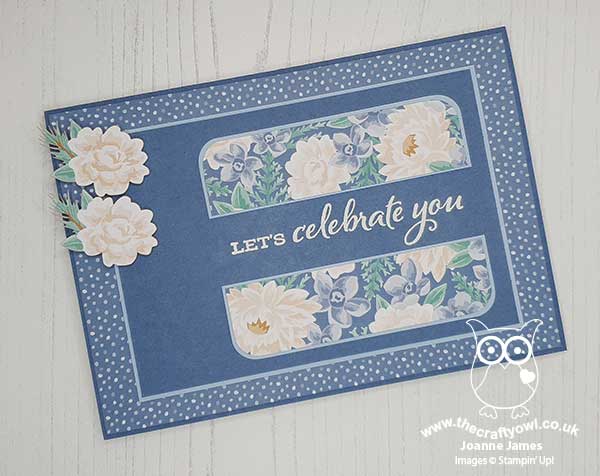
Here's the low-down on today's card:
Today's card features two different patterns from the Flowers For Every Season designer series paper stack. Some simple layering, a couple of co-ordinating floral embellishments from the Flowers For Every Season Memories and More pack and a simple heat-embossed sentiment from the 'Celebrate Sunflowers' set. And that's it - super simple! I must say, having seen the amazing cards from the rest of the team mine looks positively mediocre - they all came up with some fabulous takes on this week's sketch!
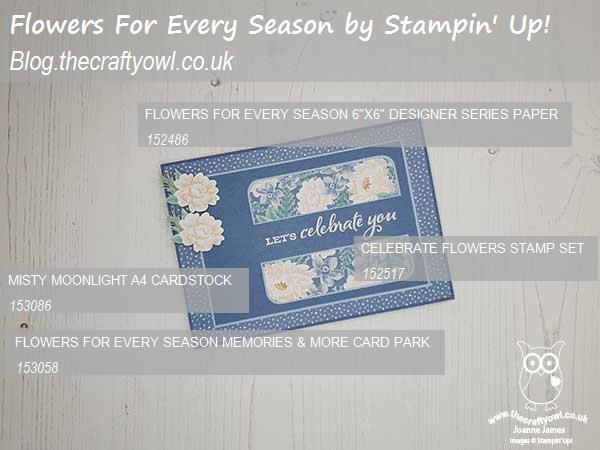
Here is the visual summary of the key products used on today's project for you to pin for easy reference:
You can see all of my 'How To' summaries on my 'How To - Tips and Techniques' Pinterest board in case you've missed any.
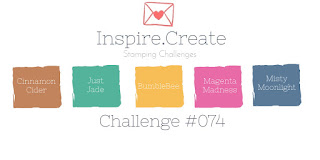
I'll be linking up with the team over at Inspire.Create as my card today features three of the 5 new in-colours: Misty Moonlight, Just Jade and Cinnamon Cider.
Here's a summary of our challenge rules:
- Create any card, scrapbooking page, 3D project or packaging project that fits the challenge.
- Please include the challenge graphic and link back to the challenge in your blog post. Turn off word verification so we can leave you lots of lovely comments. Make sure you link the post not the whole blog to the Linky. Use #AYSIXXX when uploading to a public gallery.
- If you’re unsure about ‘the rules’, check the details under the Challenge Guidelines tab on the As You See It Challenge homepage.
- In a sketch challenge, you are welcome to rotate or flip a sketch. You can replace shapes used such as substituting a circle panel for a square panel. However, we must be able to still see the basis of the original sketch in your finished product.
We look forward to seeing your creations in the AYSI gallery.
Enjoy your day and I'll be back tomorrow with another project. Until then, happy stampin'!
Stampin' Up! Supplies Used:
Table to follow