Rustic Butterfly Wreath Friend Card

by Joanne James11. May 2019 10:00

Today I'm sharing a card for the current challenge over at Fusion where I used both the sketch and inspiration photo for my card:


Given that it features butterflies, it's also my second link up with Stamp Ink Paper this week. My card turned out to be a more literal interpretation of the Fusion brief than I'd intended - take a look:


Here's the low-down on today's card:

A Quick Butterfly Wreath - My original plan was to create a wreath of layered diecut butterflies using the tiny butterflies in the Butterfly Beauty Thinlits set that I used on other cards that I shared with you earlier this week, however when I put it together the butterflies were a little too small and overwhelmed by the overall proportions of my card. As I was browsing my collection of patterned papers to decide what to use for the horizontal banner, I came across some leftover Botanical Butterfly paper from Sale-A-Bration. I punched out some small butterflies using my duet butterfly punch (this is finally back in stock now in the UK - hurrah!) and they were the perfect size for my project. I love the realistic details on each and because all I did was punch the out the effect took no time to create; perfect! I then used a plain piece of So Saffron cardstock for the horizontal panel to tie in with the colours. 

Wood Textures - I used a piece of Wood Textures designer series papers for my background, inspired by the door in the Fusion photo. I recall when I saw these papers unveiled at an Onstage event a couple of years ago, a fellow demo friend Karen was in raptures about them and all the awesome projects she could imagine making with them. I remember thinking she was mad, as I didn't think they were something I would use much - how little faith I had! As it turns out I've used these papers lots in my crafting and will be sad to see them go when they retire next month - yes, I have stocked up and suggest you do the same too!

Textured Textures - Whilst it's difficult to see in the photo, I added extra texture and interest to my Wood Textures DSP by running it through my BigShot with the Pinewood Planks embossing folder before adding to my card. This is something I often do if I'm using this paper for a background - it adds a lovely tactile dimension and interest to an otherwise simple card.

Here is the visual summary of the key products used on today's project for you to pin for easy reference:


You can see all of my 'How To' summaries on my 'How To - Tips and Techniques' Pinterest board in case you've missed any. 

Enjoy your day and I'll be back tomorrow with another project for this week's new challenge over at The Paper Players where I am hostess this week and I have a fun colour palette for you! Until then, happy stampin'!


Stampin' Up! Supplies Used:

Table built using Product Table Builder by The Crafty Owl - Independent Stampin' Up! Demonstrator.

Butterfly Beauty Inlaid Foil Diecut Birthday Card

by Joanne James9. May 2019 20:30

Today I'm sharing a card for the current challenge over at Stamps Ink Paper where they are all about winged things this week:

After I made this card for our challenge over at The Paper Players on Sunday, the frugal crafter in me couldn't bear to throw away the rectangle of foil that I cut my butterflies for the pop-up out of, so I save it, along with the inset pieces, and diecut more black butterflies using the large die in the Butterfly Beauty Thinlits set and created a second card by piecing together my offcuts - take a look:


Once I'd pieced the whole thing together, I added some ribbon and sequins beneath my sentiment banner then decorated the inside of my card with the co-ordinating Beauty Abounds stamp set:


The paper-piecing here was something of a labour of love, but that Lovely Lipstick foil is just too pretty to allow any of it to go to waste!

Here is the visual summary of the key products used on today's project for you to pin for easy reference:


You can see all of my 'How To' summaries on my 'How To - Tips and Techniques' Pinterest board in case you've missed any. 

I'll be back tomorrow with another project. Until then, happy stampin'!


Stampin' Up! Supplies Used:

Table built using Product Table Builder by The Crafty Owl - Independent Stampin' Up! Demonstrator.

Coming Soon - Hugs From Shelli Exclusive Paper Pumpkin Kit Available In The UK 15th May

by Joanne James7. May 2019 16:00

Today I want to share with you news of another special kit that will be coming to the UK for the first time this month: Paper Pumpkin! For those of you that may not be aware, Paper Pumpkin is a monthly papercrafting kit offered by Stampin’ Up! that is currently only available in the United States and parts of Canada. This month's kit is a particularly special one as it was inspired and co-created by the founder of Stampin' Up! herself, Shelli Gardner. Because the 'Hugs from Shelli' kit is so special, Stampin' Up! has decided to give demonstrators and customers everywhere the chance to experience it. As such, the Shelli kit will be available as an exclusive, limited release in all of our global (Europe, South Pacific, Japan, and Quebec, Canada) markets starting 15 May.

The exact contents of the kit are as always a closely guarded secret, but here's a short video by Shelli herself that gives a flavour of what the kit has in store: 


Part of what makes a Paper Pumpkin kit special is that Stampin' Up! don’t reveal the projects inside the box ahead of time so when it arrives there's always a sense of excitement and anticipation for the good things inside. Shelli describes the kit as “A touch of earthy and elegant spring with lots of layers and texture.” I was lucky enough at Stampin' up!'s recent Onstage event to make one of the cards in the kit - here's a picture of what that card looks like:


Isn't that so pretty? Even the envelope is beautifully decorated inside and out. No more sneak peeks, but I can confirm the Shelli kit from Paper Pumpkin includes the following:

  • An exclusive stamp set not available anywhere else
  • One Classic Stampin’ Spot® from our Classic ink collection
  • Paper and crafting materials to create 12 cards (3 cards of 4 unique designs)
  • 12 exclusive, coordinating envelopes
  • Adhesives and embellishments for all 12 cards
  • NOTE: A clear block is NOT included with this kit.

In addition, the kit will coordinate with the following Stampin’ Up! colours: Crumb Cake, Early Espresso, Old Olive, Petal Pink, Pool Party, Pretty Peacock, Soft Suede, and Very Vanilla.

So how can you get your hands on one? The 'Hugs From Shelli' kit goes on sale on 15 May and will be available only whilst supplies last. Kits are expected to be popular and to sell out quickly, so either be ready to put your order in online or contact me in advance in order that I can arrange to order your kit for you; you won't want to miss it!

I'll be back tomorrow with another project until then, happy stampin'!

Beauty Abounds Butterfly Pop Up Birthday Card for PP440

by Joanne James5. May 2019 09:00

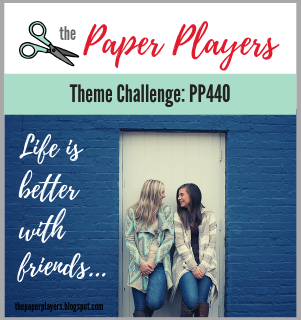
Today it's Sunday and time for this week's new challenge over at The Paper Players! It's the turn of the fabulous Jaydee to host this week and she has a fun theme challenge for you to work with:


Cards for friends are the best kind to make and I had a few different cards made that fitted this theme, but decided to share a special card that I made for one of my best friends who is celebrating a milestone birthday next month. This card is also perfect for the #SUOC222 celebratory theme over at SUO Challenges this week. My card is is bright, sparkly and features one of her favourite things - butterflies. First of all, here's the outside:


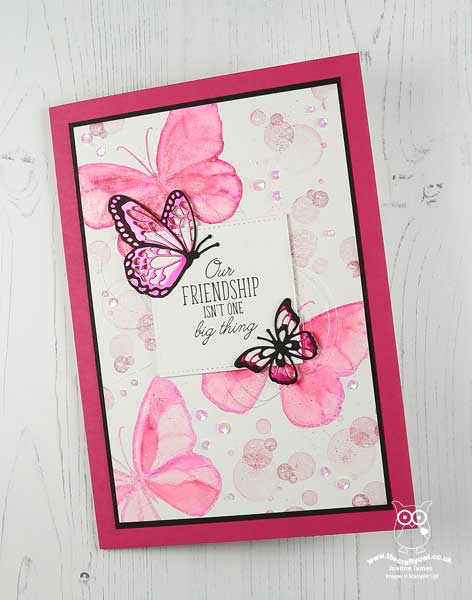
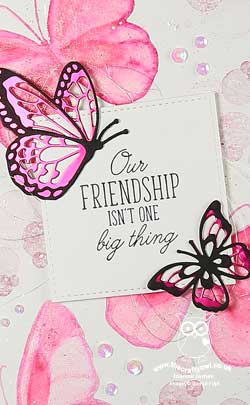
A selection of butterflies, loosely watercoloured in Melon Mambo and Lovely Lipstick and painted with Wink of Stella, along with the bokeh stamp from the Beauty Abounds stamp set, were flicked with ink and white shimmer paint, along with a liberal sprinkle of white metallic sequins form the basis for the background to my extra-large cardfront (it measure 15cm x 21cm) which provide a colourful background for my focal sentiment, which I accented with some layered diecut butterflies cut using pieces of the main large die in the Butterfly Beauty Thinlits set.

The Beauty Abounds stampset has such great sentiments for friendship cards; this one is completed on the inside of my card along with a fun pop-up surprise:


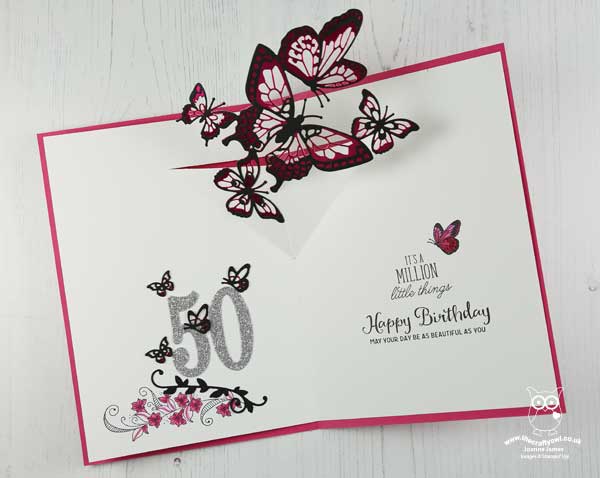
My simple pop-up includes the whole of the large butterfly thinlit, layered in black over Lovely Lipstick foil (ssaved from Sale-A-Bration). Difficult to photograph well, but it's really impressive in real life and I know my friend will love it! I added the second part of the sentiment; ours is indeed a friendship over many years, that started with the birth of our first babies but has grown in to something much more - it is not that one thing but a million little things that keep it going as the years go by.  I included some sparkly numbers (there comes a time when a milestone birthday is worth celebrating but does not necessarily need to be seen on the front of the card in my view!) along with a little more decoration and a birthday sentiment from the 'Beautiful Day' set that the watercoloured butterfly on the front also came from. 

Here is the visual summary of the key products used on today's project for you to pin for easy reference:


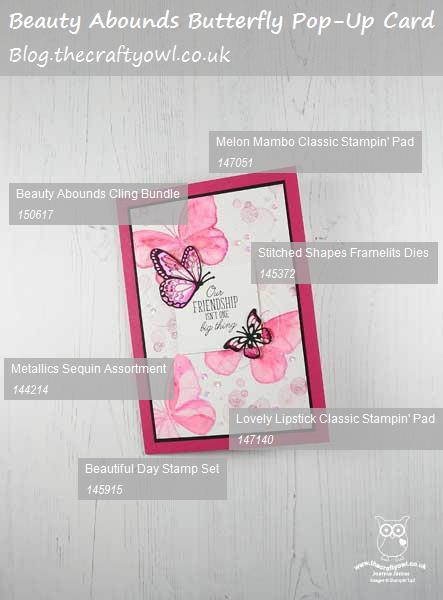
You can see all of my Product and 'How To' summaries on my 'How To - Tips and Techniques' Pinterest board in case you've missed any. 

Before you reach for your ink and papers, check out what our amazing team has created to inspire you this week:

Here's a quick recap of our challenge rules:
 
1.  Create a new paper project
2.  Upload your creation to your blog with a link back to us and provide a direct link to the post featuring your challenge submission.
3.  Please link your card to no more than four challenges, TOTAL.
4.  Have FUN!

You can see all of my 'How To' summaries on my 'How To - Tips and Techniques' Pinterest board in case you've missed any. 

Enjoy your day; we had a busy day yesterday with sport and a quick shopping trip for new school shoes for the youngest of the James Juniors who seems to be having a major growth spurt this year, (no blog post as I got too engrossed in a movie about Ted Bundy that I was watching last night and struggled to multi-process) so are looking forward to a slightly quieter one today, which will culminate with the final episode of the current season of 'Line of Duty' on TV tonight; any of my UK readers also looking forward to this 'who dunnit?' finale? We are also lucky to have a public holiday here in the UK this weekend, so will be making the most of the extra day tomorrow even though the weather is no great shakes - it's cold and showery and we even had hail yesterday! I'll be back then with another project. Until then, happy stampin'!


Stampin' Up! Supplies Used: 

Table built using Product Table Builder by The Crafty Owl - Independent Stampin' Up! Demonstrator.

Perfectly Paired Decoupage Welcome New Baby Card

by Joanne James3. May 2019 08:00

Today I'm sharing a card for the current baby theme challenge over at Inspire.Create:

 There are a couple of cute baby sets in the Spring-Summer catalogue and both are set to retire at the end of the month. I used my favourite, Perfectly Paired, to create a colourful and fun baby card - take a look:


Here's the low-down on today's card:

I've created a whole host of cards with the Perfectly Paired stamp set (check out this post here if you missed it) but they have all involved using the stamp in a single colour. This is such a fabulous stamp set to colour though and I spent a pleasant couple of hours with my Blends markers creating this card. I haven't listed them all out in the table below as I pretty much used all of them in one way or another! I stamped the image twice and coloured a few of the animals and fussy cut them and popped them up on dimensionals to create a fun decoupage detail. you can see that in this close up here:

I added a border using my favourite gingham paper and a stitched diecut edge using the Be Mine Stitched Framelits to finish my card.

Here is the visual summary of the key products used on today's project for you to pin for easy reference:


You can see all of my 'How To' summaries on my 'How To - Tips and Techniques' Pinterest board in case you've missed any. 

Enjoy your day and I'll be back tomorrow with another project. Until then, happy stampin'!


Stampin' Up! Supplies Used:

Table built using Product Table Builder by The Crafty Owl - Independent Stampin' Up! Demonstrator.

Copacobana Birthday Statements for ASYI

by Joanne James2. May 2019 07:00

Today I'm sharing a card for this week's colour challenge over at As you See It:

I've not managed to play along with this lovely group for a couple of weeks but when I saw this week's fabulous bright colour palette it was another one that I couldn't resist! Heather's inspiration photo is very 'copacabana' (yes, I have been signing the song ever since I read the challenge post!)  and I decided to try an idea that I saw on one of the samples in the Spring-Summer catalogue that I've never tried before - take a look:


Here's the low-down on today's card:

I like large single-image stamps as they can be great for clean and simple and more layered cards and both of the main stamps in the 'Birthday Statements' stamp set lend themselves to this. I don't usually stamp them in a bright colour though unless I'm leaving them uncoloured, so the sample on page 19 of the catalogue intrigued me. I stamped my image in Lovely Lipstick, then coloured it with a combination of light and dark Blends markers in Pineapple Punch, Pink Pirouette (retired but the closest I could get to Powder Pink) and light Lovely Lipstick. I decided to carry on the bright theme and mount my coloured panel on a Lovely Lipstick card base with a strip of Pineapple Punch in-colour DSP and finished the whole thing off with some Lovely Lipstick ribbon and a bow. 

I think I like this colour variation; it makes for one bright card, but I have plenty of soon-to-be-teenager classmates of Ben's that I know will love it!

Here is the visual summary of the key products used on today's project for you to pin for easy reference:


You can see all of my 'How To' summaries on my 'How To - Tips and Techniques' Pinterest board in case you've missed any. 

Enjoy your day and I'll be back tomorrow with another project. Until then, happy stampin'!


Stampin' Up! Supplies Used:

Table built using Product Table Builder by The Crafty Owl - Independent Stampin' Up! Demonstrator.

Everything Is Rosy Is Now Available To Buy - Order Yours Today!

by Joanne James1. May 2019 09:00

Just a quick post to let you know that the Everything Is Rosy Product Medley is now available to order. You can read all about this kit in my earlier post here; also here's a quick reminder of what is included:

Contact me to order yours or alternatively click on the link below that will take you directly to my online store to purchase:

Table built using Product Table Builder by The Crafty Owl - Independent Stampin' Up! Demonstrator.


The Everything Is Rosy Product Medley costs £74 and is available from today only whilst stocks last or until May 31st, whichever comes sooner. Order yours today - race you to the shop!


Purple Springtime Impressions Corner Card

by Joanne James1. May 2019 07:00

Today I'm sharing a quick clean and simple card for this week's challenge over at CAS(E) This Sketch that also works for another entry into the Addicted to CAS challenge which is all about contrasts:


This sketch was perfect for a tone-on-tone Springtime Impressions floral Corner diecut contrasted with a white front panel:


I diecut the edge of my white panel to but up to my gorgeous Grape diecut and adhered both pieces to my Highland Heather card base, paper-piecing a few of the flower centres and stamping my birthday sentiment to finish. I also trimmed the left-hand corner of the diecut to fit my portrait orientation.

That's all there is to it! 

Here is the visual summary of the key products used on today's project for you to pin for easy reference:


You can see all of my 'How To' summaries on my 'How To - Tips and Techniques' Pinterest board in case you've missed any. 

Enjoy your day and I'll be back tomorrow with another project. Until then, happy stampin'!


Stampin' Up! Supplies Used:

Table built using Product Table Builder by The Crafty Owl - Independent Stampin' Up! Demonstrator.

Butterfly Beauties in Blue For Just Add Ink

by Joanne James30. April 2019 07:00

Today I'm sharing a card for this week's colour challenge over at Just Add Ink:


I've not managed to play along with this lovely group for a couple of weeks but when I saw this week's fabulous bright colour palette I couldn't resist! I decided to go for a bold design to really make the most of all that colour and used my Butterfly Beauty Thinlits Dies for the very first time - take a look:


Here's the low-down on today's card:

A Blended Background - I wanted something with lots of colour for my background but not too much detail so as to detract from the butterflies, so decided to use the two lightest colours and apply them using a sponge dauber in a circular motion until the colours were blended and covered the whole layer. I used Shimmery White cardstock for my base; I find this helps the colours blend better and I also love the subtle shimmer it adds to the card. 

Butterfly Beauties Indeed - I loved these butterflies the moment I saw them and I've had them for months, so I'm not sure why it's taken me so long to get them out of the packet as they really are gorgeous and the star of the show for sure on today's card. I used both of the large dies and layered them together, with a smaller layered butterfly to anchor my sentiment; the set rally is choc-full of butterflies in all shapes and sizes though - lots of creative possibilities. I'm so glad these are carrying over into the main catalogue as it will give me lots more opportunities to play with them. Just a quick reminder that whilst both the Beauty Abounds stamp set and the Butterfly Beauty Thinlits Dies are carrying over, the 10% bundle discount price will not, so if you want to take advantage of that you need to order before the new catalogue goes live on 4th June.

Friendship Abounds - The dies in the Beauty Abounds bundle are rather spectacular, but the stamp set is rather special too: alongside some generic sentiments, it has two great pairs of sentiments that are just perfect for that special friend in you life. The one I used on my card today finishes on the inside with '...out of a whole world of people' (I forgot to take a photo so you'll have to take my word for it!!) How lovely is that?

Here is the visual summary of the key products used on today's project for you to pin for easy reference:


You can see all of my 'How To' summaries on my 'How To - Tips and Techniques' Pinterest board in case you've missed any. 

Enjoy your day. I'm early posting for a change and mine is shaping up to be a busy one. and I'll be back tomorrow with another project. Until then, happy stampin'!


Stampin' Up! Supplies Used:

Table built using Product Table Builder by The Crafty Owl - Independent Stampin' Up! Demonstrator.

Out of Africa Wild About You Animal Print Card

by Joanne James29. April 2019 19:15

Just a quick creative post from me today following on from my earlier share about the 'Everything Is Rosy' limited edition product medley that is coming later in the week (you can read all about that here if you missed it). I'm sharing a quick card that I made at the weekend that was initially inspired by last week's CASology challenge theme of 'Africa' (now closed but you can check out their amazing gallery here) that inspired me to use up some of my epic stash of retired designer series papers with this rather intriguing sketch from the CAS Colours and Sketches team:


So here is my card: 


A selection of 'Go Wild' retired animal print papers, inset beneath a trio of apertures cut using my rectangle stitched framelits dies and a sentiment from the retiring 'A Little Wild' stamp set - that's all there is to it! It definitely felt good to use up some of those retired papers too.

I'm also linking up my clean and simple card with the team over at Addicted To CAS where their current theme is 'contrast' and I think my varied animal skin-inspired prints are definitely that!


Here is the visual summary of the key products used on today's project for you to pin for easy reference:

You can see all of my 'How To' summaries on my 'How To - Tips and Techniques' Pinterest board in case you've missed any. 

I'll be back tomorrow with another project and compared to today's you might need sunglasses for it - bright is the word! Until then, happy stampin'!


Stampin' Up! Supplies Used:

Table built using Product Table Builder by The Crafty Owl - Independent Stampin' Up! Demonstrator.

Mini Catalogue

BROWSE THE CATALOGUE

The mini catalogue is now live! Read and download your copy here.

Shop Online

Access my online shop 24 x 7, 365 days of the year:

Current April hostess code:

VDKNV7BH

Shop Online

Join My Team

It's always a great time to join Stampin’ Up! New team members can get £130 worth of products for only £99 + free business supplies + free shipping + all the fun being a part of Stampin’ Up! Stampin' Up! has something for everyone: join my growing team and benefit from my support to enjoy Stampin' Up! however you choose.

If you're interested, call me for a chat to understand how I can help you realise your goals. Alternatively, if you have already decided to sign up and you just can't wait, please click here for the link to the online form where you can sign up and order your starter kit right away! 

Latest Kit!

Stampin Cut and Emboss

The Rock Legend Kit has all you need to make 8 cards with coordinating envelopes. Along with the new Panda Friends Kit, both are available from January 4th for just £14 each - get yours here!

2023-24 Annual Catalogue

BROWSE THE CATALOGUE

Click on the catalogue for a full list of current SU! supplies - if you would like to order any of the items featured, please drop me a line at [email protected] or give me a call on 07773 421446 - I'd be happy to help.

New Online Exclusives

There are new products available exclusively in the online store from 5 March - check them out here.

About Me

Hi I'm Joanne and live in Northampton and when I'm not looking after my husband and two beautiful children, am an avid crafter with a passion for all things Stampin' Up!

I must confess that I have never been a big rubber stamper - until I discovered Stampin' Up! that is. I love the fact that I can get such great results with co-ordinating stamps, inks, papers and punches - the possibilities are endless! Join me on my stamping journey as I share the things I love and be inspired to create amazing things yourself!

Follow Me

Monthly Newsletter

Box Builder

Click the button above to use Box Buster to create your custom box design using the Envelope Punch Board!

Kits Collection Now Available!

Stampin Cut and Emboss

The new Kits Collection from Stampin' Up! is now available!

Click here to see the current kits available and order yours online today.

I Design For


Stampin' Up Stuff

This is my personal blog and is not endorsed by Stampin’ Up! I hope you find it a plentiful source of ideas and personal inspiration but please don't copy my designs for contest submission or use for classes, publication or sale without express permission.