Witching Decor Project Kit - Halloween Witches Hat

by Joanne James5. October 2015 21:39

So today I thought we would have a change from cards and I would share with you the 3D project that I made on World Card Making Day. I know, topsy turvy, but since crafting with friends is in itself something to be celebrated, it seemed a great way to spend the day. So the project in question is the Witching Decor Project Kit in the seasonal catalogue. Normally this isn't the kind of project I would make, however the female James junior of the house, Rebecca, absolutely loved it and wore me down until I promised to buy it for her to create! 

So she invited her friend and fellow crafting enthusiast Nicholas over for the afternoon and we spent a pleasant few hours putting our respective hats together. Here is Rebecca's finished hat in all its glory:
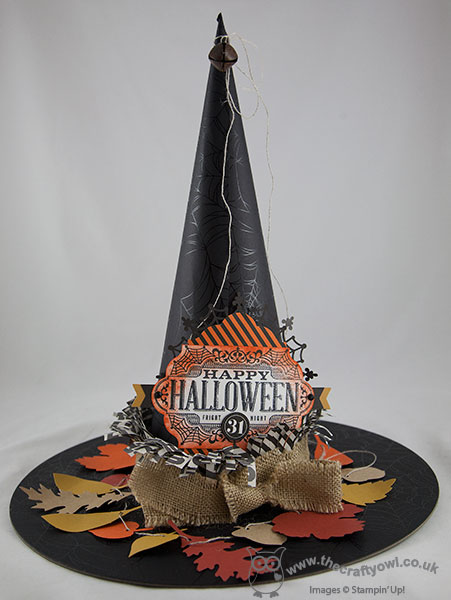
Now if you've seen the photo in the catalogue, you will see a few differences between this one and that one. the first is the shape: the one in the catalogue looks crumpled and 'worn in' (a little like the sorting hat in the Harry Potter stories!). The trouble was, once put together Rebecca decided she wanted hers to have a perfect point, so since she still managed to tie on her bell and have it tinkle, she couldn't bring herself to crumple the end! It must be a girl thing - Nicholas had no such issues and his had a wonderfully worn in appearance! 

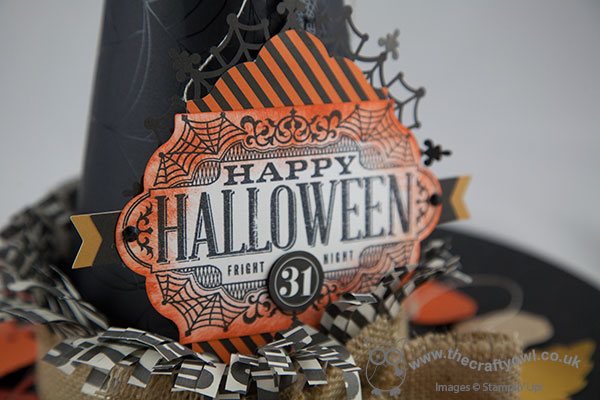
You might also notice the rather enthusiastically sponged edging to the 'Happy Halloween' label; the kit recommends using Soft Suede for a 'worn' look, yet having made one like this the children universally agreed that this didn't work for them at all and orange was most definitely needed! So we made another label - there are enough labels for 3 each of the stamp designs, in fact the whole kit is very generous in its contents; we made interchangeable labels and still had labels, flags, rhinestones and lots of leaves left over. All for just £20 and the co-ordinating 'Witches' Night' stamp set. I have a class scheduled to make this kit on 13th October - it would also make a great project for a girls' night in. I have a few calendar slots left in October so if this is something that interests you, please get in touch.
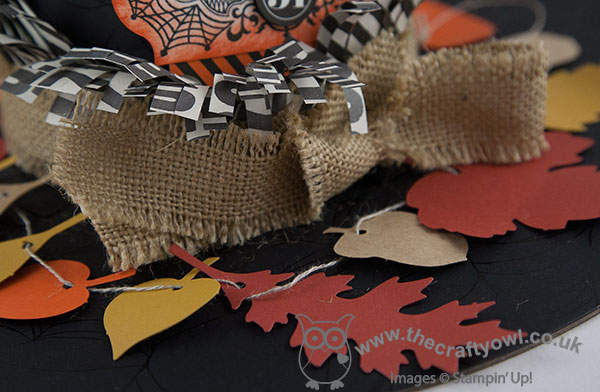
The leaves that are threaded around the edge of the hat are all pre-punched and can be used just as they are, as the children did on their hats (they just wanted to get them threaded and had no time for extra sponging!). They could also be sponged and distressed to add more texture and colour, or even stamped with the Vintage Leaves set to add more detail. 
We were so absorbed in our task, I didn't even take a photograph of us at work to share with you. Suffice to say, the children had a great time and I am loving the addition of the hat to our Halloween home decor. 

This is a great kit and very easy to construct - you might say child's play! It would be a great kit to make with children as part of the build up to your 'trick or treat' festivities. 

That's all from me today - back tomorrow with another project and some exciting children's news too! Until then, happy stampin'!


Stampin' Up! Supplies used:

Table built using Product Table Builder by The Crafty Owl - Independent Stampin' Up! Demonstrator.


A Whole Lot of Lovely English Garden Thank You Card

by Joanne James31. July 2015 08:00

Good morning everyone - it's Friday! I'm sure you are all more pleased than I am since it might be nearing the end of the week but for me it means that there are only a few more days left of my vacation before I return to the dreary weather of the UK. Oh well, let's not dwell on that!

Today I have a card that I made with one of my card class customers in mind, that features the bold patterns of the English Garden DSP. Here is my card:

We had been perusing through my DSP samplers whilst taking orders for the latest round of paper shares and the English Garden DSP came in for much comment. It was universally liked but some of my customers were unsure just how they would go about using paper with such bold patterns of a card. We chatted about it but since 'a picture tells a thousand words' as the saying goes, I thought some examples would better explain and today's card is a great example. Some of the patterns in the pack have smaller patterns so can be used in smaller quantities to add interest to a card, however others such as the paper I've used on today's card really need to be a feature of the card, rather than an add-on - the bold patterns work best when you can see as much of them as possible. 

On this card I used a base of Soft Suede, then cut a large piece of DSP into three equally sized panels and mounted each of these onto a piece of Night of Navy to give a narrow border before adhering them to my card. I could just as easily have stopped there, however on this occasion I added some retired Baked Brown Sugar thick baker's twine and a sentiment from the 'A Whole Lot of Lovely' hostess, coloured with my co-ordinating Stampin' Write markers, and added this to the front of my card. It compliments the paper without overshadowing it.

Another great example of how to use the bold patterns in this pack can be seen on this card, by my friend and fellow Paper Player the lovely LeAnne Pugliese:

LeAnne Pugliese WeeInklings Paper Players 255 Watercolor Wishes stampin up

This too allows the paper to take centre stage with a sentiment treatment that compliments and not overshadows it. I hope you like both my card and LeAnne's - please do leave me a comment below with your thoughts and pop over to LeAnne at her Wee Inklings blog to leave he a comment on her card too - and I hope these cards inspire you to 'be bold' with the patterns in the English Garden Designer Series Paper Pack.

Back tomorrow with another project; until then, happy stampin'!


Stampin' Up! Supplies Used:

Table built using Product Table Builder by The Crafty Owl - Independent Stampin' Up! Demonstrator.


A Whole Lot Of Lovely Pretty Petals Card

by Joanne James23. July 2015 08:00

Today it's time for a new challenge over at Create With Connie and Mary and this week we have a great sketch for you:

This is such a versatile sketch with so many possibilities, in the end though I settled for something that is a little unusual for me - take a look at today's card:

I was keen to use another of the papers on the Pretty Petals DSP stack as my background layer, so matted this on a base of Old Olive and Mint Macaron. I used Calypso Coral for my banner, effortlessly punched with my Triple Banner Punch (how did I ever manage without this in my life?!) and tucking a sliver of retired Old Olive ribbon beneath it (there is not a single ribbon in this colour in the current catalogue - let's hope that the Winter seasonal brings us something here in this staple colour!) I coloured my sentiment, from the 'A Whole Lot Of Lovely' hostess set (chat to me about booking a party or joining my next hostess club if you would like to own this set too!) in Pacific Point, Mint Macaron and Calypso Coral Stampin' Write markers and stamped onto Very Vanilla cardstock, that I cut out with my Big Shot and Oval Framelits.

Then for the bit that really isn't my usual style - I covered the back of the oval with Tear and Tape (how great is this product?! No more static red peel to stick to you!)and ruched some Mint Macaron lace trim all the way around the edge before adhering to my card front. I really love this pale green colour however was finding myself not really using is much in my card making, unlike it's counterparts Watermelon Wonder and Cucumber Crush (how did I ever live without these in my stamping cupboard?!) so this card is the first that seeks to rectify that. To finish, I added an Old Olive flower punched with the Petite Petals punch as leaves for the base of my Watermelon Wonder blossom accent - whilst not Calypso Coral, it is sufficiently close to compliment the coral elsewhere on my card.

So definitely more frilly than usual and this card would work just as well without the lace trim (and be more post-service friendly) but nice for a change I think! Do visit the other Design Team members to checkout their interpretations of this week's challenge sketch; and if you didn't read my Weekly Deals post yesterday, do check it out here - it contains a special offer exclusive to my customers!

Right, I'm off to top up my tan! Enjoy your day and I'll be back tomorrow with another project; until then, happy stampin'!


Stampin' Up! Supplies Used:

  • A Whole Lot Of Lovely Clear-Mount Stamp Set
  • Pretty Petals Designer Series Paper Stack
  • Big Shot
  • Ovals Collection Framelits Dies
  • Mint Macaron A4 Cardstock
  • Mint Macaron 1" Dotted Lace Trim
  • 2015-2017 In Color Stampin' Write Markers
  • 2015-2017 In Color Blossom Accents
  • Old Olive A4 Cardstock
  • Calypso Coral Stampin' Write Marker
  • Calypso Coral A4 Cardstock
  • Brights Stampin' Write Markers
  • Very Vanilla A4 Cardstock
  • Petite Petals Punch
  • Banner Triple Punch


Silhouettes and Script Meets Farmer's Market Anniversary Card

by Joanne James11. July 2015 18:04

I've been busy creating today and just have time for a quick post before I head out this evening for dinner with friends. Today's card uses this week's sketch over at Mojo Monday and showcases some of the the new Farmer's Market DSP so is perfect for linking up with SUO Challenges too where the theme is 'designer papers':

Here is my card - check out how perfectly these two paper designs from the Farmer's Market range co-ordinate with each other:

I used Old Olive for my base with a mat of Hello Honey - a colour I'm not overly fond of it has to be said, yet I think it takes on a lovely hue next to the greens on this card. The pear paper design is definitely the one on show here, yet the gingham across the bottom adds interest without overwhelming. I used a piece of Mossy Meadow for my diagonal, tied with some retired satin ribbon in the same colour then for my focal point I stamped the pear from the 'Silhouettes and Script' hostess set onto Whisper white, inking up with my sponge daubers to give the lovely shading effect then fussy cut one side and cut to other with my circle framelits. To finish I added a 'Congrats' from the same set in black and popped up on dimensionals. I just love the blended colouring on the pear - I'm going to have to do this with the other stamps in the set too!! What a fun alternative take for a wedding or anniversary card!

That's all from me today; I need to go and wash my hair and get ready for my night out! Back tomorrow with a new challenge over at The Paper Players. Until then, happy stampin'!


Stampin' Up! Supplies Used:

Table built using Product Table Builder by The Crafty Owl - Independent Stampin' Up! Demonstrator.


Best Thoughts Watercolour Card

by Joanne James4. June 2015 08:00

It's Thursday and time for a new challenge over at Create With Connie and Mary and this week we have a colour challenge for you:


I decided to do a little watercolouring with one of my favourite sets from the new catalogue - a hostess set called 'Best Thoughts':

I went for a simple layout using a base of So Saffron and an offset panel of Lost Lagoon, then stamped the flower image in Versamark and heat embossed it in white. I stamped the sentiment directly in Lost Lagoon, then used my aquapainter and all three colours to ink my flower. I did the same with the butterfly on a separate piece of watercolour paper and when dry, applied some Dazzling Diamonds to his wings using my two-way glue pen then fussy cut him out and popped him up on a dimensional so it looks as if he has landed on the flower.

I wasn't sure if these colours would work for this card, as you don't really see yellow hydrangeas, however I think this flower looks great in any colour and this colour combination, whilst unusual, is really effective. This is such a beautiful set and is exclusive to customers who host a party (or place an individual order of £150 or more). If you would like to host a Stampin' Up! party and earn this set for free, please do get in touch - I would love to share the loveliness of the new catalogue with you and your friends. Or perhaps you would be interested in joining my Stampers 6 Club - I am just about to start another round so if you would like to get on board, this is perfect timing.

I do hope you like today's card; the rest of the team have used these colours in so many different ways, so do pop by their blogs for even more inspiration. I look forward to seeing your work in our gallery this week. I have another busy day today with a couple of functions to attend; back tomorrow with another project. until then, happy stampin'!


Stampin' Up! Supplies Used:

  • Best Thoughts Clear-Mount Stamp Set
  • Watercolor Paper
  • Embossing Buddy
  • Versamark Pad
  • White Stampin' Emboss Powder
  • Heat Tool (Uk)
  • Aqua Painters
  • Lost Lagoon Classic Stampin' Pad
  • Hello Honey Classic Stampin' Pad
  • Lost Lagoon A4 Cardstock
  • So Saffron Classic Stampin' Pad
  • So Saffron A4 Cardstock


2015-6 New Stampin' Up! Annual Catalogue Launch Party Details

by Joanne James29. May 2015 10:51

Yay it's Friday! Clearly we have seen the best of the weather here in the UK this week as it is pouring down with rain here in the UK as I type. Never mind - I am tucked up indoors and want to share more widely the details of next week's Open House to celebrate the launch of the new 2015-16 Annual Catalogue, details below:


Please call me on 07773 421446 or email me with your RSVP so that I can ensure that there are enough 'make and take' packs. This event will be held at my home in Northampton - address details on RSVP. I do hope you will be able to join me!

For my lovely readers who live further afield, never fear - there will be plenty more inspiration right here in the coming days, weeks and months, so stay tuned!

Up, Up And Away with The Paper Players!

by Joanne James22. February 2015 10:00

It's Sunday and time for another challenge over at The Paper Players. Thank you to everyone who played along with my CAS bird challenge last week - there were some fabulous entries. This week the lovely Sandy is hosting and she has a sketch challenge for us - my favourite! Here is her sketch:


I decided to use the colour palette over at Colour Me for my card today - I haven't had the opportunity to play along with these lovely ladies since I finished my Design Team post over there at the start of the year, so time to say 'hello ladies!' to Hayley, Tara and the team. I just so happen to be using another stamp in the 'Time To Celebrate' hostess set that I used on my Paper Players card last week - take a look:

The temptation to use a feather in my design as per the sketch was high, however there are some wonderful examples using feathers by other members of the Design Team, so I decided to look at what else I could use and settled on the hot air balloon instead. My top mat layer is a piece of 'Flashback' DSP, the circle pattern perfect to echo the central circle of the sketch. I embossed a piece of Very Vanilla cardstock with the now retired 'Cloudy Day' embossing folder and sponged the sky in Pool Party around the clouds and framed this with a Real Red circular frame cut with my Big Shot and Circle Framelits. I added a simple sentiment banner with a little fussy cutting around the 'y' in 'you', then mounted the hot air balloon with dimensionals for a little lift. I stamped the balloon on very Vanilla and coloured it with my So Saffron Stampin' Write marker and the lightest of my Cherry Cobbler Blendabilities. I also added a little Crystal Effects to my stars for some additional dimension, although that's quite difficult to see in the photo below: 

That's my card done and I hope you like it. I love the stamps in the 'Time To Celebrate' hostess set - if they are your thing too, please get in touch if you would like to host a party to lay your hands on your very own set. Before you reach for your ink pads, do visit the other design team members to see what interesting ideas they've had this week:

The Paper Players Design Team
 
Here's a quick recap of our challenge rules:
 
1.  Create a new paper project
2.  Upload your creation to your blog with a link back to us and provide a direct link to the post featuring your challenge submission.
3.  Please link your card to no more than three challenges, TOTAL.
4.  Have FUN! 

I look forward to seeing how you interpret Sandy's sketch this week - so many possibilities! 

Back tomorrow with another project; until then, happy stampin'!


Stampin' Up! Supplies Used:

Table built using Product Table Builder by The Crafty Owl - Independent Stampin' Up! Demonstrator.


Another Feathered Friend!

by Joanne James16. February 2015 21:29

Today is the first day of the half-term holiday, so that makes for a late blog post today! Just time to squeeze in a card for this week's challenge over at The Color Throwdown where there have a lovely bright colour palette to work with this week:

I had another of the birds from the 'Time to Celebrate' stamped and laying on my desk, so decided to colour him up using my Bermuda Bay, Old Olive, Cherry Cobbler and Wisteria Wonder Blendabilities - here's my card:

A different layout to yesterday's card and again using some 'Sweet Taffy' DSP but both combined to give quite a different look and feel to yesterday's card. I have taken a real shine to this bird stamp - there's something so whimsical about it and the other stamps in this set. The 'Time To Celebrate' stamp set is a hostess set that can be earned exclusively by hosting a party (or placing an individual order of £150 or more). If you would like to host a party, please do get in touch

That's all from me today - short and sweet! Back tomorrow with another project; until then, happy stampin'!


Stampin' Up! Supplies Used:

Table built using Product Table Builder by The Crafty Owl - Independent Stampin' Up! Demonstrator.


Hello There Birdie - A Feathered Friend For The Paper Players

by Joanne James15. February 2015 09:00

It's Sunday and time for this week's challenge over at The Paper Players - and this week it's a double does of excitement as I am hosting my very first challenge with this wonderfully talented group of ladies. 'Feathered friends' is the theme of my clean and simple challenge this week so I'm looking for a bird (or two!) on your card! Here is the wonderful challenge badge that the lovely Nance has created for this week's challenge:


This is one of those challenges when I was truly spoilt for choice - there are lots of great bird images around at the moment. I decided after my busy week that I was definitely in need of some theraputic colouring, so decided to reach for the quirky bird stamp in the Spring-Summer hostess set, 'Time To Celebrate':

Since this bird doesn't look like any I've ever seen in my garden, I decided to throw caution to the wind and colour him in some totally tropical colours and really go to town! I used my Daffodil Delight and Rich Razzleberry Blendabilities markers and a Tempting Turquoise Stampin' Write marker and got colouring. I love that you can colour images like this and you really don't need to be any kind of expert to get a good result. Here's a close up of my bird so that you can see just how imprecise my colouring is: 

I really would urge anyone who is reading this and not tried colouring with Blendabilities to give it a go - I guarantee you'll like the results! I paired my bird with a piece of brightly coloured 'Sweet Taffy' paper and added a few simple banners in co-ordinating colours to finish off my card. I love the colours I used on my card today - Brights are my favourite of the Stampin' Up! colour families, and whilst there isn't a huge amount of 'white space' on my card due to my piece of bold, patterned DSP I love the finished card, which I think still has a clean feel with minimal layers and embellishments.

Before you reach for your ink pads, do visit the other design team members to see what interesting ideas they've had this week:

The Paper Players Design Team
 
Here's a quick recap of our challenge rules:
 
1.  Create a new paper project
2.  Upload your creation to your blog with a link back to us and provide a direct link to the post featuring your challenge submission.
3.  Please link your card to no more than three challenges, TOTAL.
4.  Have FUN! 

I look forward to seeing your bird projects in the gallery this week, whether chirpy, quirky or just plain feathered! The children are on half-term holiday this week so we are having a more restful week than usual. I was almost ready for a sport-free day today, when Ben was selected to play in a basketball tournament this afternoon. He is really excited about it though as it's his first one and he LOVES basketball, so is really looking forward to it.

Back tomorrow with another project; until then, happy stampin'!


Stampin' Up! Supplies Used:

Table built using Product Table Builder by The Crafty Owl - Independent Stampin' Up! Demonstrator.


Hang In There - Today's Pause For Thought Card

by Joanne James19. November 2014 08:57

Today's card is for this week's Colour Me...! card challenge where we have are working with a subtle palette of autumnal browns:


I also decided to use the rather unusual sketch layout over at Create With Connie and Mary for my card this week. Here is my card:


I used Soft Suede as my card base and layered a piece of paper from the Trim The Tree DSP stack at an angle across the bottom of the card. For the main image, I used the tree from the Nuts About You hostess set and having inked it up with my Soft Suede and Cajun Craze Stampin' Up! markers, stamped in out onto very Vanilla cardstock and partially cut out using my circle framelits, fussy cutting the leaves so that they would overhang the edge of the circle. I deliberately created a streaky finish on the tree truck to make it look a little bit like tree bark. I stamped both the sentiment and little creature (is it a possum? I'm really not sure what he's supposed to be, but he's cute all the same!) in Versamark and heat embossed them with Early Espresso embossing powder. I fussy cut the animal and adhered him over the tree so that he looked like he was 'hanging in there'. I finished with some strips of Early Espresso and a piece of retired Early Espresso taffeta ribbon to complete my card.

I made this card for a female friend who is having a tough time of it recently and I wanted to send her a little something to brighten her day and just let her know I was thinking of her. I really liked the finished card, then I read on a blog somewhere this week that it was the author's view that a thinking of you/get well card should always be in brighter colours to lift the recipients mood. As someone who was entirely happy with her card until I read this, and who also loves bright colours, I'm now having second thoughts  - maybe I should remake it with something less subtle; what do you think? Either way, I still love today's card!

Feel free to leave a comment on today's card, before hopping over to check out the amazing cards by the rest of the Colour Me...! team:

And our talented guest designer for November - Anita Bowden
 
We look forward to seeing your striking creations - what do these colours inspire you to create? 
 
Back tomorrow with another project; until then, happy stampin'!
 
 
Stampin' Up! Supplies Used:
Table built using Product Table Builder by The Crafty Owl - Independent Stampin' Up! Demonstrator.
 

Mini Catalogue

BROWSE THE CATALOGUE

The mini catalogue is now live! Read and download your copy here.

Shop Online

Access my online shop 24 x 7, 365 days of the year:

Current April hostess code:

VDKNV7BH

Shop Online

Join My Team

It's always a great time to join Stampin’ Up! New team members can get £130 worth of products for only £99 + free business supplies + free shipping + all the fun being a part of Stampin’ Up! Stampin' Up! has something for everyone: join my growing team and benefit from my support to enjoy Stampin' Up! however you choose.

If you're interested, call me for a chat to understand how I can help you realise your goals. Alternatively, if you have already decided to sign up and you just can't wait, please click here for the link to the online form where you can sign up and order your starter kit right away! 

Latest Kit!

Stampin Cut and Emboss

The Rock Legend Kit has all you need to make 8 cards with coordinating envelopes. Along with the new Panda Friends Kit, both are available from January 4th for just £14 each - get yours here!

2023-24 Annual Catalogue

BROWSE THE CATALOGUE

Click on the catalogue for a full list of current SU! supplies - if you would like to order any of the items featured, please drop me a line at [email protected] or give me a call on 07773 421446 - I'd be happy to help.

New Online Exclusives

There are new products available exclusively in the online store from 5 March - check them out here.

About Me

Hi I'm Joanne and live in Northampton and when I'm not looking after my husband and two beautiful children, am an avid crafter with a passion for all things Stampin' Up!

I must confess that I have never been a big rubber stamper - until I discovered Stampin' Up! that is. I love the fact that I can get such great results with co-ordinating stamps, inks, papers and punches - the possibilities are endless! Join me on my stamping journey as I share the things I love and be inspired to create amazing things yourself!

Follow Me

Monthly Newsletter

Box Builder

Click the button above to use Box Buster to create your custom box design using the Envelope Punch Board!

Kits Collection Now Available!

Stampin Cut and Emboss

The new Kits Collection from Stampin' Up! is now available!

Click here to see the current kits available and order yours online today.

I Design For


Stampin' Up Stuff

This is my personal blog and is not endorsed by Stampin’ Up! I hope you find it a plentiful source of ideas and personal inspiration but please don't copy my designs for contest submission or use for classes, publication or sale without express permission.