Punch Art Underwear Gift Card

by Joanne James20. July 2013 21:14

I've been taking advantage of the cooler temperatures today and spending some time in my craft room working on some punch art cards. I'll share these with you in due course, but today wanted to share a punch art card I made to accompany a lingerie gift voucher I gifted a good friend of mine on her birthday a little while ago. So here is my card:

There are lots of examples of how to create this kind of card on the internet and this is my take on it. The colour combo was inspired by the gift voucher itself, which you can just see inside the card: Rich Razzleberry on Pool Party. I then used my scoreboard to add the patterned edges to my layer with some pearls to finish off.

I love the fun nature of this card, which was shared by its recipient. Above all, so much nicer than the plain card I received from the shop when I purchased the gift voucher!

Back tomorrow with another project. Until then, happy stampin'!


Stamps: Tea Shoppe (retired)

Cardstock: Rich Razzleberry, Pool Party, Blushing Bride, Brights DSP

Ink/Stampin' Write Markers: Rich Razzleberry, Pool Party

Tools: Heart Punch, Scallop Edge Border Punch, Simply Scored Borders Plate

Finishing Touches: Basics Pearls

Happy Birthday Sister

by Joanne James18. June 2013 20:30

Today I'm back with the birthday card I promised yesterday: this time the card I made from her little brother. I saw a great card by Wendy Cranford on Pinterest a while ago and whilst this was for a LaLa Loopsy doll, I thought I could make a great likeness of Rebecca from it. Here's the link to Wendy's original card where she also provides a great video tutorial with step-by-step instructions on how she created her version. Now for my card:

I made my hair blonde and cut in a fringe - don't you just love the hair tied in bunches?! Also, instead of buttons for eyes, I used some punched navy circles and painted with Crystal Effects to make them shiny. Another sentiment courtesy of 'For My Family', this time pairing 'sister' with the 'Happy Birthday' from Wacky Wishes. Another set I'll be sorry to see go; if you would like to own this set, you need to host a party before the end of the month so get in touch!

Here's a close up of the little girl's face again:

I know, totally impractical for putting in an envelope, but I love the hair! So simple to recreate - just cut the card using paper snips into thin strands, then curl around a pencil - but so effective. The perfect card for little girls and I love that you can make them individual to look like the recipient. To be fair, this photo looks more like 'baby Rebecca' than my now 8 year-old - this is the photo that inspired my version of this card:

I guess in my mind's eye she will always look this way to me - beautiful!

Back tomorrow with another project - until then, happy stampin'!


Stampin' Up Supplies:

Stamps: For My Family, Wacky Wishes

Cardstock: Whisper White, Real Red, Daffodil Delight, Rich Razzleberry, Night of Navy, Blushing Bride, Summer Smooches Parade Designer Series Paper

Ink/Stampin' Write Markers: Real Red, Melon Mambo, Whisper White Kraft Ink

Tools: Circles #2 Originals Die, Small Heart Punch, Corner Punch, Dress Up Framelits, Itty Bitty Punches (circle), Small Oval Punch, Stamp-a-ma-jig

Finishing Touches: Basics Rhinestones

Oh, Whale! Party Invitations

by Joanne James17. June 2013 22:00

So something different today - birthday invitations! I was going to share a birthday card with you today but changed my mind (bloggers prerogative!) As already mentioned this week, it was Rebecca's 8th birthday last Saturday. She is having a swimming pool party next Sunday to celebrate with her friends and so water-themed invitations were the order of the day. She decided that 'Oh, Whale' was to be the stamp set of choice for the task, I saw this lovely Valentine card here and loved the layout, so decided to use this as the basis for my party invitation design. Here are the finished invitations:

I switched out the hearts, went for a darker blue whale and couldn't miss the opportunity to use my Cloudy Day Embossing Folder to add texture to the circle behind the whale. I really like the mix of circle styles on this card and the way the DSP, punched circle and paper piercing bring the whole design together. I then used the 'Make a Wish' set to make light work of the details on the inside of the card (no photo of this though - oops!)

Back tomorrow with another project; until then, happy stampin'!


Stampin' Up Supplies:

Stamps: Oh Whale, Make a Wish

Cardstock: Whisper White, Real Red, Polka Dot Parade Designer Series Paper (Marina Mist)

Ink/Stampin' Write Markers: Night of Navy, Marina Mist, Real Red

Tools: Circles #2 Originals Die, Cloudy Day Textured Embossing Folder, Small Heart Punch, Essentials Paper Piercing Pack, Stamp-a-ma-jig


Tiptoe Through the Tulips

by Joanne James18. May 2013 20:19

A busy week this week! I was partying last night - will share the card later this week - with an old and dear friend of mine who was celebrating a milestone birthday, so no blog post, I'm afraid. I've so much ready to share though - so keep checking back for lots of card and crafting inspiration as I should be back to daily posts now. Today I thought I would share a card inspired by a Wendy Weixler card (you can see her original card here) but I changed a few things, including the colourway to reflect the tulips in my garden, which finally bloomed a couple of weeks ago:

Tulips are one of my favourite flowers and there's nothing like a bunch of spring blooms to brighten your day. I love the dimension and depth of this card; the tulips are made using a heart punched with the Small Heart Punch, then the hearts are cut in half down the centre and three halves layered to achieve the petal effect. The leaves were made using the smallest of the oval framelits, just cutting away the edges. Here's a couple of photos of the tulips on my garden, which inspired my choice of pink and purple colours:

 These are really blousy and frilly and open out into huge blooms, whereas the ones below are much more traditional in their shape and style:

I'll leave you with one last picture that shows a close up of the tulip punch art on my card today; back tomorrow with another project, until then happy stampin'!

Stampin' Up Supplies:

Stamps: Itty Bitty Banners

Cardstock: Whisper White, Rich Razzleberry, Melon Mambo, Pink Pirouette, Gumball Green, Polka Dot Parade DSP

Ink/Stampin' Write Markers: Rich Razzleberry

Tools: Small Heart Punch, Ovals Framelits, Windows Framelits, Bitty Banners Framelits, Perfect Polka Dots Embossing Folder

Four Legged Friends

by Joanne James14. May 2013 21:32

Today I thought I'd share a couple of projects that I made for my good neighbour and friend and fill you in on the story that goes with them. My neighbour is MAD about dogs! Not just a dog-lover - I mean, head-over-heels, mad about her canine friends (and other animals too, but that's a whole other story!) Anyway, anyone reading this who knows me, knows that I am SO not like this; it's not that I don't like animals, it's just that I've never really had a pet and I don't really understand the pet-owner bond; combined with my OCD cleaning obsession this means that I can't imagine having a four legged friend running round the house, as much as my children plague me to get one. As a consequence, I have been known to say the wrong thing on occasion as far as pets are concerned; I would like to think I've learned from some of my previous faux-pas though, so when my neighbour's beloved great dane, Chelsea, passed away recently I decided to do something special to remember her. I decorated a box frame to house a favourite picture of her and this is the finished result: 

You might think it a bit pink, but for all her size and stature, she was a real girly dog if there is such a thing, with a bright pink collar and always to be seen wearing a bright pink necktie. The sentiment, 'You're in my thoughts, you're in my heart" seemed so appropriate in the circumstances. Whilst Chelsea will never be forgotten, her passing has been followed by the arrival of a new neighbour; a beautiful grey baby great dane puppy called Storm. To welcome her, I made a card, similar to one I'd seen designed by Mary Fish. You can see her card here; and this is my version:

I did add some grey stitched grosgrain ribbon across the front too, but I can't find the photo with ribbon so you'll just have to use your imagination! I stayed with the pink theme toned in with grey - I love the punch art paw print, don't you? Lastly, for all you other many dog lovers reading this, I thought you might like to see a picture of the new puppy - so here she is, Storm in all her glory:

Isn't she just the cutest?! That's all for today - back tomorrow with another project. Until then, happy stampin'!


Stampin' Up Supplies:

Stamps: Word Play, Sassy Salutations

Cardstock: Regal Rose, Melon Mambo, Basic Grey, Whisper White, Pretty in Pink, Rose Red

Ink/Stampin' Write Markers:  Melon Mambo, Basic Grey

Tools: Full Heart Punch, Owl Punch, 3/4" Circle Punch, Large Scallop Edgelits

Finishing Touches: Basics Rhinestones

Fashionista Gift Tag Set

by Joanne James3. May 2013 20:49

No stamping today! I have another Dress Up project from last month's quarterly training session: this time a lovely set of gift tags in a nice little pocket holder made using the Pop n' Cuts base again. Here's the outside of the box, decorated with its own dress on a Cute Clip hanger and another of those little filter paper flowers:

Open up the box to reveal a lovely set of dressed mannequin gift tags, each one with its own outfit:

This kind of holder is so easy to make just by adding in a couple of central score lines and box section to hold the tags; it would also make a nice notelet holder. As for the tags - what better way to ensure a gift for someone special is 'all dressed up'? My particular favourite outfit combo is the embossed filter paper sundress with the hot pink patterned bolero cardigan; leave me a comment and let me know which one you prefer, or better still how you would dress yours?

If you would like to get your hands on a gift tag set like the one above, you can do one of three things:

host a party during the month of May - this will be my hostess gift to thank you for booking a party and if you have party sales totally £300 or more, you could use your hostess credits to obtain the Pop 'n' Cuts Card base, Pop 'n' Cuts Dress Form and All Dressed Up framelit and stamps bundle ABSOLUTELY FREE!*

ask me about a class - if I have enough interested crafters, I will run a class featuring the Dress Up framelits and Pop 'n' Cuts base and you can learn how to make this set and more

contact me via [email protected] to place your order today

So many choices - I hope one of them tick's your box and I look forward to hearing from you. Back tomorrow with anohter project - until then, happy stampin'!


*Hostess credits for party sales of £300 totalling £75 (£50 plus £25 bonus if you host a party before May 30th) with one item purchased at 50% discount price


Stampin' Up Supplies:

Cardstock: Marina Mist, Sunshine and Sprinkles DSP

Ink: Basic Grey

Tools: Dress Up Framelits, Big Shot, Itty Bitty Punches, Elegant Bouquet Embossing Folder, Fancy Fan Embossing Folder, Heart Punch

Finishing Touches: Basics Rhinestones, 1/4" Stitched Grosgrain Ribbon Basic Grey, Creped Filter Paper, Cute Clips

Angry Bird in Action - Masculine Swap Card

by Joanne James15. April 2013 21:20

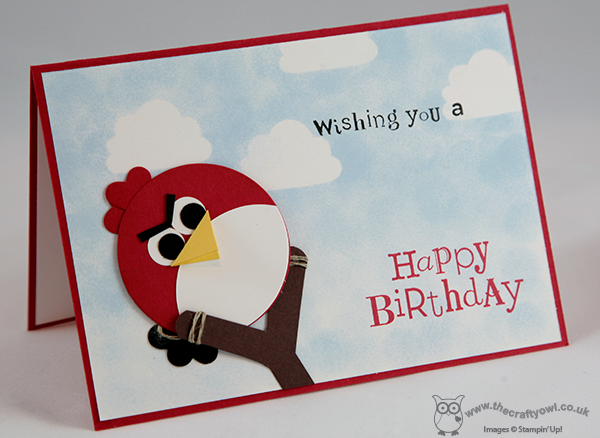
As I mentioned in yesterday's post, I was on a team training day yesterday. One of the things we like to do at these events is share 'swaps', where we each make multiples of a card or 3D project with a particular theme in mind and then 'swap' with each other. This is a great way to share in each others creativity, inspire others and to be inspired and also gives lots of items to share with customers at parties and classes. The theme for yesterday's swaps was 'masculine' and whilst I often struggle with 'grown-up' masculine, having a 5 year old son gives me plenty of opportunity to design for 'young' masculine and I'm never short of ideas. As you can see in yesterday's post, Angry Birds is an ever-popular theme at the moment, so with this in mind I worked up a slightly altered version to a card that I seem to make quite a lot of these days. Here's my original card that I've made a number of times:
And here's the slightly altered version that I made for my swaps yesterday - can you spot the key difference?
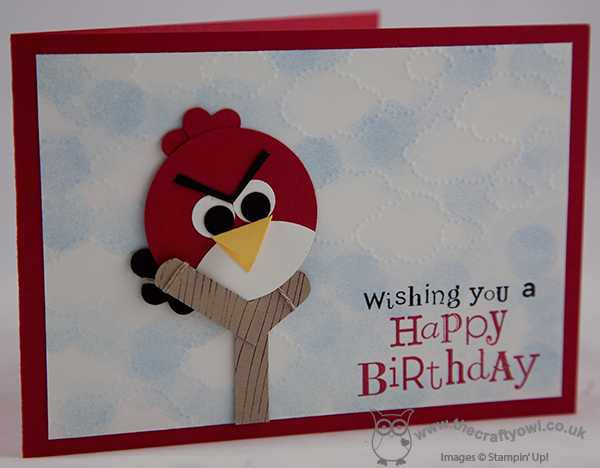
Did you spot it? Instead of sponging around a template for clouds as in the first card (I use the top of the cupcake from the Cupcake Builder Punch for this  - it makes a great cloud!) I partially embossed the background using the new Cloudy Day Textured Impressions Embossing Folder and sponged blue in between the clouds, leaving the bottom right hand corner un-embossed to allow me to stamp my sentiment onto a flat card surface. Another small difference is that instead of using Chocolate Chip cardstock for the slingshot, I used Crumb Cake, stamped in Chocolate Chip ink with the Woodgrain stamp. This last decision was prompted more by the fact that I had a large number of Crumb Cake card offcuts from a previous project that were perfect for use here (if you're reading this Chris P, this one's for you - I told you I'd find a use for those Crumb Cake offcuts!!) Punch art is great for using up all those odds and ends of cardstock left over from other projects, although having set out to make 30 of these, I did wonder if I should have chosen something a little more straightforward!

Anyway, I was really pleased with the way the all turned out. The design of this bird is slightly different to the red bird on yesterday's bookmark - I think the eyebrows make him look angrier. Here's a close up of the detail:
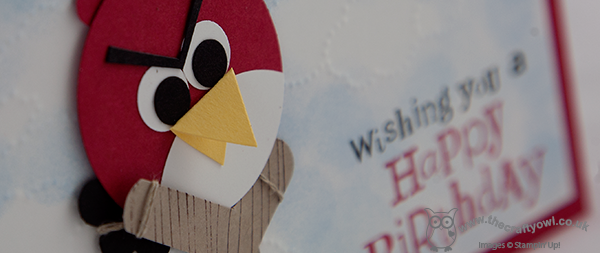
I love the beak too - there's just so much going on in this card, even after making so many I don't really tire of it. All my swaps were exchanged yesterday so I can't show you a photo of all 30, however I did make a few extras for some upcoming birthdays so I'll leave you with this last group shot of the little red fellas getting ready to be launched from their slingshots:

On that happy note, I'm off to start prepping; the Easter holidays are finally over and the children are back to school tomorrow. i'll be sad to see them go, but on the up side I'll have more time to spend in my craft room and I have lots there to keep me busy. I'll be back tomorrow with a new project - and possibly a 'sneak peek' of one of the cards we will be making in Wednesday's card class. So come back tomorrow and check it out; until then, happy stampin'!


Stampin' Up Supplies:

Stamps: Wacky Wishes (Hostess), Woodgrain

Cardstock: Real Red, Daffodil Delight, Basic Black, Whisper White, Crumb Cake

Inks: Real Red, Basic Black, Chocolate Chip, Bashful Blue

Tools: 1 3/4" Circle Punch, Small Heart Punch, Owl Punch, Itty Bitty Shapes Punch (circle), Big Shot, Cloudy Day Textured Impressions Embossing Folder, Sponge Dauber, Stamp-a-ma-jig

Finishing Touches: Linen Thread

Punch Art Angry Birds Bookmarks

by Joanne James14. April 2013 21:38

I've been enjoying a quarterly training day with my wider Stampin'Up! team today, so have lots of lovely new craft things to share with you over the next week or so. The theme of our swaps today was 'masculine'; I'll share mine with you in the next day or two when I have a half-decent photo. Meanwhile, to get you in the mood another non-card project today, keeping with the masculine theme: I made these Angry Bird punch art bookmarks a while a go and for the 'little men' in my life, they were certainly a big hit:

Aren't they just the cutest? They take a little while to make and use lots of different punches, but they're really effective. Guaranteed to make even the most reluctant reader want to open their storybook! They also make a great party bag gift for a child's birthday, either ready made or in kit form: contact me at [email protected] if you are interested in either of these. I made lots of these so here's one more picture of the whole collection:

Back tomorrow with another project; until then, happy stampin'!


Stampin' Up Supplies:

Cardstock: Real Red, Daffodil Delight, Gumball Green, Basic Black, Whisper White, Tangerine Tango

Tools: Heart Punch, 1 3/4" Circle Punch, Small Heart Punch, Owl Punch

Tags: , , , , , , ,

3D Projects | Punch Art

Love Story Anniversary Card

by Joanne James26. February 2013 20:18

I know Valentine's Day is done and dusted, but this month I also celebrated my wedding anniversary, so forgive the hearts but I've another romantic card to share with you today.

The design of this card is cased from Brian King; you can see his original card here. I loved this card the first time I saw it and knew that I was going to have to re-create it. As I don't have the Hearts Framelits, my method was slightly different; I used a large heart punch to make the negative heart shape on the central panel, with the pink heart cut out using one of the Hearts a Flutter framelits and the white heart in the centre using the small heart punch. The winning element for me is the sentiment though - it summed up my thoughts perfectly and seems as appropriate after 14 years of marriage as it would on a wedding day. The colour combination also ticks my box; I find myself using lots of Grey and Melon Mambo lately.

Hope you like it; I'll be back with something different tomorrow. Until then, happy stampin'!


Stampin' Up Supplies:

Cardstock: Melon Mambo, Basic Grey, Whisper White

Stamps: One in a Million

Ink: Melon Mambo

Tools: Large Heart Punch, Hearts a Flutter Framelits, Small Heart Punch, Big Shot


Tags: , , , , , , , ,

Cards | Stamping

L O V E spells LOVE

by Joanne James12. February 2013 12:00

With only two days to go, I thought I would share another Valentine's Day card with you today. I actually took this card to the wedding fair I exhibited at last weekend, as I thought it would also make a lovely invitation and it could be adapted to a variety of different colour combinations.  

I took my inspiration from the current Stampin' Up! catalogue on page 179 and the card that demonstrates the new Stampin' Spritzer. It is a 5" square card with a base of Melon Mambo and mat of Basic Grey, with a sharp white typeset LOVE which is inset with a small punched heart and a little diamante for just the right amount of 'bling'. Simple, but oh so effective and if you're a crafter who likes to leave things until the very last minute, really quick to execute with no stamping required! I'll be back with another Valentines idea tomorrow, but meanwhile - happy stampin'!

Stampin' Up Supplies:

Paper: Whisper White, Melon Mambo, Basic Grey

Tools: Typeset Alphabet dies, Small Heart Punch, Basic Rhinestones Jewels, Big Shot

Tags: , , , , , , , ,

Cards

Mini Catalogue

BROWSE THE CATALOGUE

The mini catalogue is now live! Read and download your copy here.

Shop Online

Access my online shop 24 x 7, 365 days of the year:

Current April hostess code:

VDKNV7BH

Shop Online

Join My Team

It's always a great time to join Stampin’ Up! New team members can get £130 worth of products for only £99 + free business supplies + free shipping + all the fun being a part of Stampin’ Up! Stampin' Up! has something for everyone: join my growing team and benefit from my support to enjoy Stampin' Up! however you choose.

If you're interested, call me for a chat to understand how I can help you realise your goals. Alternatively, if you have already decided to sign up and you just can't wait, please click here for the link to the online form where you can sign up and order your starter kit right away! 

Latest Kit!

Stampin Cut and Emboss

The Rock Legend Kit has all you need to make 8 cards with coordinating envelopes. Along with the new Panda Friends Kit, both are available from January 4th for just £14 each - get yours here!

2023-24 Annual Catalogue

BROWSE THE CATALOGUE

Click on the catalogue for a full list of current SU! supplies - if you would like to order any of the items featured, please drop me a line at [email protected] or give me a call on 07773 421446 - I'd be happy to help.

New Online Exclusives

There are new products available exclusively in the online store from 5 March - check them out here.

About Me

Hi I'm Joanne and live in Northampton and when I'm not looking after my husband and two beautiful children, am an avid crafter with a passion for all things Stampin' Up!

I must confess that I have never been a big rubber stamper - until I discovered Stampin' Up! that is. I love the fact that I can get such great results with co-ordinating stamps, inks, papers and punches - the possibilities are endless! Join me on my stamping journey as I share the things I love and be inspired to create amazing things yourself!

Follow Me

Monthly Newsletter

Box Builder

Click the button above to use Box Buster to create your custom box design using the Envelope Punch Board!

Kits Collection Now Available!

Stampin Cut and Emboss

The new Kits Collection from Stampin' Up! is now available!

Click here to see the current kits available and order yours online today.

I Design For


Stampin' Up Stuff

This is my personal blog and is not endorsed by Stampin’ Up! I hope you find it a plentiful source of ideas and personal inspiration but please don't copy my designs for contest submission or use for classes, publication or sale without express permission.