Irresistibly Floral Spring Thank You Card

by Joanne James22. February 2017 07:00

Today I'm sharing a card for this week's challenge over at CAS(E) This Sketch:

I decided to break out one of my new sponge brayers and some Irresistibly Floral embossed paper for my card today - take a look:


Here's the low-down on today's card:

Easy Embossing - I decided to brayer the circle shape onto a piece of Irresistibly Floral Specialty Designer Series Paper using a sponge brayer. This is the first time I've brayered with one of these and I must confess I'm rather impressed - they make it so easy to get a smooth graduated finish and are great for this kind of ink technique, really bringing out the pattern of the paper. I created a simple circle stencil using a spare piece of cardstock and my Circle Framelits and brayered from bottom left to top right of my circle as I wanted to try and emulate the less-than-perfect circle of the sketch. As for the paper - this patterned clear-embossed white paper is great for colouring and sponging - a great embossed finish without any for of Versamark or heat tool required. Cheating? No! Easy? Most definitely!!

Co-ordinating Florals - I stamped a flower from the Falling Flowers stamp set and diecut it and a couple of leaves from the co-ordinating May Flowers Framelits to ground my simple diecut sentiment (cut from the now retired Greetings Thinlits - still one of my go-to sets!) This bundle which you can see on page 127 of the annual catalogue also co-ordinates with the patterns on the Irresistibly Floral embossed paper - and makes designing easy!

Fresh Colour Combination - I chose a fresh, spring colour combination of pink and green to compliment my contrasting black and white background and sentiment today - here it is if you would like to save it for future inspiration too:


Here is the visual summary of the key products used on today's project for you to pin for easy reference:


You can see all of my 'How To' summaries on my 'How To - Tips and Techniques' Pinterest board in case you've missed any. 

Enjoy your day and I'll be back tomorrow with another project. Until then, happy stampin'!


Stampin' Up! Supplies Used:

Table built using Product Table Builder by The Crafty Owl - Independent Stampin' Up! Demonstrator.

Delicate Ornament Embossed Impression Christmas Card

by Joanne James24. November 2016 08:05

Today it's time for a new challenge over at Create With Connie and Mary and this week we have a colour combination for you:
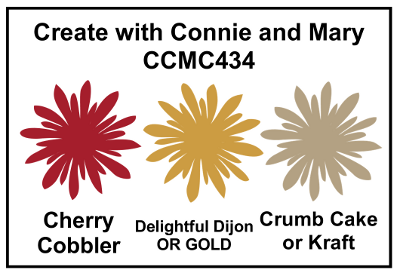
 

So I toyed with going with a thank you card today, as it is Thanksgiving in the USA - happy Thanksgiving to my fellow team members and any other US followers today! In the end I decided to go with something a little different from me; I watched this video here by Jennifer McGuire recently and have been keen to try the embossed impressions technique; these colours were perfect for what I had in mind. Here's my card:
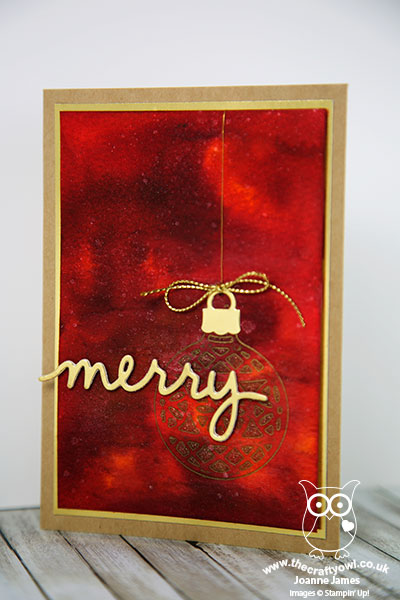
 

Here's the low-down on today's card:

Rich Red Watercolour - I created a watercolour background for my central panel using Delightful Dijon and Cherry Cobbler inks and my aquapainter. I also spritzed my card with a mix of alcohol and clear Wink of Stella to give an all-over subtle shimmer and allowed it to dry thoroughly before moving on the next step.

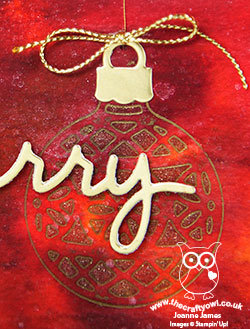
Embossed Impression - To create my ornament feature, I used the round bauble from my Delicate Ornament Thinlits, inked it with Versamark then placed the thinlit onto the watercolour paper and rolled it carefully through my Big Shot. The Big Shot sandwich here is key: multi purpose platform open to Tab 2, acrylic plate, silicon mat, watercolour paper, thinlit die then lastly the final acrylic plate. This allows the die to create an inked impression on the watercolour paper, without it cutting. I then heat embossed this with gold embossing powder to give a fine line of gold detailing. I then used my gold Wink of Stella pen to highlight each of the detailed sections on the bauble for added sparkle - the close up below does show some of the detail, but I can assure you in real life it's gorgeous (even if I say so myself!):


Touches of Gold - I finished my card with a gold foil mat and a gold foil bauble hook, hung by a piece of gold thread with bow detail along with a gold foil 'merry' sentiment cut with my Christmas Greetings Thinlits and mounted on a few additional layers to add some depth. As for the kraft - I used it for my cardbase; the neutral tone really allowed my watercoloured shimmery panel to take centre stage.

Here is the visual summary of the key products used on today's project for you to pin for easy reference:
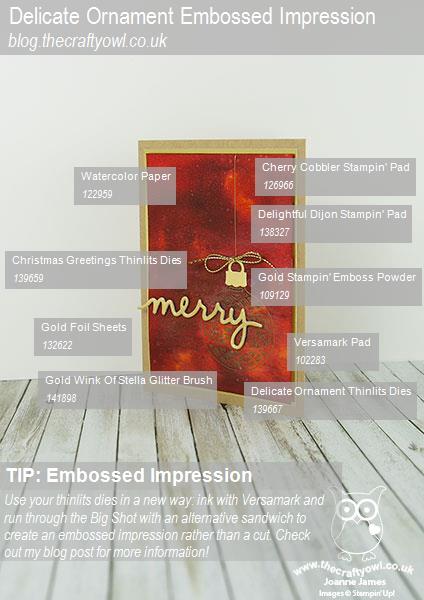
 

I did manage to get myself very inky making this card, however I'm quite pleased with the results and am looking forward to trying this technique with other thinlits dies.

You can see all of my 'How To' summaries on my 'How To - Tips and Techniques' Pinterest board in case you've missed any. 

Do visit the other Design Team members to see what they did with this week's colours; there's lots of inspiration over on their blogs too! This will be my last week as a designer on the Connie and Mary Thursday team; family demands have led me to have to scale back my commitments and as such I am stepping down. I have enjoyed my time with the team; this has always been one of my favourite challenges and will still play along when I can.

That's all from me; I'll be back tomorrow with another project. Until then, happy stampin'!


Stampin' Up! Supplies Used:

Table built using Product Table Builder by The Crafty Owl - Independent Stampin' Up! Demonstrator.

Schoolhouse Teacher Thank You Card

by Joanne James30. May 2016 09:00

Bank Holiday Monday - what better than a long weekend! I spent yesterday catching up on some gardening and had dinner with my in-laws and nephew, which made for a nice change. Today my parents are visiting so I'm looking forward to more time in the garden and another BBQ - is it me, or is there something that makes food taste so much better when cooked and eaten outdoors?!

Anyway, my card for today uses this week's sketch over at Less is More; I was so pleased to see my turtle card from a couple of weeks ago chosen as a Top 3 card this week - the competition over there is stiff, so this makes a win all the more special (thank you ladies!) With only 6 weeks to go until the end of the school year here in the UK, I thought it was time to get cracking on my teacher thank you cards, so here is today's card:

Here's the low-down on today's card:

ABC, 123 - I used a piece of retiring Schoolhouse Designer Series Paper to cover one of the portions of my background on my extra-thick Whisper White card base. Perfect for adding to the school theme, whilst leaving the all-important white space.

An Apple For The Teacher - I stamped my apple from the retiring 'Apple of My Eye' set in Real Red and fussy cut it out, cutting the leaf out separately and adding it on top. I'm not sure that children give an apple to their teacher any more (we are more likely to send cake in to ours!) Nevertheless this is such a good stamp set for teacher cards - a keeper, for sure.

Thanks, You're The Best - I finished my card with a die cut sentiment cut using my Big Shot and 'thanks' from the Greetings Thinlits. I used black cardstock and stamped the front in Versamark and heat embossed with black embossing powder a few times to give a nice shiny finish. I popped this up on dimensionals aligned with my apple and finished my card inside with 'you're the best' from the 'Sunburst Sayings' stamp set.

Easy and quick to create - just what you need if you've lots of these to make. Here is the visual summary of the key products used on today's project for you to pin for easy reference:


You can see all of my 'How To' summaries on my 'How To - Tips and Techniques' Pinterest board in case you've missed any. 

Enjoy your day and I'll be back tomorrow with another project; until then, happy stampin'!


Stampin' Up! Supplies Used:

Table built using Product Table Builder by The Crafty Owl - Independent Stampin' Up! Demonstrator.

Pretty Petals Blue Flowers Card and New Sale-A-Bration Free Products!

by Joanne James16. February 2016 19:02

Hello everyone and a happy Tuesday to you! Today I have a card for this week's challenge over at CAS(E) This Sketch and Addicted To CAS:


I saw the sketch over at CAS(E) This Sketch this week and for a minute I was wondering where to start; then I remembered one of my favourite patterns in the Pretty petals stack and I just knew where I wanted to take it. Here's my card:

This lovely pattern includes the diagonals that are so like the sketch so I knew it had to be my starting point. Whilst I'll admit it did much of the hard work, I decided that this card needed two more things: a bold sentiment - I layered three 'thanks', cut with my Greetings Thinlits, then coated in Versarmark and heat embossed clear to give a glossy finish; the second thing was a sprig of flowers just like the ones in the pattern. I fussy cut the stems, punched three Pacific Point circles and added a trio of enamel dots that I coloured black with a Sharpie and off-centred slightly, some fussy cut stems and a couple of leaves made from ... left-over pieces from the wings of a butterfly cut with my Butterfly Thinlits! I just love the bright colours and pattern of this paper - and the addition of my bloom is the perfect accompaniment!


Other news today: whilst we say goodbye to the first set of limited time Sale-A-Bration offers, we say 'hello' to some new ones: there are two new stamp sets and some rather lovely glimmer tape that have just been added to the Sale-A-Bration free product offering - here are some samples made with the new product:


Like the other items in the Sale-A-Bration catalogue, these items will be available free with each £45 spend from now until the end of the Sale-A-Bration period, 31st March. You can see full details for each of the new product on the new Sale-A-Bration flyer here.

Back tomorrow with this week's Wednesday Weekly Deals and a new project; until then, happy stampin'!


Stampin' Up! Supplies Used:

Table built using Product Table Builder by The Crafty Owl - Independent Stampin' Up! Demonstrator.

Playful Pals Jungle Elephant Hello Card

by Joanne James2. February 2016 08:00

I have a day of back-to-back classes today, with my second technique class of the month (I know and only 2nd February!) and my monthly Project Life memory keeping class in store, so a nice early blog post for you today! I have a fun card using this week's sketch over at CAS(E) This Sketch and the challenge over at The Friday Mashup to use a zoo animal on your card:


I thought the CAS(E) This Sketch layout was perfect for an idea I'd had using the Playful Pals stamp set and co-ordinating Pyramid Pals Thinlits Dies - take a look:

I had this idea of an animal in the bush/jungle peeking out amongst the greenery so I decided on an elephant and having stamped and cut out the elephant pieces in Smoky Slate, I adhered him to my bright orange background before adding my Botanical Builder leaves and my sentiment cut with the Greetings thinlits. Isn't that fun? I have visions of this elephant trampling greenery for miles around as it rampages through the bush. I envisaged my animal as living in the wild, although clearly elephants can be seen at the zoo too. This is my first outing with the Playful Pals set but I know that I am going to use of lots more - there are so many creative possibilities with a set like this! 

That's all from me today; back tomorrow with this week's weekly deals and another project. Until then, happy stampin'!


Stampin' Up! Supplies Used: 

Table built using Product Table Builder by The Crafty Owl - Independent Stampin' Up! Demonstrator.

Holly Jolly Christmas Greetings Christmas Cards - Two Ways

by Joanne James31. October 2015 22:29

A late post from me today - too much trick-or-treat fun earlier on this evening! Anyway without further ado, today I made a couple of cards using the sketch from Mojo Monday this week, the second of which is also for this week's challenge over at Merry Monday:


Both my cards feature papers from the Season of Cheer designer series paper, along with the Christmas Greetings Thinlits with the Holly Jolly Greetings stamp set - one of the great bundle offers in the current seasonal catalogue. Here's the first card I made in traditional festive colours with the holly paper:

I went with a simple base layer of Real Red, then for the panel layered the holly paper with some Mossy Meadow and added a banner of red glimmer paper before adding my layered circles featuring my sentiment, a combination of stamped elements from the 'Holly Jolly Greetings' stamp set and a glimmer die cut using the Christmas Greetings Thinlits. I really liked this card, so decided to make a second one with a slightly different sentiment combination from the same sets, this time featuring the Christmas lights paper from the same DSP pack and a slightly less traditional colour scheme. Here it is:

I just love the glimmer paper on both of these cards; I'm not a fan of loose glitter, but glimmer paper is the best! So which one do you prefer - traditional or contemporary colour scheme? They are both great, although I think I'm veering towards the holly - I'm a sucker for red and green at Christmas time! I'd love to hear your thoughts - do leave me a comment below.

Back tomorrow with this week's new challenge over at The Paper Players; until then, happy stampin'!


Stampin' Up! Supplies Used:

Table built using Product Table Builder by The Crafty Owl - Independent Stampin' Up! Demonstrator.


Sheltering Tree Cherry Blossom Card

by Joanne James30. October 2015 09:00

Today I have a change from Christmas cards; I wanted to use this week's sketch over at Less is More and I am also playing along with the challenge over at The Card Concept:


I decided that the colours over at The Card Concept would make a pretty thank you card so here's my card for today:

I've been seeing some wonderful autumnal cards made with the Sheltering Tree stamp set so I thought I would use it on this card, although I think my card looks more Spring-like than autumnal! I used a base of Pink Pirouette with a mat of Early Espresso, and stamped my tree off the edge of the panel in Early Espresso onto Very Vanilla cardstock. I overstamped the blossom in Pink Pirouette with a little Cherry Cobbler, then for my sentiment used a combination of my 'thanks' Greeting thinlits die for the negative die cut in my Cherry Cobbler banner, with 'For Being You' stamped in Early Espresso using the 'Crazy About You' stamp set. 

Clean and simple with a hint of cherry blossom - a nice change from the autumnal, Halloween and Christmas cards of late!

Back tomorrow with another project; until then, happy stampin'!


Stampin' Up! Supplies Used:

Table built using Product Table Builder by The Crafty Owl - Independent Stampin' Up! Demonstrator.


Lighthearted Leaves Chalkboard Leaf Thank You Card

by Joanne James26. October 2015 07:30

Today I have a card that I made with this week's Freshly Made Sketches challenge in mind and uses the colours over at Fab Friday and just so happens to suit the theme over at TGIF Challenges too:


As soon as I saw the sketch I knew that I wanted to create something with my Lighthearted Leaves set and Leaflets Framelits and I wanted to create something bold with bright colours and contrast, so the colours were a perfect choice. Here's my card:


I used a base of extra thick Whisper White and a mat of Basic Black, then stamped my leaf in Memento Black onto a piece of Tangelo Twist, then coloured certain areas of the leaf in white with my chalk marker. I cut the co-ordinating leaf shape out of my Bermuda Bay layer then popped this on top using dimensionals. I used the Greetings Thinlits and my Big Shot for the 'thanks', cutting it out twice, once in white and once in black than layering them, one slightly offset against the other, beneath my leaf, with a candy dot for a pop of orange (it's Pumpkin Pie, but you can't tell it's not an exact match so far away from the base layer - I won;t tell if you won't ;-)!)

Rather simple, yet the layers and graphic nature of this card, combined with the bold, bright colours and one of my favourite stamp sets make this one of those cards that I would love to receive.

That's all from me today; I'm off to make some Halloween crafts at my friends coffee morning to raise funds for the Outspan School in Uganda. Back tomorrow with another project; until then, happy stampin'!


Stampin' Up! Supplies Used:

Table built using Product Table Builder by The Crafty Owl - Independent Stampin' Up! Demonstrator.


Let It Snow! and a Birdie Hello

by Joanne James21. October 2015 21:30

Just time to sneak in a creative post today with a couple of cards for this week's CAS(E) This Sketch Challenge. They have a great sketch this week and I managed to make not one but two cards (and will be using this layout for a couple more too!). Here's the sketch:

I wanted to make a Christmas card and whilst originally I had planned on an execution to my second card below, I was inspired byChrissy's card on the CAS(E) This Sketch design team and decided to take a slightly different tack and use some Designer Series Paper and a layer - here's my card:


I covered the front of my extra thick Whisper White cardstock base with a piece of snowflake-patterned Season of Cheer DSP and made a panel out of Night of Navy, cut out with my Project Life framelit and Big Shot, and repeatedly stamped the ' Let it snow!' sentiment from the 'Snow Place' stamp set in Versamark and heat embossed it in white. To finish I took a Snowflake Elements embellishment, stamped it in White kraft ink and heat embossed it in white, then stamped it again in Versamark and heat embossed it in Iridescent Ice to give it a wonderful sparkle. This snowflake DSP is one of my favourites in the Season of Cheer pack - I love the ombre effect of the finish and those snowflake embellishments are gorgeous, whether left plain or jazzed up a little as I did here. The photo doesn't show just how wonderfully sparkly the snowflake is in real life - it's really something!

For my second card I went with an every day card and decided to make something bright and colourful:

I used a Bermuda Bay card base and I took my colour inspiration from the Cherry on Top DSP stack of papers. I created my repeated 'Hello' sentiment using my Greetings thinlits. I decided to add a simple punched bird as my embellishment this time, punched from a piece of Watermelon Wonder Color Me Irresistible Specialty DSP  - you can't really see it in the photo, but I love the subtle embossed pattern this adds in real life - and a little Bermuda Bay wing.

Two very different takes on this week's sketch - do let me know which one you prefer in the comments below! Back tomorrow with my card for this week's new challenge over at Create With Connie and Mary. Until then, happy stampin'!


Stampin' Up! Supplies Used:

Table built using Product Table Builder by The Crafty Owl - Independent Stampin' Up! Demonstrator.


Watercolour Wings and an as Light as Air Cotton Paper Butterfly

by Joanne James16. July 2015 08:00

It's Thursday and time for a new challenge over at Create With Connie and Mary, where this week we have a colour challenge for you:


I also used this week's sketch over at Mojo Monday as the inspiration for the layout of today's card, which features my first outing of my new Watercolour Wings stamp set: 

I used a base of Crushed Curry and a mat of Basic Black, combined with two co-ordinating papers from the Cherry on Top DSP stack. I embossed a solid panel of Watermelon Wonder using the new Flutterings embossing folder and added this on the left and chose to use the negative space of the Greetings Thinlit die cut for my top layer. I added my butterfly, on which I stamped each of the layers with one of the challenge colours - photopolymer really makes easy work of this kind of triple stamping. The Watermelon Wonder looked slightly orange over the yellow, so I decided to add a small diecut butterfly, cut with the smallest of the Bold Butterfly framelits out of some of the new Cotton Paper in Crushed Curry. This paper is so soft and delicate and perfect for this kind of layering, as well as for flowers and more besides. Here's a close up of the layered butterfly:

So very pretty - I can't wait to stamp this in lots of other colourways too. I hope you like today's card and those of the other Design Team members - we look forward to seeing what you do with this colour palette this week!

Back tomorrow with another project; until then, happy stampin'!


Stampin' Up! Supplies Used:

  • Greetings Thinlits Dies
  • Big Shot
  • Cherry On Top Designer Series Paper Stack
  • Fluttering Textured Impressions Embossing Folder
  • Butterflies Thinlits Dies
  • Bold Butterfly Framelits Dies
  • Basic Black A4 Cardstock
  • Crushed Curry Classic Stampin' Pad
  • Crushed Curry A4 Cardstock
  • Watermelon Wonder Classic Stampin' Pad
  • Watermelon Wonder A4 Cardstock
  • Whisper White A4 Cardstock
  • Cherry On Top Cotton Paper Assortment


Mini Catalogue

BROWSE THE CATALOGUE

The mini catalogue is now live! Read and download your copy here.

Shop Online

Access my online shop 24 x 7, 365 days of the year:

Current April hostess code:

VDKNV7BH

Shop Online

Join My Team

It's always a great time to join Stampin’ Up! New team members can get £130 worth of products for only £99 + free business supplies + free shipping + all the fun being a part of Stampin’ Up! Stampin' Up! has something for everyone: join my growing team and benefit from my support to enjoy Stampin' Up! however you choose.

If you're interested, call me for a chat to understand how I can help you realise your goals. Alternatively, if you have already decided to sign up and you just can't wait, please click here for the link to the online form where you can sign up and order your starter kit right away! 

Latest Kit!

Stampin Cut and Emboss

The Rock Legend Kit has all you need to make 8 cards with coordinating envelopes. Along with the new Panda Friends Kit, both are available from January 4th for just £14 each - get yours here!

2023-24 Annual Catalogue

BROWSE THE CATALOGUE

Click on the catalogue for a full list of current SU! supplies - if you would like to order any of the items featured, please drop me a line at [email protected] or give me a call on 07773 421446 - I'd be happy to help.

New Online Exclusives

There are new products available exclusively in the online store from 5 March - check them out here.

About Me

Hi I'm Joanne and live in Northampton and when I'm not looking after my husband and two beautiful children, am an avid crafter with a passion for all things Stampin' Up!

I must confess that I have never been a big rubber stamper - until I discovered Stampin' Up! that is. I love the fact that I can get such great results with co-ordinating stamps, inks, papers and punches - the possibilities are endless! Join me on my stamping journey as I share the things I love and be inspired to create amazing things yourself!

Follow Me

Monthly Newsletter

Box Builder

Click the button above to use Box Buster to create your custom box design using the Envelope Punch Board!

Kits Collection Now Available!

Stampin Cut and Emboss

The new Kits Collection from Stampin' Up! is now available!

Click here to see the current kits available and order yours online today.

I Design For


Stampin' Up Stuff

This is my personal blog and is not endorsed by Stampin’ Up! I hope you find it a plentiful source of ideas and personal inspiration but please don't copy my designs for contest submission or use for classes, publication or sale without express permission.