Cheers Congratulations Card FF0139

by Joanne James21. July 2023 08:00

Today I have my card for the new challenge over at Festive Friday Card Making and Paper Crafting Challenge


The challenge that we are celebrating this week is 'International Beer Day' which is on August 4th. Remember the fun thing is that at Festive Friday you do not need to actually celebrate the occasion; your goal is to simply use three or more items from the inspiration list on your project. I don't have any current product that fits with this theme, so I delved into my box of retired dies as I knew I had a combination that work perfectly. I used gold, acetate, cheers sentiment and bubbles and this is what I came up with:


Here's the low-down on today's card:

I went with a simple congratulations card that would be perfect for lots of celebrations and using my retired Sip and Celebrate Dies to diecut a couple of champagne glasses from a panel of basic white thick cardstock. I backed them with acetate, then fussy cut two pieces of distressed gold paper to look like champagne and diecut some bubbles out of them before glueing to my acetate glasses. I then added this panel to my white cardbase, before adding my diecut Cheers! sentiment cut form gold foil over the top:


Simple yet elegant, I think you'll agree - I think I'll add this to my engagement card pile!

Here is the visual summary of the key products used on today's project for you to pin for easy reference:


You can see all of my 'How To' summaries on my 'How To - Tips and Techniques' Pinterest board in case you've missed any. 

How does our board inspire you? I can’t wait to see what YOU create! For more inspiration, be sure to visit the rest of the Festive Friday Card Making and Paper Crafting Challenge Design team:

Enjoy your day and I'll be back tomorrow with another project. Until then, happy stampin'!


Stampin' Up! Supplies Used:

Table built using Product Table Builder by The Crafty Owl - Independent Stampin' Up! Demonstrator.


Gorgeously Made Textured Thank You Card FF0138

by Joanne James7. July 2023 09:00

Today I have my card for the new challenge over at Festive Friday Card Making and Paper Crafting Challenge


The challenge that we are celebrating this week is 'World Conservation Day' which is on July 28th. Remember the fun thing is that at Festive Friday you do not need to actually celebrate the occasion; your goal is to simply use three or more items from the inspiration list on your project. This week I used kraft card, copper, a wooden embellishment, foliage and a thank you sentiment and this is what I came up with:


Here's the low-down on today's card:

The starting point for today's card was actually the wooden embellishment that I found in my stash; I thought it had a similar shape to the large foliage die in the Gorgeously Made Dies set so I grabbed that stamp set and dies and set to work! I heat-embossed one of the grassy stamps in white onto my kraft mat layer, and did some tone-on-tone stamping with the script stamp on this layer too, along with some added ink blended around the edge of my panel. I then added two pieces of diecut foliage, one cut from the Copper Clay washed pattern in the Fresh As A Daisy DSP pack and one from copper foil, then added my wooden embellishment and some Copper Clay enamel dots and ribbon behind my sentiment, that I cut out with one of the labels in the Gorgeously Made die set:

In addition to my layered foliage, I added in a shape cut from corrugated kraft card that I found in my stash and some distressed Copper Clay cardstock. This card is so chock-full of texture and the warm, copper tones give it a warm, naturalistic feel - I like it!

Here is the visual summary of the key products used on today's project for you to pin for easy reference:


You can see all of my 'How To' summaries on my 'How To - Tips and Techniques' Pinterest board in case you've missed any. 

How does our board inspire you? I can’t wait to see what YOU create! For more inspiration, be sure to visit the rest of the Festive Friday Card Making and Paper Crafting Challenge Design team:


Enjoy your day and I'll be back tomorrow with another project. Until then, happy stampin'!


Stampin' Up! Supplies Used:

Table built using Product Table Builder by The Crafty Owl - Independent Stampin' Up! Demonstrator.

Watercolour World of Kindness FF0137

by Joanne James23. June 2023 09:00

Today I have my card for the new challenge over at Festive Friday Card Making and Paper Crafting Challenge. 
       

The challenge that we are celebrating this week is 'Global Forgiveness Day' which is on 7th July. Remember the fun thing is that at Festive Friday you do not need to actually celebrate the occasion; your goal is to simply use three or more items from the inspiration list on your project. This week I used green, blue, heart embellishment, background stamp and maps/globes from the list along with the layout over at Hand Stamped Sentiments and the colour palette over at Sunday Stamps (I used Cherry Cobbler, Soft Sea Foam and Boho Blue from the palette) and this is what I came up with:


Here's the low-down on today's card:

The HSS layout is a great one to showcase that Watercolour World background stamp on that feature panel because although there is a large focal sentiment too, you still get to see plenty of the map detail. I decided to try something different with this stamp today: I stamped the map in Soft Sea Foam onto Basic White cardstock, then immediately clear embossed it. This both intensified the colour of the soft green and allowed me to add my Boho Blue ink with a blender brush to my image around the coastal outline, blending out to nothing, without discolouring the land. I love this effect! I used a Boho Blue card base and DSP layer to bring out the blue colour, and added a sentiment from the retired 'Begin With A Dream' stamp set that I embellished with a (retired) Cherry Cobbler heart: 


Having punched a couple of notches in either side of my map layer, I then added a length of Cherry Cobbler thick twine and tied it in a bow to finish my card. I would normally do this across a sentiment, but since the twine doesn't obscure the wording I went with it and I quite like the finished result.

Here is the visual summary of the key products used on today's project for you to pin for easy reference:


You can see all of my 'How To' summaries on my 'How To - Tips and Techniques' Pinterest board in case you've missed any. 

How does our board inspire you? I can’t wait to see what YOU create! For more inspiration, be sure to visit the rest of the Festive Friday Card Making and Paper Crafting Challenge Design team:

Enjoy your day; exams are officially over in the James household today so we are having lunch out and a trip to the farm to pick strawberries this afternoon to celebrate - we know how to live! I'll be back soon with another project. Until then, happy stampin'!


Stampin' Up! Supplies Used:

Table built using Product Table Builder by The Crafty Owl - Independent Stampin' Up! Demonstrator.

Bright and Beautiful Starry Congratulations Card FF0136

by Joanne James9. June 2023 09:00

Today I have my card for the new challenge over at Festive Friday Card Making and Paper Crafting Challenge


The challenge that we are celebrating this week is 'International Fairy Day' which is on June 24th. Remember the fun thing is that at Festive Friday you do not need to actually celebrate the occasion; your goal is to simply use three or more items from the inspiration list on your project. This week I used pink, sparkle, vellum and stars and the current layout over at Sunday Stamps and this is what I came up with:


Here's the low-down on today's card:

No fairies or toadstools here today; instead a riot of colour for a starry congratulations card. I might be getting a little ahead of myself, but with both of the James Juniors and their friends taking major exams this year, I am hoping that lots of this kind of card will be in order, so I'm starting early! The Bright and Beautiful designer paper pack has some fabulous colours and patterns, but this all-over starry design screams celebration! I used a Bubble Bath pink card base and added mats in Basic White and Berry Burst, splitting my designer paper into three as per the sketch layout. I added a simple sentiment from the 'Charming Sentiments' stamp set in a Stylish Shapes stitched circle, and decorated this with punched stars, picking out the colours of the stars in the patterned paper. I also used some (retired) Fresh Freesia shimmer vellum for some added sparkle - hopefully you can see it on the close up below: 

I used a couple of retired star punches for my stars, but if you need a current equivalent, the Beautiful Balloons Dies have two star dies that are the same size and shape - I've included the link in the supplies list below.

The Bright and Beautiful Designer Series Paper is another of those that are available at 15% discount in this month's designer series paper sale - I would definitely recommend you stock up! 

Here is the visual summary of the key products used on today's project for you to pin for easy reference:


You can see all of my 'How To' summaries on my 'How To - Tips and Techniques' Pinterest board in case you've missed any. 

How does our board inspire you? I can’t wait to see what YOU create! For more inspiration, be sure to visit the rest of the Festive Friday Card Making and Paper Crafting Challenge Design team:


Enjoy your day and I'll be back tomorrow with another project. Until then, happy stampin'!


Stampin' Up! Supplies Used:

Table built using Product Table Builder by The Crafty Owl - Independent Stampin' Up! Demonstrator.

Beside Me Trio For Father's Day FF0135

by Joanne James26. May 2023 08:00

Today I have my card for the new challenge over at Festive Friday Card Making and Paper Crafting Challenge

    May be an illustration of text

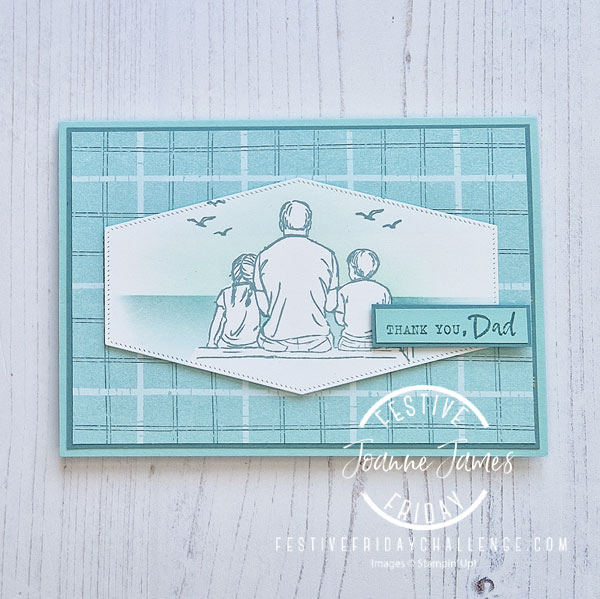
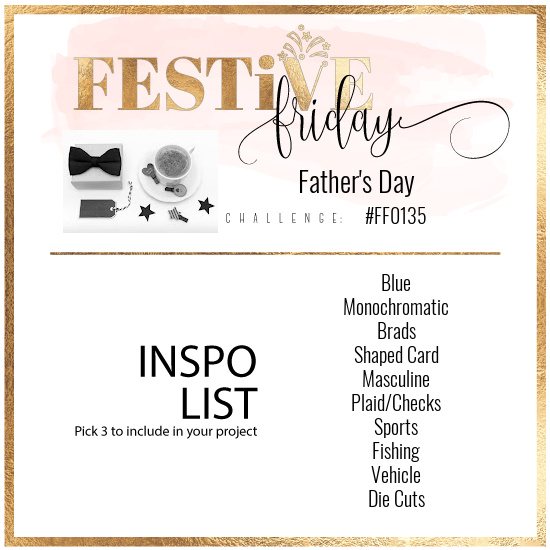
The challenge that we are celebrating this week is 'Father's Day' which is on 18th June. This time around we are also teaming up with Double Trouble: entering both challenges gives you double the chance of winning. Their Thing 1 challenge is to create a masculine card. Their Thing 2 challenge is to enter our Festive Friday Challenge. Their Thing 3 challenge is to include a plaid/check. Here's the link to enter their challenge: Double Trouble ChallengeRemember the fun thing is that at Festive Friday you do not need to actually celebrate the occasion; your goal is to simply use three or more items from the inspiration list on your project. This week I used blue, monochromatic, masculine, plaid/checks and diecuts and decided to create a Father's Day card - this is what I came up with:


Here's the low-down on today's card:

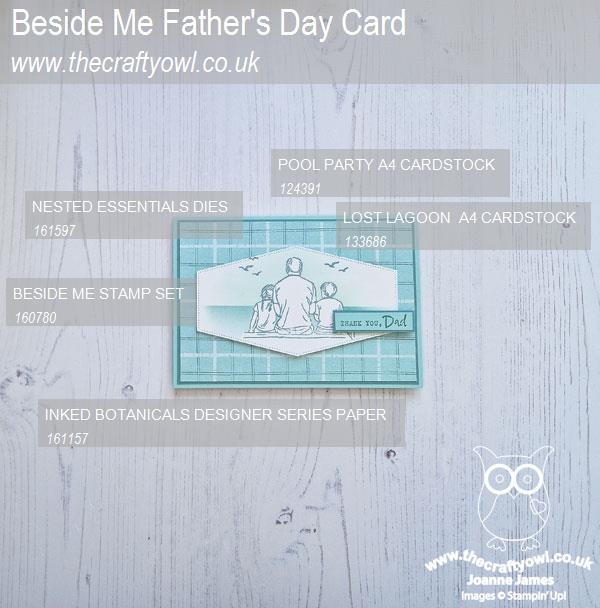
Inked Botanicals - The plaid paper that I used for my background inspired the subtle colour scheme for today's card. You may be surprised to know that this soft plaid is one of the designs in the new Inked Botanicals designer paper pack. I though the soft Pool Party and Lost Lagoon tones would provide the perfect background for my coastal themed card which I'm also linking up with the lovely ladies over at SUO Challenges who are all about the blues and sea-inspired cards.

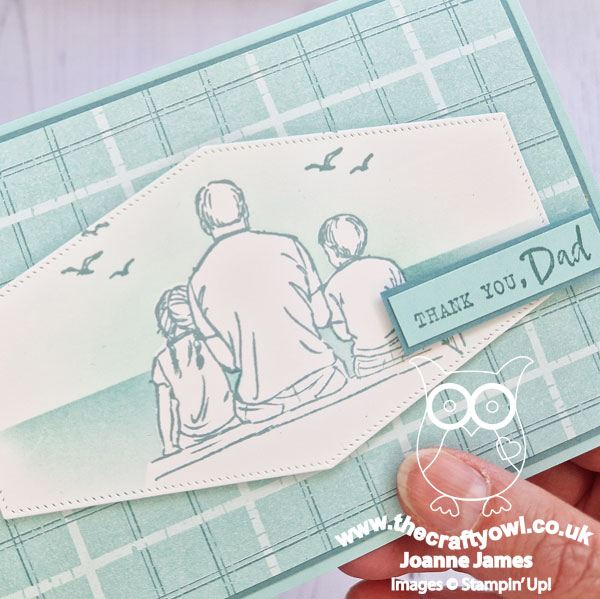
Nested Essentials - I framed my stamped scene using one of the new Nested Essentials Dies. These are one of those 'easily overlooked' products as they are a die-only set. Comprising 12 dies including 4 banners, 4 rounded corner rectangles and 4 nested diamonds with straight edges all of which have a neat stitched border detail, these are great for framing and layering and I know that they will become a new craft room staple. 

Beside Me - But Not As You Know It - The image on the front of my card is from the 'Beside Me' set - but the eagle-eyed amongst you will have noticed that there is something missing! I love this image as it looks exactly like the James Juniors with their Dad, but I don't think they have ever been fishing together - so the fishing rods had to go! This was so easy to achieve: I simply inked the stamp in Lost Lagoon and masked off the fishing rods before inking, so that they weren't present when stamped - voila! I wanted to stick with my simple colour scheme, so chose not to colour the image itself, instead masking it before inking in a sky and sea using a blending brush. You can see the results of my handiwork more closely below:

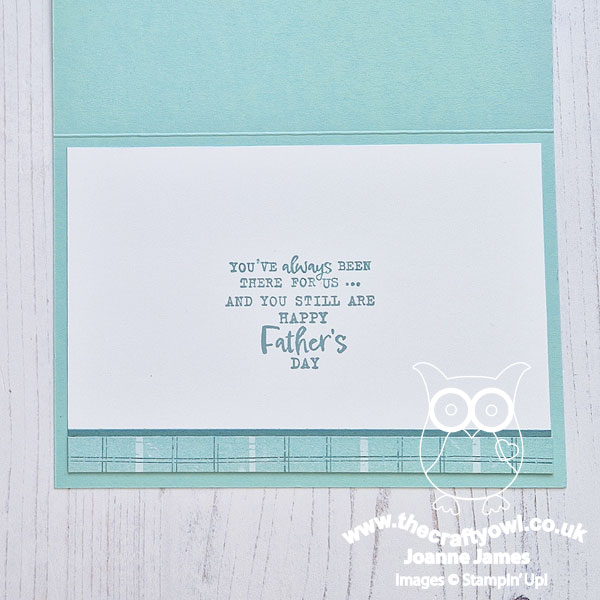
This wasn't the only stamp I tweaked on today's card. I stamped a combination of sentiments from the set inside my card, but since the image on the front of the card had two children, I wanted the sentiment to read 'You've always been there for us' as opposed to 'me'. Again, this was simple enough to achieve: I stamped the sentiment having masked out the 'me', then added in a 'u' and 's' using my Stamp-a-ma-jig to line them up, having selectively inked them up on one of the other stamps in the set:


I think it works - don't you? I love that I can tailor my stamps to create something that is bespoke to my needs. Do you ever do that with your stamps? Do leave me a comment below - I would love to know about your 'stamp hacks' too.

Here is the visual summary of the key products used on today's project for you to pin for easy reference:


You can see all of my 'How To' summaries on my 'How To - Tips and Techniques' Pinterest board in case you've missed any. 

How does our board inspire you? I can’t wait to see what YOU create! For more inspiration, be sure to visit the rest of the Festive Friday Card Making and Paper Crafting Challenge

 Design team:


Enjoy your day and I'll be back tomorrow with another project. Until then, happy stampin'!


Stampin' Up! Supplies Used:

Table built using Product Table Builder by The Crafty Owl - Independent Stampin' Up! Demonstrator.

Silly Goose Pop-Up Congratulations Card FF0134

by Joanne James12. May 2023 08:00

Today I have my card for the new challenge over at Festive Friday Card Making and Paper Crafting Challenge


The challenge that we are celebrating this week is 'National Smile Day' which is on 31st May. Remember the fun thing is that at Festive Friday you do not need to actually celebrate the occasion; your goal is to simply use three or more items from the inspiration list on your project. This week I used yellow, joke and pop-up/surprise element and this is what I came up with:


Here's the low-down on today's card:

Silly Goose - With two children taking major exams this year, there will (hopefully!) be the need for lots of congratulations cards, so I thought I'd use today's challenge to get started! This stamp from the 'Silly Goose' stamp set, with its punny joke 'goosebumps' play-on-words, is perfect for the youngest of the James Juniors, who is a master of the fist-bump and will definitely appreciate the sentiment! I went for a simple stamped image, backed with some retired Sunshine & Rainbows spots and stripes designer paper to add a subtle pop of colour (which also enables me to play along with the team over at Color Dare for their rainbow challenge):


Easiest Ever Pop-Up Surprise - I decided I would create a fun little pop-up surprise inside my card, featuring the banner-carrying duck that is another of the stamps in the 'Silly Goose' set:


 This style of pop-up is so easy to make: I just found the centre of my card fold, then cut two lines measuring 4cm long either side of the mid-point, 1.5cm apart. This section then folds the opposite way to the card fold and your image, in this case the stamped, fussy cut goose, can be attached to the lower portion so he stands up when the card is opened.

Customise Your Sentiment - The eagle-eyed amongst you will notice that the message on the original stamped image is 'thanks' but mine says 'woo hoo', which was more appropriate for a congratulations card. I simply masked out the original words before stamping the image on Pool Party cardstock, then stamped in my alternative greeting from the 'Charming Sentiments' set and fussy cut the banner before attaching to another image stamped on white cardstock. You can see it more closely below: 


This card is so fun - and so easy to make too! I'm sure there are lots of other stamped images you could use in this way - feel free to share your ideas in the comments section below.

Here is the visual summary of the key products used on today's project for you to pin for easy reference:


You can see all of my 'How To' summaries on my 'How To - Tips and Techniques' Pinterest board in case you've missed any. 

How does our board inspire you? I can’t wait to see what YOU create! For more inspiration, be sure to visit the rest of the Festive Friday Card Making and Paper Crafting Challenge Design team:


I have a busy day planned but the most significant aspect has to be that it is the last day of school for the oldest of the James Juniors - it is officially the end of an era! Where did that time go?! Enjoy your day and I'll be back tomorrow with another project. Until then, happy stampin'!


Stampin' Up! Supplies Used:

Table built using Product Table Builder by The Crafty Owl - Independent Stampin' Up! Demonstrator.

Nothing's Better Than Pizza FF133

by Joanne James28. April 2023 08:00

Today I have my card for the new challenge over at Festive Friday Card Making and Paper Crafting Challenge


The challenge that we are celebrating this week is 'National Eat What You Want Day' which is on 11th May - who knew?! Remember the fun thing is that at Festive Friday you do not need to actually celebrate the occasion; your goal is to simply use three or more items from the inspiration list on your project. This week I did go with a food-themed card; I used pizza, diecutting, gingham and food sentiment and this is what I came up with:


Here's the low-down on today's card:

I decided to create a custom sentiment as the focal point of my card, using a combination of stamped words from the 'Nothing's Better Than' stamp set and letters diecut with the Alphabet a La Mode Dies - perfect for the challenge at Just Add Ink this week too! I paired this with a strip of gingham reminiscent of an Italian pizza parlour table cloth and a slice of punch art pizza:


I added some stamped mushrooms and tomatoes from a (retired) stamp set called 'What's Cookin?' to decorate my pizza slice and added a gingham pocket inside my card to hold a gift card; I will be saving this card to send to my daughter who will hopefully be going off to university later this year and am sure will appreciate some extra funds for a pizza night out to save her having to cook for herself occasionally!

Here is the visual summary of the key products used on today's project for you to pin for easy reference:


You can see all of my 'How To' summaries on my 'How To - Tips and Techniques' Pinterest board in case you've missed any. 

How does our board inspire you? I can’t wait to see what YOU create! For more inspiration, be sure to visit the rest of the Festive Friday Card Making and Paper Crafting Challenge Design team:


Enjoy your day and I'll be back tomorrow with another project. Until then, happy stampin'!


Stampin' Up! Supplies Used:

Table built using Product Table Builder by The Crafty Owl - Independent Stampin' Up! Demonstrator.

Begin With A Dream Kindness Card FF132

by Joanne James14. April 2023 08:00

Today I have my card for the new challenge over at Festive Friday Card Making and Paper Crafting Challenge


The challenge that we are celebrating this week is 'Global Pay It Forward Day' which is on April 28th. Remember the fun thing is that at Festive Friday you do not need to actually celebrate the occasion; your goal is to simply use three or more items from the inspiration list on your project. This week my card works perfectly for our theme: I used kindness sentiment, hearts and hands along with the trio of retiring colours being showcased over at Inspire.Create and this is what I came up with:


Here's the low-down on today's card:

Begin With A Dream - The 'Begin With A Dream' stamp set is a host set, exclusively available to those who earn Stampin' rewards when they host a Stampin' Up! get-together with friends or place a single order of £150 or more. All about love and kindness, this set is perfect for the theme of 'paying it forward'. I used the row of people to create a custom DSP panel and layered my sentiment over a stamped pink heart for a pop of extra colour:  


You can still get this stamp set with a qualifying order before the end of the month, so if it's on your list don't delay - get to my online store!

Bye Bye Brights - All three of the colours on today's card are retiring as part of the upcoming colour refresh. Polished Pink is a departing 2021-23 in-colour (I will miss this pink!) and Mango Melody and Bermuda Bay are retiring from the Brights family. I love all three of these colours, but wasn't sure I could make a project that featured all three on one card. I decided simple was best, so used Bermuda Bay as my main colour, with Mango Melody for my base and a pop of Polished Pink for accent colour. I think it works - what do you think? Will you miss any or all of these colours? 

All Heart - As I looked at my almost finished card, I decided it needed a touch more pink than just the heart stamped behind my sentiment. I decided to add in a trio of cascading punched hearts for a little extra colour and the small heart on the Country Heart Punch was the perfect size and shape for the job. Love it when that happens!

This card took way more thought than it did execution time, but I really like the cheery result and will be perfect to pair with a treat for someone who is least expecting it. How will you 'pay it forward' later this month?

Here is the visual summary of the key products used on today's project for you to pin for easy reference:


You can see all of my 'How To' summaries on my 'How To - Tips and Techniques' Pinterest board in case you've missed any. 

How does our board inspire you? I can’t wait to see what YOU create! For more inspiration, be sure to visit the rest of the Festive Friday Card Making and Paper Crafting Challenge Design team:


Enjoy your day and I'll be back tomorrow with another project for my GD spot over at Just Us Girls. Until then, happy stampin'!


Stampin' Up! Supplies Used:

Table built using Product Table Builder by The Crafty Owl - Independent Stampin' Up! Demonstrator.

A Fish And A Wish Rainbow Thank You FF131

by Joanne James31. March 2023 09:00

Today I have my card for the new challenge over at Festive Friday Card Making and Paper Crafting Challenge


The challenge that we are celebrating this week is 'National Pet Day' which is on 11th April. Remember the fun thing is that at Festive Friday you do not need to actually celebrate the occasion; your goal is to simply use three or more items from the inspiration list on your project. I am not much of a pet person, but that didn't stop me perusing my stamp collection for a starting point for today's challenge. This week I used twine, fish and embossing folder and this is what I came up with:


Here's the low-down on today's card:

I paired one of the fishes from the stamp set 'A Fish and a Wish' with the rainbow macaron colours of the current Inkspirational mood board and created a vertical rainbow of fishes, reversing the stamp each time I stamped it. I added a simple thank you sentiment, co-ordinating Starry Sky twine and a few clear gems, along with a little extra stamping on the inside and outside envelope of my card. I added an embossed layer to my cardfront using the (retired) Seabed 3D Embossing Folder - you can see the detail on the close up below:

This is such a versatile set and so easy to use. Both the stamp set and the co-ordinating fish builder punch are retiring when the annual catalogue finishes at the end of April; the stamp set will also be 30% from next Tuesday, so time to pick up a bargain, perhaps? I'm also linking up today's card with the team over at The Alphabet Challenge Blog where they are celebrating reaching the end of the alphabet with 'Z is for Zodiac' and all things related; these fish are perfect for Pisces, the twelfth sign of the zodiac. Did you know that Pisces is actually the Latin word for 'fish'? Obvious when you think about it, but as a linguist the origin of words fascinates me!

Here is the visual summary of the key products used on today's project for you to pin for easy reference:


You can see all of my 'How To' summaries on my 'How To - Tips and Techniques' Pinterest board in case you've missed any. 

How does our board inspire you? I can’t wait to see what YOU create! For more inspiration, be sure to visit the rest of the Festive Friday Card Making and Paper Crafting Challenge Design team:


Enjoy your day and I'll be back tomorrow with another project and a special announcement too. Until then, happy stampin'!


Stampin' Up! Supplies Used:

Table built using Product Table Builder by The Crafty Owl - Independent Stampin' Up! Demonstrator.

By My Side for FF130

by Joanne James17. March 2023 09:00

Today I have my card for the new challenge over at Festive Friday Card Making and Paper Crafting Challenge. I used the great sketch below from Atlantic Hearts Sketch Challenge for my layout and the theme of dots or stripes (I went with dots) over at AAA Birthdays for my birthday card - take a look:


The challenge that we are celebrating this week is 'International Children's Book Day' which is on 2nd April. Remember the fun thing is that at Festive Friday you do not need to actually celebrate the occasion; your goal is to simply use three or more items from the inspiration list on your project. This week I used children's sentiment, children (child), bright colours, patterned paper and square and this is what I came up with:


Here's the low-down on today's card:

I promised you another card this week using the 'By My Side' stamp this week and this is it! This time I decided to use the little girl with her sweet bluebird friend to make a bright and colourful birthday card. I used one of the sentiments from the set on the front of my card and finished the inside with a 'Happy Birthday' greeting. I was initially going to use squares of coloured cardstock for my background, but in the spirit of using up my scraps as encouraged by my friends over at SUO Challenges this week, I grabbed some of my retired Brights Collection designer series paper and pulled out offcuts from previous projects and used my Stylish Shapes Dies to diecut a selection of squares, all with a playful, dotty design to create a harmonious background (I've included a link to the current pack of Brights DSP at the bottom of today's post in case you'd like to recreate this card):


I love the versatility of this stamp set: sweet images, great sentiments and fun for both the young and the young at heart!

Here is the visual summary of the key products used on today's project for you to pin for easy reference:
 

You can see all of my 'How To' summaries on my 'How To - Tips and Techniques' Pinterest board in case you've missed any. 

How does our board inspire you? I can’t wait to see what YOU create! For more inspiration, be sure to visit the rest of the Festive Friday Card Making and Paper Crafting Challenge Design team:


Enjoy your day; I have my parents visiting at the moment for our delayed Christmas celebrations that didn't take place due to illness. At least we managed to fit it in before Easter - the James Juniors are very much looking forward to an influx of chocolate!! I'll be back tomorrow with another project. Until then, happy stampin'!


Stampin' Up! Supplies Used:
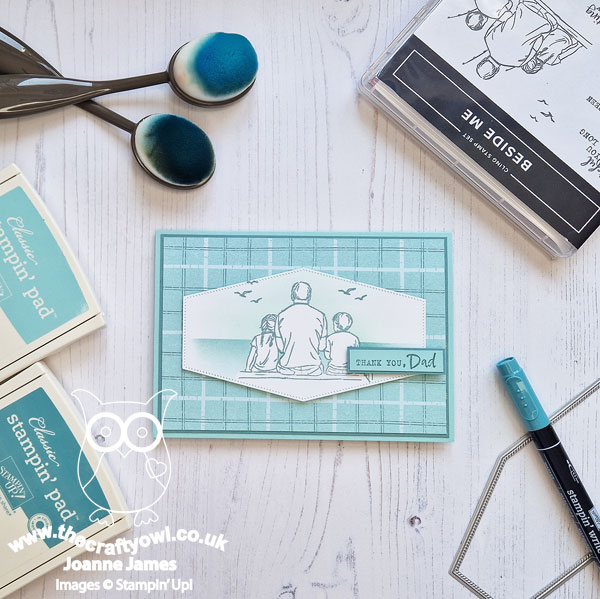
Table built using Product Table Builder by The Crafty Owl - Independent Stampin' Up! Demonstrator.

Mini Catalogue

BROWSE THE CATALOGUE

The mini catalogue is now live! Read and download your copy here.

Shop Online

Access my online shop 24 x 7, 365 days of the year:

Current April hostess code:

VDKNV7BH

Shop Online

Join My Team

It's always a great time to join Stampin’ Up! New team members can get £130 worth of products for only £99 + free business supplies + free shipping + all the fun being a part of Stampin’ Up! Stampin' Up! has something for everyone: join my growing team and benefit from my support to enjoy Stampin' Up! however you choose.

If you're interested, call me for a chat to understand how I can help you realise your goals. Alternatively, if you have already decided to sign up and you just can't wait, please click here for the link to the online form where you can sign up and order your starter kit right away! 

Latest Kit!

Stampin Cut and Emboss

The Rock Legend Kit has all you need to make 8 cards with coordinating envelopes. Along with the new Panda Friends Kit, both are available from January 4th for just £14 each - get yours here!

2023-24 Annual Catalogue

BROWSE THE CATALOGUE

Click on the catalogue for a full list of current SU! supplies - if you would like to order any of the items featured, please drop me a line at [email protected] or give me a call on 07773 421446 - I'd be happy to help.

New Online Exclusives

There are new products available exclusively in the online store from 5 March - check them out here.

About Me

Hi I'm Joanne and live in Northampton and when I'm not looking after my husband and two beautiful children, am an avid crafter with a passion for all things Stampin' Up!

I must confess that I have never been a big rubber stamper - until I discovered Stampin' Up! that is. I love the fact that I can get such great results with co-ordinating stamps, inks, papers and punches - the possibilities are endless! Join me on my stamping journey as I share the things I love and be inspired to create amazing things yourself!

Follow Me

Monthly Newsletter

Box Builder

Click the button above to use Box Buster to create your custom box design using the Envelope Punch Board!

Kits Collection Now Available!

Stampin Cut and Emboss

The new Kits Collection from Stampin' Up! is now available!

Click here to see the current kits available and order yours online today.

I Design For


Stampin' Up Stuff

This is my personal blog and is not endorsed by Stampin’ Up! I hope you find it a plentiful source of ideas and personal inspiration but please don't copy my designs for contest submission or use for classes, publication or sale without express permission.