Welsh Daffodils for Easter!

by Joanne James1. March 2014 20:16

Today I've had the kind of day where I feel like a true working mother - my 'to do' list is reaching epic proportions and I seem to be rushing from one thing to the next and am welcome for the break that sitting down to write my blog today has given me: and breathe ...!

Well being Welsh, there's only one thing I could share with you today: March 1st is St David's Day, the day that celebrates the patron saint of Wales, so it had to be a card featuring the national flower - daffodils. The first time I saw the Petite Petals punch I knew it would make great daffodil petals - it was the perfect shape. I've seen a few examples in blogland - the first one of which I think was by Jackie Topa - but today I'm going to share my version with you. So for working mothers everywhere and Welsh people at home and abroad, Here's today's card:


I stamped the petals in Daffodil Delight onto the same colour cardstock using the spotted flower stamp just to give some pattern, and made the trumpets by using a flower shape from the Itty Bitty Punches which I formed by scrunching around the rounded end of my paper piercing tool. here's a close up of the flowers so that you can see what I mean:

I cut some stems and leaves using the edges of my large oval punch and my paper snips, and mounted these onto a piece of Whisper White cardstock that I background stamped with the large colourwash stamp from the Happy Watercolour set to add some interest. I edged this piece with yellow for definition and mounted my decorated piece onto a Gumball Green card base. I decided to make my card into an Easter card and stamped my sentiment in Whisper White kraft ink and set it within a horizontal line that I drew in with my chalk marker.

I used this week's sketch layout at CAS(E) this Sketch for my card this week and was delighted to see that the challenge over at Less is More this week is to use yellow and green on your card - perfect!

Back tomorrow with another project; until then, happy stampin'!


Stampin' Up! Supplies Used:

Table built using Product Table Builder by The Crafty Owl - Independent Stampin' Up! Demonstrator.


Easter Bunny Punch Art Card and Gift Box

by Joanne James31. March 2013 21:43

I hope everyone has been enjoying a lovely Easter day, with plenty of chocolate eggs thrown in! This is my last Easter offering to share with you all and was inspired by one of my other hobbies - biscuit making. I recently enjoyed a fun day out with a friend at the Biscuiteers Icing Cafe in Notting Hill, where we spent a pleasant morning icing Easter bunnies in various poses, spring lambs and Easter eggs. My favourite was a lovely pale brown bunny with floppy ears, that shows him from behind with an iced bunny tail - he inspired this punch art bunny card, which shows him with a couple of friends:


I love the simple design with the polka dot paper and oval framelits, with just a touch of colour to each bunny tail to make them 'pop'. I didn't add a sentiment because although this card was for Easter, I wanted it to be able to use it for any occasion. My biscuits from that day are all long gone but I have the same cutter to make more at home and so designed a co-ordinating gift box, which is just the right size for a similar biscuit to fit in and would make a lovely gift for someone special:

I just made a simple shallow box with a Whisper White base and Marina Mist lid using my Simply Scored, then attached the punched bunny oval to a belly band made from the reverse side to the spots on the card, which just holds the box securely together. Next time I make one of these I'll try and include a photo of the biscuit too, although they don't hang around for long in our house, it has to be said!

Back tomorrow with thoughts of spring - until then, eat lots of chocolate and happy stampin'!


Stampin' Up Supplies:

Cardstock: Marina Mist, Whisper White, Certainly Celery, Pretty in Pink, So Saffron, Crumb Cake, Polka Dots Parade DSP

Tools: Owl Punch, 3/4" Circle Punch, 1" Circle Punch, 1 1/4" Circle Punch, Ornament Punch, Itty Bitty Shapes punch (flower), Oval Framelits, Simply Scored

Finishing Touches: 1/8" Taffeta Ribbon Marina Mist, Basics Pearls

Happy Easter From The Crafty Owl

by Joanne James31. March 2013 12:24

Happy Easter blog followers! This is the first of two blog posts today and this one is for you: the Crafty Owl is entering into the spirit of things and is playing bunny dress up ready for his Easter egg hunt today: 

I could have simply made a rabbit from my owl punch (just one of the many things the owl can become - this is such a versatile punch!) but instead decided to dress him as a bunny rabbit, complete with hat ears and bunny nose - cute, eh?!

Happy Easter everyone - I'll be back later with a bunny of a different kind. Until then, happy stampin'!


Stampin' Up Supplies:

Stamps: Wacky Wishes (hostess)

Cardstock: Pretty in Pink, Whisper White, Basic Grey, Basic Black

Ink: Pretty in Pink

Tools: Owl Punch, 3/4" Circle Punch, 1 1/4" Circle Punch, Stamp-a-ma-jig

Tags: , , , , , , , , ,

Cards | Punch Art

Spring Sampler Easter Card

by Joanne James30. March 2013 23:30

Another quick post to share a last-minute Easter card I made today. This is a case of a Connie Babbert card seen here that was so quick to make with the aid of a couple of square punches, I just had to give it a go: 

My version uses a different sentiment stamp and Easter images, but is otherwise the same. I love the Sunshine and Sprinkles paper against the Lucky Limeade background. That's me done for today - back tomorrow with a bunny rabbit Easter card and matching gift box. Until then, happy stampin'!


Stampin' Up Supplies:

Stamps: Spring Sampler, Wacky Wishes (hostess)

Cardstock: Lucky Limeade, Whisper White, Sunshine and Sprinkles DSP

Ink/Stampin' Write Markers: Daffodil Delight, Lucky Limeade, Tempting Turquoise, Melon Mambo, Basic Grey

Tools: 1 1/4" punch, 13/8" punch, hexagon embossing folder

Finishing Touches: Old Olive Grosgrain Ribbon


Tags: , , , , , , , ,

Cards | Stamping

Quick Butterfly Easter Egg Treat

by Joanne James30. March 2013 22:11

I haven't blogged for a couple of days, so two posts today to make up for it! The first one is a really quick last-minute Easter make by Sarah Willis that I saw on Pinterest; these cute butterflies are so quick and easy to do you could easily make a whole pile of them in ten minutes:


And we did! My 7 year old made all the butterflies in today's post - they were left over from a huge pile that she made as little end of term Easter gifts for the other children in her class at school. She simply stamped one of the flowers from the Mixed Bunch stamp set in four different colours, punched out with the co-ordinating punch, snipped out the top and bottom petals then used some sticky strip to attach some antenna and a mini egg to the centre of the wings and voila - one Easter egg butterfly, done. She managed to make a whole pile of these in no time at all: 

Another great way to use this stamp set, which is one of my personal favourites. I am running a card class featuring this stamp set and the co-ordinating punch on the 16th and 17th of April. There will be more details to follow shortly; if you live local to me and would like to know more, please contact me for further details.

That's all for now - another quick post from me shortly to share an Easter card I made today. Happy stampin'!


Stampin' Up Supplies:

Stamps: Mixed Bunch

Cardstock: Whisper White

Ink: Melon Mambo, Tempting Turquoise, Gumball Green, Perfect Plum

Tools: Blossom Punch

Tags: , , , , ,

3D Projects | Classes | Stamping

Which came first: the chick or the egg?

by Joanne James26. March 2013 21:51

Today I'm sharing one of my favourite Easter projects with you. I think the new oval framelits in the Spring-Summer seasonal catalogue were crying out to be made into an Easter gate-fold card, so here's my version: 

I used oval framelits 1-4 and 6 to create an Easter egg on the outside; I deliberately chose to keep the front quite simple with some paper piercing for interest and a large paper bow to tie the whole thing together. The outer oval lifts up to release the fold and reveal the surprise on the inside:

A cute punch art chick with a happy Easter message! So for this card at least, the egg came first. One last photo of a close up of the bow - a dramatic focal point for this card and I love it:


Hope you like it. Back tomorrow with more Spring loveliness; until then, happy stampin'!


Stampin' Up Supplies:

Stamps: Wacky Wishes

Cardstock: Daffodil Delight, Melon Mambo, Tangerine Tango, Old Olive

Ink: Tangerine Tango

Tools: Oval Framelits, Oval Paper Piercing Template, 1 3/4" Circle Punch, Two Step Bird Punch (for wings), Heart Punch (for feet - retired)


Tags: , , , , , , , ,

3D Projects | Cards | Punch Art

Easter Egg Treat Holder

by Joanne James25. March 2013 22:07

Today I have a lovely treat holder for you, the perfect size for a Creme Egg or something similar as a great way to 'dress up' your egg into something a little bit special. I made something similar when experimenting with wedding favour boxes a few weeks ago (I will photograph these and share another time!) and modified my original design slightly to accommodate a small Easter egg:


They were so easy: an open box base, sandwiched between two of the bookmark-style tags from the Two Tags Die set. A small hole punched for a handle, tied with some co-ordinating ribbon and a little tag made with one of the Hearts A Flutter framelits and decorated with the basket of Easter eggs stamp from the Spring Sampler set. The photo below just shows the eggs inside so you can see in more detail:

I'd like to say the eggs were still around, but ... well it is nearly Easter, right??! Might need to buy a couple more before I gift these to anyone!

Back tomorrow with another Easter project; until then, happy stampin'!


Stampin' Up Supplies:

Stamps: Spring Sampler, Bitty Banners

Cardstock: Calypso Coral, Pool Party

Ink/Stampin' Write Markers: Island Indigo, Calypso Coral, Lucky Limeade, Wisteria Wonder, Pool Party

Tools: Hearts A Flutter Framelits, Bitty Banners

Finishing Touches: Pool Party and Calypso Coral Ruffled Ribbon, Bakers Twine


Tags: , , , , , ,

3D Projects | Boxes | Stamping

Madison Avenue Easter Cross

by Joanne James24. March 2013 22:39

It's snowing outside - again! - so I've spent the day hibernating, with a combination of crafting and 'daring Monopoly' to quote my son (I'm not sure how this differs to regular monopoly, but it was fun all the same!) Lots of new things to share with you this week, but for now back on the Easter theme today, albeit with a great use of a recent Sale-A-Bration stamp set.

I saw this card by Amanda at the Craft Spa here and thought it was a really neat idea so just had to have a go at recreating it. Armed with my trusty Stamp-a-ma-jig, here's my card: 


No sentiment, as I didn't have one that fitted neatly, but still a great additional use for the Madison Avenue border stamp. Easy to decorate, as the Itty Bitty Punch shapes fit perfectly inside. Quite effective, don't you think?

Back tomorrow with more Easter treats! Until then, happy stampin!


Stampin' Up Supplies:

Stamps: Madison Avenue

Cardstock: Crumb Cake, Whisper White, Island Indigo, Pool Party

Ink: Island Indigo

Tools: Stamp-a-ma-jig, Itty Bitty Punches

Finishing Touches: Rhinestone Basic Jewels


Tags: , , , , , , ,

Cards | Sale-a-bration | Stamping

Peepo Bunny Rabbit Punch Art

by Joanne James21. March 2013 22:06

So today's card was a case of something similar I saw on Pinterest which I actually made as a birthday card for a special 7 year old recently who is just mad about rabbits. I thought I would share today as it could just as easily be adapted to an Easter card. This is the front:
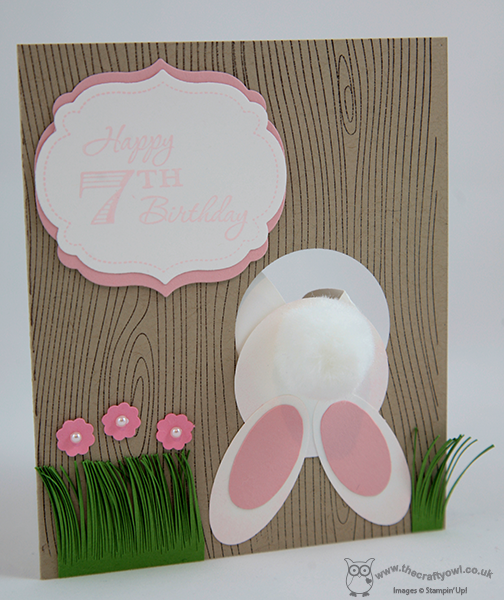
I used the 'Memorable Moments' stamp set to create the 'Happy 7th Birthday' - this is a great set that allows you to create custom birthday and anniversary greetings for pretty much any number combination. The outline stamp also fits the Labels Framelits perfectly. I love the idea of the rabbit hopping into his hidey-hole, only to open the card and see him reappear on the inside.
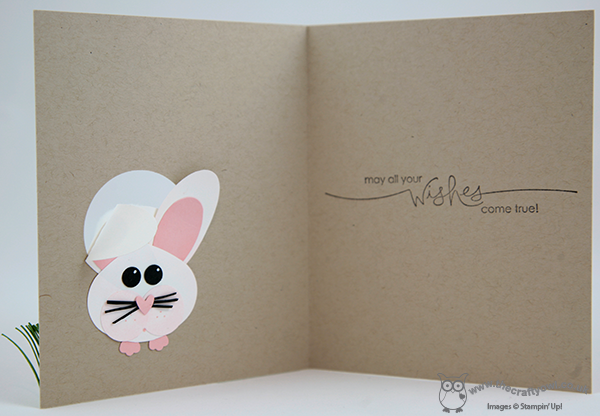
 

Here's a close-up of the inside: 
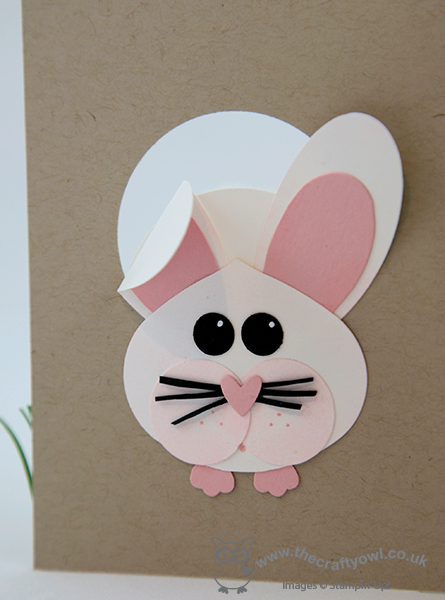
You can see the detail of his face and the subtle sponging just adds texture and character to his features. My favourite has to be the extra-large pompom tail on the front though I just love it!

So only one more day of Sale-A-Bration left - if you have an order to place or would like to sign up for the enhanced starter kit, you've got less than 24 hours to get in touch with me, so don't delay!

Back tomorrow with more Easter ideas - might even show something using one of the Sale-A-Bration sets, for all you early-birds who already have your free stamp sets and are looking for more great ways in which to use them. Until then, happy stampin'!


Stampin' Up Supplies:

Stamps: Memorable Moments, Woodgrain. Inside greeting is from a retired set - the current set 'A Word For You' is very similar though.

Cardstock: Crumb Cake, Whisper White, Basic Black, Pretty in Pink, Gumball Green

Inks: Pretty in Pink, Chocolate Chip

Tools: Itty Bitty Punches, Large Oval, Small Oval, Circle Punch (various sizes), Ornament Punch, Owl Punch (for nose), Labels Framelits, Trimmer

Finishing Touches: Basics pearls.


Two Minute Tuesday Easter Card

by Joanne James20. March 2013 22:14

Well, the weather outside has been raining on and off all day - so much for the first day of Spring! I have another Easter card for you today, a 4" square card that literally took only a couple of minutes to make: 

I wanted something plain and simple, but with some bold colour to remind me of brighter days. The images are from the Spring Sampler set in the Spring-Summer catalogue. I love the versatility of this set and have lots more to share with you over the coming days, so stay tuned. The sentiment is a partial stamp from the Wacky Wishes set again - this is the only Easter sentiment I own, so I warn you now you'll definitely be seeing more of this!

I have had a busy couple of days, with a day in London at the Biscuiteers Icing Cafe icing Easter biscuits yesterday and a 'Sounds of Spring' music concert at school this evening - I am willing the weather to get warmer and hoping it will soon oblidge! A class assembly tomorrow based on the musical 'Matilda', which should be fun and another Easter concert next week - don't you just love the end of term?

Also, whilst I remember - there was a video link about the new borders scoring plate missing from my last post; this has now been fixed, so if you'd like to see it, it's there now. One last reminder - Sale-a-bration finishes this Friday, so if you would like to place a £45 order and receive one of the 17 free gifts, or if you would like to sign up as a demonstrator and take advantage of the 25% extra free offer where you receive £162.50 worth of product on your starter kit for £99, you only have 2 days left to do so. Hopefully back tomorrow with some more Easter treats; until then, happy stampin'!


Stampin' Up Supplies:

Stamps: Spring Sampler, Wacky Wishes

Cardstock: Whisper White, Tempting Turqouise, Melon Mambo, Daffodil Delight

Ink: Tempting Turqouise, Melon Mambo, Daffodil Delight

Tools: 1 1/4" circle punch, circle die


Mini Catalogue

BROWSE THE CATALOGUE

The mini catalogue is now live! Read and download your copy here.

Shop Online

Access my online shop 24 x 7, 365 days of the year:

Current April hostess code:

VDKNV7BH

Shop Online

Join My Team

It's always a great time to join Stampin’ Up! New team members can get £130 worth of products for only £99 + free business supplies + free shipping + all the fun being a part of Stampin’ Up! Stampin' Up! has something for everyone: join my growing team and benefit from my support to enjoy Stampin' Up! however you choose.

If you're interested, call me for a chat to understand how I can help you realise your goals. Alternatively, if you have already decided to sign up and you just can't wait, please click here for the link to the online form where you can sign up and order your starter kit right away! 

Latest Kit!

Stampin Cut and Emboss

The Rock Legend Kit has all you need to make 8 cards with coordinating envelopes. Along with the new Panda Friends Kit, both are available from January 4th for just £14 each - get yours here!

2023-24 Annual Catalogue

BROWSE THE CATALOGUE

Click on the catalogue for a full list of current SU! supplies - if you would like to order any of the items featured, please drop me a line at [email protected] or give me a call on 07773 421446 - I'd be happy to help.

New Online Exclusives

There are new products available exclusively in the online store from 5 March - check them out here.

About Me

Hi I'm Joanne and live in Northampton and when I'm not looking after my husband and two beautiful children, am an avid crafter with a passion for all things Stampin' Up!

I must confess that I have never been a big rubber stamper - until I discovered Stampin' Up! that is. I love the fact that I can get such great results with co-ordinating stamps, inks, papers and punches - the possibilities are endless! Join me on my stamping journey as I share the things I love and be inspired to create amazing things yourself!

Follow Me

Monthly Newsletter

Box Builder

Click the button above to use Box Buster to create your custom box design using the Envelope Punch Board!

Kits Collection Now Available!

Stampin Cut and Emboss

The new Kits Collection from Stampin' Up! is now available!

Click here to see the current kits available and order yours online today.

I Design For


Stampin' Up Stuff

This is my personal blog and is not endorsed by Stampin’ Up! I hope you find it a plentiful source of ideas and personal inspiration but please don't copy my designs for contest submission or use for classes, publication or sale without express permission.