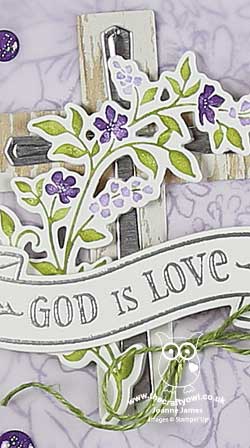
Last Day of Sale-A-Bration and Cross of Hope Easter Card for PP435

by Joanne James31. March 2019 09:00

Today it's Sunday and time for this week's new challenge over at The Paper Players! It's Laurie's turn to host this week and as it's the fifth Sunday of the month we have a tic-tac-toe challenge for you to work with:
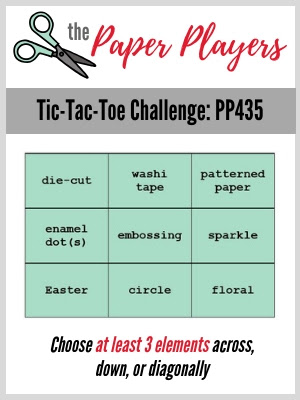
       

I really struggled with my card today - too many options to choose from on Laurie's fabulous board! I was also under a little time pressure having left my card to the last minute, which is never good for creativity! I also used this week's sketch over at Stamp Ink Paper which is great for a blank canvas with a central focal sentiment and my card also happens to use the colours over at Color Throwdown this week (as close as I have to them). So after much deliberating, I went down the left hand row of Laurie's TicTacToe board to create an Easter card (I've just realised it works for the diagonal too!) - take a look:
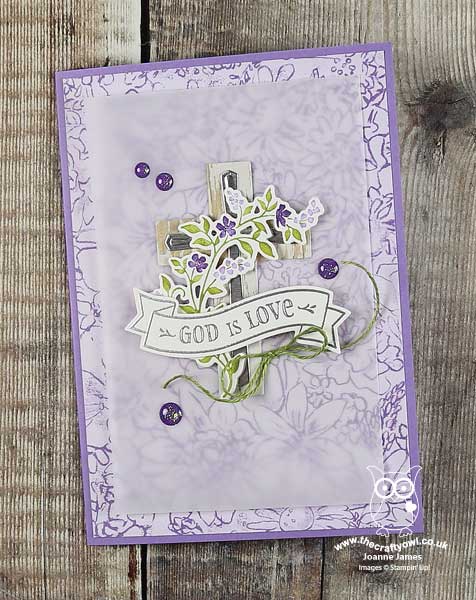
 

Here's the low-down on today's card:

Sale-A-Bration Shades of Purple - I chose to feature this pretty floral paper from the Sale-A-Bration Botanical Butterfly paper pack as the background for my card today. Such a pretty pattern - if you like it as much as I do, then you only have today to still snap it up as this year's Sale-A-Bration promotion is finally coming to an end. I softened it with a piece of vellum, so that it didn't distract from my main design yet still adds a delicate pattern detail.

Cross Of Hope - Today's Easter card features a layered cross as the basis for the centre piece: a simple cross cut from Wood Textures DSP and overlaid with a simple silver one at its centre. There are some beautiful cross dies in this framelit set (check out my fellow paper Player LeAnne's card for an example of one of my favourites) however simple was my choice for today to allow my florals to shine. 

Easter Greetings - I inked my floral stem with my Stampin' Write markers and overlaid the whole thing with an uplifting sentiment from the 'Hold on To Hope' stamp set, which I heat embossed in silver onto white - I think this is a lovely banner for Easter. A linen twine bow and some glitter enamel dots finish my card. 

So what do you think? In hindsight I think my card might have needed to be smaller in size or with a few extra layers behind, as the centre still seems a little overwhelmed by the background, but in the end I just decided to go with it! Feel free to let me know what you think in a comment below - it may prompt a rework!

Here is the visual summary of the key products used on today's project for you to pin for easy reference:
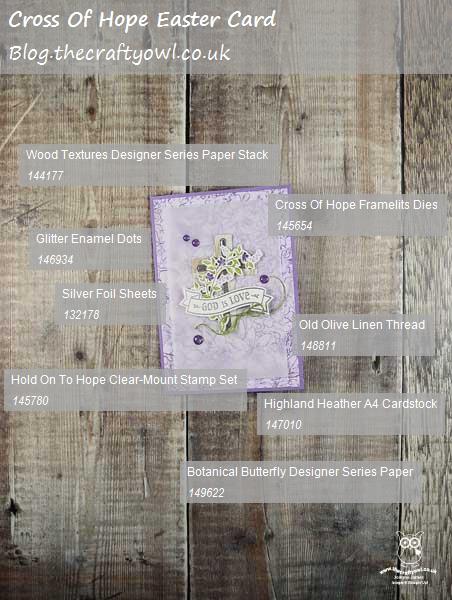
 

You can see all of my Product and 'How To' summaries on my 'How To - Tips and Techniques' Pinterest board in case you've missed any. 

Before you reach for your ink and papers, check out what our amazing team has created to inspire you this week:

Here's a quick recap of our challenge rules:
 
1.  Create a new paper project
2.  Upload your creation to your blog with a link back to us and provide a direct link to the post featuring your challenge submission.
3.  Please link your card to no more than four challenges, TOTAL.
4.  Have FUN!

You can see all of my 'How To' summaries on my 'How To - Tips and Techniques' Pinterest board in case you've missed any. 

It's Mother's Day here in the UK and we still have our German exchange student staying with us, so having experienced the delights of traditional British fish and chips yesterday, we are out to afternoon tea today. I'll try and remember to take a picture to share with you tomorrow! I'll be back tomorrow with another project and news of the fabulous new range of Stampin' Up! storage that will be on sale from April 1st - and that's no joke! Until then, enjoy your day and happy stampin'!


Stampin' Up! Supplies Used:

Table built using Product Table Builder by The Crafty Owl - Independent Stampin' Up! Demonstrator.

Gingham Easter Bunny Trio For Less Is More

by Joanne James16. March 2019 08:00

Today I'm sharing a card for the new challenge over at Less Is More where following my success in January over at LIM as their January winner, I have the honour of being guest designer this week.

For the challenge that runs for the next two weeks, the challenge is a recipe challenge and here is the badge:


Just Take Three - three images, three colours, three patterns. What fun! Here's my take on the theme:


Here's the low-down on today's card:

Take Three Bunnies - I so enjoyed making this clean and simple bunny card the other day, I decided that the only thing better than one bunny would be three - perfect for the Less Is More challenge theme! At the time of writing the Bunny Builder Punch is still available to order so if the Bunny Builder Punch is on your wish list, and you haven't yet ordered, don't delay and get your order in sooner rather than later. 

Gingham Gala Trio - I also used three different colours of Gingham Gala designer series paper on my card for my punched bunny silhouettes, this time adding white punched tails to keep a cleaner feel. 

Keeping It Simple - Keeping the paper pattern design the same and leaving plenty of white space around my bunnies, adding only a small sentiment to ground them, allows me to maintain a clean and simple feel. A super simple card with only five key material ingredients - a great card for beginners with very little stamping required.

Here is the visual summary of the key products used on today's project for you to pin for easy reference:

You can see all of my 'How To' summaries on my 'How To - Tips and Techniques' Pinterest board in case you've missed any. 

Enjoy your weekend; I am off to watch one of the James Juniors play hockey this afternoon and I'll be back tomorrow with this week's card for our new challenge over at The Paper Players. Until then, happy stampin'!


Stampin' Up! Supplies Used:

Table built using Product Table Builder by The Crafty Owl - Independent Stampin' Up! Demonstrator.

Bunny Builder Punch Approaching Not Orderable - Get Yours Before It's Too Late!

by Joanne James13. March 2019 20:00


Today I'm sharing a card for the current challenge over at Addicted to CAS where they have a great code word currently:

Clouds, puppy dogs, sheep - so many possibilities! For me though there was only one thing that sums up 'fluffy' and that's a bunny's tail - take a look:


Here's the low-down on today's card:

Get Your Bunny Builder Now Whilst You Still Can - I made this card to share with you today, before finding out late yesterday evening that the Bunny Builder Punch is in short supply and about to move to unorderable status at some point in the near future. Unlike two of the Sale-A-Bration Co-ordination items that went the same way within just a few days of ordering and with no notice - the Hop Around Framelits Dies and the Call Me Cupcake Thinlits Dies - we have at least been given a quick heads-up on this one, so if the Bunny Builder Punch is on your wish list, don't delay and get your order in now; it's unclear at this stage whether or not the punch will carry over to the new annual catalogue, so this may be your last chance to snap up this useful little tool, especially with Easter around the corner. 

Gingham Gala - Rather than stamp a bunny, I decided to punch a bunny silhouette out of the Gingham Gala designer series paper. In fresh colours, these papers are perfect for Easter and spring. For me 'fluffy' makes me think of bunny tails, but a punched paper one just wouldn't do - I removed a white pompom from some retired trim and added in to my bunny's bottom - adorable!

Keeping It Simple - A single colour, simple frame and bunny silhouette rather than stamped image keep my card design simple, clean and uncluttered. 

Here is the visual summary of the key products used on today's project for you to pin for easy reference:


You can see all of my 'How To' summaries on my 'How To - Tips and Techniques' Pinterest board in case you've missed any. 

Enjoy your evening and I'll be back tomorrow with another project. Until then, happy stampin'!


Stampin' Up! Supplies Used:

Table built using Product Table Builder by The Crafty Owl - Independent Stampin' Up! Demonstrator.

Best Bunny Spring Easter Card For The Paper Players PP431

by Joanne James3. March 2019 09:00

Today it's Sunday and time for this week's new challenge over at The Paper Players! It's the turn of the fabulous Anne-Marie to host this week and she has a fun theme challenge for you to work with:


I was in part inspired by yet another fabulous badge created by the lovely Nance for us this week to create a pretty Spring day background for my Easter bunny - take a look:


Here's the low-down on today's card:

Best Bunny - The Best Bunny stamp set is super cute and just perfect for my Easter bunny. I stamped my bunny onto Soft Suede cardstock and paper-pieced his features then layered him on some ovals. I also used the carrot decoration to add a little detail to the inside:


Spring Is in The Air - I created my spring background with a touch of brayering using a sponge brayer and Balmy Blue ink. Then I stamped some grass and added a couple of tiny butterflies from the 'Enjoy Life' stamp set. My zingy Lemon-Lime Twist Gingham Gala paper and orange accents add a fresh vibrancy to this fun Easter card.

Easter Wishes From More Than Words - My larger-than-life sentiment comes from the new 'More Than Words' stamp set that is available exclusively during March as part of the Sale-A-Bration co-ordination product launch. A great set with lost of sentiments, that also compliments greetings in a number of first stage Sale-A-Bration release stamp sets.

Here is the visual summary of the key products used on today's project for you to pin for easy reference:


You can see all of my Product and 'How To' summaries on my 'How To - Tips and Techniques' Pinterest board in case you've missed any. 

Before you reach for your ink and papers, check out what our amazing team has created to inspire you this week:

Here's a quick recap of our challenge rules:
 
1.  Create a new paper project
2.  Upload your creation to your blog with a link back to us and provide a direct link to the post featuring your challenge submission.
3.  Please link your card to no more than four challenges, TOTAL.
4.  Have FUN!

You can see all of my 'How To' summaries on my 'How To - Tips and Techniques' Pinterest board in case you've missed any. 

Enjoy your day; I am on day 2 of my weekend Creative Escapes Craft Retreat so mine will be a busy one. Day one was a lot of fun so I'm expecting day 2 to be much the same! I'll be back tomorrow with another project. Until then, happy stampin'!


Stampin' Up! Supplies Used: 

Table built using Product Table Builder by The Crafty Owl - Independent Stampin' Up! Demonstrator.

Envelope Punch Board Daisy Easter Basket

by Joanne James28. March 2018 17:30

It's the week before Easter already and so today I'm sharing a couple of really simple 3D projects that I made with a group of wonderful ladies last month that are perfect for holding Easter treats and also fit with the challenge over at Global Design Project this week:

The first one is an super easy Easter basket made with one of my most favourite tools EVER, the Envelope Punch Board  - take a look:


I love the Envelope Punch Board - my Envelope Expert and Box Buster tools are testament to that! - but it's great for lots more fun projects besides. Here I made my basket out of one of the Delightful Daisy DSP papers, decorated with some stamped and punched daisies and some faceted gems - a rather grown-up Easter basket, if you will, given the absence of bunnies! These little baskets are so easy to make and will hold a small full size egg or a collection of smaller ones. Here are the instructions in case you would like to make one too: 

  • Take a sheet of paper measuring 6” x 6”
  • Punch and score using your Envelope Punch Board at 1 ½” on all four sides
  • Turn over the sheet and repeat the step above on the reverse
  • Cut the flaps on each side to the first score line
  • Fold flaps either inside or outside to create your side panel and decorate with daisies or your chosen embellishment
  • Trim centre ends if desired (as I've done here) or adhere to the outside of the basket
  • Cut handle 15cm x 1.5cm and attach to sides

You can see more of these baskets in lots of other colours over on my Facebook page here, including some pictures of the ladies crafting 'in action'.

We also made some of the smaller egg carrier baskets, again using a piece of 6" x 6" paper and the Envelope Punch Board, this time using some of the Petal Garden DSP and some of the lovely free Sale-A-Bration Calypso Coral Shimmer Ribbon (only 4 more days to get your hands on this!) and a sweet Easter tag:


Instructions for this basket are as follows:

  • Take a sheet of paper measuring 6” x 6”
  • Punch and score using your Envelope Punch Board at 1¾” and 4” on the first side then use the score lines and guide to punch and score the remaining sides
  • Use a 3/4" circle punch to create the handles on the inner pieces and bring these up on the inside, adhering your flaps on the outside of these 

I'm mindful the instructions are not the easiest to follow without a video - watch this space and I'll see if I can make a quick one later! 

I had such a fun evening with my hostess Jane and her family and friends making these projects, and, having placed their orders, enabling Jane to earn rewards and free product, further boosted by the current Sale-A-Bration promotion. Whilst Sale-A-Bration is coming to an end in 4 days time, I am still taking party bookings into April, May and beyond, so if you would like a fun evening in with friends, crafting fun projects and earning some free Stampin' Up! product into the bargain, do get in touch.

Here are the visual summaries of the key products used on today's projects for you to pin for easy reference:

You can see all of my 'How To' summaries on my 'How To - Tips and Techniques' Pinterest board in case you've missed any. 

Enjoy the rest of your day and I'll be back tomorrow with another project. Until then, happy stampin'!


Stampin' Up! Supplies Used:

Table built using Product Table Builder by The Crafty Owl - Independent Stampin' Up! Demonstrator.
 
 
Table built using Product Table Builder by The Crafty Owl - Independent Stampin' Up! Demonstrator.

Tags: , , , , , , ,

3D Projects | Boxes | Envelope Punch Board

Basket Builder Easter Chocolate Bunny Treats

by Joanne James13. April 2017 22:31

We are into our school Easter holidays with a vengeance here in the James household and it is leaving little time for crafting! I just wanted to pop buy and share with you a cute little Easter bunny basket treat using the Basket Bunch stamp set and Basket Builder Framelit dies - retiring, but still available at a great discount at present:


These little 3D baskets are so easy to make with a 1 1/4" wide piece of cardstock, scored twice to create a U-shape, attached between each basket piece to hold the chocolate Lindt bunny then decorated with some stamped and cut out out flowers and a bow. I made these for each of my ladies that  attended a class with me this month as a thank you Easter treat and it's fair to say they were definitely well received!

You've still time to make these if you have the product or alternatively snap up a bargain now and be super-prepared for next year!

Here is the visual summary of the key products used on today's project for you to pin for easy reference:


You can see all of my 'How To' summaries on my 'How To - Tips and Techniques' Pinterest board in case you've missed any. 

I'll be back tomorrow with another project. Until then, happy stampin'!


Stampin' Up! Supplies Used:

Table built using Product Table Builder by The Crafty Owl - Independent Stampin' Up! Demonstrator.

Mediterranean Moments and Easter Chick Punch Art

by Joanne James3. April 2017 08:00

I've a busy this week ahead with this month's technique classes then a trip to Amsterdam for Onstage Live with thousands of other Stampin' Up! demonstrators from across Europe for the launch of the new Stampin' Up! Annual Catalogue - a whole two months ahead of its publish date - just one of the many things I love about being a Stampin' Up! demonstrator. More of that in future posts for sure, so this is a week I have to be organised! Today I have a couple of cards to share: here is the first one for this week's challenges over at The Color Throwdown and CAS Colours and Sketches:


I love this sketch layout - perfect for a large image. I chose to use one of the sketched images from the 'Mediterranean Moments' set and unusually decided to stamp it directly onto a coloured background:

I stamped in Night of Navy rather than black and added an enamel dot to my sentiment banner, but otherwise the stamped image speaks for itself and is perfect uncoloured for a clean and simple card. I also stamped one of the other images from the Mediterranean Moments set on the inside of my card. I'm also linking this card up with the challenge over at Less Is More where the recipe this week is to use three pastel colours.

Here is the visual summary of the key products used on today's project for you to pin for easy reference:


You can see all of my 'How To' summaries on my 'How To - Tips and Techniques' Pinterest board in case you've missed any. 

Stampin' Up! Supplies Used:

Table built using Product Table Builder by The Crafty Owl - Independent Stampin' Up! Demonstrator.


My second card today is for this week's Freshly Made Sketches challenge where the sketch was perfect for a fun Easter card idea that I had:

I saw some great Easter biscuits on Pinterest and one of them got me thinking about creating a round punch art-style chick - take a look:


I used my stitched shape circle framelit, a heart and flower framelit and the smallest shape from the Blossom Punch to create my fun chick and added a few co-ordinating strips of floral Brights designer series paper. My sentiment is from the Sale-A-Bration set 'Hey Chick' but if you don't have this you could add a 'Happy Easter' from Teeny Tiny Sentiments instead. A lighthearted clean and simple take on the sketch this week.

Here is the visual summary of the key products used on today's project for you to pin for easy reference:


You can see all of my 'How To' summaries on my 'How To - Tips and Techniques' Pinterest board in case you've missed any. 

Enjoy your day and I'll be back tomorrow with another project. Until then, happy stampin'!


Stampin' Up! Supplies Used:

Table built using Product Table Builder by The Crafty Owl - Independent Stampin' Up! Demonstrator.

Window Box Thinlits Easter Basket and Punch Art Easter Bunny

by Joanne James2. April 2017 09:00

It's Sunday and time for this week's new challenge over at The Paper Players! It's the turn of the lovely Laurie to host this week and she has a fun and timely theme challenge for us to work with:


I took the opportunity to take a break from cards this week and have a couple of quick and easy 3D items perfect for Easter treats for you to choose from. The first one is a basket made with the Window Box Thinlits to hold these cute chocolate carrots that I found when out shopping recently:


The Window Box Thinlits are so versatile and make the cutest Easter baskets! Of course I had to add a little tag with a bunny and fun sentiment and some Peek-a-boo Peach ribbon bows for decoration.

Sticking with the Easter bunny theme, I also made a punch art 'bow bunny' to decorate my little bucket of chocolate mini eggs:


I made my bunny using a combination of my Bow Builder, Festive Flower Builder and Owl Builder Punches, adding a few pearl eyes and some whiskers drawn in with my Stampin' Write marker. Not so sure about this one (I think perhaps his eyes are too far apart!)  Still, an easy way to decorate a treat container or Easter package.

Here is the visual summary of the key products used on today's projects for you to pin for easy reference:


You can see all of my Product and 'How To' summaries on my 'How To - Tips and Techniques' Pinterest board in case you've missed any. 

Before you reach for your ink and papers, check out what our amazing team has created to inspire you this week:

The Paper Players Design Team
 
 
Here's a quick recap of our challenge rules:
 
1.  Create a new paper project
2.  Upload your creation to your blog with a link back to us and provide a direct link to the post featuring your challenge submission.
3.  Please link your card to no more than four challenges, TOTAL.
4.  Have FUN! 


I look forward to seeing what you create with our fun theme this week. Enjoy the rest of your weekend as it will be over all too quickly; I'll be back tomorrow with another project; until then, happy stampin'!


Stampin' Up! Supplies Used: 

Table built using Product Table Builder by The Crafty Owl - Independent Stampin' Up! Demonstrator.
 
Table built using Product Table Builder by The Crafty Owl - Independent Stampin' Up! Demonstrator.

Easter Basket Bunch For The Paper Players

by Joanne James26. March 2017 09:00

To all my UK readers - Happy Mother's Day! It is of course Sunday and time for this week's new challenge over at The Paper Players! My good friend the super-talented Claire is the hostess this week and she has a sketch for us to work with:


I love a good sketch and this one has some great layering options. I decided that I would use the pretty Spring colours over at Fab Friday to create a basket of flowers for an Easter card - take a look:


Here's the low-down on today's card:

I kept my layers fairly neutral - a stitched circle in Mint Macaron, a panel of Calypso Coral By The Shore designer series paper - and used the Easter sentiment from the 'Suite Sentiments' set on a Very Vanilla banner, with the real focal point for my card being my basket of flowers. I cut and layered my basket using the Basket Builder framelits then stamped my daffodils and peach flowers in Memento Black onto solid colour cardstock using the Basket Bunch set and cut the out with the co-ordinating framelits, finishing them with some Calypso Coral subtles candy dots. I love the Basket Bunch bundle, not only for the Easter eggs and bunny, but also the perfect daffodils (well, I am Welsh so it is to be expected!). The framelits make cutting out these little pieces so easy and offer some great layering options too.

I'm also linking up with those lovely ladies over at As You See It too - for me, there is nothing that says Spring more than daffodils. They are so bright and cheery and inexpensive and I love to have them cut in a vase, but also to see them along the banks and hedgerows as I drive around the countryside. At the moment there are rows and rows of them on my journey driving Ben to school - they never fail to brighten my day!

Here is the visual summary of the key products used on today's project for you to pin for easy reference:


You can see all of my Product and 'How To' summaries on my 'How To - Tips and Techniques' Pinterest board in case you've missed any. 

Before you reach for your ink and papers, check out what our amazing team has created to inspire you this week:

The Paper Players Design Team
 
 
Here's a quick recap of our challenge rules:
 
1.  Create a new paper project
2.  Upload your creation to your blog with a link back to us and provide a direct link to the post featuring your challenge submission.
3.  Please link your card to no more than four challenges, TOTAL.
4.  Have FUN! 


I look forward to seeing what you create with our sketch this week. Enjoy the rest of your weekend as it will be over all too quickly; I'm looking forward to a family lunch and maybe, just maybe, a sneaky visit into my craft room this afternoon. I'll be back tomorrow with another project; until then, happy stampin'!


Stampin' Up! Supplies Used:

Table built using Product Table Builder by The Crafty Owl - Independent Stampin' Up! Demonstrator.

Basket Bunch Easter Egg Hunt Card

by Joanne James27. February 2017 20:44

Happy Monday everyone! I hope you've had a good day. I've had a busy start to the week with preparation for next week's classes followed by a pleasant hour watching Rebecca swim in a school swimming gala (she won all her races and the team won overall, so smiles all round.) Rebecca came second in her competition race yesterday too and had a new personal best time, so all good. Anyway, to today's cards - yes, two! I've made a couple of cards on the same theme using the same colours for a couple of different challenges:

Visit the Paper Craft Crew and play along with Card Sketch 232. #pcc2017 #cardsketch #papercraftcrew  www.papercraftcrew.com   

I decided I needed to get cracking (excuse the pun!) with my Easter makes, so today it's all about the Basket Bunch bundle  - take a look:


Paper Craft Crew have a great sketch this week and I really love the CAS Colours & Sketches colour combination - I will be so sad to see Cucumber Crush leave us in June! - and thought it was perfect for a little Easter egg hunt through the grass. I stamped and die cut a selection of eggs and interspersed them between my strip of grass. I layered it onto a piece of basket weave patterned paper from the Sale-A-Bration Carried Away Designer Series Paper and finished with this fun sentiment from the Basket Bunch stamp set, cut out with my Layering Ovals. May all your chocolate be solid - I love it!

Having completed this card, I thought it was probably a little too layered to qualify as truly 'clean and simple' for the lovely ladies over at CAS Colours and Sketches, so I die cut a few more pieces and created something a little more in keeping: 


Clean and simple with an alternative sentiment, yet no less colourful!

Here is the visual summary of the key products used on today's projects for you to pin for easy reference:


And for my second card:


You can see all of my 'How To' summaries on my 'How To - Tips and Techniques' Pinterest board in case you've missed any. 

Enjoy your day and I'll be back tomorrow with another project. Until then, happy stampin'!


Stampin' Up! Supplies Used:

Table built using Product Table Builder by The Crafty Owl - Independent Stampin' Up! Demonstrator.

Mini Catalogue

BROWSE THE CATALOGUE

The mini catalogue is now live! Read and download your copy here.

Shop Online

Access my online shop 24 x 7, 365 days of the year:

Current April hostess code:

VDKNV7BH

Shop Online

Join My Team

It's always a great time to join Stampin’ Up! New team members can get £130 worth of products for only £99 + free business supplies + free shipping + all the fun being a part of Stampin’ Up! Stampin' Up! has something for everyone: join my growing team and benefit from my support to enjoy Stampin' Up! however you choose.

If you're interested, call me for a chat to understand how I can help you realise your goals. Alternatively, if you have already decided to sign up and you just can't wait, please click here for the link to the online form where you can sign up and order your starter kit right away! 

Latest Kit!

Stampin Cut and Emboss

The Rock Legend Kit has all you need to make 8 cards with coordinating envelopes. Along with the new Panda Friends Kit, both are available from January 4th for just £14 each - get yours here!

2023-24 Annual Catalogue

BROWSE THE CATALOGUE

Click on the catalogue for a full list of current SU! supplies - if you would like to order any of the items featured, please drop me a line at [email protected] or give me a call on 07773 421446 - I'd be happy to help.

New Online Exclusives

There are new products available exclusively in the online store from 5 March - check them out here.

About Me

Hi I'm Joanne and live in Northampton and when I'm not looking after my husband and two beautiful children, am an avid crafter with a passion for all things Stampin' Up!

I must confess that I have never been a big rubber stamper - until I discovered Stampin' Up! that is. I love the fact that I can get such great results with co-ordinating stamps, inks, papers and punches - the possibilities are endless! Join me on my stamping journey as I share the things I love and be inspired to create amazing things yourself!

Follow Me

Monthly Newsletter

Box Builder

Click the button above to use Box Buster to create your custom box design using the Envelope Punch Board!

Kits Collection Now Available!

Stampin Cut and Emboss

The new Kits Collection from Stampin' Up! is now available!

Click here to see the current kits available and order yours online today.

I Design For


Stampin' Up Stuff

This is my personal blog and is not endorsed by Stampin’ Up! I hope you find it a plentiful source of ideas and personal inspiration but please don't copy my designs for contest submission or use for classes, publication or sale without express permission.