Simple Square Envelope Punch Board Box

by Joanne James8. January 2014 15:26

So for my second post today, I wanted to share with you one of the quick makes from my January classes, which are being held this week. This month we are featuring the Envelope Punch Board. Lots of my customers either purchased one or received one as a Christmas gift, but weren't really sure what to do with it other than make basic envelopes. They were truly inspired by my Easiest Ever Envelope Punch Board Cracker Video that I posted before Christmas, so I was keen to show them the full extent of their boards and just what they could do.

We started off by making square boxes - here's my version of the one we made:

This is a simple 2" square box, made from a 6" x 6" square piece of paper, probably the easiest type of box to make. My class used the Modern Medley DSP for their boxes (there are some pictures over on my Facebook page if you would like to see them), but for my box here I thought I would give you another 'sneak peek' of product that will be available during this year's Sale-A-Bration promotion, starting 28th January. This is a sheet from the 'Sweet Sorbet' DSP collection - lovely fresh, spring colours with black (an unusual, but very workable colour combination). I finished my box with a small 'thanks' tag and some stretch ruffle trim in Crisp Cantaloupe to hold the box closed.

Back tomorrow with another of my class projects. until then, happy stampin'!


Stampin' Up! Supplies Used:

Table built using Stampin' Up! Product Table Builder from The Crafty Owl.


MDS Digital Downloads and New Online Digital Classes

by Joanne James12. November 2013 15:24

Today is Digital Download Tuesday so I'm doing a quick digital-focused post with a link to both this week's and last week's weekly digital downloads (I forgot to post last week's links with all of the Digital Scrapbooking Days offers going on):

November 12, 2013 - Digital Downloads    November 5, 2013 - Digital Downloads

If you look at this week's downloads, you will see a new and exciting development for those of us new to MDS - online project classes! Three have been added to the store today, with a new class to be added on every last Tuesday of the month. These classes will vary in price depending on what is included in the accompanying brushsets and they are great as a means to learn both beginner and more advanced techniques. Here's a quick look at the brushsets for the first three classes to be released - click on the images for more information:

Theses video classes are not meant as a replacement for the many technique-based videos available free of charge at MyDigitalStudio.net, rather they will supplement these. Instead of focusing on one technique only they will cover a number of different aspects through the creation of a variety of projects. To access these classes, you simply purchase via my online store then download your file and log into MDS as usual.

Lastly, follow the link from my Facebook page (it would be great if you 'liked' my page first if you haven't already!) or go directly to the My Digital Studio Facebook page here and enter the competition to win the November bonus class absolutely free!

Back shortly with today's creative post; until then, happy digital stampin'!


Tags: , , , , , , ,

Classes | My Digital Studio | Promotions | Shop Online

Christmas Banners A Plenty!

by Joanne James20. October 2013 20:51

Well, today has been a fun day with a Christmas Build a Banner project class this morning. Following many laughs and giggles and a fair number of inky fingers, the lovely ladies attending my class each made a festive banner using a variety of papers and embellishments and the Build a Banner set. So there are lots of photos in this post! First of all, here is my finished banner that served as their inspiration:

My colours are Bermuda Bay and Coastal Cabana, with rosettes made from some of the lovely Winter Frost DSP and Smoky Slate chevron ribbon and finished with Coastal Cabana bows. Here's some close-ups of the rosettes - the grey one:

And here's one of the Pool Party ones:

Here's a close up of one of the bows, so easy to put together using the new Bow Bigz Die:

And lastly one showing some of the added glimmer on the flag itself:

Here are two of the ladies' lovely finished banners. Firstly, Kathy's, also in the grey/blue colourway:


And this one is Julie's, in the red-green colourway with champagne glimmer accents:


Aren't they just beautiful? I didn't manage to get photos of the other two, but I can assure you they were just as lovely. We are all feeling a little more ready for Christmas now, with one more thing ticked off our Christmas home décor list. The Build A Banner kits are great and come highly recommended; at £17.95 for the full kit including stencils and just £8.95 for the basic set, they are great value. Rebecca has put first dibs on the remaining 9 pieces in my banner kit for a name banner for her bedroom (pictures will no doubt follow in due course!). I can see me having to buy another one so that Ben can have one too ...

If you live in or around Northampton and would like a current class schedule

Back tomorrow with another project; until then, happy stampin'!


Stampin' Up Supplies Used:

 Build a Banner Simply Created KitBuild A Banner Refill KitDesigner Rosette Bigz XL DieGift Bow Bigz L DieWinter Frost Specialty Designer Series PaperFestive Flurry Framelits DiesSmoky Slate 3/4 Chevron Ribbon


Silver Glimmer Paper - by Stampin' Up!Season Of Style Designer Series Paper Cherry Cobbler 1 Grosgrain Stitched Edge Ribbon


Bright Mosaic Madness Card

by Joanne James15. September 2013 20:52

Hope you've all enjoyed a lovely weekend; mine's been great, but I must confess to not enjoying the weather; it feels like autumn has arrived with a vengeance and I don't much care for it. I am missing the Florida sunshine! Anyway, today's card is one we made in last week's Mosaic Madness class:

I've seen a few versions of this card on Pinterest and this is my take - bold and bright in Melon Mambo and Bermuda Bay. This was one of the more complicated cards we tackled, as it involves two-step stamping and accurate placement using the stamp-a-ma-jig to place the mosaic stamps accurately on the white flag. Some of my ladies chose to cheat a little and stamp their images onto scrap card and then punch them out and glue them to the flag, trimming to fit; that's fine too.

I really love this colour combination and the combination of the stamps with matching embossing folder is just right. This embossing folder is one of the most versatile and the pattern can be used either embossed or debossed, each giving a different effect. One last thing before I go - I hope you like the new-look supplies list at the end of this post. From now on, the idea is to show each of the products used with a direct line to my online store. This will make it really easy for you to purchase items and take advantage of any online hostess codes or offers or simply order your items any time, day or night. You may notice a few tweaks over the next few days as I make this happen, but if you have any questions about online ordering, please get in touch.

I'll share our other class cards with you this week. Until then, happy stampin'!


Stampin' Up! Supplies used:

Mosaic MadnessModern Mosaic Textured Impressions Embossing FolderBanner GreetingsBermuda Bay Classic Stampin' PadMelon Mambo Classic Stampin' PadMelon Mambo 1/8 Taffeta RibbonStamp-A-Ma-Jig - by Stampin' Up!

Christmas Ornament and Decorated Box

by Joanne James9. August 2013 22:13

Today I'm sharing the last of the projects we made at last weekend's Christmas workshop: a stamped clay ornament and a decorated kraft gift box to put it in. Here's a photograph of the ornament:

These clay ornaments have a natural finish and can be stamped straight onto the surface, without any additional preparation. As we were going all out for Christmas, once we had stamped our design onto the ornament we stamped the pattern again with Versamark, sprinkled with Heat and Stick Powder and heated with the heat gun, then sprinkled with Iridescent Ice glitter and heated once more. This gives the finished item a more muted colour and a lovely sparkle that catches the light.

We also decorated one of the lovely ready-made kraft boxes from the catalogue to go with it - here's the top of mine:

Together they would make a lovely gift for someone, if you could bear to part with them of course! I will be using mine to decorate my tree during the festive season, but I'm sure I can make another one or something else to go in the box! I hope you liked my first Christmas projects of the season - there will be lots more where this came from. If you would like to join any of my classes, do get in touch for more details; my September card classes will be featuring the Mosaic Madness stamp set and then from October we will be doing Christmas cards all the way through until the end of the year.

Back tomorrow with the first of the weekend birthday cards: my brother-in-law is celebrating his 'big 40' with a party tomorrow and then my own 'Baby James' will be 6 on Sunday, so I've a few birthday cards to share. Until then, happy stampin'!

Stampin' Up Supplies:

Stamps: Sweet Essentials, Four Seasons (hostess - retired)

Cardstock: Cherry Cobbler, Be of Good Cheer Designer Series Paper (retired)

Ink/Stampin' Write Markers: Real Red

Tools: Simply Scored, Big Shot, 1 1/4" Circle Punch, 7/8" and 1 3/4" Scallop Circle Punches, Merry Minis (star)

Finishing Touches: Champagne Glimmer Paper, 3/4" Cherry Cobbler Chevron Ribbon,  Cherry Cobbler 1/2" Scallop Dots Ribbon (retired)


Christmas Tea Lights

by Joanne James8. August 2013 09:44

Another week, another late post - I'm loving the summer holidays but when school's out it sure is tricky to keep everything else on track! So today I'm posting nice and early, so that I don't run out of time again!

Today I'm sharing another of the makes from my Christmas workshop that I held last weekend: a lovely set of four tea lights in a handmade box. This workshop was less about the stamping and much more about the scoring - if my ladies weren't proficient with their Simply Scored scoreboard beforehand, they sure are now! So here is our finished box:


We made a box with a sliding sleeve cover, from which we cut out an oval aperture with the Oval Framelits and backed with a window sheet, to allow a glimpse of our lovely hand-stamped candles inside. Here's a picture of the open box, with a peek at our 'dressed up' tea lights:

We edged each of them with a strip of DSP; I'll be making more of these when my festive washi tape arrives, as this is perfect for this kind of project. The candle stamping was really easy to achieve and as none of the ladies present had done this before, was a real 'wow' moment for them. I suspect lots of their friends and neighbours will be receiving stamped tea light gift sets for Christmas now that they've learned this clever technique!

I love this spotted star/snowflake paper from the retired 'Be of Good Cheer' paper set; with so many designs to choose from, we all made different ones though - here's one of the other finished sets made by Kathy during the workshop:

These papers are just so lovely, but don't be too sad that they are now retired; I have had a 'sneak peek' of the new Autumn-Winter seasonal catalogue and can honestly say, you will not be disappointed with this year's offerings!

All being well, I will be back tomorrow with the last of my Christmas workshop projects. I'm off to have a quick spot of making before meeting friends in the park for a picnic - lovely! Until then, happy stampin'!


Stampin' Up Supplies:

Stamps: Four Seasons (hostess - retired)

Cardstock: Cherry Cobbler, Be of Good Cheer Designer Series Paper (retired)

Ink/Stampin' Write Markers: Cherry Cobbler

Tools: Simply Scored, Big Shot, 1 1/4" Circle Punch, 1 3/4" Scallop Circle Punches, Oval Framelits

Finishing Touches: Creped Filter Paper, Window Sheet,  Cherry Cobbler 1/2" Scallop Dots Ribbon (retired)

Christmas Rosette Door Wreath

by Joanne James4. August 2013 19:36

As I mentioned earlier this week, yesterday I held an all-day Christmas workshop with a lovely bunch of ladies and we made a good start with our preparations for the festive season with a number of 3D projects. I'm going to share the first of these with you today: a door wreath made out of paper rosettes and featuring the sadly recently retired Be Of Good Cheer Christmas DSP. After much scoring, gluing and decorating, this was the finished article:
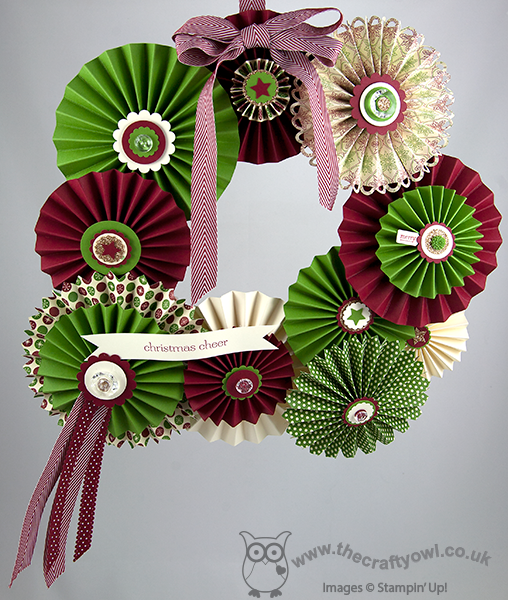
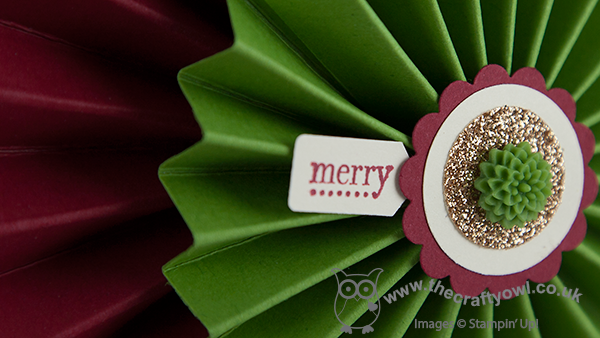
This picture shows my version of the wreath suspended. In hindsight, I should have photographed it in situ on my front door, although then my neighbours would have thought me completely mad (they already think I'm part way there, as I grow potatoes and pumpkins in my front garden, but that's a story for another time!!) The rosettes made from the patterned paper were cut using the Designer Rosette Bigx XL die, which is great for fast and easy cutting and scoring; unlike the ones made from the plain cardstock, which we scored using the Simply Scored scoreboard so they took a little longer. We used a variety of circle and scallop punches to create the centres; here's a close up of a couple of mine:
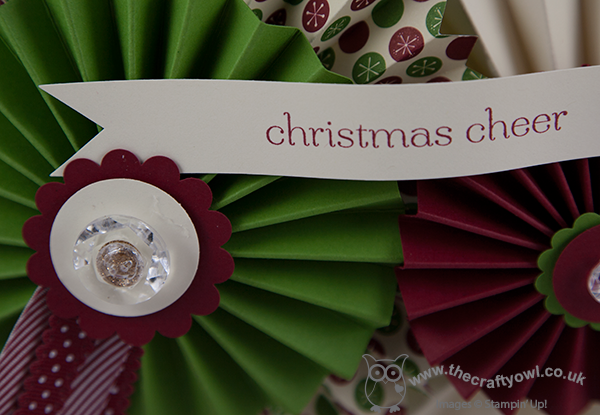
The one below was our focal point rosette, complete with ribbon trim - did you spot the lovely new Cherry Cobbler chevron ribbon in there? - and we also included a banner sentiment in keeping with the season:
The nice thing about a project like this though is that whilst everyone starts out with the same materials, each person has their own 'take' on what theirs should look like, so you end up with lots of similar but slightly different outputs. To illustrate, here is one of the finished wreaths of one of the ladies who attended:
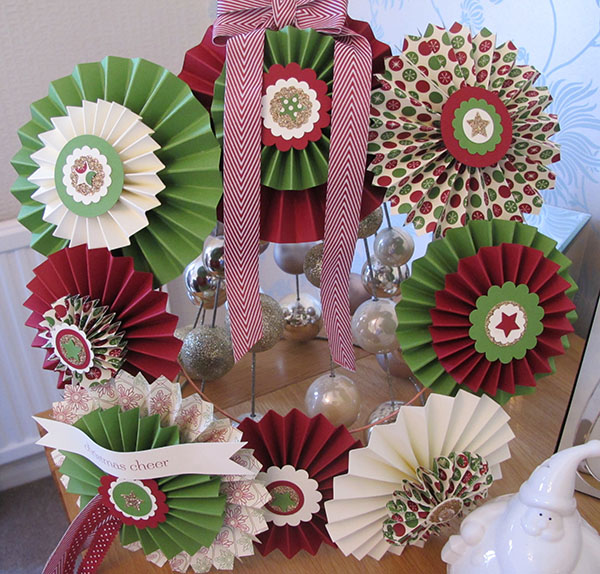
Isn't Maureen's wreath just lovely? I'll share the other projects we made with you later this week. I'm off now to recover from the party excesses of my day - my downline Barbara and I held a joint party for our 6 year old sons this afternoon: swimming party followed by birthday picnic in the park. I will share the invitations and thank you notes we made tomorrow; meanwhile, time for a nice quiet glass of wine and to put my feet up, I think!

Back tomorrow with another project; until then, happy stampin'!


Stampin' Up Supplies:

Stamps: Sweet Essentials, Tiny Tags (retired)

Cardstock: Very Vanilla, Gumball Green, Cherry Cobbler, Be of Good Cheer Designer Series Paper (retired)

Ink/Stampin' Write Markers: Cherry Cobbler

Tools: Simply Scored, Big Shot, Rosette Bigz XL Die, 1", 1 1/4", 1 3/8" Circle Punches, 7/8", 1 1/4" 1 3/4" Scallop Circle Punches, Itty Bitty Punches (circle), Merry Minis Punch Pack (star), Jewellery Tag Punch (retired)

Finishing Touches: Champagne Glimmer Paper, Vintage Faceted Designer Buttons, In Colour Dahlias, 3/4" Cherry Cobbler Chevron Ribbon,  Cherry Cobbler 1/2" Scallop Dots Ribbon


Best of Flowers - Double Embossed Vintage Class Card

by Joanne James21. July 2013 20:07

So I have a confession: I don't like all the stamps that Stampin' Up! has to offer! I like modern, clean and unfussy design and don't really go in much for the vintage, distressed look. So whilst I loved three of the four stamps in June's 'Best of Flowers' set, I struggled with the fourth one. The bouquet of roses had a real 'old fashioned' look I thought and I would probably have left it in the box uninked. I could happily spend endless hours creating things with the other three stamps in the set, each of which I love, but for the fact that I had decided to use this set for this month's card class and therefore felt I should use each of the stamps equally. After much huffing and puffing, I came up with a couple of cards and this is one, of them:

This is something of a departure from my usual style, but I quite like the way it turned out. It was also a great opportunity to teach the ladies in my class the double embossing technique, which enabled me to make the stamp the focal point, without creating an overly fussy design. Some sponging of Crumb Cake ink over the surface and some ruched seam binding ribbon were all that I needed to finish it off.

I think maybe it's the kind of card that grows on you; the more you look at it, the more appeal it has - some 'olde worlde' charm, perhaps! if you would like to own the 'Best of Flowers' set, it is still available to purchase for £13.95 until 31st March 2014. Equally, if you would like to join one of my card classes, do get in touch for more details - our September class will feature the new 'Mosaic Madness' stamp set, along with the coordinating punch and embossing folder.

Back tomorrow with another card I made using this stamp; until then, happy stampin'!


Stampin' Up Supplies:

Stamps: Best of Flowers

Cardstock: Crumb Cake, Very Vanilla

Ink/Stampin' Write Markers: Crumb Cake

Tools: Stamp-a-ma-jig, Perfect Polka Dots Embossing Folder, Designer Frames Embossing Folder, Sponge Dauber

Finishing Touches: Crumb Cake `1/2" Seam Binding Ribbon


Mosaic Trellis

by Joanne James18. July 2013 21:09

I'm back after another busy card class last night, which was great fun but I was home too late to post so am back on track this evening. We were using the 'Best of Flowers' set at yesterday's class and everyone made some great cards - I 'll share these another time. Today I have another Mosaic Madness card for you; something a little different:

To create this card, I used the mosaic stamp set along with the co-ordinating embossing folder and punch, but this time created a 'trellis' from the embossed sheet using the punch, and then stamping a two-tone pattern on the trellis so that it would really 'pop' against the Coastal Cabana ink and cardstock duo. I've been playing around with this idea in my head for a few days and having finally committed it to paper I'm really pleased with how it's turned out.

This set really is so versatile; I hope you're not tired of it yet, as there's lots more where this came from! I'll be featuring this stamp set in September's card class, so if you live in Northampton and would like to experience a little Mosaic Madness for yourself, then do get in touch for further details - whether an experienced crafter or first-time card maker, you will be more than welcome. We are not having a monthly card class in August due to the summer holidays, although on Saturday 3rd August I am holding an-all day Christmas Crafts Workshop, where we will be getting a headstart on our Christmas preparations - it pays to be organised, especially if you're a crafter!

Back tomorrow with another project; until then, happy stampin'!


Stampin' Up Supplies:

Stamps: Mosaic Madness, Really Good Greetings

Cardstock: Coastal Cabana, Whisper White

Ink/Stampin' Write Markers: Coastal Cabana, Strawberry Slush, Crisp Cantaloupe

Tools: Mosaic Punch, Mosaic Embossing Folder, Stamp-a-ma-jig

Finishing Touches: Basics Rhinestones

July 'Best of' Stamp Set: Best of Butterflies

by Joanne James1. July 2013 19:26

Two posts from me today - the first to announce the new 'Best of' set for July - Best of Butterflies. Following last month's launch, to celebrate its 25th anniversary, Stampin' Up! is releasing a new 'Best of' stamp set featuring 3-4 past favourites and one brand new design, each month until October. Each set costs £13.95 and will be available to purchase until 31 March 2014 (clear mount only). The box to the right of my blog page will show the current stamp set - the set for July is called 'Best of Butterflies' and features the following delicate butterfly designs:

I will have some samples using these stamps to share with you in due course, but if you can't wait to get your hands on them, then drop me a line at [email protected] and I will happily place an order for you.

Also, this month's card class will feature last month's 'Best of Flowers' stamp set. This month's classes are scheduled for Monday 15th and Wednesday 17th July; we will be making one card using each of the stamps and the cost of the 2 hour class is £10. If you would like to attend, do drop me a line or give me a call for more information.

Back shortly with another post; until then, happy stampin'!


Tags: , , , ,

Classes | Promotions | Stamping

Mini Catalogue

BROWSE THE CATALOGUE

The mini catalogue is now live! Read and download your copy here.

Shop Online

Access my online shop 24 x 7, 365 days of the year:

Current April hostess code:

VDKNV7BH

Shop Online

Join My Team

It's always a great time to join Stampin’ Up! New team members can get £130 worth of products for only £99 + free business supplies + free shipping + all the fun being a part of Stampin’ Up! Stampin' Up! has something for everyone: join my growing team and benefit from my support to enjoy Stampin' Up! however you choose.

If you're interested, call me for a chat to understand how I can help you realise your goals. Alternatively, if you have already decided to sign up and you just can't wait, please click here for the link to the online form where you can sign up and order your starter kit right away! 

Latest Kit!

Stampin Cut and Emboss

The Rock Legend Kit has all you need to make 8 cards with coordinating envelopes. Along with the new Panda Friends Kit, both are available from January 4th for just £14 each - get yours here!

2023-24 Annual Catalogue

BROWSE THE CATALOGUE

Click on the catalogue for a full list of current SU! supplies - if you would like to order any of the items featured, please drop me a line at [email protected] or give me a call on 07773 421446 - I'd be happy to help.

New Online Exclusives

There are new products available exclusively in the online store from 5 March - check them out here.

About Me

Hi I'm Joanne and live in Northampton and when I'm not looking after my husband and two beautiful children, am an avid crafter with a passion for all things Stampin' Up!

I must confess that I have never been a big rubber stamper - until I discovered Stampin' Up! that is. I love the fact that I can get such great results with co-ordinating stamps, inks, papers and punches - the possibilities are endless! Join me on my stamping journey as I share the things I love and be inspired to create amazing things yourself!

Follow Me

Monthly Newsletter

Box Builder

Click the button above to use Box Buster to create your custom box design using the Envelope Punch Board!

Kits Collection Now Available!

Stampin Cut and Emboss

The new Kits Collection from Stampin' Up! is now available!

Click here to see the current kits available and order yours online today.

I Design For


Stampin' Up Stuff

This is my personal blog and is not endorsed by Stampin’ Up! I hope you find it a plentiful source of ideas and personal inspiration but please don't copy my designs for contest submission or use for classes, publication or sale without express permission.