Color Theory Winter Memories And More Scrapbook Layout

by Joanne James4. November 2017 08:00

I have had a busier than usual schedule this week which has necessitated a few blog-free days - I hope you will all bear with me, whilst I like to think I'm organised clearly I'm not organised enough! So much to share and so little time really is my motto at the moment.

Anyway, today I am back with it and I have something a little different for you - this week the team over at Global Design Project have a family theme and CAS-ual Fridays are challenging us to make anything but a card - so I thought I would share one of my recent scrapbooking layouts:


Here is my layout featuring the Color Theory Memories and More card pack:


Here's the low-down on today's project:

A Traditional Layout - Whilst I don't often share my layouts with you here on my blog, I'm a real fan of the pocket-style memory keeping that we introduced with the Project Life range and subsequently with Memories and More. The pocket cards make it so easy to put pages together quickly and I love that I can organise my pages with minimal supplies and 'pretty' them up as I go or add extra detail later. Here I've used the Memories and More cards in a traditional 12" x 12" scrapbook layout as I wanted to show how these cards can be used in a variety of different ways. The pre-printed sentiment cards mean that whatever type of layout you use, Memories and More cards make it easy to create a colourful layout with no stamping required.

Color Theory For All Seasons - This layout is one of four that I created using the Color Theory Memories and More card pack, as I created one for each season. I will share the other layouts in a future blog post; as you can see this page is my Winter layout featuring the rest of the James family on our annual ice skating trip. This is something we love to do every year and make a point of doing together, just the four of us - it has become a tradition and is generally accompanied by different novelty hats each year - in the photo above Rebecca is sporting a Christmas tree whilst Ben's has elf ears! In addition to the Memories and More cards, I used some coloured embossing paste with my Pattern Party Decorative Masks to add some texture and interest to my background, along with some diecut snowflakes courtesy of the Seasonal Layers Thinlits, a little glimmer paper and some glitter enamel dots to add some festive sparkle. I added stickers from the Color theory card pack for additional sentiments and accents.

Hidden Thoughts - My layout features space for journaling on the card above my photograph, but it also features a 'hidden journaling' card concealed beneath the photograph and revealed by pulling the tab on the left hand side attached to the card that says 'Details'. The circle tab punch is great for adding tabs to your journaling cards in this way.

I'll be back tomorrow with another project for this week's challenge over at The Paper Players; until then, happy stampin'!


Stampin' Up! Supplies Used:

Table built using Product Table Builder by The Crafty Owl - Independent Stampin' Up! Demonstrator.

Cherry Cobbler Monochromatic Be Merry Christmas Card

by Joanne James16. October 2017 10:00

It's Monday again - doesn't a new week roll around quickly? Today I'm sharing a Christmas card that I made using this week's sketch over at Freshly Made Sketches:

I decided to go monochromatic with this one using a bunch of co-ordinating products from the Be Merry Suite - take a look:


Here's the low-down on today's card:

Be Merry - I decided to feature the charming reindeer from the 'Merry Mistletoe' stamp set front and centre on my card today. This was one of the sets that was available at a discount during the World Card Making Day promotions, so I'm sure lots of you will have snapped it up! I am also featuring this set, along with the Be Merry designer series papers - still available until the end of the month as part of the current 'Buy 3, get one free' promotion on designer series paper - at my November Christmas Stamp-A-Stack Event on Tuesday 7th November. This is an all-day event that will enable you to make 40, yes 40 Christmas cards and envelopes in one go! you can see more details on my Facebook Events page here - if you live in or around Northampton do get in touch if you'd like to join me in person for this event. This class can also be provided as a 'class to go' in the mail, so if you're further afield and this is something that interests you, do get in touch to order yours. 

Mask It - The observant amongst you will notice that the sentiment I used on my card today is also from the 'Merry Mistletoe' stamp set, but not as designed. On the stamp the words are one on top of the other, but I wanted them to run one after the other to fit across the banner on my card. I am not one to cut up my stamps (absolute sacrilege in my book!); luckily there was no need for such drastic measures. I simply used some low-tack tape to mask off the bottom word before inking my stamp, removed the tape and stamped 'Christmas' then did the same in reverse and used my Stamp-a-ma-jig to add 'Wishes' alongside it.

Is It A Sprig? - I needed an embellishment to finish my card and immediately reached for the metal pieces in the Year of Cheer embellishments pot. The little stars speak for themselves, but the other design, the one that I used on my card today I'm not really sure what it is supposed to be - is it a foliage sprig perhaps? I think they look a little like a reindeer antler - hence my choosing it for my card today. What do you think - I'd love to hear your thoughts!

Here is the visual summary of the key products used on today's project for you to pin for easy reference:


You can see all of my 'How To' summaries on my 'How To - Tips and Techniques' Pinterest board in case you've missed any. 

Enjoy your day and I'll be back tomorrow with another project. Until then, happy stampin'!


Stampin' Up! Supplies Used:

Table built using Product Table Builder by The Crafty Owl - Independent Stampin' Up! Demonstrator.

Painted Harvest Christmas Wreath CAS Card

by Joanne James11. October 2017 20:51

Wednesday already?! Just time for a really quick share of another clean-and-simple Christmas Wreath using the Painted Harvest stamp set that I made with some ladies in a Christmas card class a couple of weeks ago:


Here's the low-down on today's card:

A Christmas Wreath - Today's Painted Harvest stamp set Christmas wreath uses the largest of the petal stamps, stamped once in Wild Wasabi then rotated through 180 degrees before inking and stamping again in Garden Green over the top. This gives a much fuller, more dimensional wreath than the one on Monday's card. I then used the small dot stamp to stamp my Real Red berries.

Painted Autumn - I added a narrow strip of Painted Autumn designer series paper to my card; I love that the reverse side of our papers often feature a more neutral design, such as these watercoloured stripes, that lend themselves to more than just autumn/fall projects. Some of the ladies in my class used the leafy pattern on the reverse of this strip and I must say that looked great too. I'm so happy the Painted Autumn papers are included in the 'buy 3, get 1 free' offer on designer series paper this month too - all the more reason to stock up!

Season's Greetings - Today's card features a big, bold sentiment from the 'Snowflake Sentiments' set, perfect for today's card and not a snowflake in sight!

Here is the visual summary of the key products used on today's project for you to pin for easy reference:


You can see all of my 'How To' summaries on my 'How To - Tips and Techniques' Pinterest board in case you've missed any. 

Hopefully I'll be back tomorrow with another project. Until then, happy stampin'!


Stampin' Up! Supplies Used:

Table built using Product Table Builder by The Crafty Owl - Independent Stampin' Up! Demonstrator.

Painted Harvest Christmas Wreath Card

by Joanne James9. October 2017 13:00


Happy Monday everyone! Today I'm sharing a card that is actually a Christmas card but uses the Painted Harvest stamp set - take a look:


Here's the low-down on today's card:

A Christmas Wreath - The Painted Harvest stamp set really is so versatile: stamped in festive green, either singly or using both stamps, it's easy to change the look from a sunflower to a Christmas wreath. You can then either use the small dot stamp to stamp your berries or a few Real Red enamel dots as I've done here; finish with a bow of Quilted Christmas ribbon and there you have it - a simple Christmas wreath. I am featuring the Painted Harvest bundle at my monthly stamp class on Monday 6th November; this is a popular class with space now limited. If you would like to join me to explore this stamp set, do get in touch and book your place before it's too late!

Gorgeous Gingham - I backed my stitched square with a panel of Gardden Green gingham, one of the patterns in the Quilted Christmas designer series paper. This 6" x 6" paper stack has some fabulous designs both for Christmas and beyond. I also backed my DSP with a piece of extra thick Whisper White for added stability. I'm partial to a nice gingham to add a classic touch to my projects and the stack includes a Real Red gingham too - gorgeous!

Merry Christmas - My teeny-tiny sentiment is stamped in red onto Whisper White so that the words are in relief - can you tell what stamp set it comes from though? You might be surprised - I cropped it from one of the banner stamps in the Brightly Lit Christmas stamp set. I've circled it on the image below:


This stamp set is one of those reduced by 15% to for World Card Making Day until tomorrow and will also feature in its bundle at my Brightly Lit Christmas class on Tuesday 24th October. You can find full details of my classes on my Facebook page or on my website here. The important thing is to always look at all the stamps in your collection - you may find the perfect sentiment in the most unexpected if places!

Here is the visual summary of the key products used on today's project for you to pin for easy reference:


You can see all of my 'How To' summaries on my 'How To - Tips and Techniques' Pinterest board in case you've missed any. 

Enjoy the rest of your day and I'll be back tomorrow with another project. Until then, happy stampin'!


Stampin' Up! Supplies Used:

Table built using Product Table Builder by The Crafty Owl - Independent Stampin' Up! Demonstrator.

Painted Harvest Sunflowers For The Paper Players #PP364

by Joanne James1. October 2017 09:00

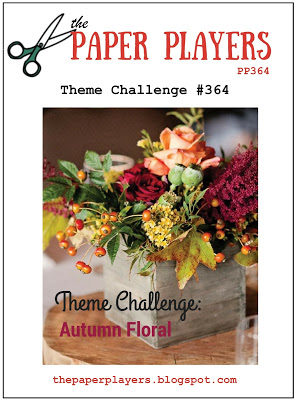
It's Sunday, the start of a new month and time for this week's new challenge over at The Paper Players! The queen of beautiful florals, the talented Sandy, is the hostess this week and her passion is reflected in her chosen theme this week:
 

I had the best of intentions of producing a fabulously over-the-top floral to honour the lovely Sandy today, but the last minute preparations for my stand at the Crafting Live Exhibition at Stoneleigh Park this weekend meant that my time rather ran away with me this week and instead I've resorted to sharing much more of a clean and simple card that I already had 'in the bag' as it were. Today's card uses one the runaway success bundles from the current seasonal catalogue - Painted Harvest. Take a look:
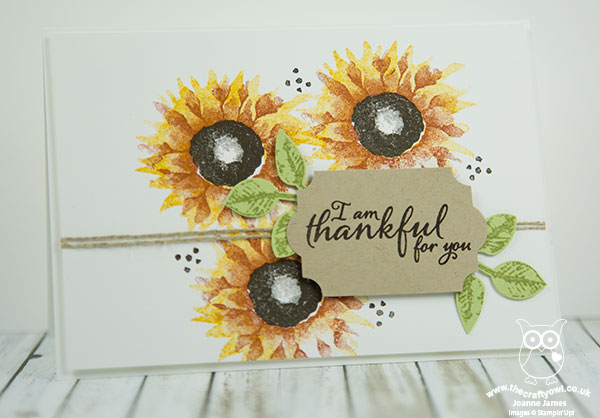
 

Here's the low-down on today's card:

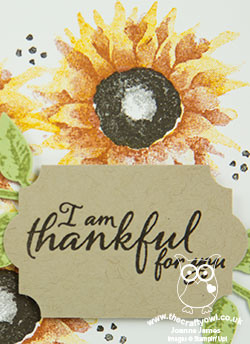
Painted Harvest - What can I say other than I LOVE these sunflowers! The sentiments in this set are lovely but it's the sunflowers that get me: it is a two-step stamp set that gives a beautiful watercoloured effect and as they are photopolymer it's so easy to stamp. They are so forgiving - they look great however you line them up! If you're a first-time stamper, this would be a great set to cut your teeth on. 

Add A Leaf - The leaves in the stamp set also match up with the leaf punch which is the other item that can be bought in the Painted Harvest bundle for a saving of 10% - that's why we all love a bundle!

Autumnal Colour Combinations - These sunflowers can be stamped in both traditional and less traditional colours; here is my sample board showing how they look stamped in a number of autumnal coloured floral combinations:
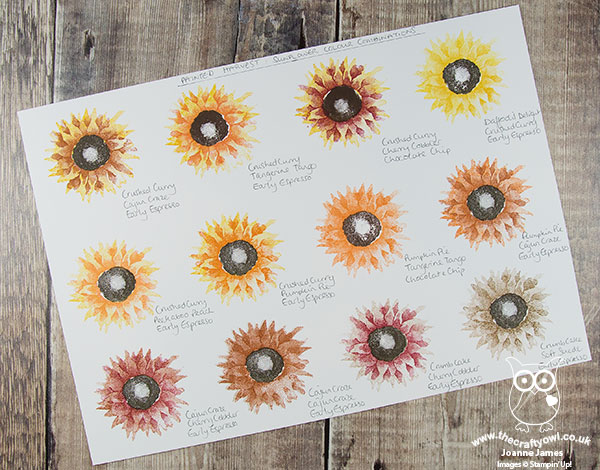
 

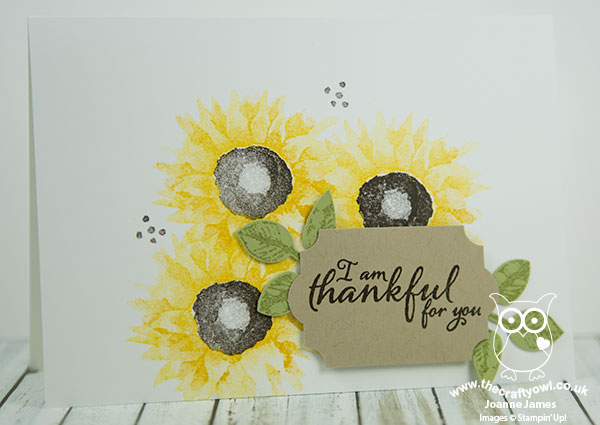
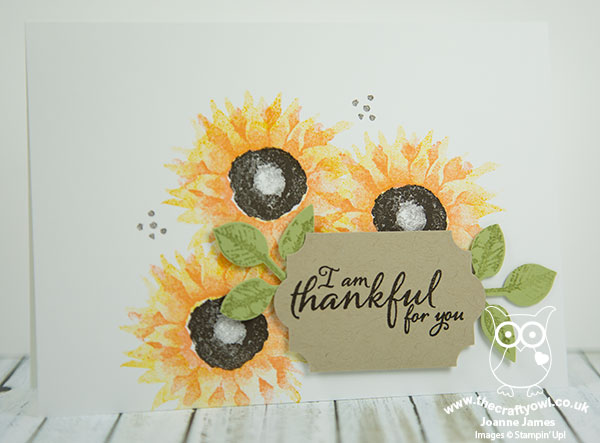
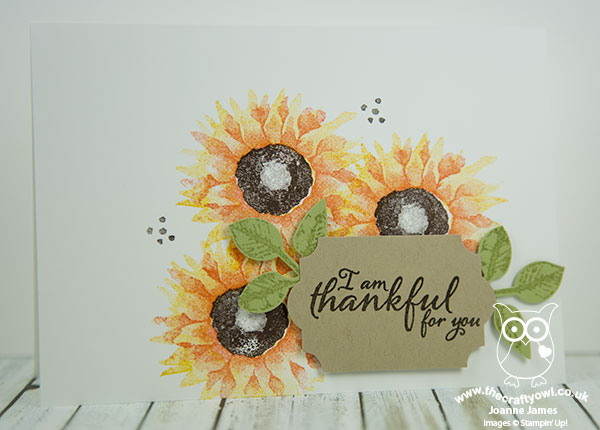
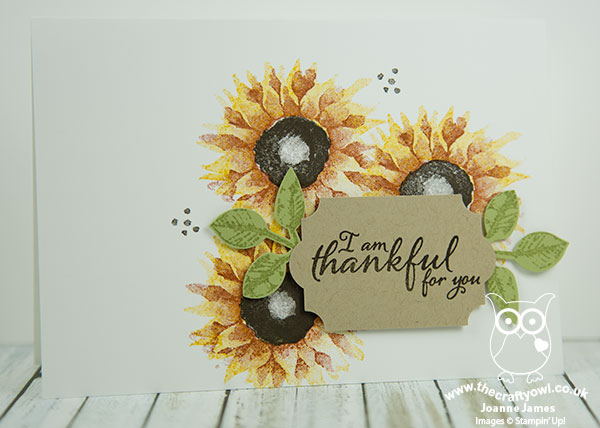
Which one is your favourite? I also made a whole bunch of these cards, minus the twine, to send out to my customers with my seasonal catalogues and as thank you cards to be included with my open house orders - here are some of them up close so you can see the colour combinations in more detail. 

This one is a combination of Crushed Curry and Daffodil Delight:
 

This one is a combination of Crushed Curry and Peekaboo Peach:
This one is a combination of Crushed Curry and Tangerine Tango:
This one is a combination of Crushed Curry and Cajun Craze:
Lastly my favourite of all, this one is a combination of Crushed Curry and Cherry Cobbler:
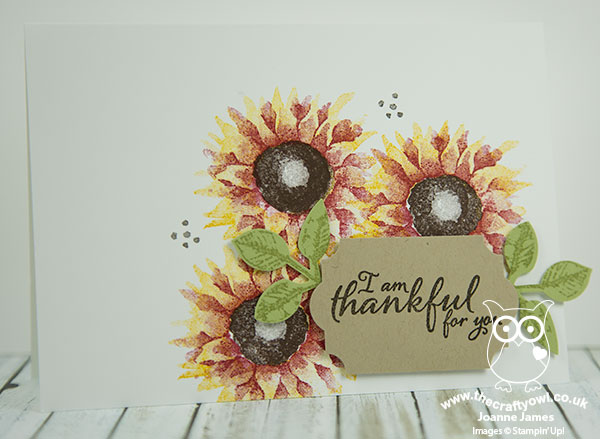
This is by no means an exhaustive set of colour combinations. Let me know in the comments below which ones are your favourites or what other combinations you've tried that you would like to share.  

Also, if you live local to me in or around Northampton, I have a class using this set scheduled for Monday 6th November - read more about it here or contact me to book your place! 

Here is the visual summary of the key products used on today's project for you to pin for easy reference:
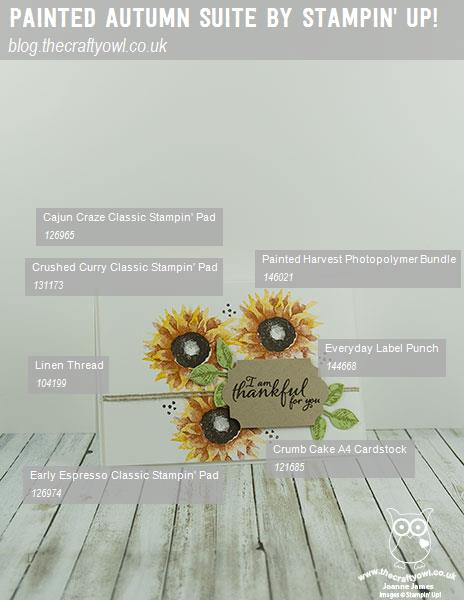
 

You can see all of my Product and 'How To' summaries on my 'How To - Tips and Techniques' Pinterest board in case you've missed any. 

Before you reach for your ink and papers, check out what our amazing team has created to inspire you this week:

The Paper Players Design Team
 
 
Here's a quick recap of our challenge rules:
 
1.  Create a new paper project
2.  Upload your creation to your blog with a link back to us and provide a direct link to the post featuring your challenge submission.
3.  Please link your card to no more than four challenges, TOTAL.
4.  Have FUN! 


I look forward to seeing what you create with this week's theme. Enjoy the rest of your weekend as it will be over all too quickly; I'll be spending a second day at the Crafting Live Show at Stoneleigh Park today - come and say hello to me on stand A10 if a visit is part of your weekend plans. I'll be back tomorrow with another project; until then, happy stampin'!


Stampin' Up! Supplies Used: 

Table built using Product Table Builder by The Crafty Owl - Independent Stampin' Up! Demonstrator.


High Tide Birthday Card For Dad #GDP103

by Joanne James6. September 2017 20:25

Good evening lovely readers! So today was the day that saw my precious James Juniors return to school - I got lots of work done, but boy was the house quiet! So we are about to return to our school routines and something close to normal working will resume. I've been busy making lots of Christmas samples in readiness for my open house on Friday however September is also a big birthday month for us, with several family members and friends celebrating birthdays (my good self included!) So today I'm sharing a card that I made for my Dad's birthday that fits perfectly with the theme over at the Global Design Project this week:

I decided to make a slightly larger card than usual as I wanted to be able to personalise it - take a look:


I decided to use the High Tide stamp set for my card - such a great set for masculine cards and one that you can use to make quite colourful masculine cards (they don't always have to be brown :-) ) I stamped my beach scene off to the left as I wanted it to act as something of a background for my sentiment, then paired the Happy Birthday from the 'Butterfly Basics' stamp set with my stamped and diecut 'DAD' - you know how much I love these letters and co-ordinating framelits! I'm not generally one for frills, especially on a masculine card, so pretty ribbon was a no-no for me, however I did add some burlap beneath my diecut letters for a little extra touch - I think it fits nicely with the beachy theme too.

If you like the High Tide set and live local to me, you might like to know that this is the set we will be using in one of my October Monthly Technique Classes - get in touch if you would like more information.

Here is the visual summary of the key products used on today's project for you to pin for easy reference:


You can see all of my 'How To' summaries on my 'How To - Tips and Techniques' Pinterest board in case you've missed any. 

I hope you enjoyed today's quick post; I'll be back tomorrow with another project. Until then, happy stampin'!


Stampin' Up! Supplies Used:

Table built using Product Table Builder by The Crafty Owl - Independent Stampin' Up! Demonstrator.

Colorful Seasons Winter Snowflakes Triple Stamping Babywipe Reinker Card

by Joanne James30. August 2017 05:00

The Bank Holiday is over and we are back to normality. I'm sharing another card from my recent technique class featuring the Colorful Seasons stamp set using the baby wipe technique, this time with a winter theme - take a look:


Here's the low-down on today's card:

Triple Stamping Technique - Today's card uses the same babywipe reinker technique that I shared with you yesterday, this time using the snowflake outline images and also incorporates another fun technique: triple stamping. This is where you stamp over several layers to create a dimensional image, or alternatively stamp over a single layer then cut your sheet into a central piece with two surrounding frames using your trimmer. Each stamped section is then layered with a solid coloured mat in between to add dimension to the image.

Seasonal Layers Snowflake - The co-ordinating Seasonal Layers Thinlits have a number of fun dies and today's card features one of the snowflakes, so incredibly detailed - check it out in the close up at the start of today's post. It makes a great focal point, this time with a glitter enamel dot as its centrepiece.

A Frosty Colour Combo - Today's colour combination is all about frosty, cold wintry days - here it is for you if you'd like to save it to use on your winter and Christmas projects:

Here is the visual summary of the key products used on today's project for you to pin for easy reference:


You can see all of my 'How To' summaries on my 'How To - Tips and Techniques' Pinterest board in case you've missed any. 

Enjoy your day and I'll be back tomorrow with another project from my class that also uses the baby wipe reinker technique. Until then, happy stampin'!


Stampin' Up! Supplies Used:

Table built using Product Table Builder by The Crafty Owl - Independent Stampin' Up! Demonstrator.

Colorful Seasons Autumn Leaves Babywipe Reinker Technique Card

by Joanne James28. August 2017 05:00

Today it's a Bank Holiday Monday here in the weekend and for once it looks as if the sun is going to shine - woohoo! I'm sharing a card from my recent technique class featuring the Colorful Seasons stamp set using a fun technique - take a look:


Here's the low-down on today's card:

Baby Wipe Technique - The Colorful Seasons stamp set has a great selection of solid and outline stamp images that work well with the babywipe reinker technique. This is where you create your own multi-coloured ink pad by adding a selection of colours to a baby wipe and then use this as your ink pad to create a variegated look. I used the technique with the small solid leaf stamp for my autumnal card - it reminds me of falling autumn leaves, which are often a mix of colours. 

Seasonal Layers Skeletal Leaf  - The co-ordinating Seasonal Layers Thinlits have a number of fun dies that include this gorgeous leaf, so incredibly detailed. It makes a great focal point, tied with a little linen thread and a decorative wooden heart (this one is retired but I've included the link below for the current version).

An Autumnal Colour Combo - This colour combination sums up the season for me - here it is for you if you'd like to save it to use on your autumn and fall projects:

Here is the visual summary of the key products used on today's project for you to pin for easy reference:


You can see all of my 'How To' summaries on my 'How To - Tips and Techniques' Pinterest board in case you've missed any. 

Enjoy your day and I'll be back tomorrow with another project from my class that also uses the baby wipe reinker technique. Until then, happy stampin'!


Stampin' Up! Supplies Used:

Table built using Product Table Builder by The Crafty Owl - Independent Stampin' Up! Demonstrator.

Beautiful Bouquet Three Ways From Simple to Stepped Up

by Joanne James4. August 2017 08:00

Happy Friday everyone! School holidays have got the better of me this week and with an all-day technique class too and pre-order of my seasonal goodies from the new Autumn-Winter catalogue, I've just not had the opportunity for blogging. I've plenty of makes to share with you though and today to thank you for your patience this week I thought I would show you not one, not two but three cards - another trio from simple to stepped up, this time featuring the Beautiful Bouquet Bundle that you can find on pages 92-93 of the 2017 Annual Stampin' Up! catalogue.

The Beautiful Bouquet stamp set has a wonderful collection of both florals and sentiments that are suitable for a wide variety of occasions and when paired with the co-ordinating Bouquet Bunch Framelits Dies can be used to make the most amazing 3D floral bouquets. The set really does offer something for every kind of crafter; I started out with the following basic colour combination and set to work:


Clean and Simple - Quick And Easy - If you're short on time or new to crafting, this set is great for a simple one layer card like this one:


All you need to do is take a sheet of Extra Thick Whisper White for your card base, stamp your stems and a few carefully chosen blooms directly onto the card front along with a sentiment of your choice, add a few rhinestones and your card is done. Bright colours that compliment each other and some contrasting flower centres really help this simple card to have a big impact.

Step It Up - If you have a bit more time and are feeling more adventurous, using a few extra tools and embellishments will allow you to 'step up' your card and create something with a little more depth and detail, whilst still relatively easy to make:


My second card follows the same basic layout as the first, however this time I've used the framelits to cut out the bow and the flower heads and popped them up on dimensionals, and some circle punches to punch out my sentiment and layer it onto some Berry Burst cardstock for extra pop. In addition to the rhinestones, I've added a little tab of Daffodil Delight Double-Stitched Ribbon to my sentiment circle for an extra touch.

Going For Gold - Stepped Up To The Max - If you have the time and want to really explore a wide range of techniques, tools and embellishments, it's possible to use the Beautiful Bouquet Bundle to create something really special:


My third card is a CASE of the card on page 93 of the Stampin' Up! catalogue and really goes to town: the framelits have been used to diecut the entire bouquet, having stamped the flower heads first, and layered onto some background-stamped squares cut with the Layering Squares Framelits and an embossed background (my card uses the retired Large Polka Dot TIEF but you could of course use the current Polka Dot Basics Textured Impressions Embossing Folder as per the catalogue sample). There are some additional colours, doilies, linen thread and a sprinkling of the gorgeous glitter enamel dots that really help to make this card something special.

Here are the visual summaries of the key products used on today's projects for you to pin for easy reference:


You can see all of my 'How To' summaries on my 'How To - Tips and Techniques' Pinterest board in case you've missed any. 

So which of the above cards is your favourite? Do leave me a comment below, I'd love to hear your thoughts. I love them all and as I have the bundle, like the fact that I can choose my style depending on how the mood - or in my case time available - takes me! I have a few more cards to share using this set, so stay tuned next week if florals are your thing.

Enjoy your day and I'll be back tomorrow with another project, quite possibly with something of a more seasonal nature. Until then, happy stampin'!


Stampin' Up! Supplies Used:

Table built using Product Table Builder by The Crafty Owl - Independent Stampin' Up! Demonstrator.

So In Love Concertina Wedding Card

by Joanne James25. May 2017 06:00

Today I'm sharing a card from this month's technique class which featured the So In Love bundle and the beautiful Falling In Love designer series paper - take a look:


 Here's the low-down on today's card:

So Detailed Thinlits - The main feature on the front of these cards is the pair of diecut panels cut using the Big Shot and the largest of the So Detailed Dies. They really are so beautiful! I backed them with some of the Falling In Love designer series paper - these papers have some lovely subtle images, some of them photographic, that make a perfect background for these detailed diecuts. Unfortunately both of these items are now sold out here in the UK - I love this card though and just had to share it so hopefully for those of you who already have these items this will still serve as useful inspiration.

So In Love - I used the So In Love stamp set to stamp my greeting on my label wrap and to decorate the inside of my card. This card is larger than usual at 6" square and opens in a concertina style - this really shows the diecuts off to full advantage. 

A New Favourite - Yes, it's here again - I used the Pretty Label Punch for my sentiment panel on the front of my card, backed with a pinched circle - can you tell how much I LOVE this new punch?!

This card is subtle in colour, using only Very Vanilla and Sahara Sand - perfect for a wedding that doesn't have a strong colour scheme. It would work well and could be adapted as an invitation too, so lots of creative possibilities and it really is the Big Shot that does all the work on this one (a die brush is essential to poke all those little pieces out cleanly!)

Here is the visual summary of the key products used on today's project for you to pin for easy reference:


You can see all of my 'How To' summaries on my 'How To - Tips and Techniques' Pinterest board in case you've missed any. 

Enjoy your day and I'll be back tomorrow with another project. Until then, happy stampin'!


Stampin' Up! Supplies Used:

Table built using Product Table Builder by The Crafty Owl - Independent Stampin' Up! Demonstrator.

Mini Catalogue

BROWSE THE CATALOGUE

The mini catalogue is now live! Read and download your copy here.

Shop Online

Access my online shop 24 x 7, 365 days of the year:

Current April hostess code:

VDKNV7BH

Shop Online

Join My Team

It's always a great time to join Stampin’ Up! New team members can get £130 worth of products for only £99 + free business supplies + free shipping + all the fun being a part of Stampin’ Up! Stampin' Up! has something for everyone: join my growing team and benefit from my support to enjoy Stampin' Up! however you choose.

If you're interested, call me for a chat to understand how I can help you realise your goals. Alternatively, if you have already decided to sign up and you just can't wait, please click here for the link to the online form where you can sign up and order your starter kit right away! 

Latest Kit!

Stampin Cut and Emboss

The Rock Legend Kit has all you need to make 8 cards with coordinating envelopes. Along with the new Panda Friends Kit, both are available from January 4th for just £14 each - get yours here!

2023-24 Annual Catalogue

BROWSE THE CATALOGUE

Click on the catalogue for a full list of current SU! supplies - if you would like to order any of the items featured, please drop me a line at [email protected] or give me a call on 07773 421446 - I'd be happy to help.

New Online Exclusives

There are new products available exclusively in the online store from 5 March - check them out here.

About Me

Hi I'm Joanne and live in Northampton and when I'm not looking after my husband and two beautiful children, am an avid crafter with a passion for all things Stampin' Up!

I must confess that I have never been a big rubber stamper - until I discovered Stampin' Up! that is. I love the fact that I can get such great results with co-ordinating stamps, inks, papers and punches - the possibilities are endless! Join me on my stamping journey as I share the things I love and be inspired to create amazing things yourself!

Follow Me

Monthly Newsletter

Box Builder

Click the button above to use Box Buster to create your custom box design using the Envelope Punch Board!

Kits Collection Now Available!

Stampin Cut and Emboss

The new Kits Collection from Stampin' Up! is now available!

Click here to see the current kits available and order yours online today.

I Design For


Stampin' Up Stuff

This is my personal blog and is not endorsed by Stampin’ Up! I hope you find it a plentiful source of ideas and personal inspiration but please don't copy my designs for contest submission or use for classes, publication or sale without express permission.