Santa's Sleigh Christmas Tree

by Joanne James2. September 2016 08:00

I'm popping my today with a quick card I made for this week's Mojo Monday challenge:

It's 'tall and skinny' week and I had the perfect idea for this week's layout - here's my card:


Here's the low-down on today's card:

Santa's Sleigh Tree - The long, skinny panel on the front of this card is perfect to showcase the Christmas tree in the Santa's Sleigh stamp set - a modern take on a traditional Nordic fir. I stamped mine as a simple outline in Emerald Envy onto extra thick Whisper White cardstock, and added my partially stamped sentiment from the same set, heat embossed in white onto Real Red cardstock, across the bottom.

Presents and Pinecones - I used a small panel of the new Presents and Pinecones designer series paper behind the tree, to tie the colours and panels of my cards together. It adds just enough interest to my otherwise clean and layered card.

Touches of Red - I used Real Red as the accent colour on my card today: the background banner, the sentiment strip, the berries on the DSP and the enamel star on top of my tree. I think it really adds to the festive feel. What's more, the enamel shapes are one of this week's special offers - so a great time to stock up!

Here is the visual summary of the key products used on today's project for you to pin for easy reference:


You can see all of my 'How To' summaries on my 'How To - Tips and Techniques' Pinterest board in case you've missed any. 

Back tomorrow with another project; until then, happy stampin'!


Stampin' Up! Supplies Used:

Table built using Product Table Builder by The Crafty Owl - Independent Stampin' Up! Demonstrator.

The New Stampin' Up! Autumn Winter Seasonal Catalogue is here!

by Joanne James1. September 2016 07:00

Happy 1st September everyone! Yes, this day has finally arrived! The new Autumn-Winter Seasonal Catalogue is here - you can download an electronic copy by clicking on the image below:

 HolidayPreOrder_DemoSite_CatalogPage_UK

There will of course be a permanent link to the catalogue in the box on the right side of my blog page until 3rd January when it ends. I've already shared lots of sneak peeks and there is so much more to come! For today, put your feet up and browse the new catalogue in all its glory.

Please feel free to contact me with any questions or queries. Don't forget to use this month's hostess code 2WMJYVKH if you are placing an order online to receive an extra thank you from me.

And there's more good news! Between now and the 21 September, each week there will be a range of special offers with selected annual catalogue items available at 25% off for one week only. Here are the first set of deals, starting today and running until 7th September:


Back soon with more creative inspiration for you. Until then, happy browsing and get writing that wish list!

Tags: , , , , , ,

Cards | Catalogues | Shop Online | Stamping

In Colour Perfect Pines Christmas Card

by Joanne James29. August 2016 19:00

We've had a Bank Holiday here in the UK today - not only a long weekend, but the sun has shone all day too! I spent my morning sewing name labels in new school uniform for the James juniors (I have the needle pricks to prove it - ouch!) then a pleasant afternoon outside and a little crafting time too. Today I have a card I made for the current challenge over at Fab Friday, where the challenge is to make a card that uses each of this year's new in-colours:

I decided to have a go at an in-colour Christmas card that used all five colours. Take a look at what I came up with: 


Here's the low-down on today's card:

Perfect Pines Christmas Tree - I cropped my Christmas tree with the Perfect Pines framelits. This set featured in last year's holiday catalogue and I was thrilled to see it carried forward into the annual catalogue. I love all of this year's in colours, however they aren't designed to be used as a set. So a word of caution - to prevent visual overload, it makes sense to choose one or two colours to focus on and allow the others to have a supporting role. Preserve white space too! I decided that Emerald Envy would be the main colour on my card, with Dapper Denim also providing some border colour and then the three lighter colours used sparingly elsewhere on my card.

Colour Blocked Fairy Lights - The simple appearance of this card belies how tricky it actually was to create. Why, you ask? Well, I had this idea that I would use the framelit to cut out strings of lights on my Christmas tree and place strips of cardstock behind. I wanted to ensure that each light was a single colour and that you couldn't see the joins between the coloured strips through the gaps. After much fussing and fiddling with my layout, I eventually worked out how to achieve the look I was after: I increased the height of each coloured strip by 1mm as I progressed down the tree, starting at 5mm and finishing at 10mm. I also cut away the top two strips so that only one of each of the colours could be seen extending beyond the tree across the card front. So easy when you know how - and yes, you are welcome!

Enamel Star - the only other things I added to my card were my greeting from the new Merriest Wishes stamp set and a Sweet Sugarplum enamel star that I added to the top of my tree. Love these enamel shapes in every colour!

Here is the visual summary of the key products used on today's project for you to pin for easy reference:


You can see all of my 'How To' summaries on my 'How To - Tips and Techniques' Pinterest board in case you've missed any. 

Back tomorrow with another project; until then, happy stampin'!


Stampin' Up! Supplies Used:

Table built using Product Table Builder by The Crafty Owl - Independent Stampin' Up! Demonstrator.

A Candy Cane Christmas Sneak Peek

by Joanne James24. August 2016 07:01

I have another Christmas card to share today, using this week's sketch over at CAS(E) This Sketch and some scrummy new product as my inspiration:

Here's my card:


Here's the low-down on today's card:

Candy Cane Lane - The new Candy Cane Lane Designer Series Paper was the inspiration for my card today. This pack has some great festive patterns in red, white, Crumb Cake and Early Espresso, with everything from candy canes to gingerbread. I used one of the designs for my main DSP panel and fussy cut a trio of the shapes and popped them on dimensionals for the triangle elements of the sketch.

A Sweet Season - My sentiment comes from the co-ordinating 'Candy Cane Christmas' stamp set, which contains a few sentiments and is great for tags and treat packaging. I stamped it in Versamark and heat embossed it in white onto my Real Red card base.

Candy Cane Twine - To finish, I added some candy cane baker's twine - this twine is white with a red metallic twist - and tied in a sweet bow.

More festive loveliness and a great sketch - the paper does all the hard work on this one!

Here is the visual summary of the key products used on today's project for you to pin for easy reference:


You can see all of my 'How To' summaries on my 'How To - Tips and Techniques' Pinterest board in case you've missed any. 

The sun is shining here in the UK - we are off to the park for the day with a picnic. Back tomorrow with this week's challenge over at Create With Connie and Mary; until then, happy stampin'!


Stampin' Up! Supplies Used:

Table built using Product Table Builder by The Crafty Owl - Independent Stampin' Up! Demonstrator.

Copper Star of Light Christmas Card

by Joanne James23. August 2016 15:33

Happy Tuesday everyone! It's Christmas in the house today and I have another festive 'sneak peek' for you from the forthcoming Autumn-Winter catalogue using this week's sketch over at Just Add Ink:

Before I share my card, I'd just like to give the lovely ladies over at Just Add Ink a quick shout out for choosing my light-up firefly card as their top pick a couple of weeks ago (you can see that card here if you missed it) - thank you ladies! This week they have a sketch - and you all know how much I love a good sketch! I took this one fairly literally - take a look:


Here's the low-down on today's card:

Star of Light - The stamps used on today's card all come from the Star of Light set in the forthcoming autumn-winter catalogue. This is a set full of stars and some beautiful sentiments and sayings and the detail lends itself beautifully to a heat embossed finish. Just check out the intricate pattern on that large die cut star! I chose a simple colour combination of copper and Island Indigo for today's card - the two colours compliment each other beautifully.

Copper Foil - There's another new product on this card: the gorgeous new copper foil that I used to die cut a couple of stars from to compliment my larger stamped one. I used the co-ordinating Starlight Thinlit Dies and my Big Shot to cut out all of the stars on today's card; they are part of a 'bundle and save' offer with the Star of Light stamp set - bonus!

Textured Border - I could have used more of the copper foil for my mat layer, but instead decided I wanted more texture. I simply sponged the edge of my cardstock with Versamark and then heat embossed using copper embossing powder to give a textured finish, and did the same to the piece that backs my sentiment banner.

Isn't it lovely? All copper and sparkly!

Here is the visual summary of the key products used on today's project for you to pin for easy reference:


You can see all of my 'How To' summaries on my 'How To - Tips and Techniques' Pinterest board in case you've missed any. 

I have a class scheduled featuring this set on 10th October; if you live in or around Northampton and would like to join me, please get in touch to book your place.

That's all from me today; back tomorrow with another Christmas card; until then, happy stampin'!


Stampin' Up! Supplies Used:

Table built using Product Table Builder by The Crafty Owl - Independent Stampin' Up! Demonstrator.

Cookie Cutter Christmas Eskimo Sneak Peek

by Joanne James18. August 2016 08:05

I've had a few blog-free days this week; we are in thick of the summer holidays and I've been spending time with the James Juniors, meeting up with friends, cooking and cycling and more. Crafting time has been limited and blogging time even less so, but I'm not complaining! We've been having fun and enjoying the sunshine and I'm sure that those of you out there in a similar situation understand completely! That said, today it's time for a new challenge over at Create With Connie and Mary and this week we have a colour combination for you:


I also used this week's sketch over at Retrosketches for my layout. I was so tempted to create a Foxy Friends card, given that these colours all appear in the A Little Foxy DSP stack; instead though, I used this paper and broke out one of my preorder Christmas stamps - wahoo! - to make my first card using my new goodies. Here's my card:


How cute is that little chap?! Here's the low-down on today's card:

Cookie Cutter Eskimo - This cute eskimo comes from the Cookie Cutter Christmas stamp set which is part of a bundle with the co-ordinating Cookie Cutter Builder Punch. He comes with a santa, gingerbread man, reindeer and teddy bear too but for today I thought he would look great on my card in his Pool Party outfit with Calypso Coral shoes. It's tricky to see, but I also added a liberal dose of clear Wink of Stella to his fur trim which gives it a lovely shimmer. The sentiment is perfect too: it carries on to the inside of the card with 'warm heartfelt greetings for a very merry Christmas'.

A Little Foxy For The Festive Season - I used two of the papers from the A Little Foxy DSP stack for the layered panels on my card. This is such a versatile pack with lots of great patterns that work all year round, Christmas included!

A Little Sparkle And Shine -  As my card was for Christmas, I took the opportunity to add some touches of silver for a little festive sparkle: a small silver metallic doily behind my eskimo, some silver metallic thread, a liberal sprinkling of rhinestones. Well, if you can't add some sparkle at Christmas when can you add it?!

Here is the visual summary of the key products used on today's project for you to pin for easy reference:


You can see all of my 'How To' summaries on my 'How To - Tips and Techniques' Pinterest board in case you've missed any. 

You only have to wait until the 1st of September before you can order this little chap and lots of other goodies from the seasonal catalogue - not long now! If you can't wait, talk to me about joining my team - you are able to order items from the new catalogue immediately as part of your starter kit. I am currently preparing my catalogues to be sent out to my customers; if you don't currently have a demonstrator and would like a copy of the new Autumn Winter catalogue, get in touch with me and I can add you to my list.

Do visit the other Design Team members to see what they did with this week's colours; there's lots of inspiration over on their blogs too!

Enjoy your day and I'll be back tomorrow with another project; until then, happy stampin'!


Stampin' Up! Supplies Used:

Table built using Product Table Builder by The Crafty Owl - Independent Stampin' Up! Demonstrator.

Perfect Pines This Christmas

by Joanne James27. July 2016 12:00

I'm a little later posting today - I blame trying to catch up with my latest favourite TV drama last night (The Catch - if you want to check it out - I'm addicted!) Anyways, 152 days until the big 'C' day - it must be time for Christmas in July! Lots of card makers start preparing for Christmas at this time of year, in addition to which us lucky Stampin' Up! demonstrators get to see and pre-order from the new Stampin' Up! Autumn Winter catalogue - which if you're a customer you have to wait until 2nd September for! I've seen some sneak peeks and can assure you there are some new products that you are going to LOVE!!!!

If you would like to get ahead of the curve and be able to see and order these products before everyone else, do get in touch to find out more about joining my team. In the meantime, I thought I would make a card for this week's colour challenge over at Fab Friday, where although a Christmas card is not compulsory the colour scheme this week is certainly festive:

For my card today I decided to go with the new Christmas papers in the annual catalogue and one of the carryover Christmas sets, Perfect Pines to create a simple holiday card:


Here's the low-down on today's card:

More For You This Christmas - At Stampin' Up! we do Christmas all year round however in your excitement to see everything in the new Annual Catalogue you might have missed a key detail about the new This Christmas Specialty Designer Series Paper: like the now retired Typeset Specialty Designer Series Paper, This Chrismas is printed in lightweight paper - similar to a newspaper print. As a result, you also get 4 sheets of each of the 6 designs in the pack, so 24 sheets in total as opposed to 12 - bonus!

Double-Up - Because the This Christmas paper is not a thick paper, it's tricky to pop up on dimensionals if it's not backed with something thicker. I wanted to be able to tie my baker's twine around my DSP layer, so in order to make it more sturdy, I backed it with a piece of extra thick Whisper White that was the same size, by simply gluing together. Easy! 

Paper-Pieced Perfect Pines - I decided to use one of the Perfect Pines Christmas trees to act as both sentiment and focal point on my card today. I stamped my tree in Garden Green and cut it out with the co-ordinating framelits, then stamped it again in Cherry Cobbler on some scrap cardstock and fussy cut the banner so that I could add the tiniest paper-pieced detail to my tree. This, in addition to a gold metallic enamel star, a sliver of gold glimmer paper and some split Cherry Cobbler baker's twine (I divided the twine into three so that it would add less bulk to my card) complete today's festive masterpiece (even if I say so myself!!) 

One more for the Christmas pile - I guess that means I'm in danger of appearing organised, right? 

Here is the visual summary of the key products used on today's project for you to pin for easy reference:


You can see all of my 'How To' summaries on my 'How To - Tips and Techniques' Pinterest board in case you've missed any. 

I have a rare child-free day today, so I am making the most of it to get through a chunk of activities on my growing 'to do' list. Enjoy your day and I'll be back tomorrow with another project; until then, happy stampin'!

Stampin' Up! Supplies Used: 

Table built using Product Table Builder by The Crafty Owl - Independent Stampin' Up! Demonstrator.

A Little Foxy Festive Reindeer

by Joanne James3. July 2016 09:00

It's been a busy week with blogging every other day I'm afraid as there is just so much happening in the James household. Rebecca gave a sterling performance as Dorothy in the Wizard of Oz on Thursday and whilst Friday evening was a relatively quiet one, I did not manage a post! Yesterday I did manage to finish my preparations for next week's classes and make a few more cards, so onwards and upwards as the saying goes! 

Today it's Sunday and time for a new challenge over at The Paper Players! It's the turn of the lovely Sandy to host this week and she has a festive themed challenge for us to play along with:


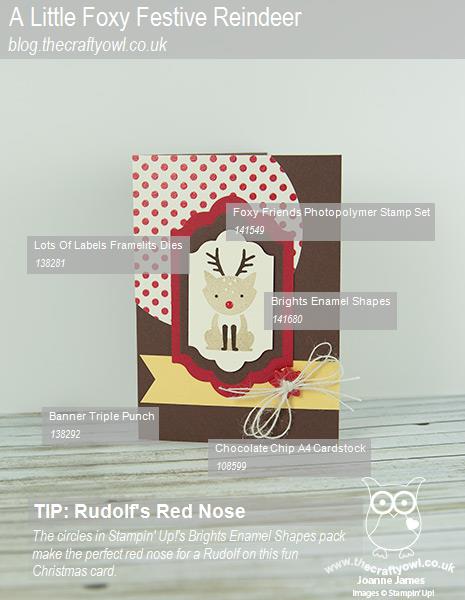
Christmas in July - now that is what I call organised! For my card this week I decided to use my Foxy Friends bundle again - this time to create a cute reindeer for my Christmas card. I also used this week's Mojo Monday sketch and the Color Throwdown colour palette for my creation:


Here's the low-down on today's card:

A Little Foxy Festive Reindeer - As I mentioned last week, the 'Foxy Friends' stamp set makes all kinds of cute baby critters and woodland animals - including a festive reindeer. Aren't those little antlers just adorable?

Lots of Labels - I decided to frame my stamped reindeer with a double mat in Real Red and Chocolate Chip using the Lots of Labels framelits. These framelits are great for layering and create a little more interest than a standard rectangle.

Red-Nosed Rudolf - I have used a number of retired products on my card today: the red button, the circle framelits to cut the background circle and the paper that I used for it (it's so vintage I don't even remember its name!) but since the background paper has a lovely glittery red polka dot pattern, I decided I did need to use one of my new favourite embellishments to finish my card in style: a Real Red Enamel Shape circle - the perfect finishing touch for my reindeer's nose!

I just love the versatility of this stamp set; that coupled with my first Christmas card of the year I think makes this a worthy card! Here is the visual summary of the key products used on today's project for you to pin for easy reference:


You can see all of my 'How To' summaries on my 'How To - Tips and Techniques' Pinterest board in case you've missed any. 

Before you reach for your ink and papers, check out what our amazing team has created to inspire you this week:

The Paper Players Design Team
 
 
Here's a quick recap of our challenge rules:
 
1.  Create a new paper project
2.  Upload your creation to your blog with a link back to us and provide a direct link to the post featuring your challenge submission.
3.  Please link your card to no more than four challenges, TOTAL.
4.  Have FUN! 

I look forward to seeing your Christmas creations in the gallery this week.

It is another big day in the James household today: Ben was selected for the Northamptonshire county allstars under-10s basketball team and he has his first match against Oxfordshire this afternoon. It's a big deal as he is one of only 12 children selected across the whole of the county - and we are all going to cheer him on for his match. Wish him luck!

Back tomorrow with another project; until then, happy stampin'!


Stampin' Up! Supplies Used:

Table built using Product Table Builder by The Crafty Owl - Independent Stampin' Up! Demonstrator.

Merry Moments Plaid CAS Christmas Card

by Joanne James3. May 2016 13:32

Everyone is back to school and work today so the house is quiet once more. I do love a long weekend, but if we had them all the time I guess we wouldn't appreciate them! Now don't worry, I've not gone mad - it's true, I have made a Christmas card today!! Today's card is for a few challenges and Christmas just seemed a good way to go!


The code word at Addicted to CAS is 'Plaid' which always makes me think of Christmas and the sketch over at CAS(E) This Sketch reminded me of ribbon around a gift and I knew it would be a perfect way to feature designer paper on my card yet still allow for lots of white space to suit the Less Is More challenge this week. So that is how Christmas was where I ended up: 

So here's the low-down on today's card:

Merry Moments - There are two plaid patterns in the Merry Moments designer series paper collection: one is predominantly Mossy Meadow in colour with a white plaid pattern, the other is the one I used here with a white base and a red, grey and green plaid. I chose this one because although it has more colours in the mix, the white base makes it very light and so it is the perfect base for my CAS card. I aligned the horizontal diagonal of my paper with the open cut space of the sketch, as opposed to the vertical. This creates more cohesion and leads the eye to the sentiment. 

A Christmas Sentiment - I chose to use a sentiment from the Embellished Ornaments stamp set for my card. This is a Christmas set that is on carryover and has two of my favourite festive sentiments. I stamped it in Mossy Meadow and added a Perfect Accent, coloured red with my Sharpie, for extra festive feel.

White Space - The sketch layout I've used today really lends itself to 'white space'. I've talked about what makes a clean and simple card before and how to use 'white space' - you can read more about that here. Clean and simple designs do not always have to contain truly 'white' space, but they rarely use pattern in large quantities.

So Christmas as Summer approaches, yet my card uses products that are available in the annual catalogue all year round, so if being prepared is your thing you might want to join me and make one too!

Here's the visual summary of the key supplies used to make this card for you to save for future reference:


You can see all of my 'How To' summaries on my 'How To - Tips and Techniques' Pinterest board in case you've missed any. 

That's all from me today; a basket of ironing awaits! I'll be back tomorrow with another project; until then, happy stampin'!


Stampin' Up! Supplies Used: 

Table built using Product Table Builder by The Crafty Owl - Independent Stampin' Up! Demonstrator.

Sleigh Ride Edgelits Christmas Ornament with Salt Technique Background

by Joanne James20. December 2015 21:29

It's Sunday and whilst there is no Paper Players post from me today - we are taking a couple of weeks off from our design commitments to enjoy the festive season with our families - however fear not - as promised I still have a project to share with you today! 

My December technique classes featured creating backgrounds with the salt technique. I had created the following pair of cards cased from the lovely Jen Timko just for fun:

I just loved the white, layering and beautiful and unique sky created using this fun technique:


You can see Jen's card and a great video on the technique here. In my class we made a similar card using the 'Jingle All the Way' stamp set but the real focus of our class was a 3 dimensional Christmas bauble ornament and a co-ordinating box to gift it in, all featuring backgrounds made using this technique. Here is my finished bauble:

This bauble is quite stunning in real life; the layering, silver foil and embossing and dazzling diamonds glimmer paper, along with that amazing sky, really show the Sleigh Ride Edgelits off to full advantage. I'm so sorry that these will not be carried over on 4th January; if you haven't already purchased them, place your order now before it's too late!

Back soon with another project; until then, happy stampin'!


Stampin' Up! Supplies Used:

Table built using Product Table Builder by The Crafty Owl - Independent Stampin' Up! Demonstrator.


Mini Catalogue

BROWSE THE CATALOGUE

The mini catalogue is now live! Read and download your copy here.

Shop Online

Access my online shop 24 x 7, 365 days of the year:

Current April hostess code:

VDKNV7BH

Shop Online

Join My Team

It's always a great time to join Stampin’ Up! New team members can get £130 worth of products for only £99 + free business supplies + free shipping + all the fun being a part of Stampin’ Up! Stampin' Up! has something for everyone: join my growing team and benefit from my support to enjoy Stampin' Up! however you choose.

If you're interested, call me for a chat to understand how I can help you realise your goals. Alternatively, if you have already decided to sign up and you just can't wait, please click here for the link to the online form where you can sign up and order your starter kit right away! 

Latest Kit!

Stampin Cut and Emboss

The Rock Legend Kit has all you need to make 8 cards with coordinating envelopes. Along with the new Panda Friends Kit, both are available from January 4th for just £14 each - get yours here!

2023-24 Annual Catalogue

BROWSE THE CATALOGUE

Click on the catalogue for a full list of current SU! supplies - if you would like to order any of the items featured, please drop me a line at [email protected] or give me a call on 07773 421446 - I'd be happy to help.

New Online Exclusives

There are new products available exclusively in the online store from 5 March - check them out here.

About Me

Hi I'm Joanne and live in Northampton and when I'm not looking after my husband and two beautiful children, am an avid crafter with a passion for all things Stampin' Up!

I must confess that I have never been a big rubber stamper - until I discovered Stampin' Up! that is. I love the fact that I can get such great results with co-ordinating stamps, inks, papers and punches - the possibilities are endless! Join me on my stamping journey as I share the things I love and be inspired to create amazing things yourself!

Follow Me

Monthly Newsletter

Box Builder

Click the button above to use Box Buster to create your custom box design using the Envelope Punch Board!

Kits Collection Now Available!

Stampin Cut and Emboss

The new Kits Collection from Stampin' Up! is now available!

Click here to see the current kits available and order yours online today.

I Design For


Stampin' Up Stuff

This is my personal blog and is not endorsed by Stampin’ Up! I hope you find it a plentiful source of ideas and personal inspiration but please don't copy my designs for contest submission or use for classes, publication or sale without express permission.