Double-Embossed Feathers and Frost Christmas Card

by Joanne James18. September 2018 07:00

Today I'm sharing a card for this week's challenge over at Just Add Ink where the team have my favourite kind of challenge - a sketch!

I initially thought I would replace the diamond shape in the centre with a circular wreath, until I was browsing my stamp sets and realised it would work perfectly with the foliage square in Feathers and Frost, so I set to work. Here's what I came up with:


 Here's the low-down on today's card:

Double-Embossing - I decided to heat emboss my leaves and sentiment on my card with silver embossing powder for some festive sparkle, adding a little more colour with my light Smoky Slate Blend pen, and also added some dry embossing to my white card base with the Layered Leaves dynamic embossing folder. Whilst this isn't especially Christmassy and is also quite difficult to see on the photograph, I love the extra texture and interest that it adds. 

Layered Shapes and Lots of Berries - I added a fussy-cut poinsetta from the same set to the centre of my leaves and coloured it with my Real Red Blends. I decided to use Real Red as an accent colour on my card, both in my layered mats and the many red rhinestones I used as berries. Yes, I used a ton of these sparkly beauties, however I wanted something more than flat colour and love the way they catch the light. Besides, there are 220 in a single pack - so plenty to go around!

Not Just Joy - I used the word 'Joy' as the circular element on the front of my card and completed my sentiment with two more sentiments from the set inside my card:


Here is the visual summary of the key products used on today's project for you to pin for easy reference:


You can see all of my 'How To' summaries on my 'How To - Tips and Techniques' Pinterest board in case you've missed any. 

Enjoy your day and I'll be back tomorrow with another project. Until then, happy stampin'!


Stampin' Up! Supplies Used:

Table built using Product Table Builder by The Crafty Owl - Independent Stampin' Up! Demonstrator.

All Is Bright Paper Clip CAS Monochromatic Christmas Card

by Joanne James31. August 2018 07:00

Before I get into my creative post today, I just wanted to remind you that we are nearing the end of the month so today is the final day to take advantage of this month's offers: a free bonus coupon for every £45 spend, redeemable against next month's purchases, and also the limited time Blended Seasons bundle and the second colour assortment pack of watercolor pencils. You can read more about both of these offers here and here.

Don't forget to check out my Creative Escapes Luxury Weekend Creative Retreats post as well - the Bank Holiday booking offer ends today too!

Today I'm sharing a card for the current challenge over at Less Is More where they have a great sketch challenge: 


I haven't managed to play along with these ladies for ages (even though they are now running fortnightly challenges which does make it easier - thank you ladies!) but I had a great clean and simple idea for a Christmas card using this sketch - take a look:


Here's the low-down on today's card:

Four Stitched Squares - There are lots of ways that you could interpret the squares in the sketch; they could be quarters of a whole, or individual entities. I decided that they would be four individual stitched squares, to form a base for my main decoration. 

Take A Paperclip ... or 4 - Another new Autumn-Winter catalogue product are the All is Bright Paper Clips - a collection of gold star and tree-shaped paper clips to accent your festive cards and packaging. I used them as the main decoration on my card today - so simple! I must confess I have a ton of shaped paper clips in my collection - I think I might be making a few more of these cards in different colourways to use some of my paperclip stash up!

Keeping it CAS - I stamped my sentiment and heat embossed it in gold directly onto the base of my card and decided to keep my card base and stitched squares all the same colour to maintain a clean and simple feel. My 'white space' today is of course green - Call Me Clover, the new in-colour green, to be precise. A nice Christmas Tree green and the gold and green combo is a winning festive double act in my book!

Here is the visual summary of the key products used on today's project for you to pin for easy reference:


You can see all of my 'How To' summaries on my 'How To - Tips and Techniques' Pinterest board in case you've missed any. 

Following a visit to a maze yesterday and some overnight camping, we are off to enjoy some watersports and crazy golf today since we are forecast a fine and sunny day. Enjoy your day and I'll be back tomorrow with another project. Until then, happy stampin'!


Stampin' Up! Supplies Used:

Table built using Product Table Builder by The Crafty Owl - Independent Stampin' Up! Demonstrator.

Christmas Wishes From A Skating Spirited Snowman

by Joanne James30. August 2018 08:00

Before I get into my creative post today, I just wanted to remind you that we are nearing the end of the month so you have just two more days to take advantage of this month's offers: a free bonus coupon for every £45 spend, redeemable against next month's purchases, and also the limited time Blended Seasons bundle and the second colour assortment pack of watercolor pencils. You can read more about both of these offers here and here.

Check out this post with details on my Creative Escapes Luxury Weekend Retreats too - you have until the end of the week to take advantage of my Bank Holiday booking offer for my next weekend in October!

A day off yesterday as we had a family day out at the Black Country Museum (a fun visit if you're in the UK and never been - lots of fun interactive history) and I needed to give the first episode of the Great British Bake Off my undivided attention yesterday evening (more on that later!) but I'm back with you today and I'm sharing a card using this week's CAS(E) This Sketch and the current bright colour palette over at Inspire.Create for a fun Christmas card:


This another of those great sketches that can be used in lots of different ways with the sentiment diecuts that I love - although I did need to rotate my card base through 90 degrees and go 'long and thin' to fit everything in! Take a look:


Here's the low-down on today's card:

Merry Christmas Thinlits - Today is the turn of the 'Christmas' thinlit to feature, stamped with a 'merry' for good measure; these dies are going to get a full work out this season, I think they are just great! I love that with the co-ordinating bundled stamp set, there are so many sentiment combinations you can make; this is absolutely a 'go-to' set for me this Christmas.

Spirited Snowman - I liked the 'object' at the end of the sentiment on the sketch and thought the little skating snowman from the new Spirited Snowmen set would fit perfectly and look as if he was almost skating the sentiment into the ice. I decided to heat emboss the snowman and an array of snowflakes from the same set across the top of my card, so that the white elements, i.e. the snow, would be white against my sponged background. I must confess whilst this looks great in white in real life, especially with the sparkle of the Wink of Stella on the snowman, the snowman loses some of his definition in white when photographed. In hindsight silver might have been a better choice - or maybe a little added definition to the body of the snowman with my Blends; something to play around with on version 2!

Unconventional Brights For Christmas - You could have looked at the Inspire.Create colour challenge colours this week and be forgiven for thinking that a Christmas card would not come immediately to mind with these bright colours; I actually thought they would be perfect for a sponge-brayered sky and his bright woollen scarf and hat combo. Once I'd stamped the snowman onto my cardfront, I stamped him again onto a post-it note and cut it out to create a mask so that I could brayer my Bermuda Bay sky, whilst keeping my snowman white. I then coloured the rest of my Snowman with my Blends/Blendabilities/Stampin' Write Markers. I did stick to the colour palette along with a smidge of black and grey neutrals, save one exception - I used orange for the snowman's carrot nose. I'm not sure any other colour would do so I hope I'll be forgiven this departure! Lastly, I painted my snowman liberally with Clear Wink of Stella; difficult to see on the photo, but so pretty in real life.

Here is the visual summary of the key products used on today's project for you to pin for easy reference:


You can see all of my 'How To' summaries on my 'How To - Tips and Techniques' Pinterest board in case you've missed any. 

So what do you think - do these unconventional brights work on today's Christmas card? Do leave me a comment below - I would love to hear your thoughts.

Enjoy the rest of your day; the James Juniors are currently in the kitchen baking homemade wagon wheel biscuits, having been inspired by the technical challenge on last night's Great British Bake Off - I'll let you know tomorrow how they turned out when I'll be back with another project! Until then, happy stampin'!

I typed this post up last night but am finally going live this morning - I will share the wagon wheels tomorrow! 

Stampin' Up! Supplies Used:

Table built using Product Table Builder by The Crafty Owl - Independent Stampin' Up! Demonstrator.

A Trio Of Festive Sneak Peeks For The Paper Players PP407

by Joanne James26. August 2018 09:00

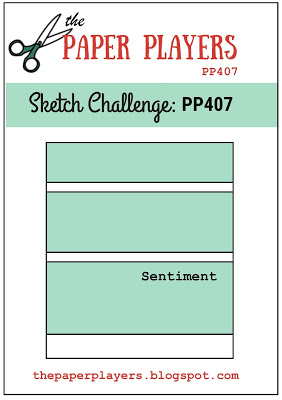
Today it's Sunday and time for this week's new challenge over at The Paper Players! It's the turn of the fabulously creative Jaydee to host this week and she has my favourite, a sketch challenge, for you to work with:


I just love this sketch and could have used it a hundred times over (thanks Jaydee!) and in fact I actually used it to make 6 cards in one sitting, two sets of three cards each, all featuring fabulous new products from the forthcoming Autumn-Winter catalogue and I'm going to share one of those sets with you today.

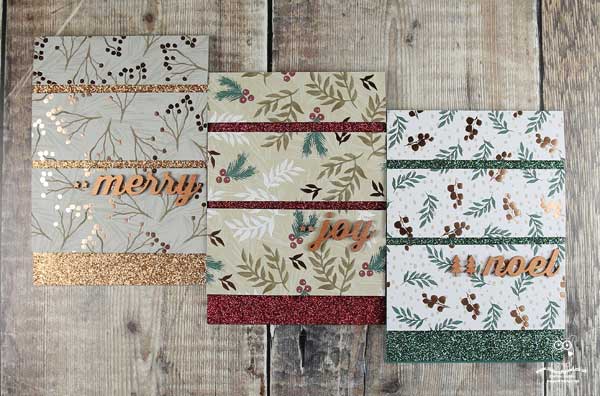
My cards focus on some of the fabulous products in one of my favourite new festive suites; here are the three cards I'm sharing with you today:


Here's the low-down on today's cards:

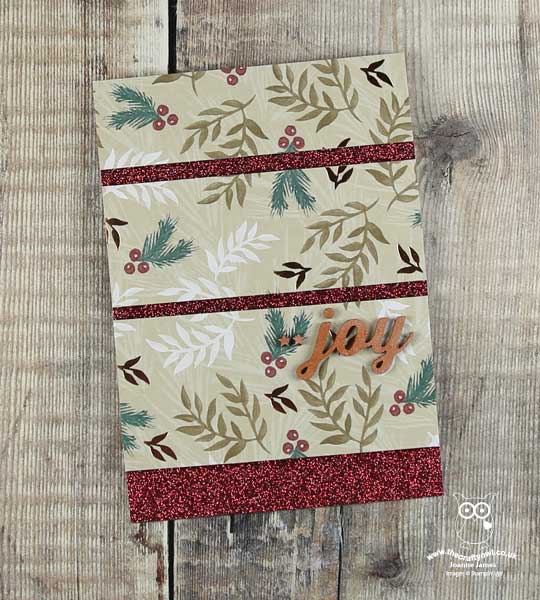
Joyous Noel - I decided that the sketch layers lent themselves to a showcase of both the designer series paper and co-ordinating glimmer paper in the Joyous Noel Suite. The papers feature classic festive seasonal designs with copper foil accents on one side of each sheet and take it from me, they are beautiful! I co-ordinated each of my chosen patterns with a background of glimmer paper - these papers come in Copper, Merry Merlot and Tranquil Tide as on the close up of the card below:

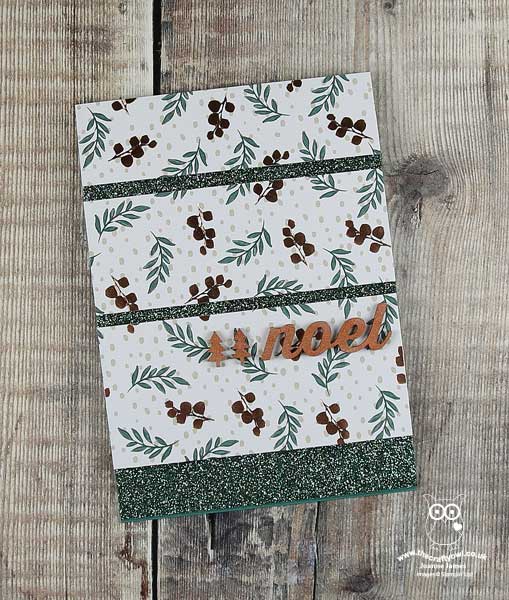
A Wooden Sentiment - Each of my cards feature a wooden sentiment element, from another of the suites in the catalogue - the Festive Farmhouse Suite. These wooden accents come with a light grey finish (I've coloured mine - more on that below!) and contain 3 separate sentiments, along with a collection of stars and Christmas trees. There are a total of 32 pieces for just £3.75, so they represent great value - I know I'll be using lots of these! Each of my cards features a different sentiment and detail - the second of my cards is the set features the word 'joy' and a  couple of stars:


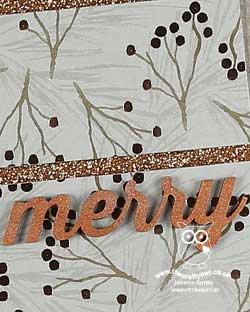
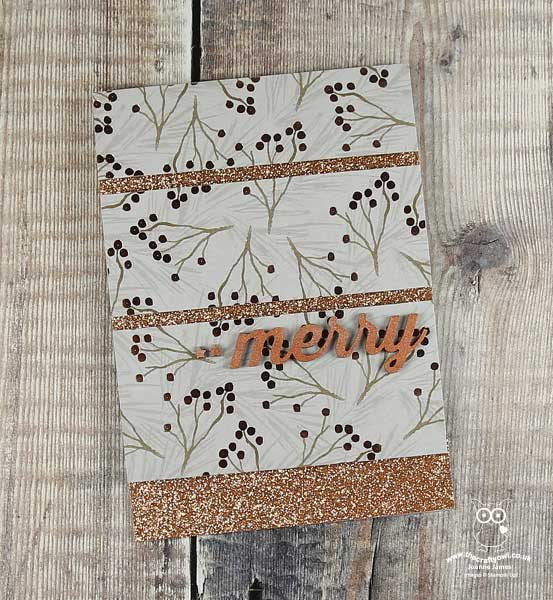
Shades of Copper - As I mentioned above, the wooden elements are grey in colour straight out of the packet. Ordinarily I would have heat embossed them in copper embossing powder, but there is a new product in the seasonal catalogue that does a much better job: shimmer paint. Yes, for those of you die-hard Stampin' Up! fans that go back as far as I do, you will remember we used to stock champagne shimmer paint previously; the new catalogue includes shimmer paint in 4 colours: champagne, white, gold and the copper that I used here. Simply apply with a sponge dauber to add subtle and shine to your projects - so easy! Here's a close-up of the detail so you can appreciate just how pretty it is:


And here's the full final card in my set - this card really is all about the copper:


Don't you just love all that shimmer and sparkle? I am going to be getting through a lot of this paper during the festive season; it will also be featuring in the projects at my two day Creative Escape Luxury Weekend Craft Retreat in October. You can read all about that in yesterday's post here, along with details of a Bank Holiday offer for those who would like to join me and fill the last few remaining spots - I hope you can join me for some festive creative fun!

Oh and I almost forgot - I decorated the insides of each of my cards too! Here's a peek inside:


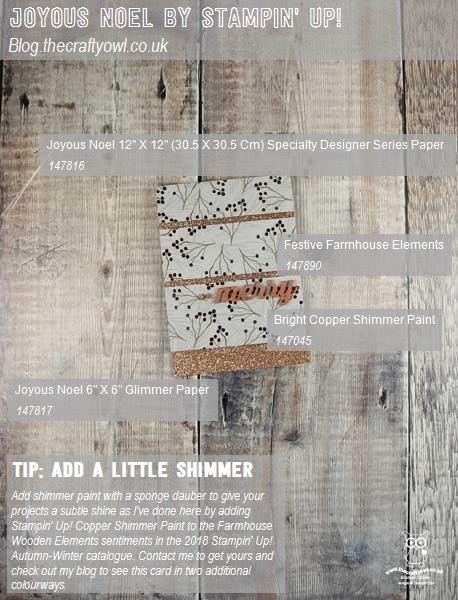
Not long now until the new seasonal catalogue launches and you can purchase these products for yourselves; meanwhile, here is the visual summary of the key products used on today's projects for you to pin for easy reference:


You can see all of my Product and 'How To' summaries on my 'How To - Tips and Techniques' Pinterest board in case you've missed any. 

Before you reach for your ink and papers, check out what our amazing team has created to inspire you this week:

Here's a quick recap of our challenge rules:
 
1.  Create a new paper project
2.  Upload your creation to your blog with a link back to us and provide a direct link to the post featuring your challenge submission.
3.  Please link your card to no more than four challenges, TOTAL.
4.  Have FUN!

You can see all of my 'How To' summaries on my 'How To - Tips and Techniques' Pinterest board in case you've missed any. 

I will share my other set of three cards that I made with today's sketch later in the week. Until then, enjoy the rest of your weekend and I'll be back tomorrow with another project. Until then, happy stampin'!


Stampin' Up! Supplies Used: 


Table built using Product Table Builder by The Crafty Owl - Independent Stampin' Up! Demonstrator.

Two Way Embossed Square Seasonal Wreath Christmas Card

by Joanne James20. August 2018 07:00

Happy Monday everyone! It's a new week and I've a few things ready to share with you this week, including a card today for a couple of challenges that is choc-full of sneak peeks:

   Paper Craft Crew Sketch Challenge 303! Play along with the latest challenge by visiting www.papercraftcrew.com #stampinup #papercraftcrew #papercrafts #stamping #sunnygirlscraps #crafting #crafts #craft #creative #creativity #create #sketchchallenge #colorchallenge #inspirationalchallenge #tictactoechallenge

Yes, it's still summer and I'm crafting for Christmas again, but having received my pre-order of goodies from the forthcoming Stampin' Up! Autumn-Winter Seasonal catalogue, I couldn't resist getting stuck in. Take a look:


 Here's the low-down on today's card:

An Embossed Seasonal Wreath - I loved the idea of the challenge over at Just Add Ink this week, which is to choose 2 different types of embossing on your card. It gave me the perfect opportunity to use a new-to-me embossing folder that is actually to be found in the annual catalogue, so available right away! The Seasonal Wreath TIEF attracted my attention as soon as I saw it; great for non-seasonal projects too, this wreath makes a great centrepiece on a card and I can see it being a staple of my Christmas crafting stash. It results in a subtle embossed finish (a little difficult to see the detail on my photo, but I can assure you it's there and it's gorgeous!) The wreath fits on a standard A6 card, but here I decided to make a 6" x 6" square one.

A Merry Christmas - For my second type of embossing, I went with the partial heat embossing of my Merry Merlot diecuts courtesy of the new Merry Christmas Thinlits - LOVE these! I simply sponged the lower portion of the diecut letters with Versamark and heat embossed with copper embossing powder. I took my colour combo for today's project from one of the new designer series paper packs - Joyous Noel - that features in the new catalogue. Whilst it doesn't feature on my card, the combination of Tranquil Tide, Merry Merlot and copper are inspired from these beautiful papers.

The Extra Details - There are a couple of additional 'sneak peeks' on today's card: the copper glimmer paper, the gorgeous Merry Merlot and Copper Reversible Ribbon and the sentiment on the inside of my card, courtesy of the Merry Christmas To All stamp set:


Are you keen to get your hands on some of these new products too? You will have to wait until 5th September to order them, but if you aren't already a customer of mine, don't already have a Stampin' Up! demonstrator and would like a copy of the new catalogue, then just get in touch with me by email with your address details or call me to reserve your copy.

Lastly, the sketch over at Paper Craft Crew inspired the layout for today's card; definitely one I'll use again.

Here is the visual summary of the key products used on today's project for you to pin for easy reference:


You can see all of my 'How To' summaries on my 'How To - Tips and Techniques' Pinterest board in case you've missed any. 

Enjoy your day and I'll be back tomorrow with another, slightly less festive, project. Until then, happy stampin'!


Stampin' Up! Supplies Used:

Table built using Product Table Builder by The Crafty Owl - Independent Stampin' Up! Demonstrator.

Ready For Christmas?!

by Joanne James31. March 2018 20:00

I'm back for a second post today! I had a little time for a spot of crafting this morning - I feel like I haven't been in my craft room to make something 'just because' in such a long time! So somewhat ironically, given that it's Easter weekend, I made a Christmas card! Yes - I couldn't resist making a card to join in with the challenge over at Merry Monday this week: 


I decided to use the cute little sausage dog from the Ready For Christmas stamp set, still available on carryover from the last Autumn-Winter seasonal catalogue, along with some retired Christmas Around The World tartan designer series paper:


I had a little fun with this card, and paper pieced both the occasional table and the dog using two different patterns from the Wood Textures DSP stack - don't you just love the honey-colour of that naughty-but-cute dachshund?! And a simple sentiment on the inside from the same set completes my card:


Here is the visual summary of the key products used on today's project for you to pin for easy reference:


You can see all of my 'How To' summaries on my 'How To - Tips and Techniques' Pinterest board in case you've missed any. 

Back soon with another project. Until then, happy stampin'!


Stampin' Up! Supplies Used:

Table built using Product Table Builder by The Crafty Owl - Independent Stampin' Up! Demonstrator.

Make Your Handcrafted Christmas Easy With The Watercolor Christmas Card Kit

by Joanne James21. December 2017 09:00

Today is the last day for posting here in the UK to guarantee your Christmas cards will arrive in time for Christmas. If, like me, you have been making Christmas cards all season but still need a few extra at the last minute, the Watercolor Christmas Project kit is definitely a quick solution.

I am a big fan of Stampin' Up!'s kits, which are very generous and of extremely high quality and the Watercolor Christmas Project Kit s no exception. Here are each of the designs in the kit:


Each kit makes 20 cards, 5 each of 4 designs, which look time-consuming but in fact take only minutes to assemble. Which is good news, given that I made up a pack last night for sending out today! I love the co-ordinating Watercolor Wishes stamp set too, however the kit can be used with other sentiment sets you have if you prefer. These kits are on offer as part of the year-ed sale, so I would highly recommend you grab a few and make them up now ready for next year - it will give you a great head start for your cardmaking and you will hit the festive season running!

Here is the visual summary of the key products used on today's project for you to pin for easy reference:


You can see all of my 'How To' summaries on my 'How To - Tips and Techniques' Pinterest board in case you've missed any. 

Back soon with another project; until then, happy shopping!


Stampin' Up! Supplies Used:

Table built using Product Table Builder by The Crafty Owl - Independent Stampin' Up! Demonstrator.

Tags: , , , , , ,

Cards | Shop Online | Shop Stampin' Up! Online | Stamping

Brightly Lit Christmas 3 Ways From Simple To Stepped Up - Part 2

by Joanne James20. December 2017 22:00

I've been away for a few days with my family to experience the delights of the German Christmas markets and enjoy some much-needed pre-Christmas R&R, but have just managed to squeeze in a post for you this evening amidst some last-minute card writing to share the second part of my Brightly Lit Christmas set and possibly one of my favourite cards of the season - take a look:


 Here's the low-down on today's card:

A Framed Christmas Lampost - I created my delightful snowy lampost scene and use the crossbar lampost framelit to create a gorgeous frame for my mini focal point, something I picked up from a wonderful crafty friend of mine, the talented Amanda Bates over at The Craft Spa; thanks for the inspiration, Amanda!

Light The Lamps - The best bit of this stepped-up card? The lamps light up! I used a Chibi circuit kit to create a circuit behind the main panel and when you press the presents, the lamps light as you can see on this zoomed-in photo below:


How cool is that?! These circuits are easy to create although with three bulbs on this card, a little pricey and only really suitable for a special card, but a fun way to step up a card with the Christmas Lampost Thinlits Dies for sure.

Pick A Piece Of Paper - The only stamping on my card is the little 'Merry' banner across my wreath; the wreath itself and the presents were diecut from the Christmas Around The World Designer Series Paper. This paper is the one I initially found the most difficult to work with, yet in reality have used most - it's amazing how creative you can be when challenged! 

Here is the visual summary of the key products used on today's project for you to pin for easy reference:


You can see all of my 'How To' summaries on my 'How To - Tips and Techniques' Pinterest board in case you've missed any. 

Enjoy your day and I'll be back soon with another project. Until then, happy stampin'!


Stampin' Up! Supplies Used:

Table built using Product Table Builder by The Crafty Owl - Independent Stampin' Up! Demonstrator.

Last Day For Online Ordering To Guarantee Arrival For Christmas!

by Joanne James14. December 2017 13:23


Just popping by with a quick reminder that today is the last day to place your Stampin' Up! orders online to guarantee shipping in time for Christmas. You will still be able to place orders after today, and of course gift vouchers and Stampin' Up!'s all-inclusive kits will still be available to purchase and collect from me right up until Christmas Eve, however for orders that need to be shipped, today is the day!

Don't forget to add the current hostess code NASJ4PVF to receive a thank you in the post from me.


Tags: , , , , ,

Shop Online | Shop Stampin' Up! Online | Stamping

Brightly Lit Christmas 3 Ways From Simple To Stepped Up - Part 1

by Joanne James11. December 2017 22:09

It's a little while since I shared a 'one stamp set, three ways' post with you showing you three cards using one suite and how to use the products within that suite to create cards that range from simple to stepped up. Today is the first of two posts that will do just that - this time featuring the Christmas Around The World Suite and the Brightly Lit Christmas Bundle that you can find on pages 28-29 of the 2017 Autumn-Winter seasonal Stampin' Up! catalogue that I used in a class a couple of months ago.

The Brightly Lit Christmas stamp set has a fun collection of festive banners that co-ordinate with a basic lamppost design and when paired with the co-ordinating Christmas Lamppost Thinlits Dies can be used to make the most ornate and detailed 3D traditional lamppost designs. The set is great for quick and easy and more complex cards with a real 'wow' factor.  

Clean and Simple - Quick And Easy - If you're short on time or new to crafting, this set is great for a simple card like this one:


All you need to do is take a sheet of Extra Thick Whisper White for your card base and mat layer, stamp your lamppost and hanging banner directly onto the card front and sponge a little yellow ink for lamp light, use the wreath bauble stamp to add some snowflakes (stamp in Versamark and add Dazzling Diamonds glitter) and a red ribbon bow and your card is done. Festive red and the subtle sparkling snowflakes help this simple card to have a big impact.

Step It Up - If you have a bit more time and are feeling more adventurous, using a few extra tools and embellishments will allow you to 'step up' your card and create something with a little more depth and detail, whilst still relatively easy to make:


My second card follows the same basic layout as the first, still using just the stamps from the Brightly Lit Christmas set, however this time I've stamped only the top portion of the lamppost and masked off the lower portion and used the Carols of Christmas stamp set and co-ordinating Card Front Builder Dies to cut out some festive poinsettia flowers to adorn the lamppost, centred with some gold enamel shapes, added a couple of twists of red and gold ribbon behind and a couple of background banners using the Triple Banner Punch, one of which is a contemporary tartan to add a bold splash of colour. 

My third card is a real 'wow' - but you'll have to come back for Part 2 for that one!

Here are the visual summaries of the key products used on today's projects for you to pin for easy reference:

Card 1:


Card 2:


You can see all of my 'How To' summaries on my 'How To - Tips and Techniques' Pinterest board in case you've missed any. 

I'll be back soon with the third card in this set, which is my absolute favourite. Until then, happy stampin'!


Stampin' Up! Supplies Used:

Card 1:

Table built using Product Table Builder by The Crafty Owl - Independent Stampin' Up! Demonstrator.


Card 2:

Table built using Product Table Builder by The Crafty Owl - Independent Stampin' Up! Demonstrator.

Mini Catalogue

BROWSE THE CATALOGUE

The mini catalogue is now live! Read and download your copy here.

Shop Online

Access my online shop 24 x 7, 365 days of the year:

Current April hostess code:

VDKNV7BH

Shop Online

Join My Team

It's always a great time to join Stampin’ Up! New team members can get £130 worth of products for only £99 + free business supplies + free shipping + all the fun being a part of Stampin’ Up! Stampin' Up! has something for everyone: join my growing team and benefit from my support to enjoy Stampin' Up! however you choose.

If you're interested, call me for a chat to understand how I can help you realise your goals. Alternatively, if you have already decided to sign up and you just can't wait, please click here for the link to the online form where you can sign up and order your starter kit right away! 

Latest Kit!

Stampin Cut and Emboss

The Rock Legend Kit has all you need to make 8 cards with coordinating envelopes. Along with the new Panda Friends Kit, both are available from January 4th for just £14 each - get yours here!

2023-24 Annual Catalogue

BROWSE THE CATALOGUE

Click on the catalogue for a full list of current SU! supplies - if you would like to order any of the items featured, please drop me a line at [email protected] or give me a call on 07773 421446 - I'd be happy to help.

New Online Exclusives

There are new products available exclusively in the online store from 5 March - check them out here.

About Me

Hi I'm Joanne and live in Northampton and when I'm not looking after my husband and two beautiful children, am an avid crafter with a passion for all things Stampin' Up!

I must confess that I have never been a big rubber stamper - until I discovered Stampin' Up! that is. I love the fact that I can get such great results with co-ordinating stamps, inks, papers and punches - the possibilities are endless! Join me on my stamping journey as I share the things I love and be inspired to create amazing things yourself!

Follow Me

Monthly Newsletter

Box Builder

Click the button above to use Box Buster to create your custom box design using the Envelope Punch Board!

Kits Collection Now Available!

Stampin Cut and Emboss

The new Kits Collection from Stampin' Up! is now available!

Click here to see the current kits available and order yours online today.

I Design For


Stampin' Up Stuff

This is my personal blog and is not endorsed by Stampin’ Up! I hope you find it a plentiful source of ideas and personal inspiration but please don't copy my designs for contest submission or use for classes, publication or sale without express permission.