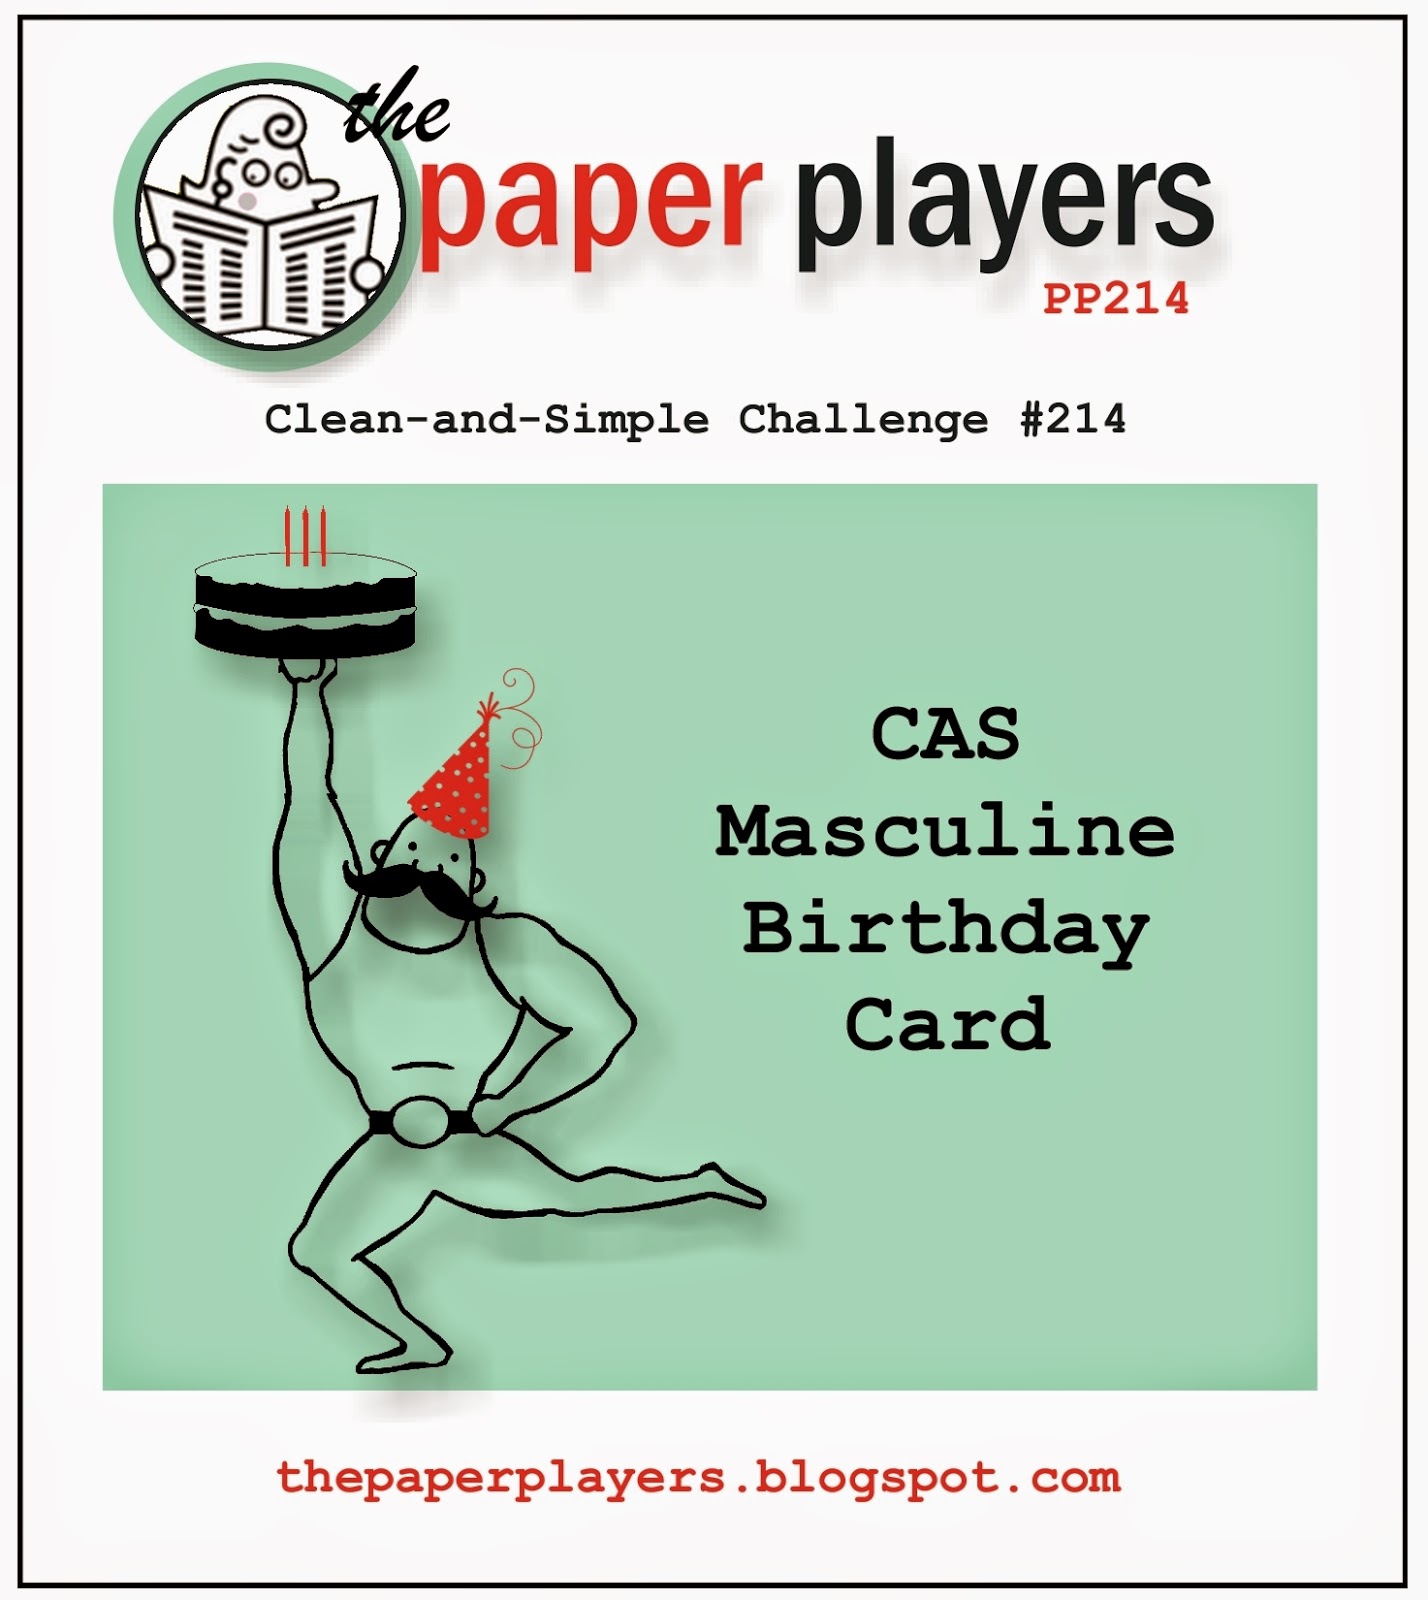
by Joanne James21. September 2014 07:00It's Sunday so I'm here with my card for this week's challenge over at The Paper Players, where Jaydee has the following clean and simple challenge for us:

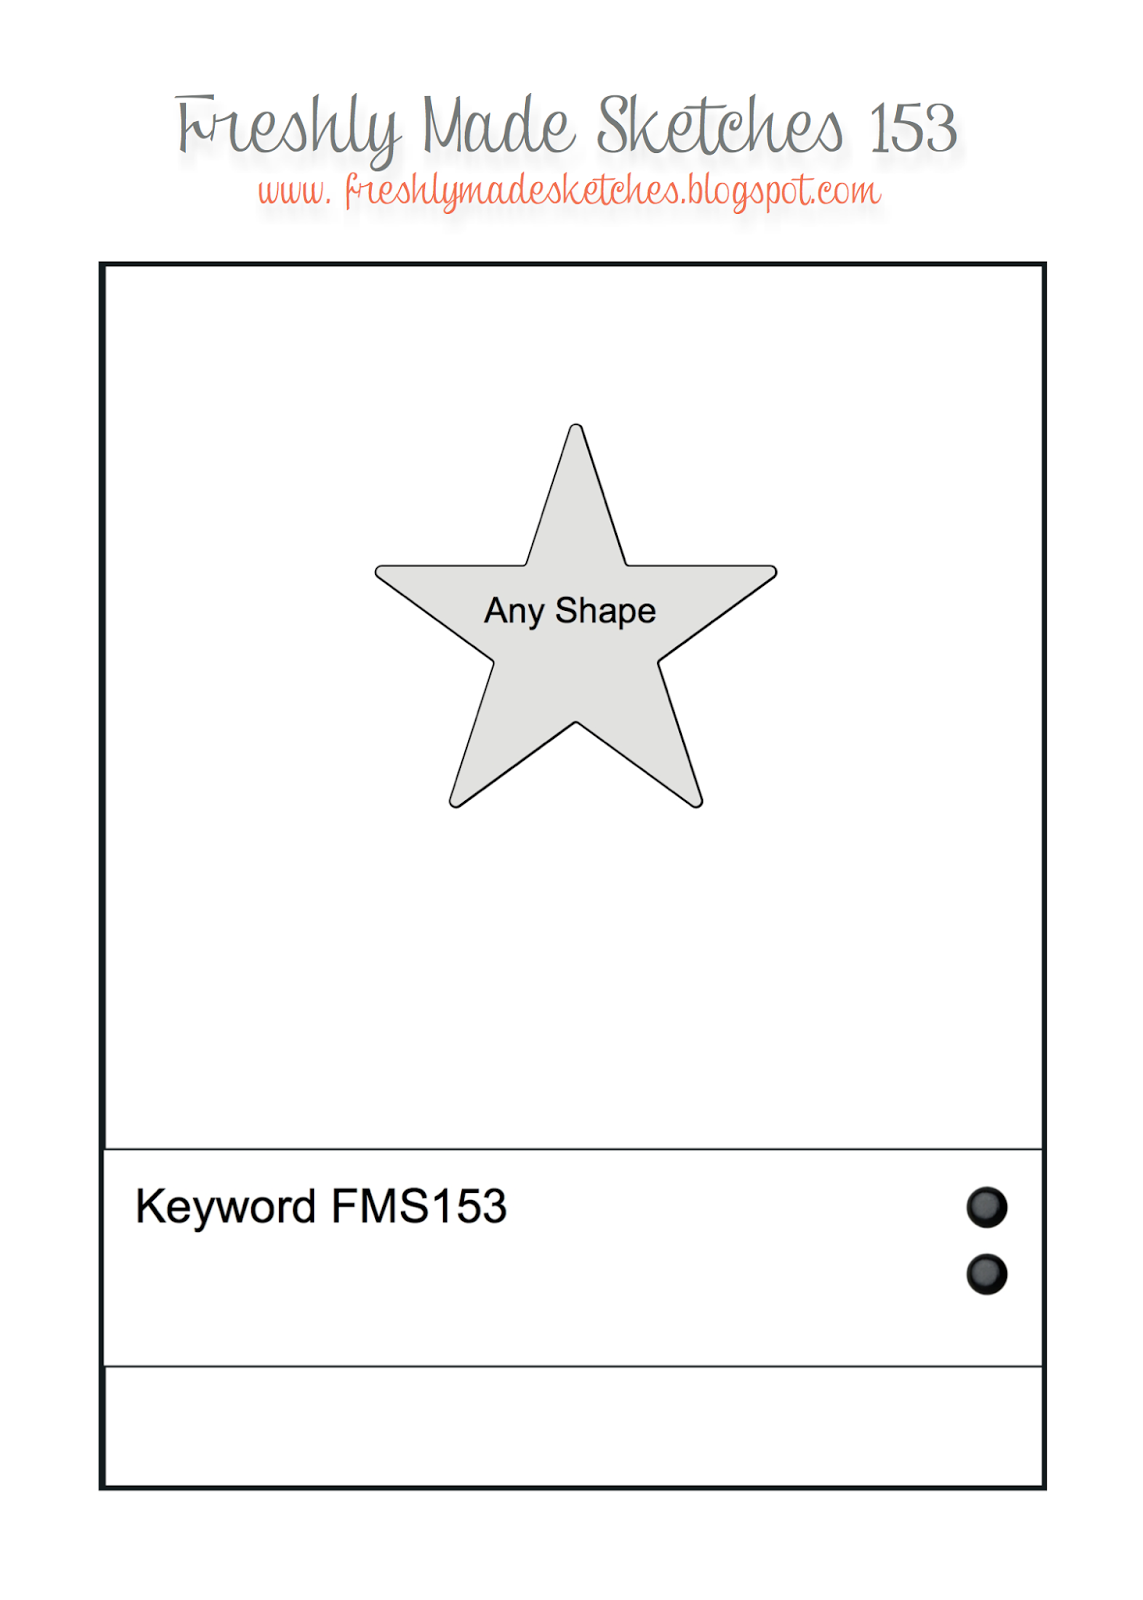
I also used the above sketch from Freshly Made Sketches again for my card this week and this week's card is a lot more 'clean' than last weeks - here is my card:
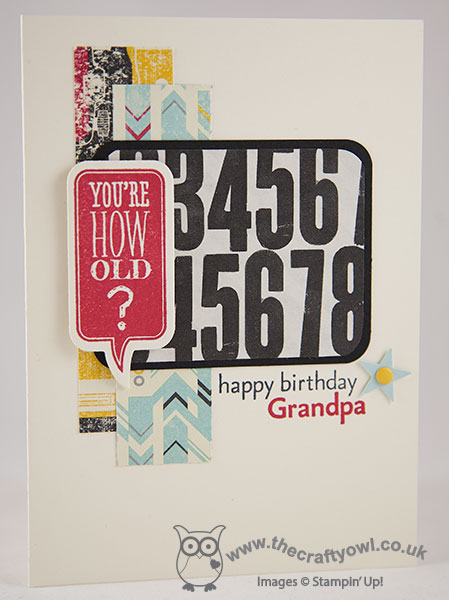
My card is really simple, with a piece of the numbered Typeset paper mounted on Basic Black as the central panel of my card, with a couple of strips of Flashback DSP behind to add some colour and the focal point word bubble 'You're How Old?' stamped in Real Red. I finished my card with the sentiment 'happy birthday Grandpa' (stamped with my vintage 'For My Family' stamp set - a keeper!) and a punched star.
Yesterday was my Dad's 70th birthday and I made this card for him from the children - they think 70 is positively ancient, so the word bubble was entirely appropriate! - however it occurred to me as I typed up my post that not only could you change out the sentiment to just say 'happy birthday' or include the role of any family member (dad, brother, uncle, etc.) this might also work as a fun tongue-in-cheek card with the sentiment as is. So beware any male that feels he's 'over the hill', because one of these cards could be heading your way Grandpa!
Do check out the other design team cards this week; as always, there is some great inspiration and I look forward to seeing your challenge entries in the gallery. Right, I'm off to prepare for Sunday lunch and hopefully enjoy a restful family day before the onset of a new week. Enjoy your weekends everyone!
Back tomorrow with another project; until then, happy stampin'!
Stampin' Up! Supplies Used:
3c67216b-06d0-4efb-9a73-71b4b3181f08|0|.0|96d5b379-7e1d-4dac-a6ba-1e50db561b04
Tags: Just Sayin', First Edition, Flashback, For My Family, Itty Bitty Accents Punch Pack, Candy Dots, corner punch, Shop online, Stampin' Up, Stampin' Up Card, Stampin' Up Card ideas, Stampin' Up Supplies, Typeset, Word Bubbles Framelits
Cards | Stamping
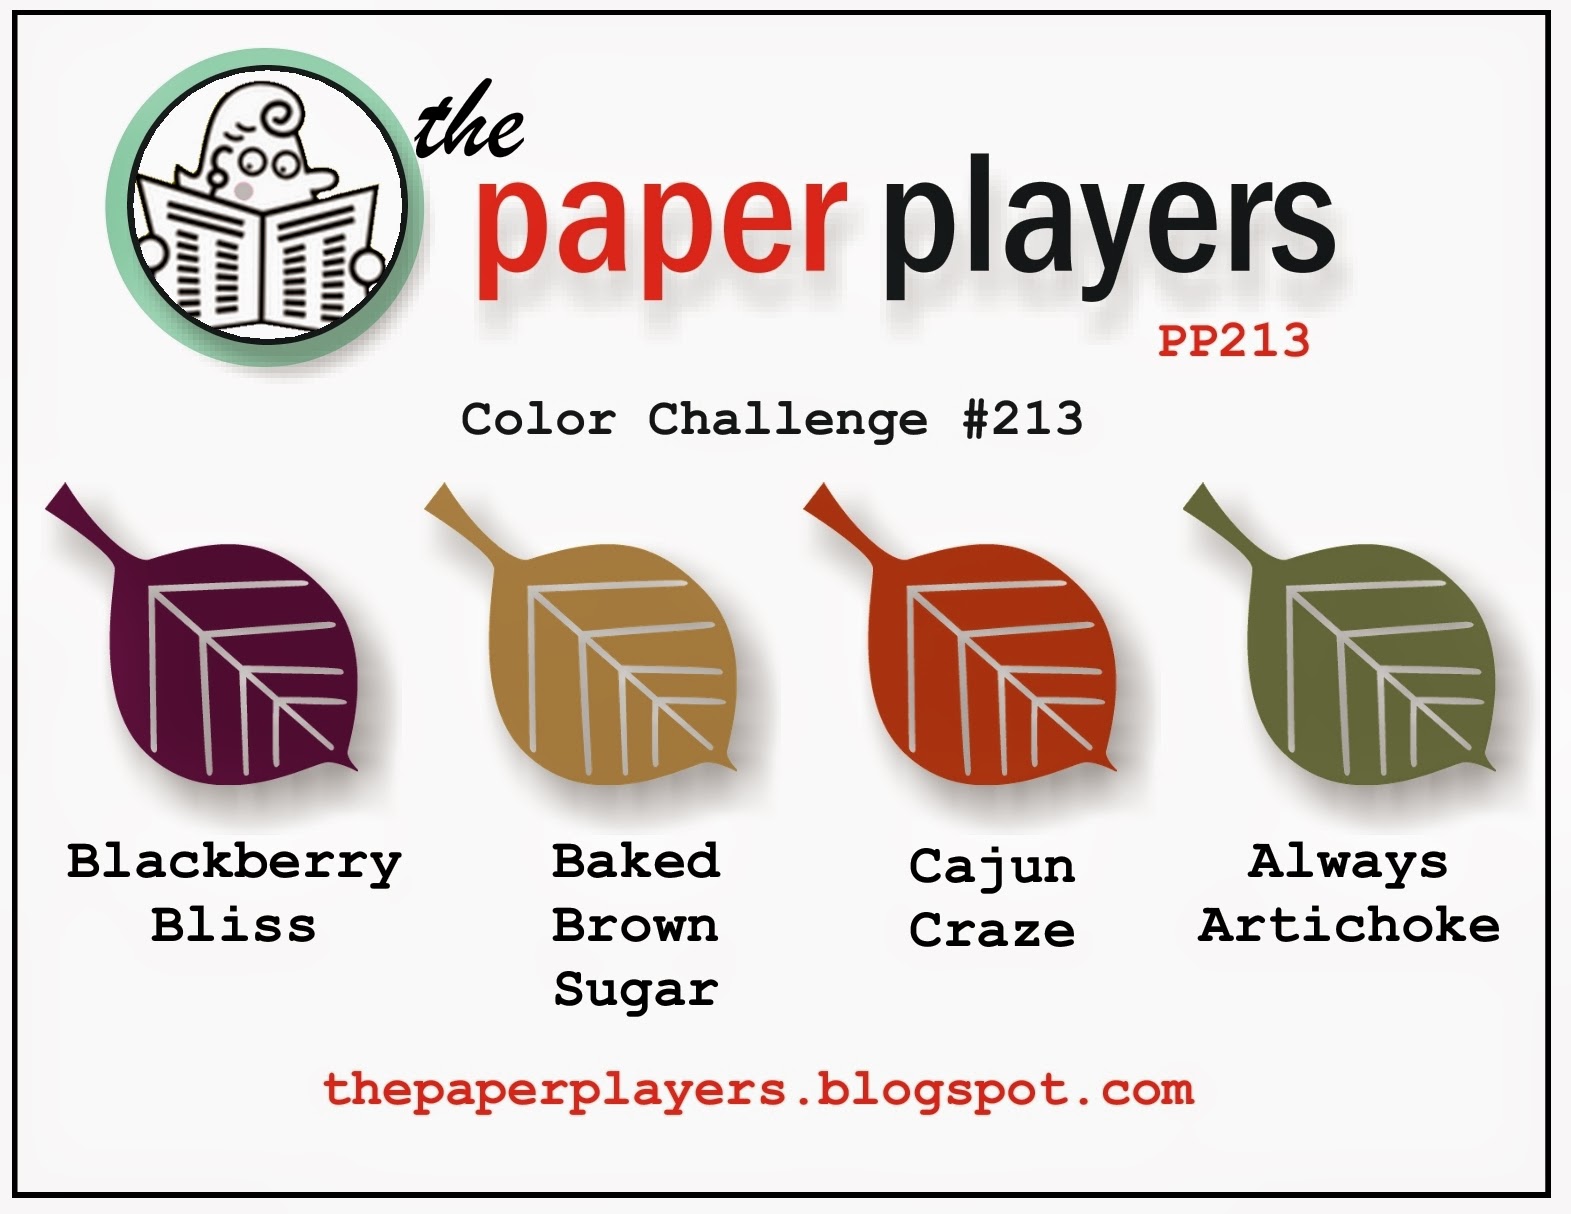
by Joanne James14. September 2014 08:00Today I'm sharing my Design Team card for The Paper Players, where this week Anne Marie has chosen this beautiful Autumnal colour palette for us to work with:
I also used the sketch over at Freshly Made Sketches this week for my layout. As soon as I saw this week's colours, I knew it was time to make an Autumn wreath card using my 'Wondrous Wreath' stamp set, as I've been wanting to do one of these for ages. Here's my card:
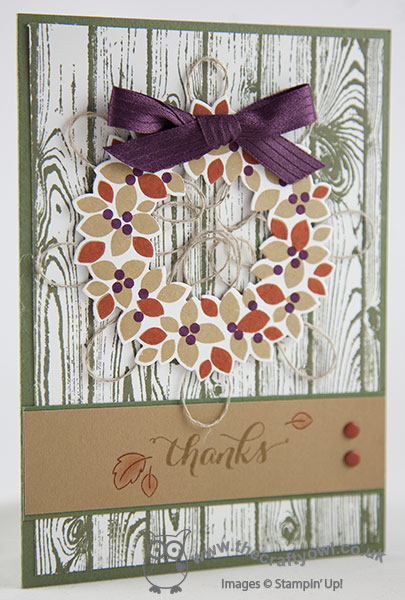
I used Baked Brown Sugar and Cajun Craze for the leaves on my wreath and stamped the berries in Blackberry Bliss. I cut it out using my Big Shot and the co-ordinating framelits and looped some linen thread behind it before adhering it with dimensionals to my Hardwood background, stamped in Always Artichoke (this panel reminds my of a mossy whitewashed shed!). I finished my wreath with a bow in the gorgeous Blackberry Bliss satin ribbon and a sentiment panel stamped with a simple 'thanks' and decorated with a few leaves from my 'Gratitude For Days' stamp set and a couple of candy dots. I love the rustic feel of this card - so fitting for this time of year.
Do pop by the challenge blog and see how the other Paper Players designers have used this week's colour combination - there are some fabulous cards from this talented bunch of designers.
I'm still playing catch up so am looking forward to a reasonably restful day today before the onslaught of another new and action-packed week. Back tomorrow with another project; until then, happy stampin'!
Stampin' Up! Supplies Used:
9fe17a29-10ff-4bb2-8de0-89b884066f38|1|5.0|96d5b379-7e1d-4dac-a6ba-1e50db561b04
Tags: Wondrous Wreath, Hardwood, Big Shot, Magnetic Platform, Another Thank You, Candy Dots, Shop online, Stampin' Up, Stampin' Up Card, Stampin' Up Card ideas, Stampin' Up Supplies, Gratitude For Days
Cards | Stamping
by Joanne James26. August 2014 15:30As I'm writing my post today there is finally a break in the rain - hurrah! I hope that everyone here in the UK had a lovely Bank Holiday weekend, despite the dreadful weather across most of the country yesterday. I am now home, having spent a long weekend away in Somerset with my extended family, celebrating my Mother-in-law's forthcoming 70th birthday. We were fortunate to have had wonderful weather and spent a great weekend on the beach, fossil hunting, playing rounders and generally having a relaxing time.
Today I'm sharing a card I made a while ago as one of the samples for the UK Regional Training Day where I was asked to do a 'wow' technique presentation using the Traveler stamp set. This card is one of the ones that was actually inspired by the set, rather than featuring it directly, although the old fashioned brownie camera that inspired my card does feature on the inside. I decided to try my hand at a shaker card and created it to look like an old fashioned camera - here's the front of my card:
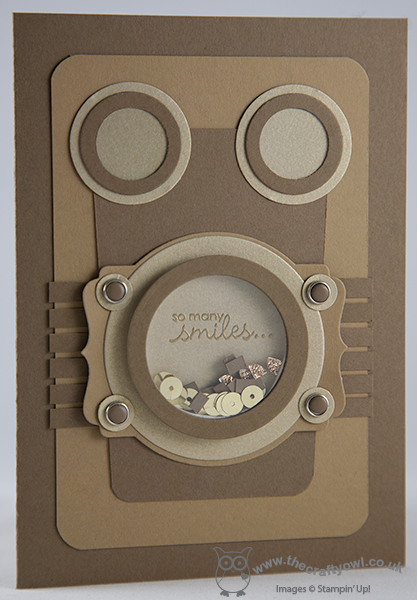
I used Soft Suede, Baked Brown Sugar and Brushed Gold cardstock and a variety of circle punches and both circle and deco label framelits to construct my shaker, and filled the window with gold sequins and some confetti squares cut using my fringe scissors from baked Brown Sugar cardstock and Champagne glimmer paper. I used the Petite Pairs sentiment set and heat embossed the first half of my sentiment in gold on the inside of my shaker frame. This was then continued on the inside of the card:
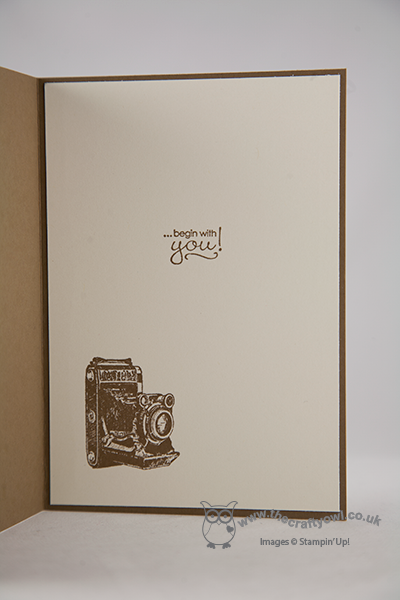
I also finished with the camera stamp. So what do you think - does my punch art camera shaker card bear any resemblance to the real thing? I thought this would make a fun masculine shaker card - proving even grown ups can be fun!
Back tomorrow with my Design Team card for this week's Colour Me...! challenge - and I have a fun 'sneak peek' Christmas card to share with you!
Until then, happy stampin'!
Stampin' Up! Supplies Used:
d8ff5816-b75b-4099-8492-98feab5b6931|0|.0|96d5b379-7e1d-4dac-a6ba-1e50db561b04
Tags: Traveler, Stampin' Up Supplies, Stampin' Up Card ideas, Stampin' Up Card, Stampin' Up, Shaker cards, Shop online, circle punch, Circles Framelits, Deco Labels Framelits, Petite Pairs, Candy Dots, Candy Dot Brads, corner punch
Cards | Punch Art | Stamping
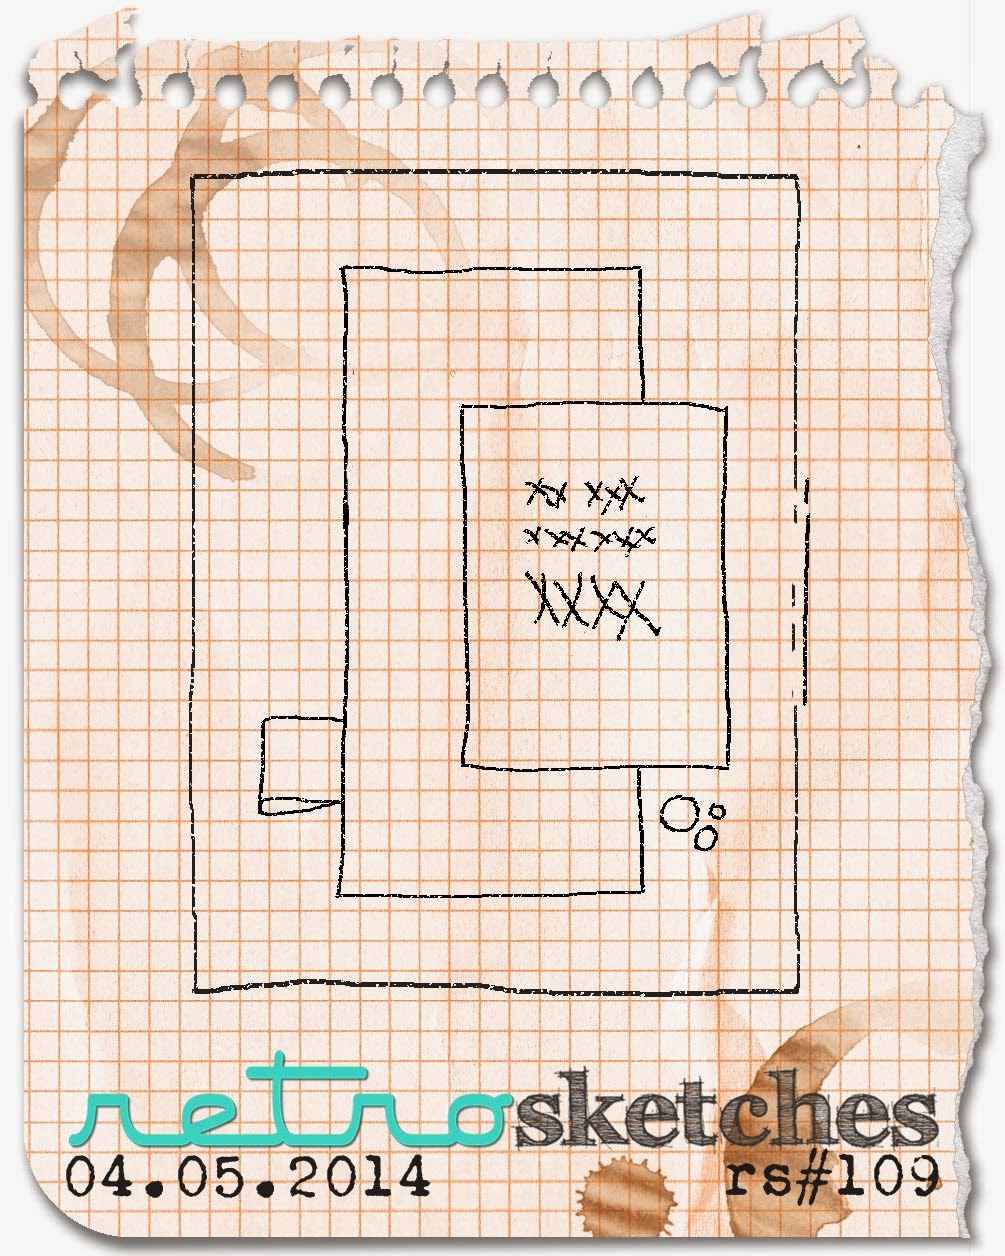
by Joanne James7. August 2014 20:56Today I'm excited to share with you my first Flower Patch card! Now, this may not seem like a big event, but for someone who has had the stamp set for over a month whilst having to wait (not so) patiently for the matching framelit set, it is a big deal! I decided to make a card for the challenges over at 'Less is More' and Retrosketches, where the colour palette and sketch were perfect for what I had in mind:
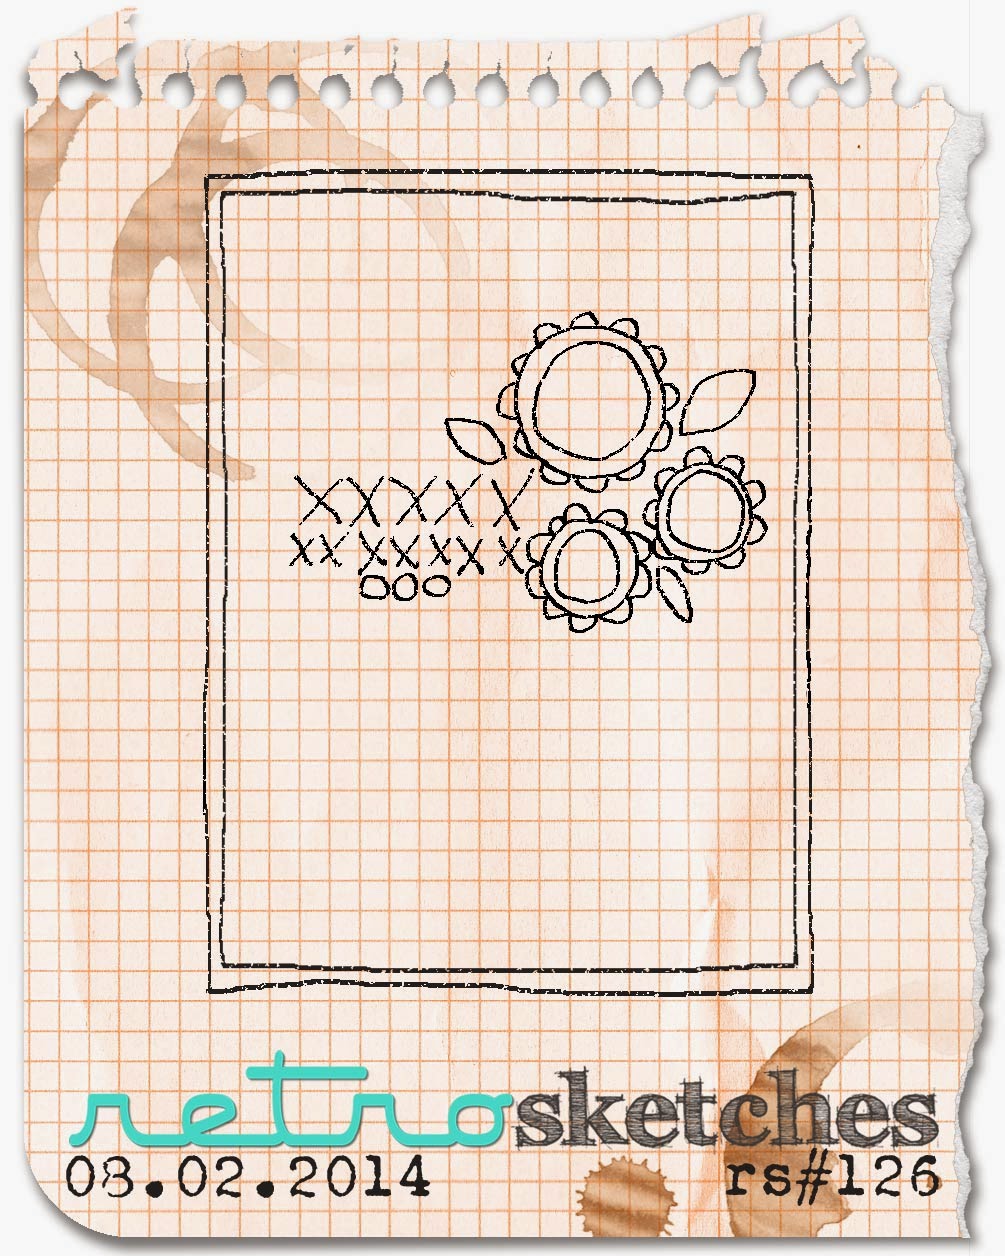
Since the lovely Sarah over at 'Less Is More' is celebrating her birthday this week, I decided a birthday card should be the order of the day. Here's what I came up with:
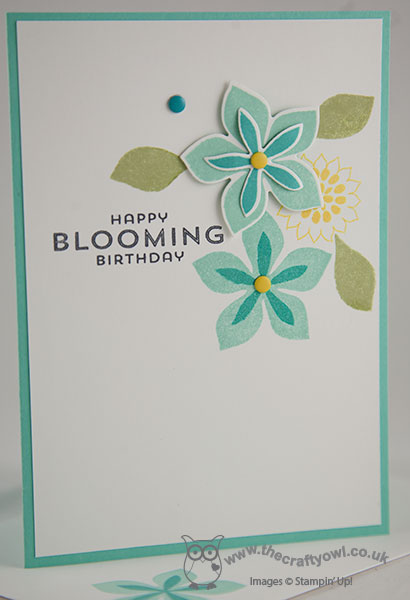
My card base is Coastal Cabana, which I matted with Whisper White and stamped my sentiment in Momento Black, then surrounded it with a trio of flowers in Coastal Cabana, Daffodil Delight and Bermuda Bay, cutting out one of these with my framelits and layering it to add depth and dimension. I finished with a few candy dots for the flower centres and a random one (just because!). The stamp set is photopolymer, which makes aligning everything so easy no need even for a stamp-a-ma-jig!
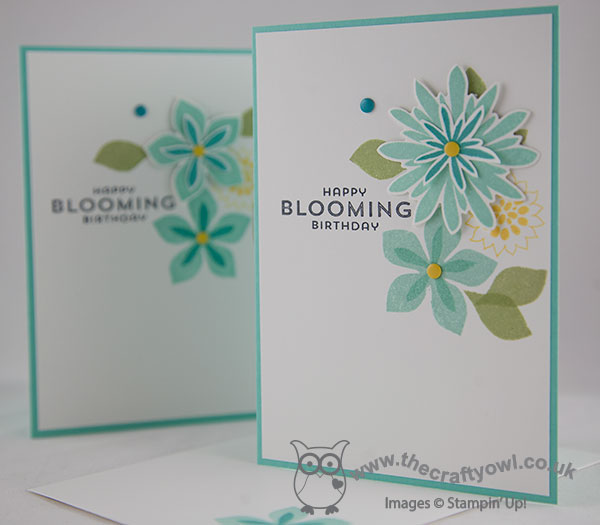
I liked my card so much, I decided to create another one with one of the other framelits in the set - I need a few extra birthday cards in my 'emergency' box - here is my slight variation on the card above:
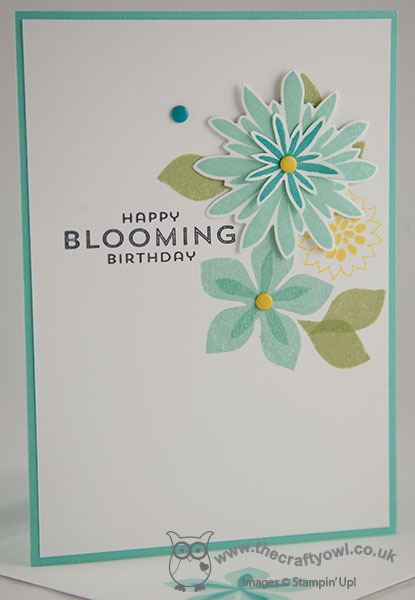
These cards use surprisingly few supplies, yet I think they have real interest. This set has so much potential I am so glad that I can finally get creating with it - it my well replace Simple Stems from the Spring-Summer seasonal catalogue in my 'bold flower' affections! I'm also linking my card up over at SUO Challenges, where the theme this week is 'new toys' - well, I've certainly had fun playing with mine!
Back tomorrow with another project; until then, happy stampin'!
Stampin' Up! Supplies Used:
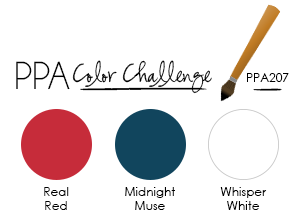
by Joanne James17. June 2014 10:25Today's card is for this week's Pals Paper Arts challenge, where Team 2 have chosen a rather patriotic colour palette this week, with one last opportunity to use Midnight Muse before it retires at the end of the month:
I decided these colours would make a perfect masculine card and so have another sneak peek using the Traveler stamp set, coming in the new 2014 annual catalogue. Here is my card:
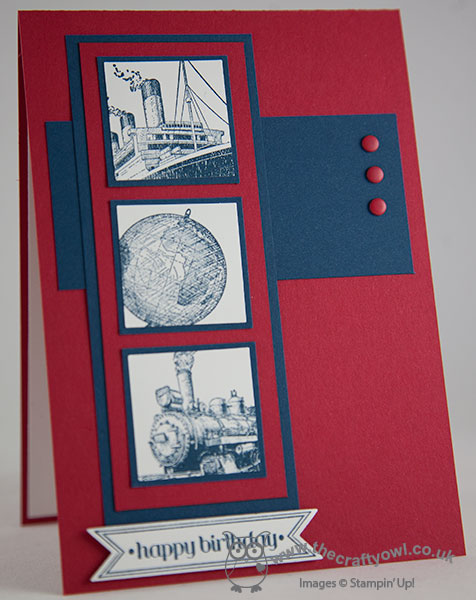
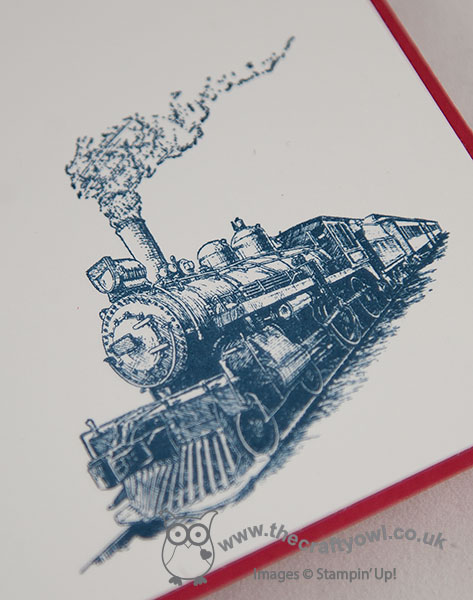
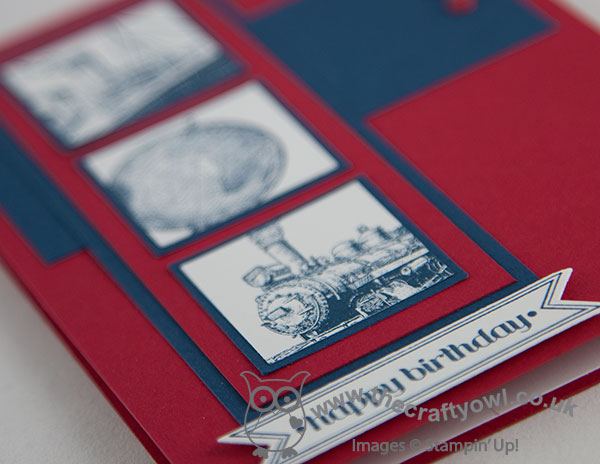
I stamped three of the stamps in the set - the ocean liner, the globe and the steam train - in Midnight Muse, then cropped these images and mounted them on individual mats in the same colour, followed by a larger Real Red and Midnight Muse panel. This is then overlaid on a crossways panel finished with some Real Red candy dots and lastly a sentiment stamped in Midnight Muse with one of the Itty Bitty Banners stamps and cut out with the co-ordinating framelit. I even gave the inside some star treatment with a steam train - I don't do this often enough, and even when I do I often forget to share with you:
I really like this set, having used it so much already. Despite its 'vintage' look, it lends itself to a more modern finish too. I'm also linking my card up to Addicted to CAS where the theme this week is 'transport'. Back tomorrow with the Wednesday Deals and another card. Until then, I'm off to prepare for a private class tomorrow, get on with some admin and then hopefully squeeze in a make or two as well - happy stampin'!
Stampin' Up! Supplies Used:
*Traveler Stamp Set - available 1st July 2014.
d8ba92c0-6291-4c28-ba0d-374ad3dc57d8|0|.0|96d5b379-7e1d-4dac-a6ba-1e50db561b04
Tags: Bitty Banners, Bitty Banners Framelits, Big Shot, Square Punches, Traveler, Candy Dots, Shop online, Stampin' Up, Stampin' Up Card, Stampin' Up Card ideas, Stampin' Up Supplies, 2014 Annual Catalogue
Cards | Stamping
by Joanne James1. May 2014 21:48Back again with a creative post today - just in time to share my card for The Paper Players this week, where Anne Marie has this sketch challenge for us:
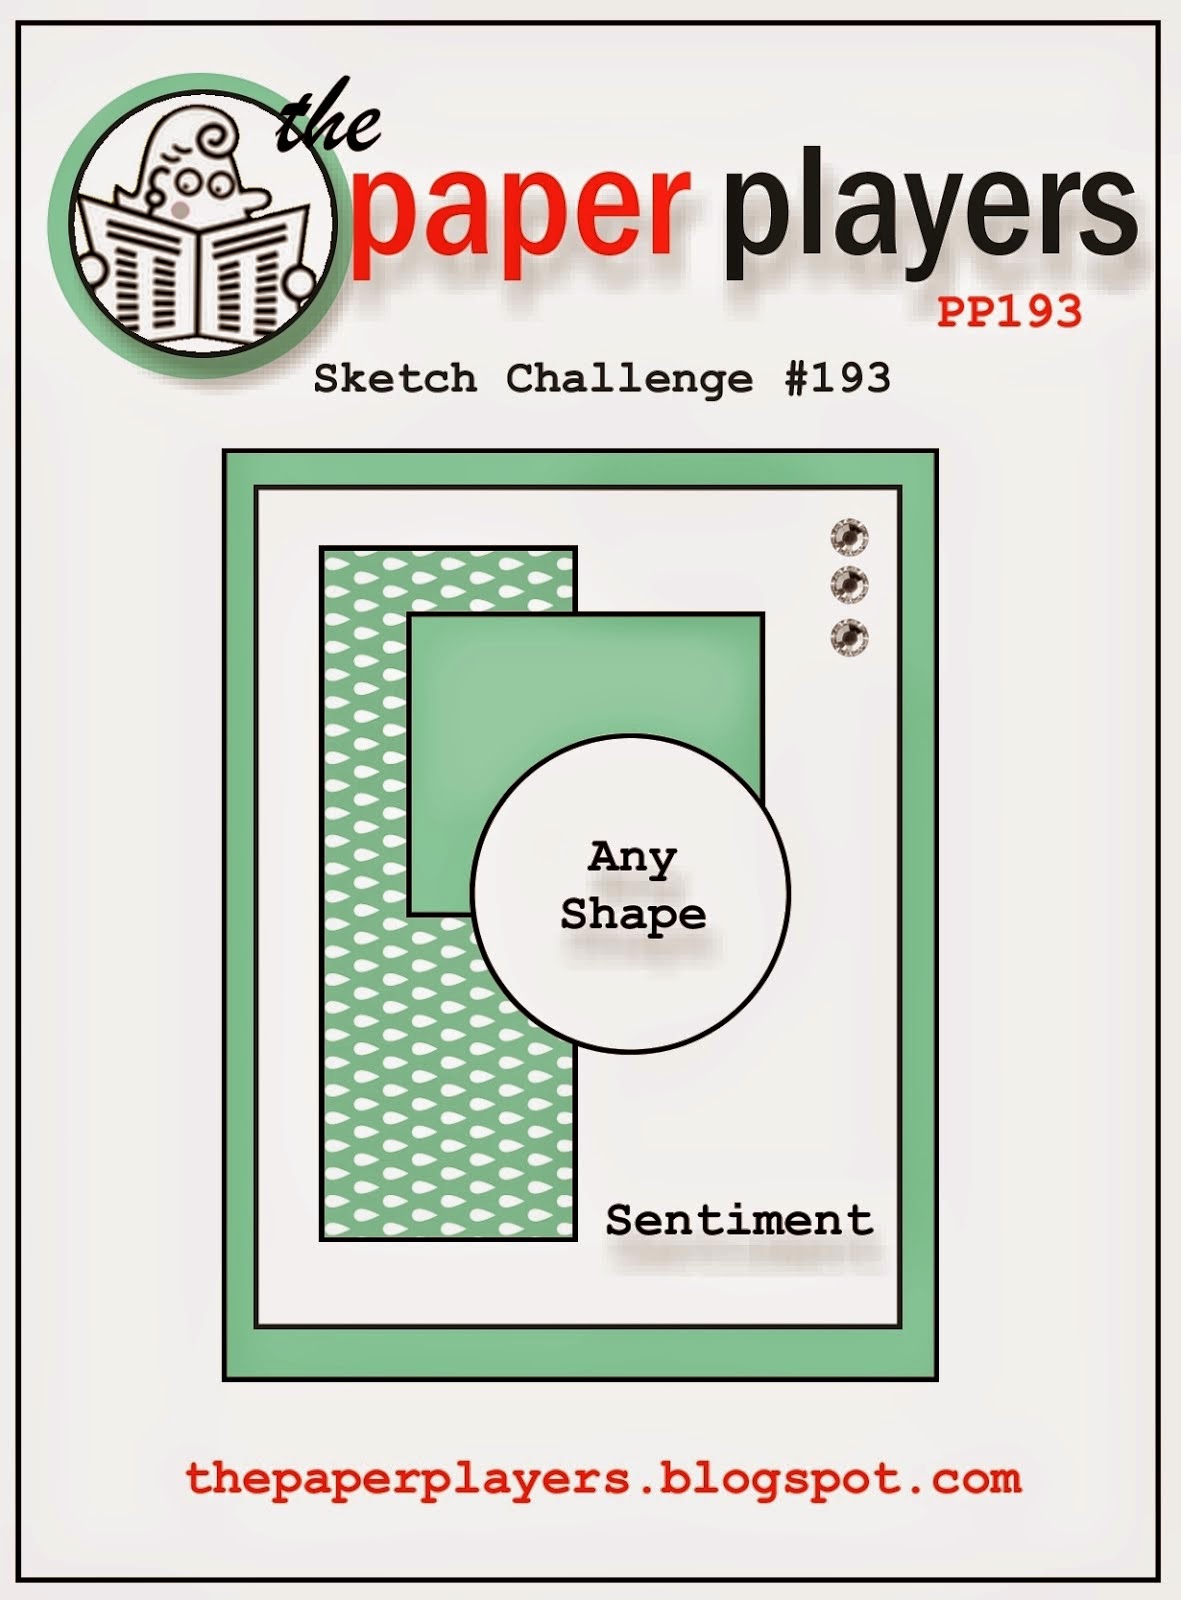
I decided to use a sheet of the flower patterned paper from the Fresh Prints DSP Stack as the starting point for my card; I love the pattern on this paper, but have been almost afraid to use it as it's so busy. Today I took the plunge - here's my card:
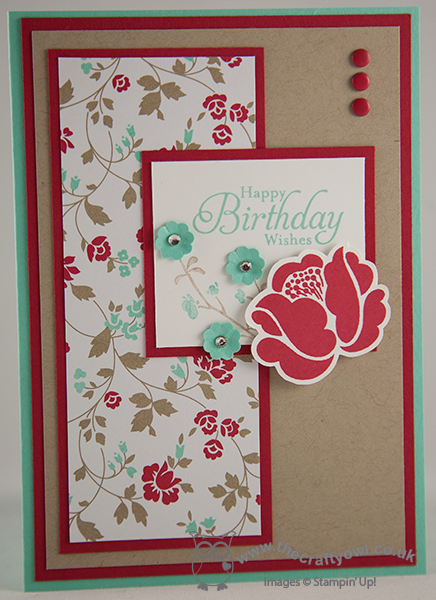
I used a Coastal Cabana base for my card, then matted a piece of Crumb Cake on Real Red and adhered to the base. I used the flower DSP for the main panel and broke slightly from the sketch to put my sentiment on the second rectangular panel, as opposed to the Crumb Cake layer. I stamped the blossom stamp from the Morning Meadow hostess set around it, having coloured it with my Crumb Cake and Coastal Cabana markers, then punched three flowers from Coastal Cabana cardstock using my Itty Bitty Flower punch and moulded them around the end of my paper piercing tool to shape them before adhering over some of the stamped blossoms. I then finished with a Real Red stamped flower from Simple Stems and three red candy dots (I really need these to be sold in packs of red only - I use more red ones than any other colour!!)
I'm quite pleased with the final result - the bold red borders really ground the busy flower pattern I think. I'm also linking this card up with SUO Challenges, where the challenge this week is to use a flower on your card.
Must go - I've grocery shopping to do before I turn in for the night (thank heavens for online grocery stores!)
Back tomorrow with another project; until then, happy stampin'!
Stampin' Up! Supplies Used:
by Joanne James7. April 2014 19:53Good evening blog readers! I managed to get a little time in my craft room today (a reward to myself for finishing the housework :-) ) so thought I would make a quick card for this week's Pals Paper Arts challenge, where they are having their first colour challenge of Spring 2014 and would like us to work with the following colours:
This is not a colour combination I would choose independently, but I really like it - I think the three colours work really well together. I decided to use one of the flowers from the Simple Stems stamp set and this week's sketch over at Retrosketches, and this is what I eventually came up with:
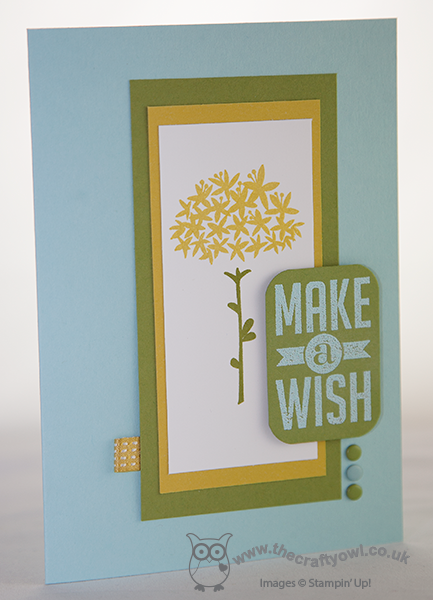
I say eventually, because this didn't turn out to be a quick card at all - it was one of those where the idea in your head doesn't fall onto the paper quite as easily as you hoped it would; I had about four aborted attempts before this one! That said, I love this flower for the Simple Stems set; it reminds me of a dandelion clock, which was the reason for pairing it with the 'Make a Wish' sentiment from the Perfect Pennants set. I stamped my sentiment in Versamark and heat embossed in Pool Party embossing powder to give it some texture and make it stand out against the Old Olive background. A small loop of ribbon and a trio of candy dots complete my card.
Back tomorrow with another project; until them, happy stampin'!
Stampin' Up! Supplies Used:
by Joanne James6. April 2014 19:00Good evening lovely blog readers! Today I'm sharing a card (well, actually two!) that I made a little while ago but that I didn't share with you at the time. I made this card using an old Freshly Made Sketches layout - here is my card:
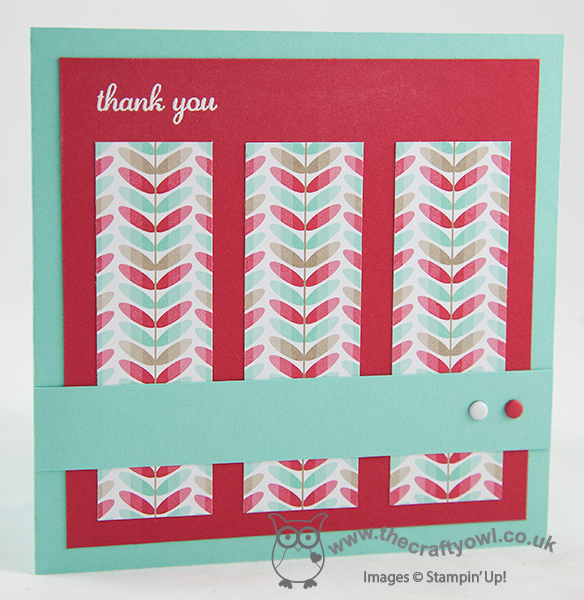
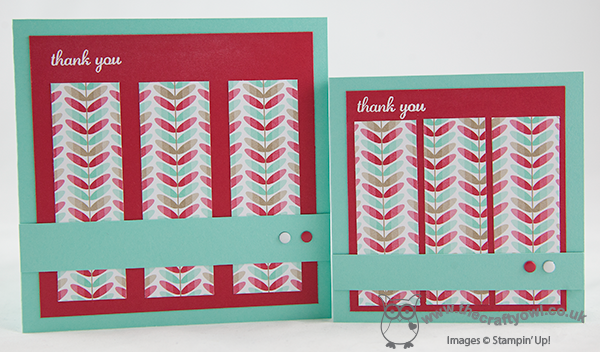
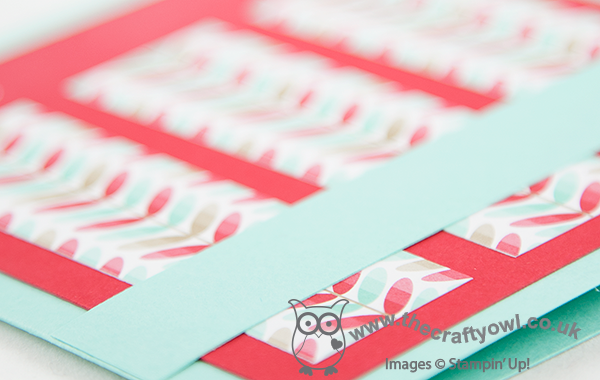
My card uses the Fresh Prints DSP stack - this paper stack is great value and perfect for cards and the pattern I've used on this card is one of my favourites: an Orla Kiely-inspired design I think and one that also appeared in last year's Sycamore Street Sale-A-Bration DSP pack, but this time updated with some fresh colours for the new season. I cut three panels, having centralised the pattern, and matted it on Real Red and a Pool Party base, with a Pool Party banner finished with two co-ordinating candy dots. The original sketch had only two dots and I wrestled with myself to not use three (I think things looks better in threes!) but I decided that the two dots balanced the sentiment on the top left-hand side of the card, so left alone! I stamped my sentiment in Versamark and heat-embossed with Whisper White embossing powder, because whilst I didn't want it to dominate my card, I didn't want it to get lost either. This was the card I was happy with, but I promised two cards today and thought I would show you the first one I made; it was slightly smaller in size but to the same layout, but instead of centralising the pattern on each individual strip, I simply cut a piece of paper equally into three. It gives quite a different effect - see what I mean:
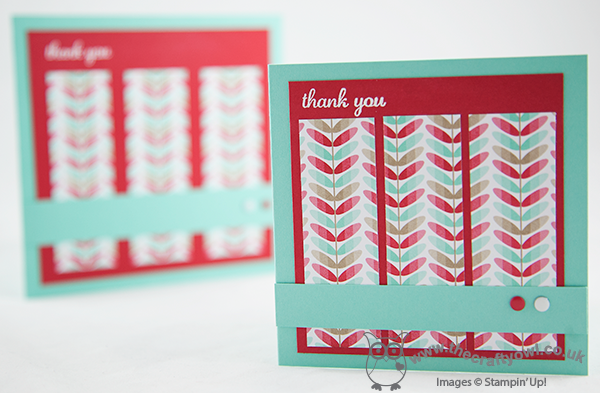
This cut really didn't work for me, as I felt such a clean card need the symmetry in the pattern - hence the second version. Here are both cards in focus side by side - which one do you prefer?
Who would have thought that such a simple card took so much thought? But for me, that's the difference between a good card and a great card! Lesson over for today; I'm off to listen to the next instalment of Harry Potter, our current bedtime reading book.
Back tomorrow with another project; until then, happy stampin'!
Stampin' Up! Supplies Used:
by Joanne James12. March 2014 10:11I'm hoping for a super-efficient day today: the dinner is already prepared and in the slow cooker, I've managed a few admin tasks and I'm getting my blog post in nice and early before I crack on with more creating and ticking a few more things off my ever-growing 'to do' list - I love days like this! Today I'm sharing two versions of essentially the same card - you'll see why shortly!
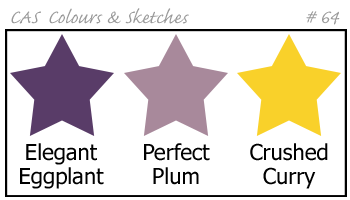
I loved the colours over at CAS Colours and Sketches this week and had a specific card in mind that I thought would also work for the challenge over at Less is More, where the challenge is One Layer cards featuring Spring flowers. So here are the CAS colours this week:
These colours reminded my of iris, a spring flower that we are starting to see in bloom now; I decided to use the orchid stamp from the Happy Watercolour set for my card (an iris is a type of orchid, right?!) because I needed to be able to create something abstract without any green and the stamps in this set are perfect for this. So here is my one layer card:
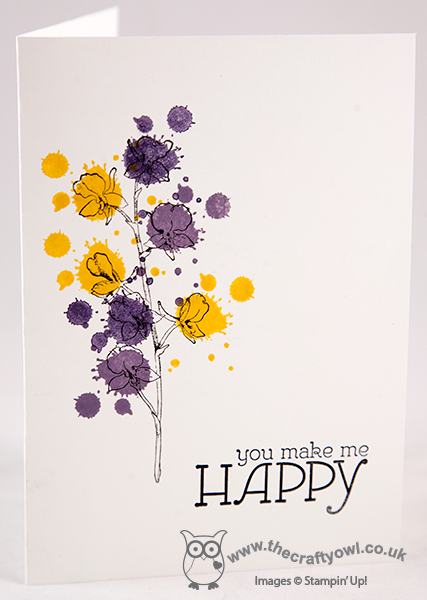
Instead of using one of the watercolour pieces to colour the flowers, I decided the bold colours needed something different so used one of the Gorgeous Grunge 'splodge' stamps instead; I saw something similar at a recent training event by Laura Mackie and decided this stamp would work nicely with the bold colour scheme. The splodges look random, but are perfectly placed: with the aid of my Stamp-a-ma-jig, it was easy to get the correct placement that I wanted. I then finished off with the 'happy' sentiment from the Happy Watercolour set - I love the font on this stamp. Having made this one layer card, I then decided to 'step it up' a little - here is my second card:
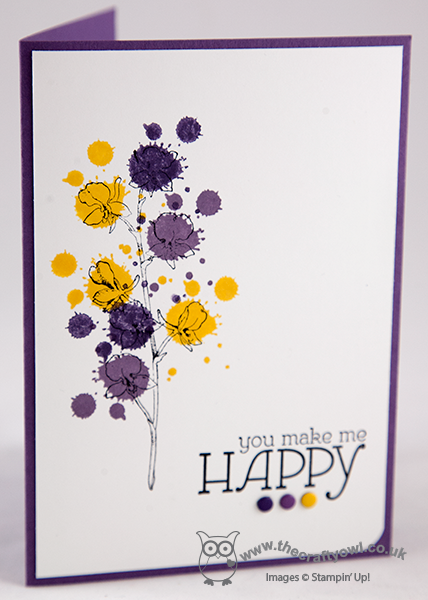
This time I layered on a base of Perfect Plum and finished the sentiment with some co-ordinating Candy Dots, rounding one corner of the white layer with my Envelope Punch Board. Some subtle additions, but they give the card quite a different look I think. I like both of these cards - which one do you prefer?
The 'Happy Watercolour' stamp set will feature in my classes on 28th and 30th April - if you live in Northampton and would like to join me to make some beautiful cards using this set, please get in touch for more information and to book your place. You can find my full class schedule here.
Right, I'm off to get inky! Back tomorrow with another project; until then, happy stampin'!
Stampin' Up! Supplies Used:
2dc518d3-fd24-4030-9b4f-d714327c5af4|0|.0|96d5b379-7e1d-4dac-a6ba-1e50db561b04
Tags: Candy Dots, Envelope Punch Board, Happy Watercolour, one layer cards, Gorgeous Grunge, Shop online, Stamp-a-ma-jig, Stampin' Up, Stampin' Up Card, Stampin' Up Card ideas, Stampin' Up Supplies
Cards | Classes | Stamping
by Joanne James4. March 2014 22:24Good evening lovely readers! I have finished editing my next video tutorial but have bumped it to tomorrow so that I can fit in a quick card that I made for this week's Paper Craft Crew challenge. here is this week's sketch layout:
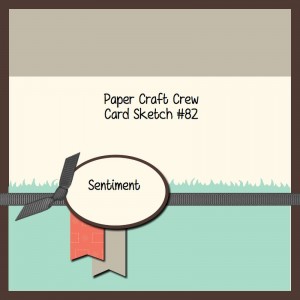
Here is the card I made using this layout:
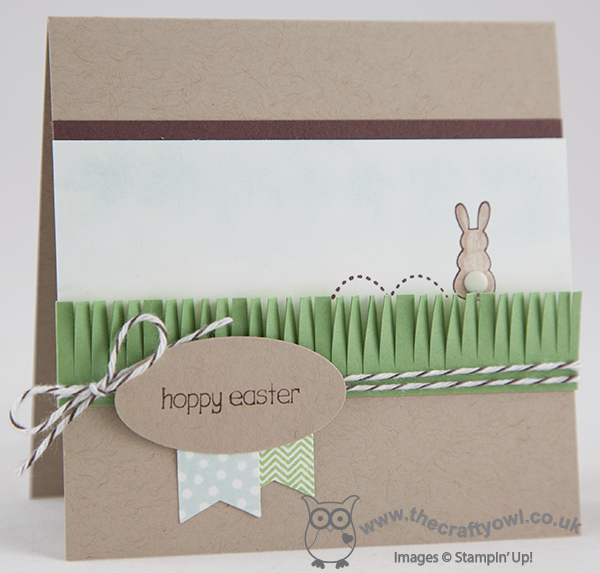
I went with a 4" square card for a change and a Crumb Cake base, then took a strip of Whisper White that I lightly sponged in Soft Sky across the top with Wild Wasabi across the bottom, then stamped the bunny minus the sentiment in Chocolate Chip and coloured him with Crumb Cake ink and a blender pen, before adding a candy dot for his tail. I matted this section on a strip of Chocolate Chip and then added a fringe of Wild Wasabi to the front of the card to make it look like the bunny was hiding in the grass. The new fringe scissors are great for creating grass in an instant and add a lovely texture. I then finished by wrapping some Early Espresso baker's twine around my card and tying in a bow. I stamped the sentiment onto an oval of Crumb Cake cardstock and finished with two co-ordinating banners, stamped using the Banner Blast stamp set and punched out with the matching punch. Both of these items are available free with a spend of £45 or more during Sale-A-Bration - contact me or visit my online store if you would like to place a £45 order and receive these gifts for free.
I've had a busy day today so am off to bed for a well-earned rest; back tomorrow with the second in my 'Any Size' box tutorial series. Until then, happy stampin'!
Stampin' Up! Supplies Used:
857a10ab-e2de-414a-a7f9-f2ec4120ed25|0|.0|96d5b379-7e1d-4dac-a6ba-1e50db561b04
Tags: Candy Dots, Easter, Earn Free Products, Sale-a-bration 2014, Sale-a-bration, Shop online, Stampin' Up, Stamp-a-ma-jig, Stampin' Up Card, Stampin' Up Supplies, Eggstra Spectacular, Fringe Scissors
Cards | Sale-a-bration | Stamping