Love Cats And Warm Quilts For CCS505

by Joanne James21. February 2023 13:00

It's Tuesday and time for a new challenge over at CAS Colours & SketchesThis week's challenge is a sketch challenge and I've designed a sketch with a split horizontal panel that offers lots of possibilities:


Feel free to flip or rotate the sketch when making your card. For my card today I wanted to try out an idea I've had brewing for a while - take a look:


Here's the low-down on today's card:

You know how much I love these 'Love Cats' and here I've used the lounging feline again; this time not on a ledge of designer paper though - I though the the background stencil in the Loveliest Layers Decorative Masks could be made to look like a quilted bedspread; I'm sure there are plenty of cat-lovers out there who allow their pets to lounge on their beds, so this card is for them! I stamped my cat in Basic Grey, masking the hearts and stamping separately in pink, then masked the whole cat with masking paper and added my stencil detail, using Tahitian Tide first, then rotating the stencil and filling in the gaps with Starry Sky to create my quilted effect. I added a scrap of stitched white cardstock to one end to suggest a folded sheet and my sentiment to finish my card. Here's a closer look at the stencilling:


So the question is - did you see what I saw with these stencils? I'm wondering if I should have added a scallop-edged 'pillow' with my sentiment to further add to the effect - maybe next time! I am thoroughly enjoying exploring with stencils - I'm also linking up for a second entry over at Inkspirational where they are focusing on stencils for their current challenge. If like me you are discovering the delights of stencils, do check out their design team cards and gallery too - lots of lovely stencil inspiration. 

Here is the visual summary of the key products used on today's project for you to pin for easy reference:


You can see all of my 'How To' summaries on my 'How To - Tips and Techniques' Pinterest board in case you've missed any. 

Enjoy your day and I'll be back tomorrow with another project. Until then, happy stampin'!


Stampin' Up! Supplies Used:

Table built using Product Table Builder by The Crafty Owl - Independent Stampin' Up! Demonstrator.

Around The Bend CAS Thank You Card CCS 504

by Joanne James7. February 2023 13:00

It's Tuesday and time for a new challenge over at CAS Colours & Sketches. We are into the second month of the year and I am your hostess for February! Our first challenge is a colour challenge: 


For my card today I took the opportunity to have another play with my Around the Bend Dies and create a clean and simple thank you card - take a look:


Here's the low-down on today's card:

Today's card features the detailed corner die. I added a piece of Country Gingham Balmy Blue check to my Balmy Blue card base, then overlaid a piece of white featuring the corner diecut on top. Onto this white panel, I stamped a simple 'thanks' from the 'Biggest Wish' stamp set and added a diecut flower with leaves using other dies in the set:

 I love the embossed detail on the diecuts in this set - it adds interest and allows a single flower to take centre stage, with nothing else needed to compliment that pretty corner detail.

Here is the visual summary of the key products used on today's project for you to pin for easy reference:


You can see all of my 'How To' summaries on my 'How To - Tips and Techniques' Pinterest board in case you've missed any. 

As a reminder, for our colour challenges, you must use all of the stated challenge colours. You may also use neutral colours; however, the challenge colours should be the most noticeable ones featured on your card. We use Stampin' Up! color names for reference, but you are welcome to use any other companies' products as long as you match the challenge colours as closely as possible.

Enjoy your day; I'm looking forward to catching up on some crafting before a super-late school run this evening; the youngest of the James Juniors is having to forgo his weekly club hockey practice in order to participate in a whole school House Singing competition. Apparently his house is singing 'I Will Survive' by Gloria Gaynor - having listened to the practice, I'm not sure the audience will, but there we are!!

I'll be back tomorrow with another project. Until then, happy stampin'!


Stampin' Up! Supplies Used:

Table built using Product Table Builder by The Crafty Owl - Independent Stampin' Up! Demonstrator.
 

This Birthday Piggy CCS503 Double

by Joanne James31. January 2023 12:00

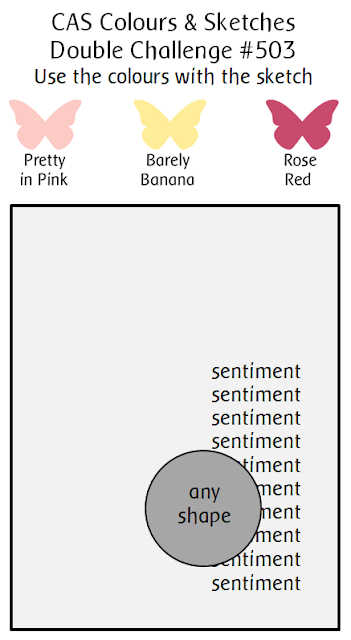
It's Tuesday and time for a new challenge over at CAS Colours & Sketches. Since we have a fifth Tuesday in January (where did this month go?!), we have a retro double challenge for you!  As a reminder, this is where we pair one of our previous colour combinations with an old sketch and you have to use both to make your card. You don't have to use an old set too (although you are welcome to!) - I decided these colours and the layout were perfect for 'This Birthday Piggy' which also means I can play along with my friends over at Just Us Girls this week where they are celebrating with clean and simple birthday cards.
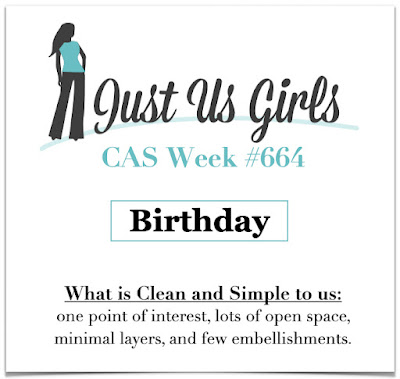
      

As a point of note, the Just Us Girls badge this week has a great reminder of the definition of 'clean and simple' - one point of interest, lots of open space, minimal layers and few embellishments. These are the same criteria we use at CAS Colours & Sketches too so players, take note!  

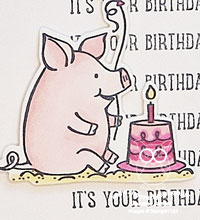
I repeated my 'It's Your Birthday!' sentiment, stamped in Tuxedo Black, in the corner of my white panel and for my focal point I used that super-sweet piggy celebrating his birthday, complete with cake and balloon:
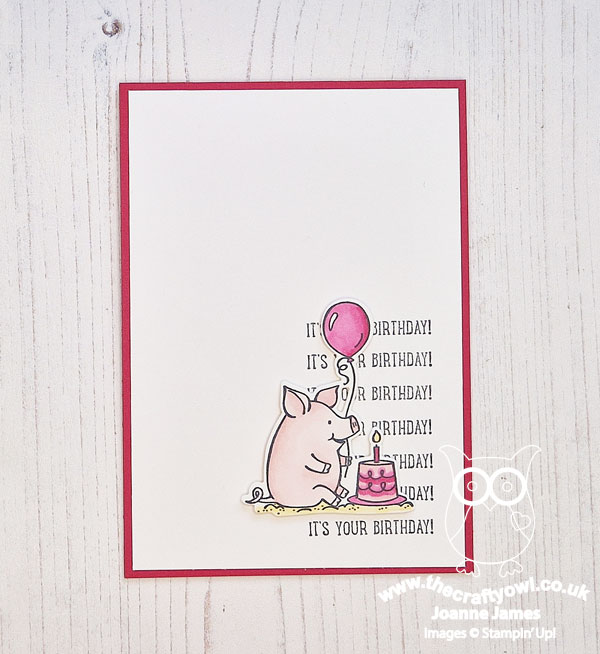
 

I coloured my image with my Stampin' Blends (colours substituted with the closest ones in my collection: Pink Pirouette (retired), Lovely Lipstick (retired) and So Saffron). I cut out my image using the Playful Piggy Dies - did you know these are still available here in Europe on the Clearance Rack, for the bargain price of £11.60 (reduced from £29)? This image could easily be fussy cut too, but there are so many great dies in this set in addition to those that cut out the images, they are definitely worth the purchase:
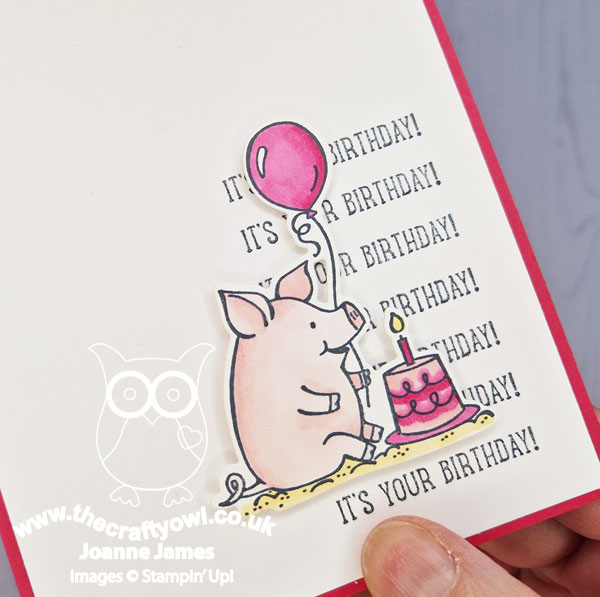
That's all there is to it - an easy, fun clean and simple birthday card!

Here is the visual summary of the key products used on today's project for you to pin for easy reference:
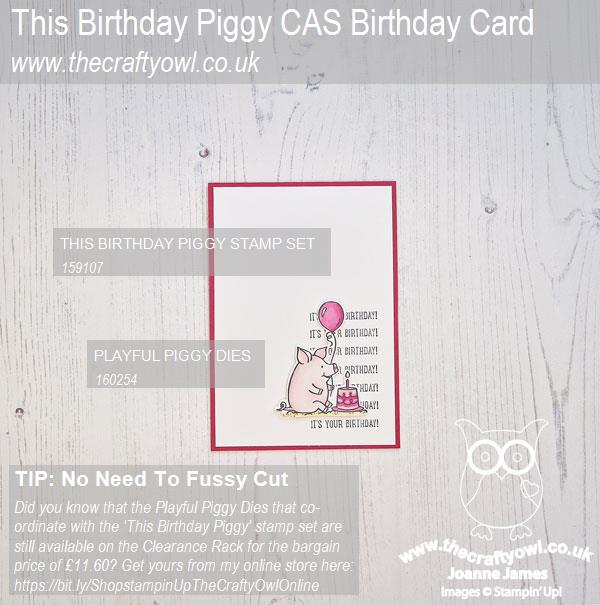
 

You can see all of my 'How To' summaries on my 'How To - Tips and Techniques' Pinterest board in case you've missed any. 

As a reminder, for our colour challenges, you must use all of the stated challenge colours. You may also use neutral colours; however, the challenge colours should be the most noticeable ones featured on your card. We use Stampin' Up! color names for reference, but you are welcome to use any other companies' products as long as you match the challenge colours as closely as possible.

Enjoy your day and I'll be back tomorrow with another project. Until then, happy stampin'!

Edited to add: My cute birthday piggy was Chic of The Week over at Just Us Girls - woohoo!
 

Stampin' Up! Supplies Used:

https://www.stampinup.uk/products/playful-piggy-dies?demoid=5006714

Table built using Product Table Builder by The Crafty Owl - Independent Stampin' Up! Demonstrator.

Country Bouquet CAS Flower Trio CCS502

by Joanne James17. January 2023 12:00

It's Tuesday and time for a new challenge over at CAS Colours & Sketches. The lovely Michal is hosting this month and her second challenge is a sketch challenge: 


Michal has asked that we use a trio of repeating shapes with a sentiment beneath. Feel free to flip or rotate the sketch when making your card.

For my card today I went super simple! I grabbed my Country Bouquet bundle and Country Floral Lane paper and this is what I came up with:


Here's the low-down on today's card:

I punched a trio of heart-shaped flowers and leaves straight from the designer series paper, then added them to my blank white card base. I finished my card with a sentiment stamped just underneath:


And that was my card - done! #SimpleStamping at its best! The three hearts were the perfect width for my card. I didn't even finish the inside sentiment - I like the fact that I can use this card for any purpose as it is, so i will either add something when I come to send it or just leave it blank for my handwritten message. Just four items needed for today's card - and you could forgo the designer paper and just stamp your hearts and leaves to create this in different colours if you prefer.

Here is the visual summary of the key products used on today's project for you to pin for easy reference:


You can see all of my 'How To' summaries on my 'How To - Tips and Techniques' Pinterest board in case you've missed any. I'm linking today's card up over at Just Us Girls where the code word is 'hearts' - might have another go with this theme tomorrow too!

Enjoy your day and I'll be back tomorrow with another project. Until then, happy stampin'!


Stampin' Up! Supplies Used:

Table built using Product Table Builder by The Crafty Owl - Independent Stampin' Up! Demonstrator.

Clean and Simple Sweetest Cherries CCS501

by Joanne James3. January 2023 13:00

It's Tuesday and time for our first challenge of the new year over at CAS Colours & Sketches. We are changing things up in 2023: we are welcoming a new trio of designers to our permanent team - waves to Lucy, Rachel and Sue - and whilst we will keep our format of colour, sketch and double challenges, our challenges are moving from a weekly to a fortnightly schedule, so even more time for you to participate! The super-talented Michal is hosting the month of January and our first challenge is a colour challenge: 


For my card today I decided to leave behind the excesses of the festive season and start the year with some fresh fruit - take a look:


Here's the low-down on today's card:

This week's colours reminded me of morello cherries, so I grabbed my 'Sweetest Cherries' stamp set from the annual catalogue and stamped a pair of juicy fruits, blending my colours on the stamp with a sponge dauber before stamping, then fussy cut them, along with the word 'sweet' which I stamped in Blackberry Bliss, and added these with dimensionals to a white card base trimmed with a piece of Cherry Cobbler designer paper from the Regals pack.


I stamped the first part of the sentiment directly onto the card base, and finished the sentiment on the inside with another cherry to decorate:


A great #simplestamping project to get you started with your new year crafting - and one of your '5 a day' too! I'm also linking today's project up over at TGIF Challenges where they are 'keeping it simple'.

Here is the visual summary of the key products used on today's project for you to pin for easy reference:


You can see all of my 'How To' summaries on my 'How To - Tips and Techniques' Pinterest board in case you've missed any. 

As a reminder, for our colour challenges, you must use all of the stated challenge colours. You may also use neutral colours; however, the challenge colours should be the most noticeable ones featured on your card. We use Stampin' Up! color names for reference, but you are welcome to use any other companies' products as long as you match the challenge colours as closely as possible.

Enjoy your day and I'll be back tomorrow with another project. Until then, happy stampin'!


Stampin' Up! Supplies Used:

Table built using Product Table Builder by The Crafty Owl - Independent Stampin' Up! Demonstrator.

Christmas Lights Snowflake for CCS 500

by Joanne James13. December 2022 13:00

It's Tuesday and time for a new challenge over at CAS Colours & Sketches. It's not only our final challenge of the year before we all take a break for Chrstiams but we are also celebrating a milestone - our 500th challenge! There are prizes to be one for those participating this week, so we would love you to join us. We are ending the year on a high - for our final challenge, Patricia would like you to take and one of our 2022 challenges, sketch, colour or double, and make a seasonal card with it:  


No surprises that I went with the sketch option! I chose sketch number 478 from back in July. You can see the original card I made with it here; for today's card, I went with an altogether more sparkly affair with the Lights Aglow Suite - take a look:


Here's the low-down on today's card:

I used a piece of sparkly gold Very Vanilla Lights Aglow designer paper on my base, and overlaid this with a piece of Very Vanilla which I cut using my Basic Borders Dies to which I'd added a (retired) gold heat-embossed sentiment. For my focal point, I added a diecut snowflake, again with detail heat embossed in gold - I just love the delicate detail of the snowflake image:


So simple yet so sparkly!!

Here is the visual summary of the key products used on today's project for you to pin for easy reference:


You can see all of my 'How To' summaries on my 'How To - Tips and Techniques' Pinterest board in case you've missed any. 

As a reminder, for our colour challenges, you must use all of the stated challenge colours. You may also use neutral colours; however, the challenge colours should be the most noticeable ones featured on your card. We use Stampin' Up! color names for reference, but you are welcome to use any other companies' products as long as you match the challenge colours as closely as possible.

I'm also linking today's card up with the team over at CAS on Friday where their challenge is embossing (I've used heat embossing on my card), at Alphabet Challenge where the current letter is 'R for reduce' (CAS) and at Inkspirational where the challenge theme prompt is 'GOLD'.

Enjoy your day and I'll be back tomorrow with another project. Until then, happy stampin'!


Stampin' Up! Supplies Used:

Table built using Product Table Builder by The Crafty Owl - Independent Stampin' Up! Demonstrator.

#Simplestamping Jingle Jingle Jingle Jolly Wreath Christmas Card CCS 499

by Joanne James6. December 2022 13:00

It's Tuesday and time for a new challenge over at CAS Colours & Sketches. It's the last month of the year and Patricia is hosting this month. This will be a special month for us, since next week we celebrate our 500th challenge! More on that next week though - we are kicking off the month with a colour challenge: 


For my card today I went with some #simplestamping using just the three ink colours in this week's colours, one stamp set and some Basic White Thick cardstock to create my fun and colourful Christmas card:


Here's the low-down on today's card:

I decided the small candy cane, star and bell images in the 'Jingle Jingle Jingle' stamp set would be perfect for a fun festive wreath with a difference, so I lightly drew a circle in pencil on my card front and stamped my small images randomly in a circle. On a separate piece of cardstock, I stamped the word 'jolly', adding a santa hat to the O, and fussy cut it out. I stamped part of my sentiment inside my wreath and the added my fussy cut word, slightly offset for interest:


I originally stamped my wreath onto a rectangular card, but it didn't look right, so I cropped it tightly and mounted it onto a square white card with a wide frame to preserve some 'white space' and it looked much better. If I had started on a square base I would have forgone the red mat layer - this would simplify this card even further. This is such a great stamp set for #simplestamping cards that require nothing more than stamps, ink and paper.

Here is the visual summary of the key products used on today's project for you to pin for easy reference:


You can see all of my 'How To' summaries on my 'How To - Tips and Techniques' Pinterest board in case you've missed any. 

As a reminder, for our colour challenges, you must use all of the stated challenge colours. You may also use neutral colours; however, the challenge colours should be the most noticeable ones featured on your card. We use Stampin' Up! color names for reference, but you are welcome to use any other companies' products as long as you match the challenge colours as closely as possible.

Enjoy your day and I'll be back tomorrow with another project. Until then, happy stampin'!


Stampin' Up! Supplies Used:

Table built using Product Table Builder by The Crafty Owl - Independent Stampin' Up! Demonstrator.

Retro Spruced Up Ornament Dies CCS498 Double

by Joanne James29. November 2022 13:00

It's Tuesday and time for a new challenge over at CAS Colours & Sketches. Cecile is hosting this month and since we have 5 weeks this month we are ending with a double challenge: 


Feel free to flip or rotate the sketch when making your card.

I have loved all of Cecile's colour and sketch choices this month and whilst I normally struggle with a double challenge, this one came together easily - I love it when that happens! For my card today I used my Spruced Up Outline Dies to create a collection of ornaments in three sizes to mirror the circles on the sketch, in each of the challenge colours - take a look:


Here's the low-down on today's card:

Retro Colours - As I no longer have any of this week's colours (long time readers of my blog will remember my thoughts on Always Artichoke!), I substituted with my nearest matches: Pool Party, Mossy Meadow and Blushing Bride respectively. I actually think they look ok together and the Mossy Meadow is perfect for a festive feel; I made this my dominant colour of the trio and used it for a hint of mat layer colour and my sentiment too.

Wintry Pines - Whilst I could have just added my baubles and been done, they looked a little 'lost', so I added a panel of embossed pines courtesy of the Wintry 3D Embossing Folder. This is a narrow EF so did mean I had to get creative with my layering to maintain the square aspect ratio, but I think it works and I really love the way the ornaments now look as if they are hanging from pine branches. Keeping this layer white helps to keep the clean and simple feel yet adds beautiful subtle embossed detail:


'Tis The Season - Finally, my simple sentiment is courtesy of the 'Jingle Jingle Jingle' stamp set - just enough to finish without obscuring the detail of my card.

Here is the visual summary of the key products used on today's project for you to pin for easy reference:


You can see all of my 'How To' summaries on my 'How To - Tips and Techniques' Pinterest board in case you've missed any. 

I really love this card - so much so, I'm going to make a few more in alternative colourways too.

As a reminder, for our colour challenges, you must use all of the stated challenge colours. You may also use neutral colours; however, the challenge colours should be the most noticeable ones featured on your card. We use Stampin' Up! color names for reference, but you are welcome to use any other companies' products as long as you match the challenge colours as closely as possible.

Enjoy your day; I'll be back later with another post with important details about this week's upcoming Retiring List. Until then, happy stampin'!


Stampin' Up! Supplies Used: 

Table built using Product Table Builder by The Crafty Owl - Independent Stampin' Up! Demonstrator.

Season of Chic Christmas Snowflakes CCS 497

by Joanne James22. November 2022 13:00

It's Tuesday and time for a new challenge over at CAS Colours & SketchesThis week's challenge is a sketch challenge and Cecile has asked that we overlay an image and background element: 


Feel free to flip or rotate the sketch when making your card. For my card today I used my snowflake and 'swoosh' stamps from the 'Season of Chic' stamp set along with some diecut snowflakes cut with the Chic Dies for some winter birthday or Christmas inspiration:


Here's the low-down on today's card:

I added a simple border with my white chalk marker then stamped some tone-on-tone snowflakes stamped in Orchid Oasis to my cardfront, along with a swoosh in Starry Sky for contrast, and complimented this with a white heat-embossed sentiment and some white glimmer diecut snowflakes, trimmed with Opal Rounds:


I added some stamped snowflakes and a greeting to the inside of my card, and carried the detail over to the envelope too:


A card that works for a winter birthday or Christmas - and easy to make too!

Here is the visual summary of the key products used on today's project for you to pin for easy reference:


You can see all of my 'How To' summaries on my 'How To - Tips and Techniques' Pinterest board in case you've missed any. 

Enjoy your day and I'll be back tomorrow with another project. Until then, happy stampin'!


Stampin' Up! Supplies Used:

Table built using Product Table Builder by The Crafty Owl - Independent Stampin' Up! Demonstrator.

Christmas Pinecones Clean and Simple CCS 496

by Joanne James15. November 2022 13:00

It's Tuesday and time for a new challenge over at CAS Colours & Sketches. Cecile is hosting this month and she has our second colour challenge of November: 


I usually struggle with colour challenges, but Cecile has chosen some great ones this month - I love them all! For my card today I decided these colours were perfect for another Christmas card - take a look:


Here's the low-down on today's card:

Masked Blending - I started by adding a couple of strips of masking tape to my white card base and using a blending brush, blended my Soft Succulent ink from the corner across my card, fading at the edges. I then removed the masking tape to give a nice border to frame my main focal image. 

Christmas Pinecones and A Blending Trick - I decided these colours would be perfect for some pine needles and pinecones, so I cut some using my Christmas Pinecone Dies and snipped out a section that could be used to fit my corner. I created two-tone colours by adding the same colour ink to deepen the colour on one of the layers - this is a useful trick to create two tones of the same colour easily. I added some puffy snow and some iridescent gems for a little extra detail:


Christmas To Remember - The sentiment on the front of my card comes from the 'Christmas To Remember' stamp set, and I used another from the same set on the inside of my card. I stamped it in Early Espresso to compliment my pinecone detail.

This card does have more detail than I usually choose for a CC&S card, however it is still clean and simple with some clean, white space. 

Here is the visual summary of the key products used on today's project for you to pin for easy reference:


You can see all of my 'How To' summaries on my 'How To - Tips and Techniques' Pinterest board in case you've missed any. 

As a reminder, for our colour challenges, you must use all of the stated challenge colours. You may also use neutral colours; however, the challenge colours should be the most noticeable ones featured on your card. We use Stampin' Up! color names for reference, but you are welcome to use any other companies' products as long as you match the challenge colours as closely as possible.

Enjoy your day. I am spending today with one of my dear crafty friends that I don't get to see often face-to-face and we have lots to catch up on, so I'm really looking forward to it! I'll be back tomorrow with another project. Until then, happy stampin'!


Stampin' Up! Supplies Used:

Table built using Product Table Builder by The Crafty Owl - Independent Stampin' Up! Demonstrator.

Mini Catalogue

BROWSE THE CATALOGUE

The mini catalogue is now live! Read and download your copy here.

Shop Online

Access my online shop 24 x 7, 365 days of the year:

Current April hostess code:

VDKNV7BH

Shop Online

Join My Team

It's always a great time to join Stampin’ Up! New team members can get £130 worth of products for only £99 + free business supplies + free shipping + all the fun being a part of Stampin’ Up! Stampin' Up! has something for everyone: join my growing team and benefit from my support to enjoy Stampin' Up! however you choose.

If you're interested, call me for a chat to understand how I can help you realise your goals. Alternatively, if you have already decided to sign up and you just can't wait, please click here for the link to the online form where you can sign up and order your starter kit right away! 

Latest Kit!

Stampin Cut and Emboss

The Rock Legend Kit has all you need to make 8 cards with coordinating envelopes. Along with the new Panda Friends Kit, both are available from January 4th for just £14 each - get yours here!

2023-24 Annual Catalogue

BROWSE THE CATALOGUE

Click on the catalogue for a full list of current SU! supplies - if you would like to order any of the items featured, please drop me a line at [email protected] or give me a call on 07773 421446 - I'd be happy to help.

New Online Exclusives

There are new products available exclusively in the online store from 5 March - check them out here.

About Me

Hi I'm Joanne and live in Northampton and when I'm not looking after my husband and two beautiful children, am an avid crafter with a passion for all things Stampin' Up!

I must confess that I have never been a big rubber stamper - until I discovered Stampin' Up! that is. I love the fact that I can get such great results with co-ordinating stamps, inks, papers and punches - the possibilities are endless! Join me on my stamping journey as I share the things I love and be inspired to create amazing things yourself!

Follow Me

Monthly Newsletter

Box Builder

Click the button above to use Box Buster to create your custom box design using the Envelope Punch Board!

Kits Collection Now Available!

Stampin Cut and Emboss

The new Kits Collection from Stampin' Up! is now available!

Click here to see the current kits available and order yours online today.

I Design For


Stampin' Up Stuff

This is my personal blog and is not endorsed by Stampin’ Up! I hope you find it a plentiful source of ideas and personal inspiration but please don't copy my designs for contest submission or use for classes, publication or sale without express permission.