by Joanne James8. October 2013 15:40A quick post from me today as I'm out again this evening preparing for our school annual bonfire and fireworks display. I promised to share a card with you today, so thought I'd share this lovely festive flurry card that we made in my card class yesterday:
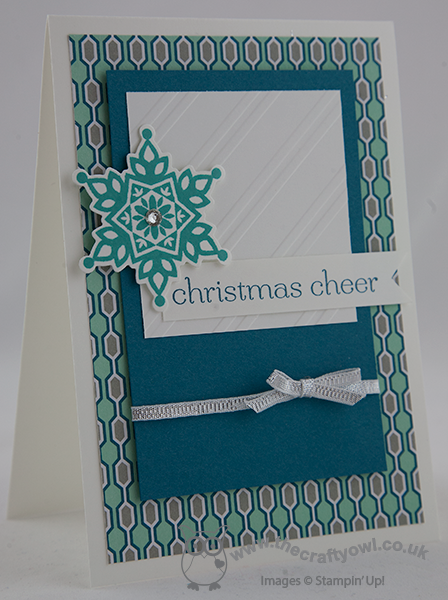
This is a case of a Mary Fish card (you can see her original card here) minus the frosted finish embellishment. Whilst I love the embellishment and you will see them on future blog cards, our class cards are all intended to be post-friendly, so the frosted embellishment on this card had to go! We replaced with a large rhinestone instead to give a little sparkle but not add too much bulk. I love the Winter Frost colours of this card - they have a real fresh and modern feel.
Lastly, it's Tuesday, also known as Digital Download Day. Click on the link below to see all of the new digital downloads available in the online store this week:

There are some great new downloads this week, including calendar and photobook templates that would make lovely Christmas presents. Why not have a click and take a look?
Back tomorrow with another card; until then, happy stampin'!
Stampin' Up Supplies Used:


5b1c2ae0-6b18-4876-8e97-5269f69f496c|0|.0|96d5b379-7e1d-4dac-a6ba-1e50db561b04
Tags: Stampin' Up Supplies, Stampin' Up Card ideas, Stampin' Up Card, Stampin' Up, Stamp-a-ma-jig, Shop online, Festive Flurry Framelits, Festive Flurry, Winter Frost, Sweet Essentials, Stylish Stripes TIEF, Big Shot, Magnetic Platform
Cards | Classes | Stamping
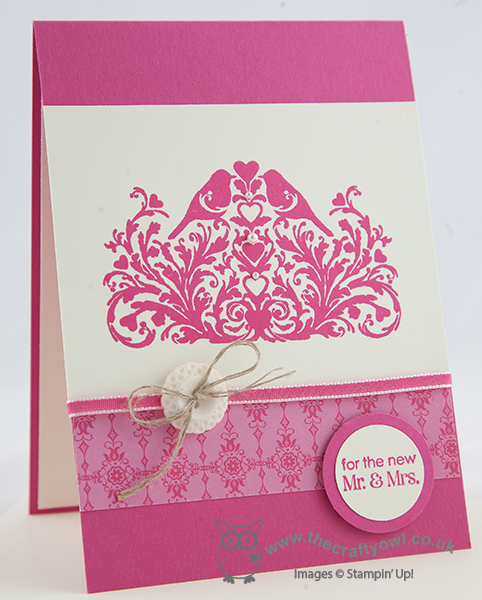
by Joanne James2. October 2013 21:06A quick post from me today to share a wedding card and gift box I made for my friends and neighbours, Annette and Jason, who got married at the weekend. The theme of the wedding was bright pink and the gerbera was a feature flower, both in the bridal and bridesmaids bouquets and on the invitations and wedding favours. Having made the wedding invitations (I will share these in a future post - I have 'mislaid' the photographs I took on completion!), I decided to make a wedding card that was pink but not flower-themed, but I did design a gift box that complemented the overall décor to house their gift.
Here is the card, using the lovely 'From This Day Forward' stamp, inspired by a similar card by Monica Gale here:
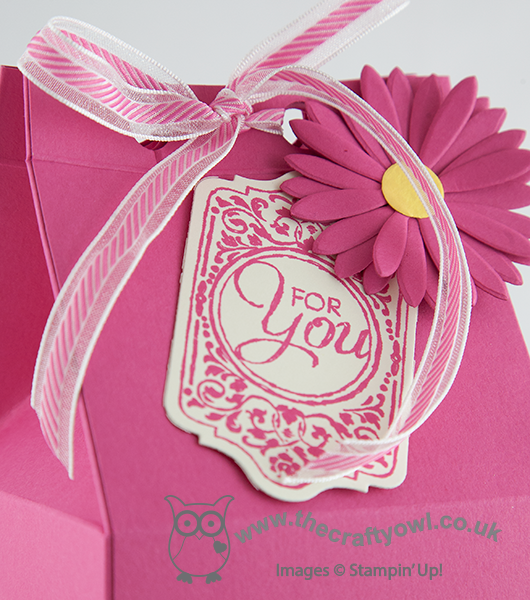
I also created a gift box with a belly band with a gerbera design, that echoed the design of the wedding stationery and favours. My box was inspired by this mini version by Sam MacDonald of Pootles Paparcraft here, and although whilst the shape is the same, the overall dimensions are considerably larger! here is my full size version:
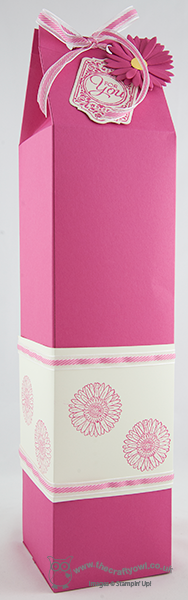
Very large, with a 9cm x 9cm square base, and very pink, but more sturdy than a gift bag and much more personal. I finished it off with some retired Melon Mambo organza ribbon (currently available to purchase on the Clearance Rack!) and a die-cut flower with co-ordinating Chalk Talk gift label. here's a close up of the detail:
The sun shone and the wedding day was perfect - what more can you ask for? Congratulations to the new Mr & Mrs Harrison - wishing you a happy future together.
Back tomorrow with another project and the detail behind the 2 week £25 sign up offer that begins on October 7th; until then, happy stampin'!
Stampin' Up Supplies Used (for the card only):


db51ab79-74bb-4cf0-a77c-ccfe6124d66d|0|.0|96d5b379-7e1d-4dac-a6ba-1e50db561b04
Tags: 3D Projects, boxes, Chalk Talk, Magnetic Platform, Big Shot, Shop online, Stampin' Up, Stampin' Up Card, Stampin' Up Card ideas, Stampin' Up Supplies, Weddings, From This Day Forward
3D Projects | Boxes | Cards | Stamping
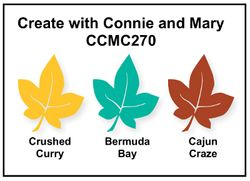
by Joanne James1. October 2013 12:34I promised a creative post today (technically this is a bonus, as I already shared some MDS creativity with you earlier, but I'm not one to split hairs :-)), so here it is. I was inspired by the fabulous autumnal cards I'm seeing on the internet at the moment and when I saw the colour challenge at Create with Connie and Mary this week I thought I'd join in. So here's the colour palette for this week's challenge:
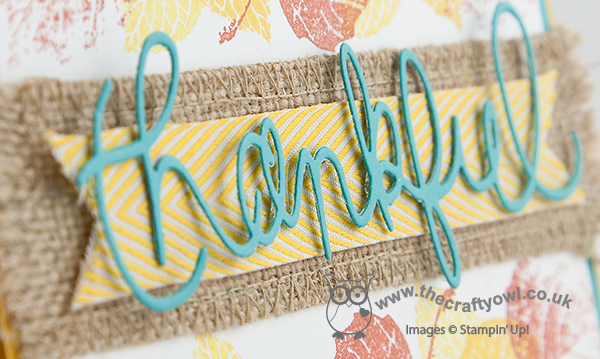
I don't own any of the lovely leafy stamp sets in the current annual and seasonal catalogues (shock, horror!), but I am still the proud owner of a retired 'French Foliage' stamp set, so I combined this set with one of the fabulous new thinlits to create my card:
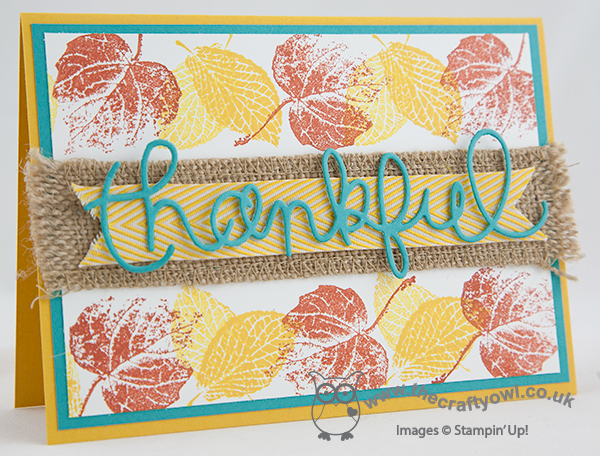
I stamped off the leaves on some scrap paper first to give a less intense colour, then used the 'thankful' thinlit, layered on some burlap and chevron ribbon to create the true focal point for my card. I love these thinlits and think the 'thankful' just pops on this card in the Bermuda Bay colour cardstock! My top tip to release the cut card easily from the thinlit is to line it with waxed paper first, which enables it to press out easily.
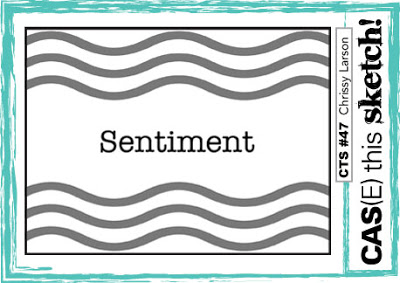
I am also linking this card up to CAS(E) This Sketch #47 this week, where the layout sketch is as follows:
If you would like to purchase any of the supplies used to make this card (except for the stamp set, although there are lots of similar current sets available) please click on the item links to my online store below. My children have a harvest festival at school today and this reminds us all it is a good time to give thanks. I'm sure you, like me, have lots to be thankful for so readers, crafters and customers alike - this card is for you! Back tomorrow with more creative loveliness! Until then, happy stampin'!
Stampin' Up Supplies Used:


by Joanne James16. September 2013 22:32This is a short post I'm afraid - I've already typed this once and lost it, so am furiously retyping (I'm blaming the computer rather than the operator though - bloggers prerogative!) Today I'm sharing another of the mosaic cards from last week's class, this time showcasing the Quatrefancy Speciality Designer Series Paper:
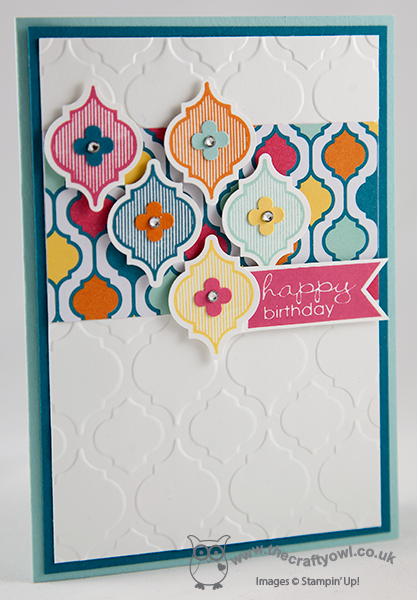
This is a CASe of a Janine Tinklenberg card that I saw on Pinterest. I love the bold colours of the designer paper and the stamped punched images really make it 'pop'. There really is so much you can do with this product suite; this card is simple in design, yet so effective.
Did you notice that all the cards in this month's class also featured the Banner Greetings stamp set? This is an exclusive hostess set that you can purchase with hostess credits earned on a qualifying party or individual order (£150 or more). There has never been a better time to host a party, with so many lovely new hostess sets in both the annual catalogue and Autumn-Winter seasonal catalogue to choose from. So what are you waiting for? Treat yourself to an early Christmas present of free crafting goodies and book a party with me today - get in touch to discuss available slots, there are still times available before Christmas.
Back tomorrow with another project; until then, happy stampin'!
Stampin' Up! Supplies Used:


181185fe-2d3c-4e62-987a-4e50dceac0c7|0|.0|96d5b379-7e1d-4dac-a6ba-1e50db561b04
Tags: Banner Greetings, Itty Bitty Punches, Mosaic Madness, Mosaic Embossing Folder, Mosaic Punch, Quatrefancy, Shop online, Stampin' Up Card, Stampin' Up Card ideas, Stampin' Up Supplies, Big Shot, Host a Party
Cards | Classes | Host a Party | Stamping
by Joanne James15. September 2013 20:52Hope you've all enjoyed a lovely weekend; mine's been great, but I must confess to not enjoying the weather; it feels like autumn has arrived with a vengeance and I don't much care for it. I am missing the Florida sunshine! Anyway, today's card is one we made in last week's Mosaic Madness class:
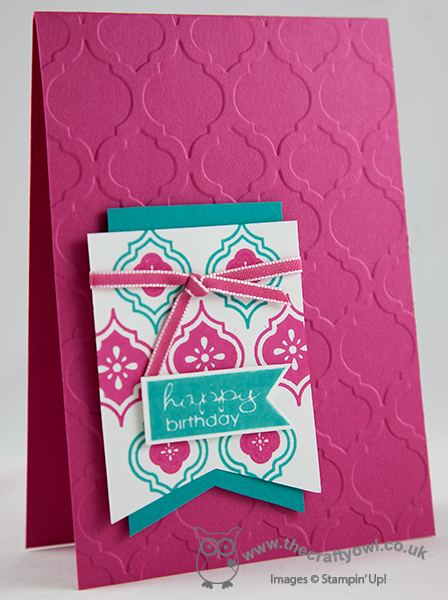
I've seen a few versions of this card on Pinterest and this is my take - bold and bright in Melon Mambo and Bermuda Bay. This was one of the more complicated cards we tackled, as it involves two-step stamping and accurate placement using the stamp-a-ma-jig to place the mosaic stamps accurately on the white flag. Some of my ladies chose to cheat a little and stamp their images onto scrap card and then punch them out and glue them to the flag, trimming to fit; that's fine too.
I really love this colour combination and the combination of the stamps with matching embossing folder is just right. This embossing folder is one of the most versatile and the pattern can be used either embossed or debossed, each giving a different effect. One last thing before I go - I hope you like the new-look supplies list at the end of this post. From now on, the idea is to show each of the products used with a direct line to my online store. This will make it really easy for you to purchase items and take advantage of any online hostess codes or offers or simply order your items any time, day or night. You may notice a few tweaks over the next few days as I make this happen, but if you have any questions about online ordering, please get in touch.
I'll share our other class cards with you this week. Until then, happy stampin'!
Stampin' Up! Supplies used:


by Joanne James14. September 2013 21:09Last week it was my mother-in-law's birthday and today I'm sharing the birthday card I made for her, using my Chalk Talk set for the first time:
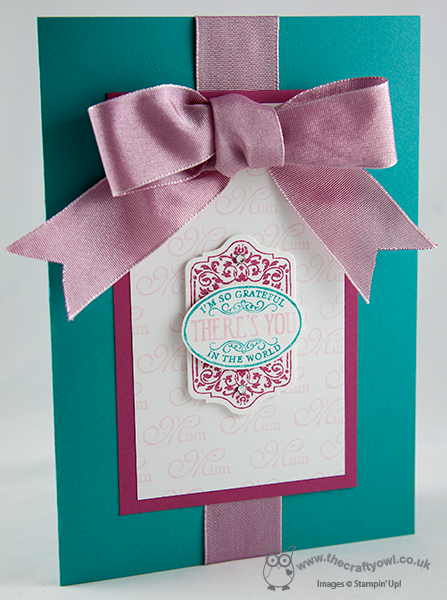
I had some of the lovely pink wide ribbon left over from the Spring-Summer Seasonal Catalogue earlier in the year and I wanted this to be a real feature of this card, so the actual stamping is understated. I really love the sentiment on this Chalk Talk stamp and for someone who is such an integral part of our family, it was especially appropriate for this card. Also, did you notice the background paper - wondering where I got this from? Well, I made it myself using the 'Mum' stamp from the retired 'For My Family' stamp set. I'm really pleased with how it turned out - and I didn't even use a stamp-a-ma-jig to line it up! I love the colour combo too - I'm really into Bermuda Bay at the moment and I think it works really well with the pinks in this card.
Back tomorrow with another card; until then, happy stampin'!
Stampin' Up Supplies:
Stamps: Chalk Talk, For My Family (retired)
Cardstock: Whisper White, Rose Red, Bermuda Bay
Ink/Stampin' Write Markers: Pink Pirouette, Rose Red, Bermuda Bay
Tools: Chalk Talk Framelits, Extra Large Oval Punch, Big Shot, Magnetic Platform
Finishing Touches: 1 1/4" Two Tone Ribbon (retired), Basics Rhinestones
by Joanne James13. September 2013 20:30No post yesterday, but two today to make up for it! Here's the first one. Great news - the Big Shot Magnetic Platform is back and now available to order again!
This is one of the 'unsung heroes' of this year's annual catalogue, although clearly I am not the only one to think so - some 13 weeks worth of stock sold out in about 3 weeks! I'm happy to report that supplies have now been restored, so if you've been eagerly awaiting yours, now's the time to order!
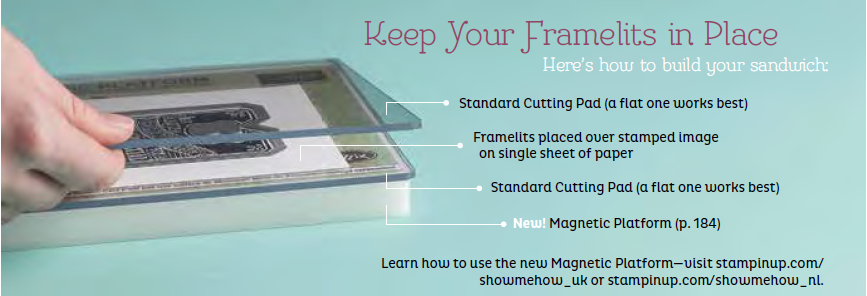
The magnetic platform makes light work of cutting cardstock with framelits; no longer do you need to rely on post-it notes and hope that they hold everything in place. If you would like to see the magnetic platform in action, here's a great video from Stampin' Up that shows you how it works:
If you would like to order a magnetic platform, either contact me or pop over to my online store now to purchase.
Back shortly with another post; until then, happy stampin'!
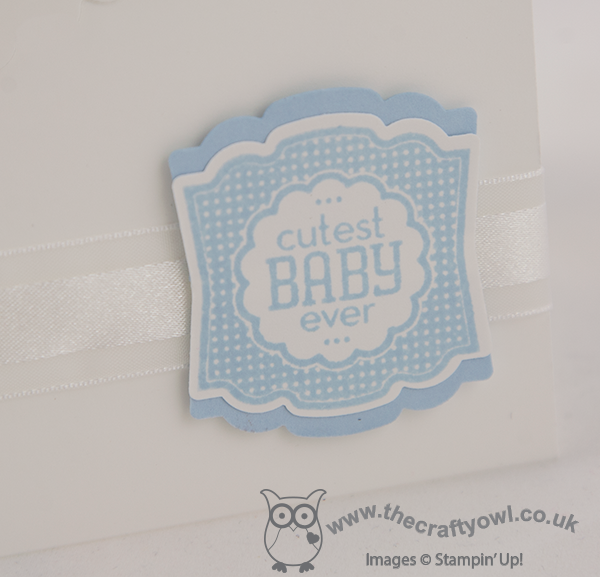
by Joanne James28. August 2013 07:30Today I'm sharing a recent commission card I made for a friend of mine who wanted to welcome the latest addition to her extended family, another in a long line of little boys! The brief was 'simple classic' and we agreed a bib style card would be perfect. I made a 6" square card, using the new Circles Framelits to create the bib:
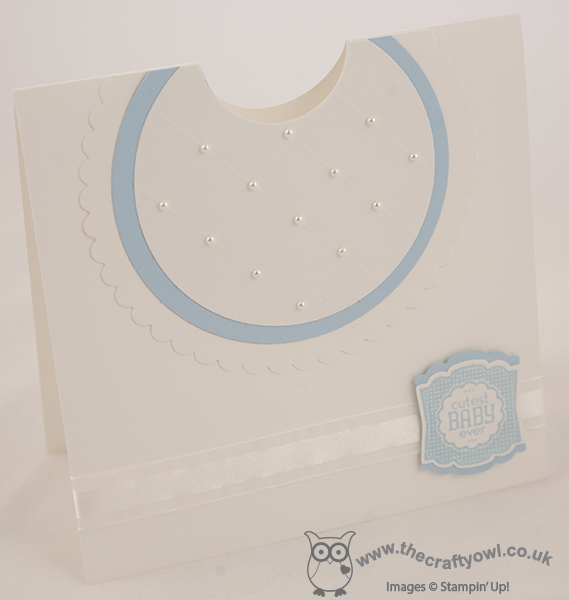
I scored the central section on the reverse at 1/2" intervals and finished with tiny pearls for added detail. I added took the opportunity to create a layered label using my new baby Label Love stamp and co-ordinating Artisan Label punch - here's a close up:
How cute is this? I love how easy it is to create the background layer which in this instance added just enough colour to pop this off the front of this largely white card. I used some of my retired Bashful Blue card stock - I will miss this colour for baby boy cards, it's such a perfect shade.
Back tomorrow with another project; until then, happy stampin'!
Stampin' Up Supplies:
Stamps: Label Love
Cardstock: Whisper White, Bashful Blue (retired)
Ink/Stampin' Write Markers: Bashful Blue (retired)
Tools: Artisan Label Punch, Circles Framelits, Simply Scored
Finishing Touches: Whisper White 5/8" Organza Ribbon, Basics Pearls
by Joanne James27. August 2013 19:30A quick post from me today. Here is the last of my favourite Telford swaps to share: this one was by Maria (you can see her blog here):
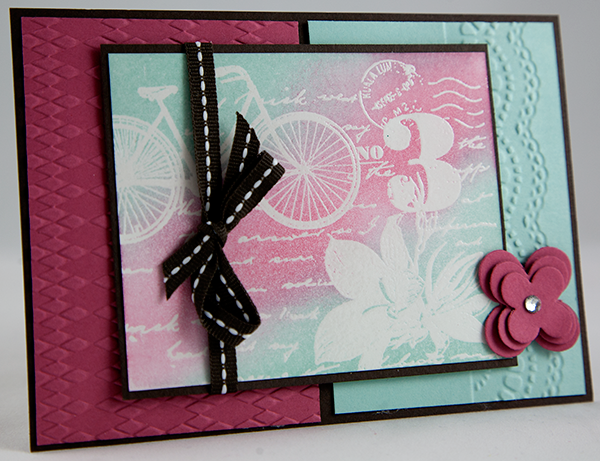
I like it because it used a number of products and sets I don't have and showcases some beautiful clear embossing. I love the overall finished effect of this card and the unusual colour combination too.
Back tomorrow with another of my cards; until then, happy stampin'!
Stampin' Up Supplies:
Stamps: Postage Due
Cardstock: Primrose Petals, Pool Party, Whisper White, Early Expresso
Ink/Stampin' Write Markers: Primrose Petals, Pool Party, Versamark
Tools: Big Shot, Delicate Design Textured Impressions Embossing Folder, Argyle Textured Impressions Embossing Folder, Floral Fusion Sizzlit
Finishing Touches: Clear Embossing Powder, Early Expresso Stitched Grosgrain Ribbon, Basics Rhinestones
by Joanne James18. August 2013 20:08Another 40th birthday card today, this one showcasing lots of new products. This was the birthday card from my children to their uncle, so I wanted it to fauna fun design; this is what I came up with:
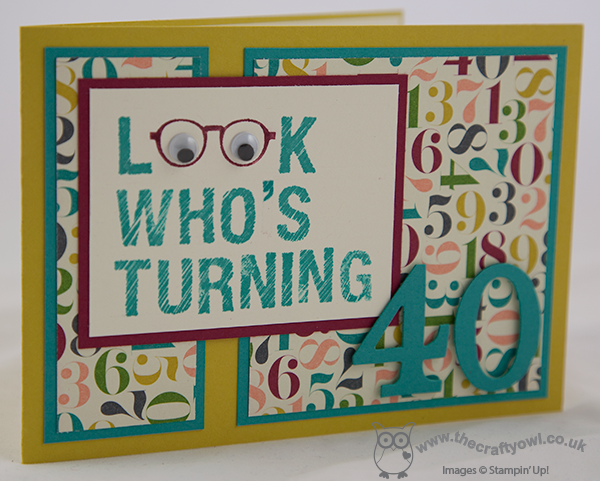
I used the Birthday Basics Designer Series Paper as the inspiration for the colour scheme for this card - that and the fact that I already had Bermuda Bay out on my desk (I love this new colour!) I built the sentiment from my Simply Sketched Alphabet stamps and added a fun element by replacing the 'OO' with a pair of spectacles and googly eyes. I stamped the spectacles by inking up one pair on my 'Spectacular' single stamp - I have been having lots of fun with this stamp (as a specs wearer it really appealed to me!); this, and the other single stamps, are still available to purchase until the end of the month. See the box on the right of my blog page for more details and make sure you contact me before the end of the month if you'd like to order one.
My children thought this card was really funny, although I'm not sure that I would have got away with it as far as my specs-wearing brother-in-law is concerned, were I not a specs wearer myself!
Back soon with another project; until then, happy stampin'!
Stampin' Up Supplies:
Stamps: ABC-123 Sketch Alphabet and Numbers, Spectacular
Cardstock: Summer Starfruit, Bermuda Bay, Raspberry Ripple, Very Vanilla, Birthday Basics Designer Series Paper (SAB - retired)
Ink/Stampin' Write Markers: Bermuda Bay, Raspberry Ripple
Tools: Simply Scored, Big Shot, Typeset Alphabet Die, Stamp-a-ma-jig
Finishing Touches: Googly eyes (non SU)
dec94f86-e21f-4289-864c-3a26e3169f4b|1|5.0|96d5b379-7e1d-4dac-a6ba-1e50db561b04
Tags: ABC-123 Sketch Alphabet & Numbers, Big Shot, Birthday Basics, Stamp-a-ma-jig, Simply Scored, Stampin' Up, Stampin' Up Card, Stampin' Up Card ideas, Stampin' Up Supplies, Typeset Alphabet, Spectacular
Cards | Promotions | Stamping