Going Global Meets Going Places Compass Masculine Card

by Joanne James22. March 2016 11:59

It's Tuesday and today I have a change of style with a masculine card for you! I'm too late to link up over at Pals Paper Arts Challenge but I just couldn't resist this great sketch from Beth Beard:

PPA-292-Mar17

So many lovely layers! The minute I saw this sketch I knew that I wanted to use the compass from the 'Going Global' stamp set and the co-ordinating papers in the Going Places DSP stack. Here's my card:


Today's card is all about co-ordination, colour and layout:

Co-Ordination - One of the things that make Stampin' Up! special is the extent to which suites of product fit seamlessly together and co-ordinate with our standard inks and cardstock and the Going Places product suite is no exception. Trendy, masculine patterns and textures with travel-inspired designs make this set perfect for cards for the man in your life. Whilst I don't often mix more than one designer paper on a card at any one time, the contrasting colours of the papers I used today work really well and the repitition of the compass image is what really makes this card.

Colour - Basic Black and Very Vanilla are in both of my chosen designer papers so I knew these colours would feature heavily on today's card. I needed a third colour though; what to choose? I decided upon one of our soon-to-be retired 2014-16 in-colours, Lost Lagoon. I wanted something muted, yet natural and Lost Lagoon fitted the bill.

Layout - I love a sketch with lots of layers and Beth's doesn't disappoint! My card actually has 12 separate layers, yet the definition of each plays an important part in the finished look and feel. Having chosen my sentiment and where I was going to position it on my card, I did take one liberty with Beth's sketch; my papers and compass were all centred on my card and whilst Beth's sketch shows the banner coming from one side and flagged on one end only, I knew I needed to centralise my Lost Lagoon banner too to maintain the balance of my card. This gave me the balanced look I was aiming for.

Here is a visual summary of the key products used to make today's card for easy reference:


I hope you like today's card. I have a short work day today as the James Juniors are on an early collection from school as it's the last day of term, so I need to get cracking! Before I go - for those of you interested in yesterday's netball scores, both A and B teams won their matches so Rebecca was thrilled to end the season on a high. 

I'll be back tomorrow with another project. until then, happy stampin'!


Stampin' Up! Supplies Used:

Table built using Product Table Builder by The Crafty Owl - Independent Stampin' Up! Demonstrator.


In The Meadow Square Card

by Joanne James17. March 2016 08:05

Today it's time for a new challenge over at Create With Connie and Mary and this week we have a colour combination for you:


These colours immediately made me think of nature so I decided to use my new 'In The Meadow' stamp set for my card today:


I stamped my images in Archival Black ink and used my aquapainter and inks to colour them in before cutting out with my Circles Framelits. My Soft Suede card base is square and I layered this with a mat of Mossy Meadow and a piece of striped paper from the English Garden designer series paper pack that has a lovely watercoloured feel. I added a strip of Mossy Meadow and before I added a few twists of linen thread and a bow, decided to add a strip of wide Watermelon Wonder ribbon on something of a whim. The only other place I used this one of the challenge colours was on the butterflies next to my sentiment, so thought I would try a bold injection of colour; I liked it, so I kept it! This stamp set is not the type I am normally drawn to, but having seen some beautiful scenes created with it I decided I had to have it and I love the creative possibilities it offers.

Here's today's visual summary of the key products used to create today's card for easy reference:


Do visit the other Design Team members to see what they did with this week's colours; there's lots of inspiration over on their blogs too!

I have another busy day in store today (no rest for the wicked and all that!)

Enjoy your day and I'll be back tomorrow with another project; until then, happy stampin'!


Stampin' Up! Supplies Used:

  • Big Shot
  • Precision Base Plate
  • In The Meadow Clear-Mount Stamp Set
  • Watermelon Wonder 1" Stitched Satin Ribbon
  • Circles Collection Framelits Dies
  • Magnetic Platform
  • Linen Thread
  • English Garden Designer Series Paper
  • Soft Suede Classic Stampin' Pad
  • Soft Suede A4 Cardstock
  • Mossy Meadow Classic Stampin' Pad
  • Mossy Meadow A4 Cardstock
  • Whisper White A4 Thick Cardstock
  • Watermelon Wonder Classic Stampin' Pad

Botanical Blooms CAS Thank You Card

by Joanne James16. March 2016 21:09

I'm back! No blog post from me yesterday I'm afraid: I have been battling a dreadful cold this week and with my busy days a few early nights have been in order. Today I'm back with another of my technique class cards using all three products from the Botanical Garden bundle, this time a clean and simple thank you card. I made this card early last week before last week's sketch over at Freshly Made Sketches was published, so I couldn't quite believe it when I saw both the sketch and Amy o'Neill's FMS Design Team card, that bears many similarities to mine - spooky how that happens sometimes! Here is the card I designed for my class:

This card is all about the vine; it can be used in lots of different ways (here's another example on an earlier card here) but one thing is for sure, it makes such a beautiful edging for a card. On this card it is cut into the front piece of my extra thick Whisper White card base and a piece of Botanical Gardens Designer Series Paper adhered to the back panel beneath it to show through when closed. The focal point of my card is another flower cut using my Big Shot and the Botanical Gardens framelits, but the other things that make this card special are:

Suite Sayings Sentiment - One of my favourite current sentiment sets, Suite Sayings, has a wide variety of sayings and this one is perfect for a thank you 'just because'.

Awesomely Artistic Grunge - I added a little back splatter using the grunge stamp in the Awesomely Artistic set to add a little more colour and soften my card, without obscuring too much of the all important 'white space' that adds so much to a truly CAS card.

A Trio of Embellishments - I actually managed to use three separate embellishments to my card: a White Perfect Accent for my flower middle (coloured black with my Sharpie), some strands of looped gold twine and a vellum leaf. Each of them adding a subtle detail without overwhelming.

Here's visual summary of key products used to make today's card for easy reference:


I hope you like today's card. I'll be back tomorrow with a card for this week's new challenge over at Create With Connie and Mary. Until then, happy stampin'!


Stampin' Up! Supplies Used:

Table built using Product Table Builder by The Crafty Owl - Independent Stampin' Up! Demonstrator.


Botanical Gardens Suite - On Your Special Day

by Joanne James14. March 2016 21:21

Good evening lovely readers! I have had a busy day with the second of this month's technique classes this morning and a Spring concert for one of the James Juniors this afternoon. Today I'm sharing a card I made for this week's challenge over at TGIF Challenges that was also one of the cards I made with the ladies in my card class this morning. I haven't played along with the TGIF team for a while and I couldn't resist this week's sketch:

My card features all of the products in the Botanical Gardens bundle offer (buy all 3 and save 15%) - Botanical Gardens Designer Series Paper, Botanical Blooms stamp set and Botanical Builder Framelits Dies - and features a fun technique. Here is my card:

Today's card is a celebration of the Botanical Gardens product suite, but there are three things that really make it special:

Customised Designer Series Paper - The paper I used for the background on my card is one of a number of patterns in the Botanical Gardens Designer Series paper pack that can be customised using the Botanical Blooms stamp set. Many of the leaves and flowers can be stamped with veins and stamens in the colours of your choice to create a variety of different looks. I had great fun adding detail to my background and this best thing is, this can be different every time. 

Fuss-free Flowers - I just love the Botanical Builder Framelits Dies for limitless floral creative possibilities, yet the two things that really make these fuss-free can't even be seen on this card: the Big Shot Die Brush and the Big Shot Precision Base Plate. Both perfect for working with intricate dies, they really do enable these flowers to pop out easily, no wax paper required. You may think you don't need these items, however whilst you could use a standard or magnetic platform, you will definitely get better results using these tools. My customers keep telling me this too, so impressed are they with the results.

A Free Sentiment - The sentiment on my card is from the Sale-A-Bration set 'Botanicals For You'. This stamp set co-ordinates with the other Botanicals products and is available free with a £45 spend before the end of the month. The Botanical Gardens bundle costs £46.75, so if you buy the bundle, you can get this set for free too - bargain!

Here is today's visual summary of the key products used and top tip for easy reference:


I hope you like today's card; I have two more to share this week using this product suite that were also makes in my technique class today, so stay tuned for those. Back tomorrow with another project; until then, happy stampin'!


Stampin' Up! Supplies Used: 

Table built using Product Table Builder by The Crafty Owl - Independent Stampin' Up! Demonstrator.

Picture Perfect Hummingbird Card

by Joanne James13. March 2016 09:00

It's Sunday and time for a new challenge over at The Paper Players! It's the turn of our esteemed leader the amazing Nance to host our challenge this week and she has a fun colour scheme for you to play along with:


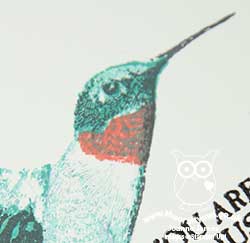
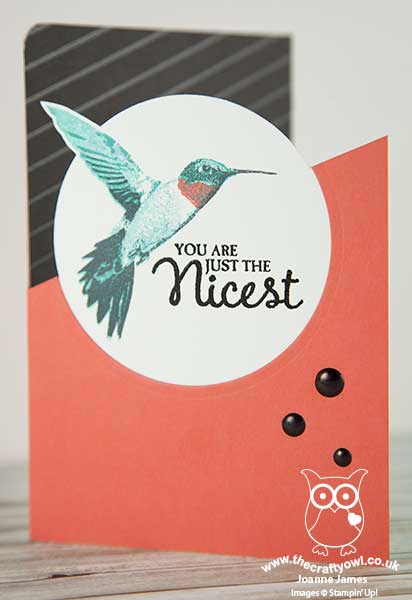
For my card this week I was inspired to use my Picture perfect stamp set for the first time; I've seen so many brightly coloured hummingbirds with this set, I thought these colours would be perfect to create one of my very own. Take a look:


Here are the key features of today's card:

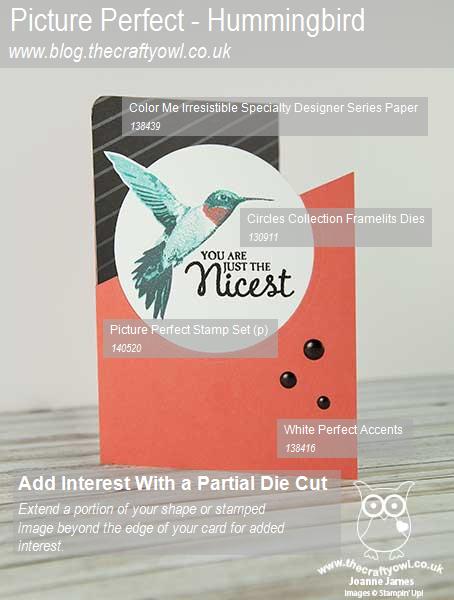
Picture Perfect Hummingbird - 'Picture Perfect' is a multi-step image stamp set, with each of the stamps having two, three or four layers. The hummingbird comes in four pieces, so in order to get four layers with only three colours, I stamped my first and third layers in Bermuda Bay, having stamped off the first one so that it was lighter in colour. I stamped the second stamp in Calypso Coral and the fourth and final one in Memento Black. Whilst it sounds complicated, this set is made from photopolymer which makes lining up the images really straightforward. 

Partial Die Cutting using Circle Framelits - I decided upon a rather unusual layout for my card today, using a base of Calypso Coral with the top part of the front cut away on the diagonal. I stamped my bird onto a piece of Whisper White and having fussy cut his wing tip by hand, I then cut a partial circle up to the diagonal before adhering behind so that it aligned with my cut away circle on my card base. Circle Framelits are invaluable for this kind of partial diecutting, as you simply roll through the Bid Shot to the desired point without cutting the whole way through.

Color Me Irresistible Specialty Designer Series Paper - I used this black pre-embossed paper last week on this card and decided it was just the thing to add a block of colour to the background of my card today too. The subtle stripes align perfectly to the diagonal line of my card and add interest without detracting from the bird.

Lastly, I stamped my sentiment in Versamark and heat embossed it in black and added a trio of White Perfect Accents, coloured black using a Sharpie, for a little extra shine. I spent ages trying to work out what to do with these colours, but once I'd decided on using this stamp set, it all came together seamlessly. Love it when that happens!

Here's today's visual summary of the key things needed to make today's card for easy reference:


Remember you can also find all of my 'Tip and Techniques' summaries on my Pinterest page here.

Before you reach for your ink and papers, check out what our amazing team has created to inspire you this week:

The Paper Players Design Team
 
 
Here's a quick recap of our challenge rules:
 
1.  Create a new paper project
2.  Upload your creation to your blog with a link back to us and provide a direct link to the post featuring your challenge submission.
3.  Please link your card to no more than four challenges, TOTAL.
4.  Have FUN! 


I look forward to seeing what you create with our colour palette this week. We are off to basketball today and hockey today, Rebecca has a birthday party to attend to and I have lots of preparation for this week's classes to be getting on with, so it's going to be a busy one!

Back tomorrow with another project; until then, happy stampin'!


Stampin' Up! Supplies Used: 

Table built using Product Table Builder by The Crafty Owl - Independent Stampin' Up! Demonstrator.

Watercolour Wishes Suite Sayings Easter Card

by Joanne James9. March 2016 09:00

The week is flying by - Wednesday already! Today I have a great clean and simple card for this week's challenge over at CAS(E) This Sketch that you really could put together in a jiffy. Firstly, here's this week's sketch:

I decided to make a quick Easter card featuring one of my favourite sentiments from the 'Suite Sayings' stamp set and some left over bits and pieces from my Watercolour Wishes card kit - take a look:

Using a piece of Pool Party cardstock for my cardbase, there are three key things that make this card:

Suite Sayings Stamp Set - This is one of those sets that has a sentiment for pretty much any occasion and this Easter one is a favourite of mine. I love the swirly script and the size, which works perfectly inside or on the front of a card.  

Lots of Labels Framelits Dies - I used the largest of the Lots of Labels Framelits Dies, cutting my Whisper White cardstock to just narrower than the die so that I could extend the length of my panel and only cut the framelit shape along one end. This is a useful technique - here's a photo that shows how it should look before you put it through the Big Shot:


Watercolour Wishes Card Kit - This has to be most favourite Stampin' Up! kit of all time - it contains everything you need to make 20 cards; what's more the stamp set, ink spots and acrylic block can all be used to create more projects with your own card bases once you've made up those in the kit. There are lots of spare embellishments too, with banners, flowers, washi tape, sequins and wooden pieces left over - perfect to make the most of today's card.

Here is the visual summary of today's card for reference:


I hope you like today's card - sometimes a quick card is in order and in 'waste not, want not' mode this one was a perfect opportunity to use up the generous leftovers from my kit!

I'm off to my Coffee and Card Drop-in Session this morning at Bell of Northampton - you can read all about that here - and am going to watch one of my juniors play in a netball match this afternoon. Back tomorrow with my card for this week's challenge over at Create With Connie and Mary where we have a fun sketch in store for you. Until then, happy stampin'!


Stampin' Up! Supplies Used:

Table built using Product Table Builder by The Crafty Owl - Independent Stampin' Up! Demonstrator.


Happiest of Birthdays Birthday Bouquet Card

by Joanne James8. March 2016 11:47

It's Tuesday and today I have a card using this week's sketch over at As You See It Challenge:

AYSIChallenge126

I saw this sketch and decided to use the Birthday Bouquet product suite for my rather pink card today - take a look:

There are three key elements to today's card - taking each in turn:

Birthday Bouquet Designer Series Paper - I chose this piece of ribbon-festooned paper that mirrors the horizontal lines of the sketch for the background for my card today. It's quite a busy pattern with some strong colour added with the Mossy Meadow, my chosen accent colour for this otherwise pink card, and is the perfect backdrop for my feature sentiment.

Birthday Blooms Stamp Set - I decided to use Blushing Bride cardstock for the focal circle that houses my sentiment. Using a coloured circle instead of white can be an interesting way to ring the changes on a card. Here I stamped my circle with the flower bouquet from 'Birthday Blooms' in Blushing Bride too for a subtle tone-on-tone effect with my sentiment in Mossy Meadow to stand out. I bordered this circle with a circle of Whisper White to frame it and lift it from the busy background.

Embellishments - I used a selection of embellishments to finish my card today: some simple 1/4" Blushing Bride cotton ribbon, pepped up with some twists of silver metallic thread, a few rhinestones and a sprinkle of sequins from the Love Blossoms embellishment kit to add just the right amount of sparkle.

Here's today's visual summary of the key products used to make today's card for reference:


I hope you like today's card - I even remembered to decorate the inside and my envelope too! I'm off to start preparing for the next of my Coffee and Card Classes at Bell of Northampton tomorrow - you can read all about them here and if you are local I'd love you to join me. No booking required - just drop in!

I'll be back tomorrow with another project; until then, happy stampin'!


Stampin' Up! Supplies Used:

Table built using Product Table Builder by The Crafty Owl - Independent Stampin' Up! Demonstrator.

Sunburst Sayings and Thinlits Shine It's Your Day

by Joanne James6. March 2016 09:00

Firstly, happy Mothering Sunday to all UK mothers reading this - today is most certainly our day! It's also Sunday and time for a new challenge over at The Paper Players! It's the turn of the talented Sandy to host our challenge this week and she has a great theme for you to play along with:

    PPA-290-Mar03

I was all set to make a rainy day card for today's challenge but I couldn't get the idea in my head to work on paper - so some other time for that card! Instead I decided to use my Sunburst Thinlits and create a bright sunshine card which came together much more like my vision:


I used this week's sketch over at Pals Paper Arts for my layout and created a fun fold card, where the second part of my sentiment acted as a clasp to hold the left-hand panel closed. I used a panel of Daffodil Delight spotted Schoolhouse Designer Series Paper on the right-hand panel and on the left I stamped some sunshines in Versamark and heat embossed them with clear embossing powder. This sunshine is from one of the early limited edition Sale-A-Bration sets, 'Hello' and the good news is that availability of this stamp set has been extended while stocks last. You've still time to snap it up, but you'd better be quick!

For my main square, I used a background of Tempting Turquoise to which I added a Daffodil Delight sunburst, edged with Tangelo Twist. For my sunshine centre, I stamped 'Shine' from the 'Sunburst Sayings' stamp set onto some Daffodil Delight cardstock and fussy cut the outer elements of the sentiment before cutting the remainder with a circle framelit, which allowed my sentiment to overhang. I backed this circle with a mat cut from a 1 3/4" scalloped circle punch, that I punched once then rotated and punched again to create the starburst effect - this is a neat little trick and perfect for this kind of design. It's also a great way to get a second shape from one punch. I then framed the whole square with a Tangelo Twist frame cut using my square framelits. The second part of my sentiment was cut with the washi tape thinlit from the Mini Treat Bag Thinlits set and I adhered this with a dimensional to the right so that it could serve to hold the fold shut. I just love the bright sunshine colours of today's card and the layering of all the elements within the focal square - this will certainly brighten someone's day. The 'Sunburst Sayings' stamp set and Sunburst Thinlit die are another of the great 'bundle and save' offers in the current seasonal catalogue, giving you a saving of 15% when you purchase them together - bonus!

Here's today's visual summary for easy reference:


Thank you to everyone who has left me a sweet comment or feedback on these new graphics, which have been very well received; they make great Pins too!

Before you reach for your ink and papers, check out what our amazing team has created to inspire you this week:

The Paper Players Design Team
 
 
Here's a quick recap of our challenge rules:
 
1.  Create a new paper project
2.  Upload your creation to your blog with a link back to us and provide a direct link to the post featuring your challenge submission.
3.  Please link your card to no more than four challenges, TOTAL.
4.  Have FUN! 

I look forward to seeing what you create with our theme this week. We are off to basketball this morning with time for a special Mother's Day lunch before venturing out to a birthday party this afternoon. Not quite the restful Mother's Day I had in mind, but life goes on today as always and as my family frequently tell me "Every day is Mother's Day in the James Household!". I have been treated to cards, flowers and gifts today so I am feeling perhaps a little more loved than usual :-) 

I hope you all have an enjoyable Mothering Sunday, whether you are celebrating or are focused on other things today. Back tomorrow with another project; until then, happy stampin'!


Stampin' Up! Supplies Used:

Table built using Product Table Builder by The Crafty Owl - Independent Stampin' Up! Demonstrator.

Color Me Irresistible Botanical Blooms Happy Birthday

by Joanne James3. March 2016 08:05

Today it's time for a new challenge over at Create With Connie and Mary and this week we have a colour combination for you:


I thought this colour combination was quite an unusual one and I did spend a lot of time working out what to do with it! Eventually there were two things that set me off on the path that led to today's card: one was the desire to use a piece of the coloured Color Me Irresistible Specialty Designer Series Paper and the other was this card by the lovely Connie Babbert! I loved the layout of Connie's card and knew when I saw it that it would be perfect for what I had in mind - here is the end result:


I decided to use Hello Honey for my card base and make a feature panel of the Color Me Irresistible paper - this paper is quite dramatic but the hint of pattern and combination with the other two challenge colours worked perfectly. A few layered Botanical Builder flowers and a happy birthday sentiment from the 'Tin of Cards' stamp set, finished with a black satin ribbon bow, finish my card. I just love the flower combinations that you can achieve with the Botanical Builder Framelit Dies - in addition by sponging the centres and edges and adding feathered lines using the tip of your Stampin' Write marker, as I did on the largest of the blooms on today's card, it's easy to create beautifully realistic and dimensional flowers. 

Here is today's visual summary for easy reference:


Do visit the other Design Team members to see what they did with this week's colours; there's lots of inspiration over on their blogs too!

Enjoy your day and I'll be back tomorrow with another project; until then, happy stampin'!


Stampin' Up! Supplies Used:

  • Tuxedo Black Memento Ink Pad
  • Botanical Builder Framelits Dies
  • Tin Of Cards Photopolymer Stamp Set
  • Color Me Irresistible Specialty Designer Series Paper
  • Very Vanilla A4 Cardstock
  • Hello Honey A4 Cardstock
  • Hello Honey Classic Stampin' Pad
  • Cajun Craze Classic Stampin' Pad
  • Cajun Craze A4 Cardstock
  • Basic Black 3/8" Stitched Satin Ribbon
  • Neutrals Candy Dots
  • Project Life Corner Rounder

He Is Risen Sunburst Easter Card

by Joanne James1. March 2016 21:00

Firstly, Happy Saint David's Day to any fellow Welsh bloggers or blog readers! I have had a busy day of classes today, with the first of my technique classes this month this morning and my Project Life memory keeping class this afternoon. I'm not so organised that I had an early blog post for you; my card was made,I just fell asleep at my laptop yesterday evening before I could schedule it! Today's card is for the 300th challenge over at Just Add Ink where they have this sketch as inspiration this week:

JAI #300

I saw this sketch and knew it would be perfect for a card that I've had in mind for a while using my Sunburst Thinlits Die - take a look: 

I wanted to create an Easter card with a sunburst behind a cross; how to make my cross though? I decided to try and make one using a sunburst, by squaring up the edges and cutting away the diagonal sections. Here's a work in progress picture that shows you how I cut it:


I hope that is helpful. I ran my cross through my Woodgrain embossing folder to add some texture and make it stand out against my super-CAS background of So Saffron and Pear Pizzazz. I allowed my sentiment strip to overhang the width of my paper slightly and made my own sentiment using the stamps in the 'Crazy For You' stamp set, masking off letters where not needed until I had my phrase. The Alphabet Rotary Stamp would also allow you to create something similar. I added a gold button, a twist of retired Tangelo Twist satin ribbon and a sprinkling of Pumpkin Pie sequins to finish my card. This is a great Easter card that can be made using entirely non Easter-specific supplies, which is always useful. What do you think of my cross idea? I'd love to know whether you think this works - do leave me a comment with your thoughts below. 

Here's today's visual summary for easy reference:


That's all from me today; I'll be back tomorrow with another project; until then, happy stampin'!


Stampin' Up! Supplies Used:

Table built using Product Table Builder by The Crafty Owl - Independent Stampin' Up! Demonstrator.


Mini Catalogue

BROWSE THE CATALOGUE

The mini catalogue is now live! Read and download your copy here.

Shop Online

Access my online shop 24 x 7, 365 days of the year:

Current April hostess code:

VDKNV7BH

Shop Online

Join My Team

It's always a great time to join Stampin’ Up! New team members can get £130 worth of products for only £99 + free business supplies + free shipping + all the fun being a part of Stampin’ Up! Stampin' Up! has something for everyone: join my growing team and benefit from my support to enjoy Stampin' Up! however you choose.

If you're interested, call me for a chat to understand how I can help you realise your goals. Alternatively, if you have already decided to sign up and you just can't wait, please click here for the link to the online form where you can sign up and order your starter kit right away! 

Latest Kit!

Stampin Cut and Emboss

The Rock Legend Kit has all you need to make 8 cards with coordinating envelopes. Along with the new Panda Friends Kit, both are available from January 4th for just £14 each - get yours here!

2023-24 Annual Catalogue

BROWSE THE CATALOGUE

Click on the catalogue for a full list of current SU! supplies - if you would like to order any of the items featured, please drop me a line at [email protected] or give me a call on 07773 421446 - I'd be happy to help.

New Online Exclusives

There are new products available exclusively in the online store from 5 March - check them out here.

About Me

Hi I'm Joanne and live in Northampton and when I'm not looking after my husband and two beautiful children, am an avid crafter with a passion for all things Stampin' Up!

I must confess that I have never been a big rubber stamper - until I discovered Stampin' Up! that is. I love the fact that I can get such great results with co-ordinating stamps, inks, papers and punches - the possibilities are endless! Join me on my stamping journey as I share the things I love and be inspired to create amazing things yourself!

Follow Me

Monthly Newsletter

Box Builder

Click the button above to use Box Buster to create your custom box design using the Envelope Punch Board!

Kits Collection Now Available!

Stampin Cut and Emboss

The new Kits Collection from Stampin' Up! is now available!

Click here to see the current kits available and order yours online today.

I Design For


Stampin' Up Stuff

This is my personal blog and is not endorsed by Stampin’ Up! I hope you find it a plentiful source of ideas and personal inspiration but please don't copy my designs for contest submission or use for classes, publication or sale without express permission.