Succulent Garden Meets You've Got This

by Joanne James18. April 2017 13:00

Today I'm sharing a card for this week's new challenge over at CAS Colours and Sketches where I am the guest designer this month. This week it's a colour challenge:


Since each of these colours appears in the Succulent Garden Designer Series Paper (still available on the retiring list - grab it while you can!), I used that as my starting point for my card today - take a look:

Here's the low-down on today's card:

Clean and Simple with Designer Series Paper - I decided to use a piece of the Succulent Garden designer series paper that I hadn't previously cut into for my card today. Whilst 'clean and simple' is all about the clean space with minimal layers and embellishments, it is possible to use DSP on a clean and simple card - you just have to use it sparingly. I used just a small 2.5" x 2.5" square, cut out with my square Stitched Shape Framelit for a little added detail. By keeping the rest of my cardfront plain, it retains an overall 'CAS' feel.

A Two Tone Sentiment - Inking up your sentiment with Stampin' Write Markers is a great way to ring the changes with a stamped sentiment. My chosen sentiment from the 'You've Got This' stamp set has two different font styles so really lends itself to different colours. I've used Old Olive and Tip Top Taupe; next time you're crafting get your markers out and try this with your sentiment stamps, I'd love to see what you create!

CASE Your CAS - My card today is a CASE 'copy and selectively edit' of this CAS 'clean and simple' card made a few weeks ago by my friend and Paper Players team mate LeAnne Pugliese. I changed out the paper, used an oval instead of a circle for my sentiment and switched flowers for succulents to make this card my own, but the similarities are clear to see. Thank you for the inspiration LeAnne!

Here is the visual summary of the key products used on today's project for you to pin for easy reference:


You can see all of my 'How To' summaries on my 'How To - Tips and Techniques' Pinterest board in case you've missed any. 

Enjoy your day and I'll be back tomorrow with another project. Until then, happy stampin'!


Stampin' Up! Supplies Used:

Table built using Product Table Builder by The Crafty Owl - Independent Stampin' Up! Demonstrator.

Bon Voyage Swirly Bird Boat Card

by Joanne James17. April 2017 04:00

Happy Easter Monday everyone! I hope you all enjoyed your fill of chocolate eggs yesterday - I know that we had more than our fair share here in the James household for sure! Today I'm sharing a card for this week's sketch over at Freshly Made Sketches:

I love Jen's sketch this week and knew immediately what I wanted to do with it; eventually on Saturday I managed to find some time to create - take a look:


Here's the low-down on today's card:

A Swirly Boat and Scribble - I used the edge of my wavy sea thinlit in my Swirly Scribble set to create the curved line as per in the sketch (I actually flipped my Very Vanilla piece over and used the reverse so that my wave followed the same contours as the sketch). This was the starting point for my card and everything else followed from there. I stamped my Swirly Bird boat and background splatters onto the Vanilla section, then fussy cut the sail and popped it up on a dimensional, having heat embossed the Calypso Coral sail with copper embossing powder for added shine. The Swirly Bird stamp set and co-ordinating Swirly Scribble thinlit dies are one of my favourite bundles in the current annual Stampin' Up! catalogue and I'm so pleased that they are carrying over into the new 2017-18 catalogue. The discounted bundle price won't be carrying over though, so if you want to save 10% by purchasing them together be sure to order them before the new catalogue goes live on 1st June.

By The Sea Shore - I used a layer of the retiring By The Shore paper for the bottom part of my card to provide the perfect seascape. I will be so sorry to see this paper leave us! It's still available on the retiring list whilst stocks last, so snap some up now before it's too late.

A Bon Voyage Banner - I decided to use a pair of curved sentiments from the 'Banners For You' set on my card today; they followed the contours of the curved edge perfectly and made for a fun 'Bon Vogage' type card. 

Here is the visual summary of the key products used on today's project for you to pin for easy reference:


You can see all of my 'How To' summaries on my 'How To - Tips and Techniques' Pinterest board in case you've missed any. 

Enjoy your day and I'll be back tomorrow with another project. Until then, happy stampin'!


Stampin' Up! Supplies Used:

Table built using Product Table Builder by The Crafty Owl - Independent Stampin' Up! Demonstrator.

Stampin' Up! Sneak Peek - Bike Ride For The Paper Players

by Joanne James16. April 2017 10:00

It's Sunday and time for this week's new challenge over at The Paper Players! It's the turn of the amazing LeAnne to host this week and she has a clean and simple challenge for us to work with:


So I couldn't resist sharing a sneak peek of a brand new stamp set with you today - a fabulous two-step stamping set called 'Bike Ride', that I received as part of an all-attendee giveaway at Onstage in Amsterdam last week - take a look:


Isn't that fun?! Read on for the low-down on today's card:

Demonstrator Perks And A Sneak Peek - One of the best perks about being a Stampin' Up! demonstrator is being able to get your hands on new products before anyone else does! I came home from Onstage last week with some new stamp sets including this fun bicycle stamp set. I was also able to participate in an event-only pre-order which means I am expecting another box of new goodies on Tuesday morning - can't wait! If you are excited by getting your hands on new products early, do get in touch with me about joining my team now so that you can take advantage of these pre-order demonstrator perks too.

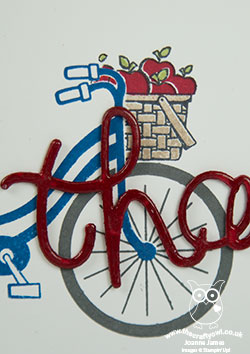
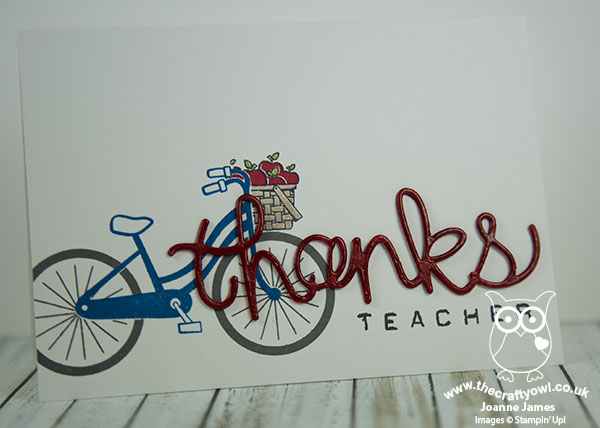
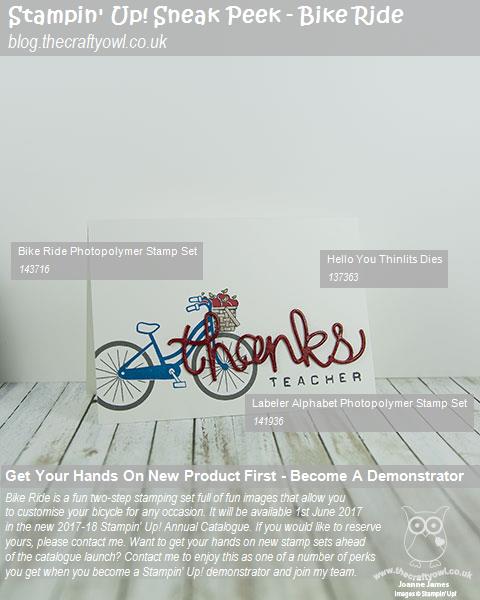
A Bike Ride For Teacher - Today's sneak peek is a set called 'Bike Ride'. Such a fun two-step stamp set with lots of little accessories - everything from flowers to apples and books to an adorable puppy dog! You can build endless combinations to make your two-wheeled creations totally unique. The best bit? This set also has some co-ordinating Build A Bike framelits that will make putting your creations together as easy as can be! My CAS card today uses just the stamp set - I created a few masks to enable me to stamp my bicycle as a single layer and adapted the basket to fit the front of my bike. For my first card I stamped my bicycle slightly off the page and added a basket of apples with an overlaid thanks diecut from the retiring 'Hello You' thinlit set (I cut this out 3 times, stacked them and heat embossed with clear embossing powder for added dimension and shine) and the word teacher stamped with my Layered Alphabet set -so useful for custom greetings. 

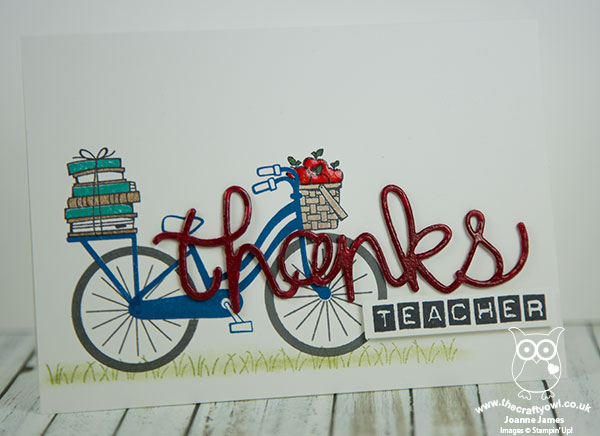
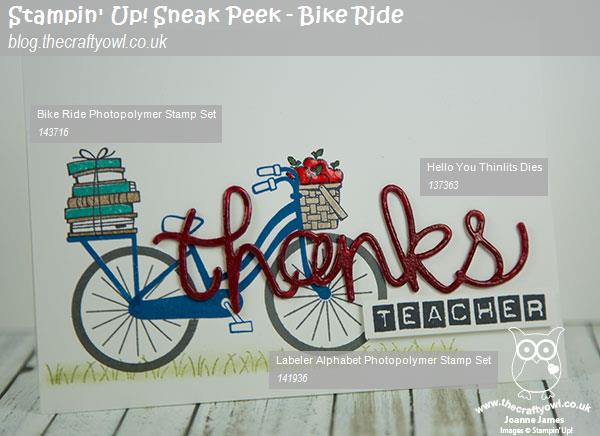
Teacher Thank You Take Two - I was having so much fun with my set, I created a second card to share with you too! This time I stamped the whole of my bicycle on the card front so that in addition to my basket of apples (accented with my fine tip glue pen) I could add a stack of books to the rear. I also grounded my bicycle with a little sponging and some stamped grass (from the retiring 'Basket Bunch' stamp set) and stamped the word teacher in bold block lettering and cut it out and popped it up on dimensionals for added impact:


I had so much fun playing with this set and making an early start on my teacher thank you cards for the end of next term. I've lots more ideas for this set and I can't wait to get my hands of the framelits when the new catalogue goes live on June 1st! 

Here is the visual summary of the key products used on today's project for you to pin for easy reference:


You can see all of my Product and 'How To' summaries on my 'How To - Tips and Techniques' Pinterest board in case you've missed any. 

Before you reach for your ink and papers, check out what our amazing team has created to inspire you this week:

The Paper Players Design Team
 
 
Here's a quick recap of our challenge rules:
 
1.  Create a new paper project
2.  Upload your creation to your blog with a link back to us and provide a direct link to the post featuring your challenge submission.
3.  Please link your card to no more than four challenges, TOTAL.
4.  Have FUN! 

I look forward to seeing your clean and simple creations in the gallery this week. Enjoy the rest of your weekend - we will be either hunting for or eating chocolate as our primary activities today - I think we might need a bike ride later to work some of our calories off! I'll be back tomorrow with another project, also with a travel theme so be sure to tune on for that, Until then, happy stampin'!


Stampin' Up! Supplies Used: 

Table built using Product Table Builder by The Crafty Owl - Independent Stampin' Up! Demonstrator.

Circle Of Spring 3D Easel Drawer Card

by Joanne James14. April 2017 18:10

Today I'm sharing a card using this week's colours over at Color Throwdown:

These colours are so very pretty and I was also inspired by the florals to create a 3D easel drawer card today using the retiring stamp set 'Circle of Spring' - take a look:


Here's the low-down on today's card:

Circle Of Spring - I stamped the floral wreath from Circle of Spring and coloured it in with my Calypso Coral, Peekaboo Peach, So Saffron and Wild Wasabi Stampin' Write markers. I then cut it out with my Wondrous Wreath framelits and added a diecut bow too. Both the stamp set and framelits that I've used on my card today are retiring from the annual catalogue at the end of May and are available only whilst stocks last. The Circle of Spring stamp set is currently showing as low inventory, so if this is on your 'must have' list then do order as soon as possible to avoid disappointment.

A Card And Gift In One - I recently made some easel drawer cards similar to this one for Mother's Day with a group of 21 Girl Guides - this stamp set also contains a 'happy Mother's Day' greeting - who had a lot of fun colouring their stamped images. They used a variety of pastel colours and they all looked so pretty when complete (it's a shame I was too busy to take a photograph of them all together - you'll have to take my word for it!) We made our cards on top so that they would open to enable a personal message to be written inside. The most exciting part though for the girls was the fact that this is a gift and card in one - the drawer pulls open to reveal 4 chocolates fitting perfectly inside:


The hardest thing for the girls was to not eat a chocolate or two whilst they were crafting! 

All You Need Is A Sheet of 12" x 12" - The easel drawer card is really easy to make using just one sheet of 12" x 12". It needs to be cut as follows:

  • One piece of 6" x 6", scored at 1.5" on each side for the drawer itself
  • One piece of 3" x 10", scored at 2", 3.5", 6.5" and 8" on the long side, to form the wrap for the drawer
  • One piece of 3" x 6", scored at 3" and 4.5" on the long side, with the 3" section adhered to the top of the drawer wrap at the front and the 1.5" scored sections folded towards you like a mountain.
  • One piece of 3" x 6", scored at 3" on the long side for the card - this is adhered to the front section of the 1.5" x 3" section above (see the photo).

I hope that all makes sense - a video tutorial for another time, I think! To finish, I decorated the drawer section with co-ordinating paper from the Subtles DSP stack. 

These little boxes would also make nice wedding favours - you can get two box cards out of 3 sheets of 12" x 12" cardstock so they would be pretty economical too. 

Here is the visual summary of the key products used on today's project for you to pin for easy reference:


You can see all of my 'How To' summaries on my 'How To - Tips and Techniques' Pinterest board in case you've missed any. 

Enjoy your day and I'll be back tomorrow with another project. Until then, happy stampin'!


Stampin' Up! Supplies Used:

Table built using Product Table Builder by The Crafty Owl - Independent Stampin' Up! Demonstrator.


Basket Builder Easter Chocolate Bunny Treats

by Joanne James13. April 2017 22:31

We are into our school Easter holidays with a vengeance here in the James household and it is leaving little time for crafting! I just wanted to pop buy and share with you a cute little Easter bunny basket treat using the Basket Bunch stamp set and Basket Builder Framelit dies - retiring, but still available at a great discount at present:


These little 3D baskets are so easy to make with a 1 1/4" wide piece of cardstock, scored twice to create a U-shape, attached between each basket piece to hold the chocolate Lindt bunny then decorated with some stamped and cut out out flowers and a bow. I made these for each of my ladies that  attended a class with me this month as a thank you Easter treat and it's fair to say they were definitely well received!

You've still time to make these if you have the product or alternatively snap up a bargain now and be super-prepared for next year!

Here is the visual summary of the key products used on today's project for you to pin for easy reference:


You can see all of my 'How To' summaries on my 'How To - Tips and Techniques' Pinterest board in case you've missed any. 

I'll be back tomorrow with another project. Until then, happy stampin'!


Stampin' Up! Supplies Used:

Table built using Product Table Builder by The Crafty Owl - Independent Stampin' Up! Demonstrator.

Retirement List Items Are Flying Off The Shelves!

by Joanne James11. April 2017 09:00

So after a flurry of activity on the Stampin' Up! website last night as the retiring lists went live, things seem to have calmed down and are a little more stable this morning. Some items, particularly in-colour re-inkers and some of the retiring punches, are already unavailable. There are still though a number of great bargains to be had, including some of my favourites below - each of the items on the second row of the table is available at a whopping 50% off:


Table built using Product Table Builder by The Crafty Owl - Independent Stampin' Up! Demonstrator.
 
I also want to draw your attention to the following key basic items that you may want to stock up on before they are gone forever:
 
Table built using Product Table Builder by The Crafty Owl - Independent Stampin' Up! Demonstrator.
 
Well, for me the owl builder punch is definitely an essential item!!!
 
I have another order going in this afternoon so if you are local to me and would like to save on P&P, please get your orders to me by 4pm. The only way to be sure you can get your hands on them though is to place your order online - don't forget to add this month's hostess code Y2MKPTP6 to receive a little thank you from me for all orders over £25.
 
Back later with today's creative post; unitl then, happy shopping!


Get Retiring Products Before They're Gone!

by Joanne James10. April 2017 19:00

I have a card to share today but first things first - the list of products that will be retiring from this year's annual and Spring-Summer seasonal catalogues has been announced! You can read the full list by clicking here; there are some tremendous bargains to be had - I will have a review of the things I am going to miss most tomorrow, however if you want to stock up on any of the retiring in-colour items, especially re-inkers, I would urge you to do that sooner rather than later as they are always the first things to sell out. Click on the links below to take you directly to my online shop to purchase any of the in-colour items that are still in stock at time of posting:

Table built using Product Table Builder by The Crafty Owl - Independent Stampin' Up! Demonstrator.

Today I'm sharing a card that uses these departing in-colours - take a look:


I used Stampin' Up!'s Whisper White notelets and a bold sentiment from the 'Thankful Thoughts' stamp set, cut out using my square Stitched Shape Framelits to create an elongated rectangular panel, along with a variety of combinations of the in-colour designer series paper stacks, along with some white ribbon for a finishing touch. I made a whole collection of them in each of the retiring colours and decorated the envelope flaps to co-ordinate too. Here's a glimpse of one in each colour:


You can see all of my 'How To' summaries on my 'How To - Tips and Techniques' Pinterest board in case you've missed any. 

Enjoy your day and I'll be back tomorrow with another project. Until then, happy stampin'!


Stampin' Up! Supplies Used:

  • Thankful Thoughts stamp set
  • Whisper White Notelets and Envelopes

Flourishing Phrases and Flourish Thinlits Sympathy Card

by Joanne James10. April 2017 13:00

Today I'm sharing a card for this week's new challenge over at CAS Colours and Sketches where I am the guest designer for the month of April. I shall be joining the lovely ladies on the CAS Colours and Sketches team and each Tuesday at 1pm GMT I will be publishing my post for the new challenge for the week. It's also perfect for the current SUO Challenge, where the theme is 'Sympathy and Caring'. This week it's a sketch challenge, my favourite:


 I decided to go with florals again this week and turned the sketch through 90 degrees as it fitted my sentiment better - take a look:


Here's the low-down on today's card:

My card today features both the Flourishing Phrases stamps and co-ordinating Flourish Thinlits - I heat embossed the large flower with clear embossing powder onto my Basic Black background and added a framed sentiment, layered flower and border piece to ground them. A tricky one to photograph, but the shiny embossed background looks lovely in real life. I wouldn't usually choose black for a sympathy card, but it was perfect to allow my bright flower and border to 'pop'; the colour combination was inspired by a dress a friend of mine was wearing when I met up with her last week and I couldn't wait to use it on a card; sometimes inspiration strikes in the funniest places.

The Flourishing Phrases/Flourish Thinlits set is a great bundle that contains a little of everything: stamps, decorative and floral framelits and a whole bunch of sentiments suitable for many different occasions that work for both the outside and inside of your card. The good news is both the stamp set and framelits are on carryover into the new 2017-2018 annual catalogue; the 10% discounted bundle price however, is not. So if you want to benefit from this, you need to place your order for the bundle using the bundle code 142323 (clear mount) or 142322 (wood mount) before 31st May.

Here is the visual summary of the key products used on today's project for you to pin for easy reference:


You can see all of my 'How To' summaries on my 'How To - Tips and Techniques' Pinterest board in case you've missed any. 

Before you reach for your ink and papers, check out what the rest of the team has created to inspire you this week. Enjoy your day and I'll be back tomorrow with another project. Until then, happy stampin'!


Stampin' Up! Supplies Used:

Table built using Product Table Builder by The Crafty Owl - Independent Stampin' Up! Demonstrator.

Simple Oh So Succulents

by Joanne James9. April 2017 09:00

I'm back following a few days of blog absence due to my travels to Amsterdam for Stampin' Up!'s Onstage Live this week. More about that in another post; for today it's Sunday and time for this week's new challenge over at The Paper Players! It's my turn to host this week and I have a fun colour challenge for us to work with:


I made my card for today last week before leaving for Onstage Live in Amsterdam and was a little time-stretched so needed something quite quick and easy and the sketch layout over at Fab Friday was perfect for such a card. Having had the opportunity to have a sneak peek of some of the amazing florals from the rest of the Design Team I decided to go for an alternative look and pulled out my Oh So Succulent stamp set to create a super simple card - take a look:


Here's the low-down on today's card:

Layered Succulents - I decided to stamp a variety of succulents and rather than use a mask to create dimension, I decided to cut them all out using the co-ordinating Succulent Framelit Dies and just rearrange them until I was happy, adding some of them with dimensionals for a more 3D effect. A much quicker solution and when your pushed for time, much more sensible!

Rock and Roll Succulents - I stamped some of my succulents exclusively in Mint Macaron and others in Mint Macaron then rolled the edge of the stamp into my Perfect Plum ink pad before stamping to give a variegated effect.

Back to Black - I decided to heat emboss my sentiment in white onto Basic Black cardstock instead of using black ink on white to provide a contrast to the black outlined succulents on the white panel. 

Here is the visual summary of the key products used on today's project for you to pin for easy reference:


You can see all of my Product and 'How To' summaries on my 'How To - Tips and Techniques' Pinterest board in case you've missed any. 

I do wish I had allowed my trailing succulent to the left of the sentiment to sit over rather than under my sentiment, but hey ho!

Before you reach for your ink and papers, check out what our amazing team has created to inspire you this week:

The Paper Players Design Team
 
 
Here's a quick recap of our challenge rules:
 
1.  Create a new paper project
2.  Upload your creation to your blog with a link back to us and provide a direct link to the post featuring your challenge submission.
3.  Please link your card to no more than four challenges, TOTAL.
4.  Have FUN! 


I look forward to seeing what you create with this week's colour palette. Enjoy the rest of your weekend as it will be over all too quickly; I'm hoping to rest up after my hectic visit and spend a quiet day at home with my family and my new Stampin' Up! catalogue! I'll be back tomorrow with another project; until then, happy stampin'!


Stampin' Up! Supplies Used: 

Table built using Product Table Builder by The Crafty Owl - Independent Stampin' Up! Demonstrator.

Pastels Big on Birthdays For CAS Colours and Sketches

by Joanne James4. April 2017 13:00

Today I'm sharing a card for this week's new challenge over at CAS Colours and Sketches where for the next month I am going to be the guest designer! I shall be joining the lovely ladies on the CAS Colours and Sketches team and each Tuesday at 1pm GMT I will be publishing my post for the new challenge for the week. My first week is the following colour challenge:


Since all three colours are pastels I'm also linking up with the team over at Less Is More for the second time this week.

I decided to go with florals and a clean and simple birthday card - take a look:


Here's the low-down on today's card:

Big On Birthdays - I used one of the sentiments from the 'Big on Birthdays' set as the focal point for my card today. A simple base of So Saffron and a Pear Pizzazz frame and all that was left was to spend some time colouring the florals in a combination of all three challenge colours. I added the co-ordinating longer floral bough on the back of my envelope and inside my card for a little extra detail and brushed the flowers on the front of my card with my clear Wink of Stella for a subtle sparkle, but it really was as easy as that!

This stamp set is great for a pretty card in a record amount of time, perfect for when you need a card at the last minute or are just short on time like me this week!

Here is the visual summary of the key products used on today's project for you to pin for easy reference:


You can see all of my 'How To' summaries on my 'How To - Tips and Techniques' Pinterest board in case you've missed any. 

Before you reach for your ink and papers, check out what the rest of the team has created to inspire you this week. Enjoy your day and I'll be back tomorrow with another project. Until then, happy stampin'!


Stampin' Up! Supplies Used:

Table built using Product Table Builder by The Crafty Owl - Independent Stampin' Up! Demonstrator.

Mini Catalogue

BROWSE THE CATALOGUE

The mini catalogue is now live! Read and download your copy here.

Shop Online

Access my online shop 24 x 7, 365 days of the year:

Current April hostess code:

VDKNV7BH

Shop Online

Join My Team

It's always a great time to join Stampin’ Up! New team members can get £130 worth of products for only £99 + free business supplies + free shipping + all the fun being a part of Stampin’ Up! Stampin' Up! has something for everyone: join my growing team and benefit from my support to enjoy Stampin' Up! however you choose.

If you're interested, call me for a chat to understand how I can help you realise your goals. Alternatively, if you have already decided to sign up and you just can't wait, please click here for the link to the online form where you can sign up and order your starter kit right away! 

Latest Kit!

Stampin Cut and Emboss

The Rock Legend Kit has all you need to make 8 cards with coordinating envelopes. Along with the new Panda Friends Kit, both are available from January 4th for just £14 each - get yours here!

2023-24 Annual Catalogue

BROWSE THE CATALOGUE

Click on the catalogue for a full list of current SU! supplies - if you would like to order any of the items featured, please drop me a line at [email protected] or give me a call on 07773 421446 - I'd be happy to help.

New Online Exclusives

There are new products available exclusively in the online store from 5 March - check them out here.

About Me

Hi I'm Joanne and live in Northampton and when I'm not looking after my husband and two beautiful children, am an avid crafter with a passion for all things Stampin' Up!

I must confess that I have never been a big rubber stamper - until I discovered Stampin' Up! that is. I love the fact that I can get such great results with co-ordinating stamps, inks, papers and punches - the possibilities are endless! Join me on my stamping journey as I share the things I love and be inspired to create amazing things yourself!

Follow Me

Monthly Newsletter

Box Builder

Click the button above to use Box Buster to create your custom box design using the Envelope Punch Board!

Kits Collection Now Available!

Stampin Cut and Emboss

The new Kits Collection from Stampin' Up! is now available!

Click here to see the current kits available and order yours online today.

I Design For


Stampin' Up Stuff

This is my personal blog and is not endorsed by Stampin’ Up! I hope you find it a plentiful source of ideas and personal inspiration but please don't copy my designs for contest submission or use for classes, publication or sale without express permission.