#StorageByStampinUp Is Here!

by Joanne James10. April 2019 11:00


I am catching up a little today and want to share here news of Stampin' Up!'s new range of storage solutions that was launched last week. Whether you have an entire room or a small corner in your home for stamping, your creative space should be tailored to you. The new product line, Storage by Stampin’ Up!, provides you with modular storage solutions that let you organise—and customise—your space your way!

Storage by Stampin’ Up! is designed to store and showcase your Stampin’ Pads, Stampin’ Ink Refills, Stampin’ Blends, Stampin’ Write Markers, Watercolor Pencils, and other accessories. Here are some other features and benefits of Storage by Stampin’ Up!:

  • Keeps products organised, tidy, visible, and trackable at all times.
  • Ensures that your Stampin’ Pads, Stampin’ Write Markers, and Stampin’ Blends are stored horizontally, as recommended.
  • Designed to be stylish, durable, compact, stackable, and modular.
  • Blends in naturally with most home decor with its white neutral colour.
  • Stacks vertically and can be arranged to fit practically any flat workspace.
  • Easily assembled and disassembled for rearrangement and/or cleaning.

 The storage range comprises the following elements:

One of the biggest advantages of the range is that because it is modular, you can work out what you need and collect it over time, adding to it as budget allows and your crafting collection grows. The ink pad holder is designed to fit the new-style ink pads, however the old style ink pads can be easily accommodated in the open storage cubes, which also fit half-size wood mount stamp cases - perfect for holding embellishments.

You can download a handy configuration chart worksheet here which is great for helping you determine which storage configuration works best for you.

Storage by Stampin' Up! is available from April 1st and will feature in the forthcoming 2019-20 Annual Catalogue. It is worth noting however, that because Storage by Stampin’ Up! is a brand-new product line, the inventory levels for the initial April 1st launch are based on research of similar products and their existing demand. If the inventory of Storage by Stampin’ Up! products is depleted, we will turn items off until their inventories have been replenished.

I will have some of the new storage on display at my 2019-20 Annual Catalogue Open House Launch Event on 5th June, so do get in touch for more details if you'd like to come along to see it up close.

Please find links below to each of the new storage items currently available in the online store below:

Table built using Product Table Builder by The Crafty Owl - Independent Stampin' Up! Demonstrator.


Important Stampin' Up! News: Stampin' Trimmer Discontinuation and DieCutting and Embossing Changes

by Joanne James9. April 2019 20:00

Today saw two very important announcements from Stampin' Up! that I need to make you aware of. The first of these is in relation to the Stampin' Trimmer:


Stampin’ Up! has decided to retire the Stampin’ Trimmer as of 3 June 2019, including all accessories—replacement cutting blades, scoring blades, and cutting mats. They have experienced challenges with the supplier and are taking the opportunity to research and explore a replacement option for this product, which will not be the same as the current Stampin’ Trimmer. 

While the replacement cutting blades will also retire with the trimmer and will not be featured in the annual catalogue, Stampin' Up! has ordered what would normally be six months of inventory based on recent historical patterns to help  customers during this transition away from the current trimmer. When the retiring list goes live on 15 April, the order limit for the blades will increase from three to six (and the limit will remain at six until they’re no longer available). From now until September, Stampin' Up! will receive intermittent shipments from the supplier. But please know that this news could cause faster inventory depletion. Throughout these months, we anticipate times when the blades will not be orderable (and not offered as a backorder) - this is currently the case here in the UK. During those downtimes, you will have the option to enter an e-mail address to receive notification when the blades are available again.

Click the images below to head right over to my online store to start shopping for the Stampin’ Trimmer and the replacement consumable items:

Table built using Product Table Builder by The Crafty Owl - Independent Stampin' Up! Demonstrator.

The second Big News item of the day is that Stampin’ Up! also announced that they’ll be transitioning to a new manufacturer for their dies and embossing folders moving forward.

Stampin’ Up! is moving to a direct-to-manufacturer relationship. This means that they will work directly with the factories who manufacture their dies and folders instead of working with another company who then works with different factories. This gives them greater control and potential for increased speed to market, which can only be a good thing. 

TRANSITION TO NEW DIE-CUTTING AND EMBOSSING LINE

Here’s a look at how this transition will unfold:

Through

June 3, 2019

Die and Folder Supply: While Supplies Last and Interruptions

  • Inventory on some retiring dies may be depleted before the end of the 2019 occasions and 2018–2019 annual catalogue sales period; Stampin’ Up! will not replenish inventory on any retiring dies and folders that sell out.
  • Inventory on some dies and folders carrying over into the 2019–2020 catalogue may be depleted; if this happens, they may go on backorder or may not be available to order until they have replenished the inventory.

April 15–

June 3, 2019

Retiring List
  • The old-style die-cutting & embossing machine will be on the retiring list while supplies last. This also includes related products such as plates and platforms.
  • Dies and embossing folders included on the retiring list will not be offered in the new catalogue in any format.
  • Dies and standard embossing folders NOT included on the retiring list will be carried over into the 2019–2020 annual catalogue. Stampin’ Up! will use up their current inventory before starting to ship new-style dies, so even if you place an order in 2020, you might receive an old-style die or folder.

Beginning

June 4, 2019

2019–2020 Annual Catalogue
  • All new dies and embossing folders (denoted with a “New” icon in the catalog) will be produced by their new supplier and made in the new style with a different and high-quality product design.
  • For carryover dies and non-3D embossing folders, Stampin’ Up! will use up their current inventory before starting to ship new-style dies, so even if you place an order in 2020, you might receive an old-style die or folder.
  • All new and carryover 3D embossing folders will be produced by their new supplier and made in the new style with a different and high-quality product design.
  • Carryover 3D embossing folders (previously named Dynamic) will not be available to order beginning with the catalogue launch but they are in process on getting these ready to go and they’ll be available as soon as possible. Stampin’ Up! will let you know when they are ready.
  • No die-cutting & embossing machine will be available for purchase from Stampin’ Up! in the 2019–2020 annual catalogue.
 
One of the biggest impacts of this change is that there will be no die-cutting and embossing machine in the 2019-20 annual catalogue. The Big Shot and its associated accessories will therefore be retiring so if you have been considering a Big Shot purchase you should do it now. Now would also be a good time to stock up on consumable Big Shot accessories, such as the die brush and replacement cutting pads. Head over to my online store to purchase yours via the links below:
 
Table built using Product Table Builder by The Crafty Owl - Independent Stampin' Up! Demonstrator.
 

HIGHLIGHTS: NEW-STYLE DIES AND EMBOSSING FOLDERS

Since Stampin’ Up! is using a new supplier for their dies and embossing folders, they’ll be manufactured differently, which means the way you use them will be a little different. A few of the changes between the old-style and new-style products are listed below. In the future, Stampin’ Up! will also provide videos to show how to craft with the new-style dies and embossing folders and better showcase the features described below.

Here are some of the changes you’ll notice with our new-style dies and embossing folders:

  • The new-style open dies (those that coordinate with stamps) use a high quality metal that’s thinner than before but still as strong and durable.
  • The new-style dies have an added lip to the inside of the blades.
  • On old-style dies, when you place an open die (dies that coordinate with stamps) over a stamped image, a small border of cardstock is visible around the stamped image. With new-style dies, the die hugs the edge of the stamped image. Instead of aligning the die to the space around the stamped image, you will align it to the edges of the stamped image. When the image is cut, there will still be a cardstock border around the image.

OLD STYLE ALIGNMENT

2019_DIE_COMPARISON__1
2019_DIE_COMPARISON__3

NEW STYLE ALIGNMENT

2019_DIE_COMPARISON__2
2019_DIE_COMPARISON__4
  • They’ve improved the adhesive that secures the dies to the insert sheet in the package so that it’s not too sticky. It’s easier to remove dies from the insert sheet, and the adhesive won’t cling to the dies.  (Hurrah for this update!!)
  • They’ve standardized the size of the die inserts for easier storage. There are now only two insert sizes: 5″ x 7″ (12.7 x 17.8 cm), which coordinate in size with the stamp cases, and 6″ x 6″ (15.2 x 15.2 cm). The standard sizes will allow uniform storage in whatever system you use. The envelopes that the dies come in will be slightly larger.
  • With old-style Dynamic folders, they recommended that you spritz cardstock before embossing to soften the fibers so you got a better impression. Now, that extra step will not be necessary because the new-style folders usually create a crisp impression without spritzing. The way the new folders are manufactured also gives options for more detailed and intricate designs in the future.
  • 3D folders are thinner than the old-style Dynamic folders. Because they are thinner, you will need to use a shim, depending on the die-cutting & embossing machine you use.

I will be attending Stampin' Up!'s Onstage event here in the UK this weekend and am looking forward to getting my hands on the new dies and learning more about these changes. I will continue to share updates here and on my Facebook Page as they occur. In addition, a quick note for anyone reading this who is either an online or in-person customer of mine - please do request to join my Facebook VIP Customer Group if you're not in it already - this way you can be sure that you will receive news and updates as soon as they are happen!

First Steps New Baby Boy Welcome Card for AYSI197

by Joanne James9. April 2019 14:00

Today I'm sharing a card for the current challenge over at As You See It where the ladies have a great sketch to play with:

This is one of those versatile sketches that is a 'keeper' and can be used in so many ways. I still had my gingham papers out on my desk following Sunday's cards and decided it was perfect for a baby card - take a look:


Here's the low-down on today's card:

First Steps - My focal point sentiment comes from the 'First Steps' stamp set, an adorable collection of sweet baby images that are perfect for cards, invites, showers, samplers and more. I stamped my sentiment using my Stamparatus so that I could ink it several times and get a really solid image, then having stamped off first stamped the tiny footprints behind it in the same colour.  

Subtle Textures - I embossed my top panel with the Subtles embossing folder to add a little texture without detracting from the sentiment. I added a little more detail with the soft organdy ribbon and used my layers and scalloped border/mat detail to add a little more interest and to tie in my panel of Balmy Blue gingham check across the bottom. 

Monochromatic Blue - I kept my card simple with a monochromatic Balmy Blue and Whisper White colour combination however this design could be easily replicated in pink for a girl or any of the other colours in the Gingham Gala designer series paper stack for a more gender-neutral design.

Here is the visual summary of the key products used on today's project for you to pin for easy reference:


You can see all of my 'How To' summaries on my 'How To - Tips and Techniques' Pinterest board in case you've missed any. 

Enjoy your day and I'll be back tomorrow with another project. Until then, happy stampin'!


Stampin' Up! Supplies Used:

Table built using Product Table Builder by The Crafty Owl - Independent Stampin' Up! Demonstrator.

Balloons Floating Frame Birthday Cards

by Joanne James8. April 2019 11:30

Happy Monday everyone! Today I'm sharing a card using the sketch over at Freshly Made Sketches and the current colour palette at Fab Friday:


My card features a technique that is currently all the rage and I've been wanting to have a go at - the floating frame technique. This actually means I have two cards for you! Here's the first one:


And here's the second one, featuring the outer frame element:


Here's the low-down on today's card:

Floating Frames - The floating frame technique is really easy to create with a few basic tools: some 'Press and Seal' food wrap or similar, a framelit - I used my Rectangle Stitched Framelits Dies - and lots of dimensionals! You simply stamp and punch/diecut your images, lay them out, cover with Press and Seal, trim to frame size and cut out your central piece, before adhering dimensionals to the back of the diecut pieces and adhering to your chosen card base. Finally you remove the Press and Seal and your floating shapes remain in place. Jennifer McGuire has a fabulous video on this technique if you want to see one of these cards being made - you can see it here

Birthday Balloons - I've seen some fabulous examples of this technique, mostly using florals, but I was in need of some birthday cards and I thought the colours over at Fab Friday would be perfect for some bright and colourful balloons. I had so much fun making these cards I'm going to make a few more in alternative colour combos too - this is a great card design that would work well for both boys and girls, so makes a great storecupboard standby. I stamped my balloons with one of the stamps in the 'Happy Birthday Gorgeous' stamp set before punching them for added interest and I used one of the other balloon stamps in the set to decorate the envelope, as you can see below:

No need for a naked envelope here!

A Birthday Greeting - For my second card, I needed a larger greeting to sit inside my frame so my Well Written Framelits were the perfect choice. I also added an extra balloon for balance, tied with some white baker's twine. The same design could be used with other stamps and sentiments from this set too to make cards for other occasions - how many other combinations can you come up with? 

Here are the visual summaries of the key products used on today's projects for you to pin for easy reference:


You can see all of my 'How To' summaries on my 'How To - Tips and Techniques' Pinterest board in case you've missed any. 

Enjoy your day; we are having a kit clear-out in the playroom today. So far we've made an erupting volcano, an insect hut, a flying helicopter and two solar-powered motorised dinosaurs. You've got to love the Easter holidays! I'll be back tomorrow with another project. Until then, happy stampin'!


Stampin' Up! Supplies Used:

Table built using Product Table Builder by The Crafty Owl - Independent Stampin' Up! Demonstrator.


A Good Day Gingham Gala Card Trio

by Joanne James7. April 2019 09:00

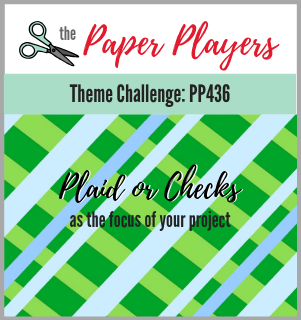
Today it's Sunday and time for this week's new challenge over at The Paper Players! It's the turn of the fabulous LeAnne to host this week and she has a fun theme challenge for you to work with:

I decided to get making with my Gingham Gala designer series paper and made not one, not two but three cards for today's challenge - all of which use this week's Fusion sketch too (turned through 90 degrees):

I didn't get overly creative with my gingham panels as I wanted to use them as backgrounds in their own right and really let them shine.

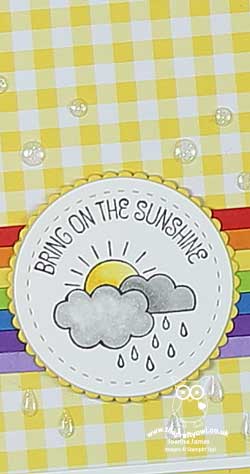
So, to my cards! Each of them also coincidentally features a stamp from the stamp set, 'A Good Day', for my feature circles.  Here is the first one:


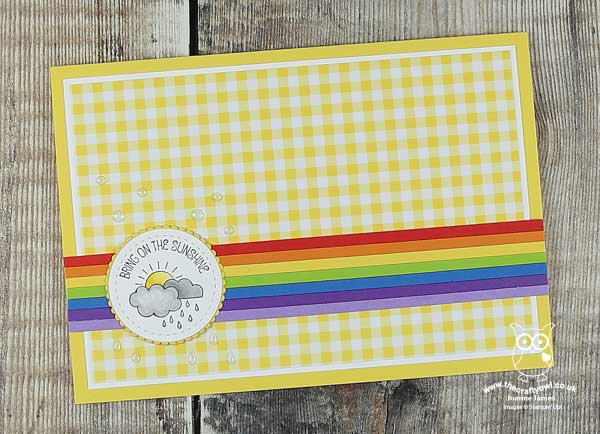
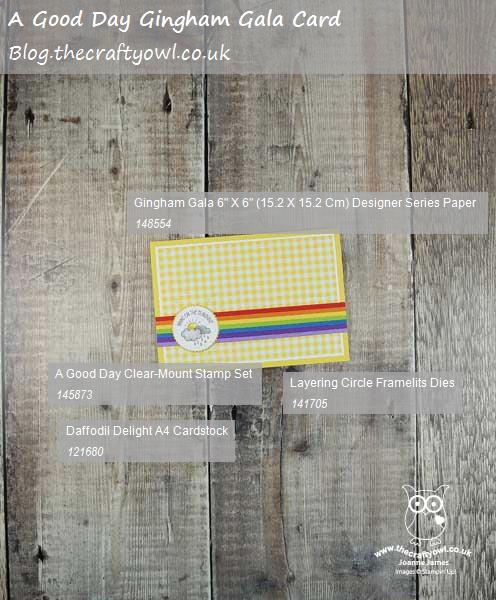
This card is my favourite from a creative point of view, as I love the sun/rain rainbow idea and the bright yellow check just makes this such a happy card!

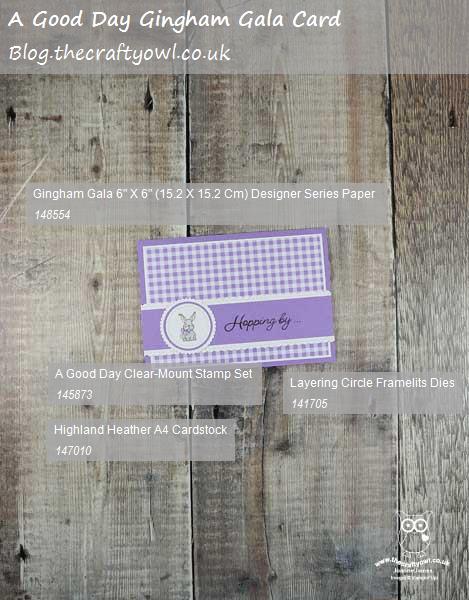
For my second card I created one that uses not only the Fusion sketch but the theme too - no Easter eggs sure, but the cutest of Easter bunnies:


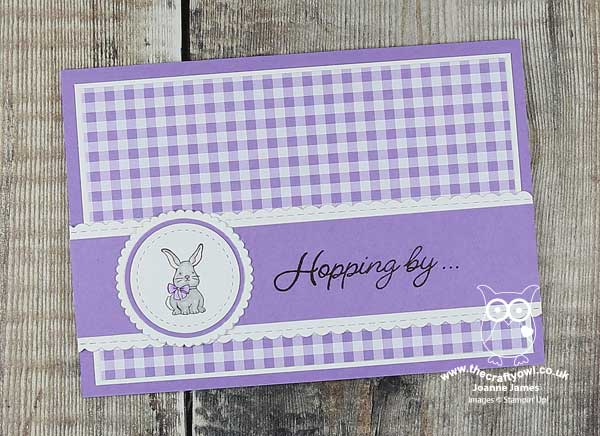
I stamped part of my sentiment on the banner. which I also bordered with one of the the edgelits in the Be Mine Stitched Framelits set and continued it on the inside of my card. I forgot to take a photo of my 'corrected' inside, but if you're interested and fancy a giggle you can pop over to my Facebook page to see the original one!

For my final card, I was inspired by this week's Global Design Project #GDP183 theme of 'A Day At The Park':

For me a day at the park is not complete without a ride on the swings, so this sweet little tree swing was perfect to fit this theme and paired with a sentiment from the Sale-A-Bration set 'Part of My Story' and the fresh green gingham makes for a sweet, uplifting card:


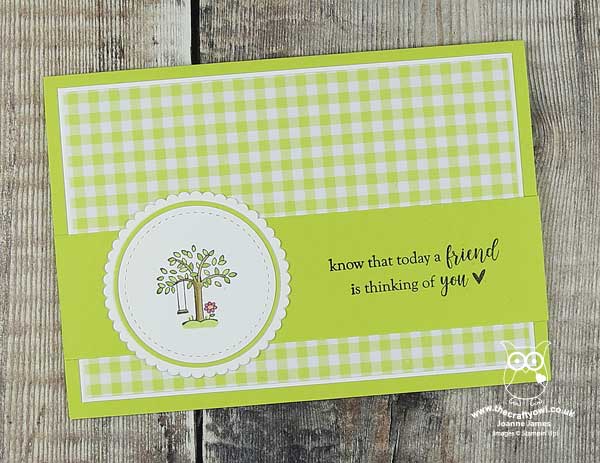
This is the card that I like most in terms of layout - whilst each of the images needs a different sized circular element, this is the one that I like the most in terms of overall proportion. 

Here are the visual summaries of the key products used on today's project for you to pin for easy reference:


You can see all of my Product and 'How To' summaries on my 'How To - Tips and Techniques' Pinterest board in case you've missed any. 

I hope you like my gingham trio; I also created a 'bonus' card using plaid as the main feature of my design so do pop back later in the week to see another example using this week's theme.

Before you reach for your ink and papers, check out what our amazing team has created to inspire you this week:

Here's a quick recap of our challenge rules:
 
1.  Create a new paper project
2.  Upload your creation to your blog with a link back to us and provide a direct link to the post featuring your challenge submission.
3.  Please link your card to no more than four challenges, TOTAL.
4.  Have FUN!

You can see all of my 'How To' summaries on my 'How To - Tips and Techniques' Pinterest board in case you've missed any. 

Enjoy your day; we are having a restful one with a roast dinner with all the trimmings for lunch and then we'll be watching the Oxford-Cambridge boat race on TV in the afternoon - armchair sportsmen for once! I'll be back tomorrow with another super-fun project that you are not going to want to miss. Until then, happy stampin'!


Stampin' Up! Supplies Used: 

Table built using Product Table Builder by The Crafty Owl - Independent Stampin' Up! Demonstrator.

Mediterranean Moments Cafe Note Card

by Joanne James6. April 2019 21:00

I've had a busy week that's kept me away from my blog but I have managed to get lots made over the past couple of days so I should be better prepared this week! Today I'm sharing a card for the current challenge over at Just Add Ink that also uses the sketch layout at The Paper Craft Crew:

   Paper Craft Crew Sketch Challenge PCC332

I missed playing with the ladies over at Just Add Ink last week as I just didn't manage to get my card finished and blogged (one for another time!) but as soon as I saw their inspiration photo this week I knew exactly which set I was going to use. Here's my card:


Mediterranean Moments is a stamp set that I've used many times, but not recently so it was a good opportunity to dust off this favourite from the annual catalogue and get to work. The photo reminded me of the cafe scene so this formed the basis of my main focal point, stamped on white and coloured with my Stampin' Blends. I used the PPC sketch to push me to consider a different layout to any I've used previously with this set. I did some tone-on-tone stamping using one of the other stamps in the set and embossed the main panel with a brick pattern for added texture and interest, and added a few wooden leaf embellishments from my box. I added a sentiment from Itty Bitty Greetings to finish my 'just because' note card.

Here is the visual summary of the key products used on today's project for you to pin for easy reference:


You can see all of my 'How To' summaries on my 'How To - Tips and Techniques' Pinterest board in case you've missed any. 

Enjoy your evening and I'll be back tomorrow with another project. Until then, happy stampin'!


Stampin' Up! Supplies Used:

Table built using Product Table Builder by The Crafty Owl - Independent Stampin' Up! Demonstrator.

Forever Lovely Birthday Cards

by Joanne James1. April 2019 21:00

I've had my first class of the month today and today I have a couple of cards to share with you: one from my class and one that my class card was based on, both of which were inspired by the lovely Julee Tilman's current Mojo Monday sketch (turned through 90 degrees):

Here's the first card I created using the beautiful All My Love suite - take a look:


Here's the low-down on today's card:

Whilst the papers in the All My Love suite feature classic romantic colours, these papers are not just about hearts - they feature some fabulous florals too. This card features one of my personal favourites and compliments the Soft Sea Foam background beautifully. 

Along with the die cut detail of the sentiment panel, this makes for a simple yet pretty card. 

Here is the visual summary of the key products used on today's project for you to pin for easy reference:

Here is the second similar card that we made in my class, using an alternative colourway, this time with a couple of diecut flowers to compliment the patterned paper:

Here is the visual summary of the key products used on today's project for you to pin for easy reference:

You can see all of my 'How To' summaries on my 'How To - Tips and Techniques' Pinterest board in case you've missed any. 

Enjoy your evening and I'll be back tomorrow with another project. Until then, happy stampin'!


Stampin' Up! Supplies Used:

Table built using Product Table Builder by The Crafty Owl - Independent Stampin' Up! Demonstrator.

Last Day of Sale-A-Bration and Cross of Hope Easter Card for PP435

by Joanne James31. March 2019 09:00

Today it's Sunday and time for this week's new challenge over at The Paper Players! It's Laurie's turn to host this week and as it's the fifth Sunday of the month we have a tic-tac-toe challenge for you to work with:


I really struggled with my card today - too many options to choose from on Laurie's fabulous board! I was also under a little time pressure having left my card to the last minute, which is never good for creativity! I also used this week's sketch over at Stamp Ink Paper which is great for a blank canvas with a central focal sentiment and my card also happens to use the colours over at Color Throwdown this week (as close as I have to them). So after much deliberating, I went down the left hand row of Laurie's TicTacToe board to create an Easter card (I've just realised it works for the diagonal too!) - take a look:


Here's the low-down on today's card:

Sale-A-Bration Shades of Purple - I chose to feature this pretty floral paper from the Sale-A-Bration Botanical Butterfly paper pack as the background for my card today. Such a pretty pattern - if you like it as much as I do, then you only have today to still snap it up as this year's Sale-A-Bration promotion is finally coming to an end. I softened it with a piece of vellum, so that it didn't distract from my main design yet still adds a delicate pattern detail.

Cross Of Hope - Today's Easter card features a layered cross as the basis for the centre piece: a simple cross cut from Wood Textures DSP and overlaid with a simple silver one at its centre. There are some beautiful cross dies in this framelit set (check out my fellow paper Player LeAnne's card for an example of one of my favourites) however simple was my choice for today to allow my florals to shine. 

Easter Greetings - I inked my floral stem with my Stampin' Write markers and overlaid the whole thing with an uplifting sentiment from the 'Hold on To Hope' stamp set, which I heat embossed in silver onto white - I think this is a lovely banner for Easter. A linen twine bow and some glitter enamel dots finish my card. 

So what do you think? In hindsight I think my card might have needed to be smaller in size or with a few extra layers behind, as the centre still seems a little overwhelmed by the background, but in the end I just decided to go with it! Feel free to let me know what you think in a comment below - it may prompt a rework!

Here is the visual summary of the key products used on today's project for you to pin for easy reference:


You can see all of my Product and 'How To' summaries on my 'How To - Tips and Techniques' Pinterest board in case you've missed any. 

Before you reach for your ink and papers, check out what our amazing team has created to inspire you this week:

Here's a quick recap of our challenge rules:
 
1.  Create a new paper project
2.  Upload your creation to your blog with a link back to us and provide a direct link to the post featuring your challenge submission.
3.  Please link your card to no more than four challenges, TOTAL.
4.  Have FUN!

You can see all of my 'How To' summaries on my 'How To - Tips and Techniques' Pinterest board in case you've missed any. 

It's Mother's Day here in the UK and we still have our German exchange student staying with us, so having experienced the delights of traditional British fish and chips yesterday, we are out to afternoon tea today. I'll try and remember to take a picture to share with you tomorrow! I'll be back tomorrow with another project and news of the fabulous new range of Stampin' Up! storage that will be on sale from April 1st - and that's no joke! Until then, enjoy your day and happy stampin'!


Stampin' Up! Supplies Used:

Table built using Product Table Builder by The Crafty Owl - Independent Stampin' Up! Demonstrator.

Sale-A-Bration By the Bay - Get Yours Before It's Too Late!

by Joanne James28. March 2019 21:30

Today I've just got time for a quick post to share another card made using the Sale-A-Bration stamp set 'By The Bay' that I made a while ago but haven't got around to blogging. Here's my card:


A simple scene watercoloured on shimmery white paper with inks and an aquapainter, layered with a tone-on-tone panel of Balmy Blue embossed with the Stripes embossing folder and paired with some burlap and leaves and a sentiment with stitched edge detail. Easy as that! You have only 4 more days to snap it up for free with a £45 order so if it's on your list, get your order in before the weekend. 

Here is the visual summary of the key products used on today's project for you to pin for easy reference:


You can see all of my 'How To' summaries on my 'How To - Tips and Techniques' Pinterest board in case you've missed any. 

Enjoy your evening and I'll be back tomorrow with another project. Until then, happy stampin'!


Stampin' Up! Supplies Used:

Table built using Product Table Builder by The Crafty Owl - Independent Stampin' Up! Demonstrator.

6 Days Left Of Sale-A-Bration 2019: Shop-Host-Join Whilst You Can Still Earn More!

by Joanne James26. March 2019 21:00

No post yesterday I'm afraid as my day was long and busy, from the moment the youngest James Junior got dropped off at school at the crack of dawn to go on his school trip to Paris to an evening spent helping out with a local Brownie pack followed by Girl Guides doing a spot of Mother's Day crafting. Today has seen the arrival of our German language school exchange student, but a long journey has resulted in an early night so I've time to sit and blog this evening. Today I'm sharing the most popular card from my last Sale-a-Bration class that features not one, but three of the fabulous products that can be yours free with a purchase of £45 or more:


Here's the low-down on today's card:

A Trio of Sale-A-Bration Goodness - Today's card features three of the Sale-A-Bration goodies that are still available for you to receive free with a spend of £45 - can you spot them all? The wooden butterfly from the Butterfly Elements, and a piece of Grapefruit Grove foil sheet that has been embossed with the Country Florals Dynamic Textured Impressions Embossing Folder. This card is so simple to recreate and would work in lots of alternative colours too - the ladies in my class loved it! Check out the detail of the foil embossing - it really is lovely. 

Shop, Host, Join: There's Still Time - So whether you are going to shop and spend £45 or more (you get one free item for each £45 spend, or one of the higher-value ones for a £90 spend) or host your own party (an online party - or single qualifying order if your shopping list is a long one! - are still options at this stage), you still have 5 days to do so, so get those orders in. 

Join My Team For An Extra Sweet Reward - Whether you are a hobbyist or would like to build a business of your own, there's never been a better time to invest in a Stampin' up! starter kit. Not only will you receive £170 of product of your choice for a £99 spend, if you pay an additional £26 you can receive the fabulous and super-useful craft and carry tote too. You can read more about all of the Sale-A-Bration offers in my earlier post here; if you've any further offers, or would like to chat to me and find out the details of a special incentive that I am offering for qualifying joiners this week, do get in touch - I would love you to join my team.

Here is the visual summary of the key products used on today's project for you to pin for easy reference:


You can see all of my 'How To' summaries on my 'How To - Tips and Techniques' Pinterest board in case you've missed any. 

Enjoy your evening and I'll be back tomorrow with another project. Until then, happy stampin'!


Stampin' Up! Supplies Used:

Table built using Product Table Builder by The Crafty Owl - Independent Stampin' Up! Demonstrator.

Mini Catalogue

BROWSE THE CATALOGUE

The mini catalogue is now live! Read and download your copy here.

Shop Online

Access my online shop 24 x 7, 365 days of the year:

Current April hostess code:

VDKNV7BH

Shop Online

Join My Team

It's always a great time to join Stampin’ Up! New team members can get £130 worth of products for only £99 + free business supplies + free shipping + all the fun being a part of Stampin’ Up! Stampin' Up! has something for everyone: join my growing team and benefit from my support to enjoy Stampin' Up! however you choose.

If you're interested, call me for a chat to understand how I can help you realise your goals. Alternatively, if you have already decided to sign up and you just can't wait, please click here for the link to the online form where you can sign up and order your starter kit right away! 

Latest Kit!

Stampin Cut and Emboss

The Rock Legend Kit has all you need to make 8 cards with coordinating envelopes. Along with the new Panda Friends Kit, both are available from January 4th for just £14 each - get yours here!

2023-24 Annual Catalogue

BROWSE THE CATALOGUE

Click on the catalogue for a full list of current SU! supplies - if you would like to order any of the items featured, please drop me a line at [email protected] or give me a call on 07773 421446 - I'd be happy to help.

New Online Exclusives

There are new products available exclusively in the online store from 5 March - check them out here.

About Me

Hi I'm Joanne and live in Northampton and when I'm not looking after my husband and two beautiful children, am an avid crafter with a passion for all things Stampin' Up!

I must confess that I have never been a big rubber stamper - until I discovered Stampin' Up! that is. I love the fact that I can get such great results with co-ordinating stamps, inks, papers and punches - the possibilities are endless! Join me on my stamping journey as I share the things I love and be inspired to create amazing things yourself!

Follow Me

Monthly Newsletter

Box Builder

Click the button above to use Box Buster to create your custom box design using the Envelope Punch Board!

Kits Collection Now Available!

Stampin Cut and Emboss

The new Kits Collection from Stampin' Up! is now available!

Click here to see the current kits available and order yours online today.

I Design For


Stampin' Up Stuff

This is my personal blog and is not endorsed by Stampin’ Up! I hope you find it a plentiful source of ideas and personal inspiration but please don't copy my designs for contest submission or use for classes, publication or sale without express permission.