English Garden In Bloom Friendship Card

by Joanne James22. October 2015 08:05

Today it's time for a new challenge over at Create With Connie and Mary and this week we have a great colour challenge for you:


When I sat down to work on my card this week I realised that all of the challenge colours could be found in the lovely English Garden Designer Series Paper, so it seemed like the perfect opportunity to showcase it. I also used this week's sketch over at Retrosketches as the basis for my layout. Here's my card: 


I used a base of Hello Honey with a mat of Soft Suede, then covered my cardfront with a piece of floral patterned paper featuring all of the colours. I added a 2" circle of Mossy Meadow and cut my banner from a piece of neutral kraft corrugated paper, to add texture and detail without detracting from the pattern. I stamped my sentiment from the 'Garden In Bloom' set in Soft Suede on Whisper White and matted this on a banner of Hello Honey, both of which I punched with my Triple Banner Punch. I considered using the butterfly from this set too as my embellishment, however it was a little too small to really stand out. I decided to go with a simple layered butterfly instead, punched using my Bitty Butterfly and Elegant Butterfly punches, with a couple of strands of gold metallic thread for antennae. To finish, I added a trio of Mossy Meadow enamel dots. This is one of those cards that really is 'all about the paper' - the English Garden papers are so very pretty though, they deserve to take centre stage. 

Do visit the other Design Team members to see how they used this week's challenge colours; there's lots of inspiration over on their blogs too!

Enjoy your day and I'll be back tomorrow with another project; until then, happy stampin'!


Stampin' Up! Supplies Used:

  • Garden In Bloom Photopolymer Stamp Set
  • English Garden Designer Series Paper
  • Soft Suede Classic Stampin' Pad
  • Soft Suede A4 Cardstock
  • Hello Honey A4 Cardstock
  • Mossy Meadow A4 Cardstock
  • Gold Metallic Thread
  • 2" Circle Punch
  • Banner Triple Punch
  • Bitty Butterfly Punch
  • Elegant Butterfly Punch
  • Kraft And White Corrugated Paper


Let It Snow! and a Birdie Hello

by Joanne James21. October 2015 21:30

Just time to sneak in a creative post today with a couple of cards for this week's CAS(E) This Sketch Challenge. They have a great sketch this week and I managed to make not one but two cards (and will be using this layout for a couple more too!). Here's the sketch:

I wanted to make a Christmas card and whilst originally I had planned on an execution to my second card below, I was inspired byChrissy's card on the CAS(E) This Sketch design team and decided to take a slightly different tack and use some Designer Series Paper and a layer - here's my card:


I covered the front of my extra thick Whisper White cardstock base with a piece of snowflake-patterned Season of Cheer DSP and made a panel out of Night of Navy, cut out with my Project Life framelit and Big Shot, and repeatedly stamped the ' Let it snow!' sentiment from the 'Snow Place' stamp set in Versamark and heat embossed it in white. To finish I took a Snowflake Elements embellishment, stamped it in White kraft ink and heat embossed it in white, then stamped it again in Versamark and heat embossed it in Iridescent Ice to give it a wonderful sparkle. This snowflake DSP is one of my favourites in the Season of Cheer pack - I love the ombre effect of the finish and those snowflake embellishments are gorgeous, whether left plain or jazzed up a little as I did here. The photo doesn't show just how wonderfully sparkly the snowflake is in real life - it's really something!

For my second card I went with an every day card and decided to make something bright and colourful:

I used a Bermuda Bay card base and I took my colour inspiration from the Cherry on Top DSP stack of papers. I created my repeated 'Hello' sentiment using my Greetings thinlits. I decided to add a simple punched bird as my embellishment this time, punched from a piece of Watermelon Wonder Color Me Irresistible Specialty DSP  - you can't really see it in the photo, but I love the subtle embossed pattern this adds in real life - and a little Bermuda Bay wing.

Two very different takes on this week's sketch - do let me know which one you prefer in the comments below! Back tomorrow with my card for this week's new challenge over at Create With Connie and Mary. Until then, happy stampin'!


Stampin' Up! Supplies Used:

Table built using Product Table Builder by The Crafty Owl - Independent Stampin' Up! Demonstrator.


New Wednesday Weekly Deals Are Here!

by Joanne James21. October 2015 09:00

It's Wednesday and you know what that means: a new collection of Wednesday Weekly Deals! These offers are valid for one week only. As always, a new collection of deals will be announced next Wednesday.

If you want to take advantage of any of the deals on offer, you can support my business by placing your order online by clicking here or using the link to my store on the right hand side of my blog page where it says 'Shop Online' or with me in person. Don't forget to add the new Hostess Code for October 9JGQEYWJ if your order is under £150 and be sure to make sure that you don't check the 'no contact' box if you'd like to be kept updated with the progress of you order and receive a little thank you in the post from me. 

Here's a summary of this week's one-week only Wednesday deals - only three this week again, click on each item to go to the online store to purchase:

Table built using Product Table Builder by The Crafty Owl - Independent Stampin' Up! Demonstrator.

An eclectic but useful trio this week - I think the Chalk Talk Framelits are the best bargain - down to £16.50 and perfect for creating all kinds of layered tags for your Christmas gifts! 

Back later with today's creative project; until then, happy shopping!

Vintage Leaves Autumn Home Decor Wreath

by Joanne James20. October 2015 22:27

I've had a busy day today with my 'Shake It Up!' Children's Craft Class making the shaker cards featured in the 'To You And Yours Shaker Cards Project Kit'. We all had tremendous fun and made lots of great cards. I'll share a picture from our class at the end of today's post, however in the meantime my blog project to share with you today is the one that my Facebook followers had a sneak peek of last week that I made with a lovely group of ladies - our Autumn leaf wreaths. We based our design on this one created by Stampin' Up! Artisan Designer Alison Okamitsu; I made a large wreath like Alison's to hang on my front door and the ladies liked it so much they wanted to create a similar, smaller version - here is ours:


We used a selection of muted colours and the wonderful Vintage Leaves stamp set and cut out the leaves using our Big Shot and co-ordinating Leaflets Framelits (one of the catalogue 15% off bundles if you are a bargain-hunter!), some pinecones, a few leaves punched with the bird builder punch and a burlap bow to finish. Isn't that pretty? The ladies were all so very pleased with their wreaths and their stamping as this is something of a first for them! 

This was a private class that I held for a group of like-minded friends who often invite me to run a class just for them. If you have a group of friends that you would like to arrange a crafty get-together with, or would simply like to join in with one of my existing scheduled classes, then do get in touch - I would love to hear from you! Don't forget the offer of additional Stampin' rewards is also still valid until the 9th November - party sales of £200 or more will earn an extra 3% of Stampin' Rewards (formerly known as Hostess Credits) so if you have a long wish list, I've still a few slots left so contact me to book your party today!

Before I go, let me share a photo of the James Juniors proudly displaying their handiwork from this morning's class:

Like mother, like daughter (and son!) as the saying goes - what else can I possibly add?!

Back tomorrow with another project; until then, happy stampin'!


Stampin' Up! Supplies Used:

Table built using Product Table Builder by The Crafty Owl - Independent Stampin' Up! Demonstrator.


Santa's On His Way! Christmas Card

by Joanne James19. October 2015 08:00

Good morning - happy Monday everyone! Today I have a card for this week's challenge over at Freshly Made Sketches where they have a great sketch to work with this week:

I used the sketch as the basis for today's Christmas card, although I did make my card landscape rather than portrait as it seemed to fit my layers a little better. Here's my card:

I decided to use the 'Santa's on his way' sentiment from the Cup of Cheer stamp set for my focal sentiment and stamped it in Archival Basic Black on Very Vanilla, popping up the banner element which I stamped in Real Red. I backed this with an offset piece of red striped paper from the Home For Christmas DSP pack, and used a piece of the snow paper from the same set for my background. I used some retired Very Vanilla seam binding for my vertical stripe and for my second overlaid element I fussy cut one of the adorable Santa figures from the Home For Christmas DSP - I just love these papers, I am on my fourth pack already!

Today I will be putting the finishing touches to the preparations for my children's shaker Christmas Card class tomorrow. I'll be back to tell you all about it then and will have another project to share with you. Until then, happy stampin'!


Stampin' Up! Supplies Used:

Table built using Product Table Builder by The Crafty Owl - Independent Stampin' Up! Demonstrator.


Vintage Leaves Holly Christmas Card

by Joanne James18. October 2015 10:00

It's Sunday and time for a new challenge over at The Paper Players! This week it is the turn of the multi-talented Nance, who not only produces fabulous cards but also designs all our challenge badges and does so much to keep our challenge blog running smoothly - thank you Nance! This week we have a clean and simple challenge for you:
 

I considered going with something autumnal for my card today, but in truth I've had this idea for a card in my head for a while and decided that since it fits today's brief it was about time I got it down on paper - and it's a Christmas card! Take a look:
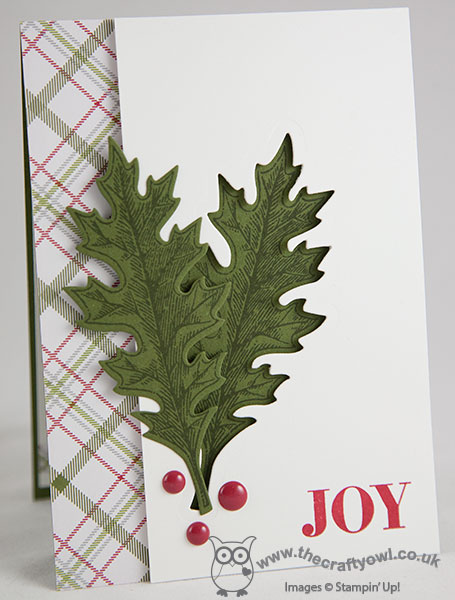
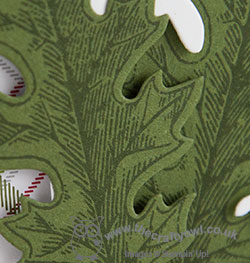
I've been using my Vintage Leaves set a lot this week and I'm not sure whether it is meant to be or not, but the large spiky leaf definitely reminds me of holly, so I decided to use it on a Christmas card. I used Mossy Meadow for my card base and adhered a strip of the gingham patterned paper from the Merry Moments DSP stack down the left hand side. My raised panel is extra thick Whisper White cardstock, out of which I cut the spiky leaf shape using the co-ordinating Leaflets Framelits Dies - another one of the great 15% off bundles when you purchase both items together from the current catalogue - and stamped the leaf in Mossy Meadow directly onto the Mossy Meadow panel below, so that it could be seen through the aperture. I then stamped another leaf on a separate piece of Mossy Meadow and cut this out with the same framelit too, positioning it at an angle over the first one and overhanging the edge of the white panel. My 'Joy' sentiment is from the Holly Jolly Greetings set and stamped in Real Red. To finish, I added a trio of Cherry Cobbler Home For Christmas enamel dots for my berries - I love these, they add the perfect finishing touch to my card. So what do you think - do these leaves work as holly? Either way, I am pleased with the finished result.

Before you reach for your ink and papers, check out what our amazing team has created to inspire you this week:

The Paper Players Design Team
Anne Marie Hile - on leave
 
 
Here's a quick recap of our challenge rules:
 
1.  Create a new paper project
2.  Upload your creation to your blog with a link back to us and provide a direct link to the post featuring your challenge submission.
3.  Please link your card to no more than three challenges, TOTAL.
4.  Have FUN! 
 

I look forward to seeing your CAS creations this week.

I'm having a change of sport today as Rebecca is playing in her first club hockey tournament of the season, so I'm off to cheer her team on and then we'll be home for a late lunch. Fortunately for us this weekend marks the start of our school half-term holiday, so we have a lovely two week break from our routine of homework and early mornings to look forward to, which is especially welcome given how cold and dark it has been this week  - far from jumping out of bed in the morning I am more inclined to snuggle under the duvet and hibernate! Enjoy your Sunday however you are choosing to spend it.

I'll be back tomorrow with another project; until then, happy stampin'!


Stampin' Up! Supplies Used:

Table built using Product Table Builder by The Crafty Owl - Independent Stampin' Up! Demonstrator.


Happy Haunting Halloween Card

by Joanne James17. October 2015 22:22

Just time today to squeeze in a blog post using this week's sketch over at Mojo Monday; the talented Julee Tilman comes up with some of the best sketches and I love to play along here whenever I can. Here is this week's sketch:


The minute I saw this week's sketch I knew what I wanted to do with it and fortunately I managed to find some time this afternoon to bring my design to fruition. Here's my card:

I just knew I wanted to use one of my spider web doilies for the circular element, so my Halloween theme and everything else just came from there. A Tangelo Twist base and a piece of the large gingham-print Happy Hauntings DSP served as the background, with a panel of the fun ghostly pattern from the same set as my feature piece. I overlayed this with the spider web doily and a 'Boo' from the Cheer All Year set stamped in Tangelo Twist on Very Vanilla for my centre. I stamped my main sentiment in black on a piece of Tangelo Twist - also from Cheer All Year, although I masked it and stamped the 'happy' above the 'haunting' rather than alongside it. I was looking at my finished card and felt like it was missing a little something, so I fussy cut a spider from black glimmer paper and placed him on the spider's web (I did cut him freehand, so don't look too closely at his less-than-straight legs!). I'm also playing along with the team over at Fusion this week since my chosen theme fits with their photo inspiration a treat (right down to the lone spider!) 

I hope you like today's card; back tomorrow with this week's card for our new challenge over at The Paper Players. until then, happy stampin'!


Stampin' Up! Supplies Used:

Table built using Product Table Builder by The Crafty Owl - Independent Stampin' Up! Demonstrator.


Black Glimmer Sleigh Ride Edgelits Card

by Joanne James15. October 2015 08:05

Today it's time for a new challenge over at Create With Connie and Mary and this week we have a great sketch challenge for you:


Having contemplated the use of washi tape on today's card, I decided to take a more liberal interpretation and used my much loved Sleigh Ride Edgelits to create the layers on today's card:


I decided to use a piece of the rather dramatic black Winter Wonderland Specialty Designer Series Paper as the main feature paper for my card, layering this on a piece of gold foil and a base of Whisper White extra thick cardstock. This DSP is gorgeous - very glossy and with a beautiful sheen to it. I then layered my edgelits, cutting the trees out of gold glimmer paper and the houses out of Whisper White extra thick cardstock, but reversing both so that my sweeping lines went in the right direction according to the sketch! I stamped my sentiment from the co-ordinating stamp set 'Jingle All The Way' in Memento Black onto the white layer, just above the sweep of my final layer - Santa and his sleigh cut out of black glimmer paper and tied with a gold corded trim bow.  

I wasn't sure that black glimmer paper would work on a Christmas card, but I'm so glad I gave it a try; it really compliments the dsp on my card and just goes to prove that black glimmer paper has a life beyond Halloween! 

Do visit the other Design Team members to see how they used this week's challenge sketch; there's lots of inspiration over on their blogs too!

Enjoy your day and I'll be back tomorrow with another project; until then, happy stampin'!


Stampin' Up! Supplies Used:

  • Winter Wonderland Specialty Designer Series Paper
  • Whisper White A4 Thick Cardstock
  • Big Shot
  • Magnetic Platform
  • Jingle All The Way Wood-Mount Bundle
  • Gold Cording Trim
  • Gold Foil Sheets
  • Gold Glimmer Paper
  • Black Glimmer Paper
  • Tuxedo Black Memento Ink Pad


Hello Autumn Leaves Card

by Joanne James14. October 2015 21:19

It's all about leaves today! I've had a busy yet fun day today with a lovely bunch of ladies today making autumn wreaths. It's always fun to get together and do something a little different and it's nice to teach people to make things other than cards once in a while. I will share our project later this week; today I'm sneaking in a card to a couple of challenges I've had my eye on:


I just love this week's sketch over at CAS(E) This Sketch (patterns in threes are always good!) and the theme and colours along with the wonderful autumnal inspiration at The Challenge inspired me to create my card today:

A base of kraft cardstock with a mat of Cheery Cobbler provide the perfect backdrop for my Very Vanilla panel, which I stamped with the Hello Autumn sentiment from the 'Cheer All Year' set (such a versatile set, this one!) in Soft Suede and the leaf image from the Project Life Seasonal Snapshot 2015 set, which I stamped alternately in Delightful Dijon, Cajun Craze and Cherry Cobbler. I added a linen thread bow to one of my leaves to finish and that's my clean and simple card for today! I love stamp sets that can be used for lots of different things and today's cards uses two such sets. 

That's all from me today; back early tomorrow with this week's post for the new challenge this week over at Create With Connie and Mary. until then, happy stampin'!


Stampin' Up! Supplies Used:

Table built using Product Table Builder by The Crafty Owl - Independent Stampin' Up! Demonstrator.


New Wednesday Weekly Deals!

by Joanne James14. October 2015 09:00

It's Wednesday and you know what that means: a new collection of Wednesday Weekly Deals! These offers are valid for one week only. As always, a new collection of deals will be announced next Wednesday.

If you want to take advantage of any of the deals on offer, you can support my business by placing your order online by clicking here or using the link to my store on the right hand side of my blog page where it says 'Shop Online' or with me in person. Don't forget to add the new Hostess Code for October 9JGQEYWJ if your order is under £150 and be sure to make sure that you don't check the 'no contact' box if you'd like to be kept updated with the progress of you order and receive a little thank you in the post from me. 

Here's a summary of this week's one-week only Wednesday deals - click on each item to go to the online store to purchase:

Table built using Product Table Builder by The Crafty Owl - Independent Stampin' Up! Demonstrator.

Only three offers this week, but good ones nonetheless! My favourite would have to be the Cupcake Builder Punch - a 'storecupboard staple' of the punch collection and one that can be used for lots more besides (think clouds, handbags, ice creams ...). Also the Six-Sided Sampler set is a great set for all you quilters out there!

Back later with today's creative project; until then, happy shopping!

Mini Catalogue

BROWSE THE CATALOGUE

The mini catalogue is now live! Read and download your copy here.

Shop Online

Access my online shop 24 x 7, 365 days of the year:

Current April hostess code:

VDKNV7BH

Shop Online

Join My Team

It's always a great time to join Stampin’ Up! New team members can get £130 worth of products for only £99 + free business supplies + free shipping + all the fun being a part of Stampin’ Up! Stampin' Up! has something for everyone: join my growing team and benefit from my support to enjoy Stampin' Up! however you choose.

If you're interested, call me for a chat to understand how I can help you realise your goals. Alternatively, if you have already decided to sign up and you just can't wait, please click here for the link to the online form where you can sign up and order your starter kit right away! 

Latest Kit!

Stampin Cut and Emboss

The Rock Legend Kit has all you need to make 8 cards with coordinating envelopes. Along with the new Panda Friends Kit, both are available from January 4th for just £14 each - get yours here!

2023-24 Annual Catalogue

BROWSE THE CATALOGUE

Click on the catalogue for a full list of current SU! supplies - if you would like to order any of the items featured, please drop me a line at [email protected] or give me a call on 07773 421446 - I'd be happy to help.

New Online Exclusives

There are new products available exclusively in the online store from 5 March - check them out here.

About Me

Hi I'm Joanne and live in Northampton and when I'm not looking after my husband and two beautiful children, am an avid crafter with a passion for all things Stampin' Up!

I must confess that I have never been a big rubber stamper - until I discovered Stampin' Up! that is. I love the fact that I can get such great results with co-ordinating stamps, inks, papers and punches - the possibilities are endless! Join me on my stamping journey as I share the things I love and be inspired to create amazing things yourself!

Follow Me

Monthly Newsletter

Box Builder

Click the button above to use Box Buster to create your custom box design using the Envelope Punch Board!

Kits Collection Now Available!

Stampin Cut and Emboss

The new Kits Collection from Stampin' Up! is now available!

Click here to see the current kits available and order yours online today.

I Design For


Stampin' Up Stuff

This is my personal blog and is not endorsed by Stampin’ Up! I hope you find it a plentiful source of ideas and personal inspiration but please don't copy my designs for contest submission or use for classes, publication or sale without express permission.