Get Well Soon for The Paper Players PP178

by Joanne James15. January 2014 20:43

A quick post from me today! With all the coughs and colds that are ever-present in our house at the moment, I thought I would take the opportunity today to create a get well soon card. Here is my card:

I used my Stampin' Write Markers to ink up the flowers on my 'Wildflower Meadow' stamp, leaving out the dots and replacing the bird with the sentiment. I then simply embossed the coloured image and mounted using the Coastal Cabana blue as my accent colour. I took the colours from this week's challenge over at 'The Paper Players' as the inspiration for my card:

I actually found it tricky to work with four different colours and did break the 'blue and green should never be seen without a colour in between' rule with this one, but I like it!

Back tomorrow with a one layer card: until then, happy stampin'!

Stampin' Up! Supplies Used:

Table built using Stampin' Up! Product Table Builder from The Crafty Owl.


Two For One - Times Two!

by Joanne James14. January 2014 12:51

Well, it had to happen - I successfully shared my cold with my daughter, who as a result is off school today feeling considerably down in the dumps! Even a bonus dose of 'Animal Rescue' on TV can't make up for missing two of her favourite lessons of the week - Art and PE. I'm sure a couple of days in the warm to catch up on some sleep and get things under control will help no end. As for me - my day is not quite turning out as planned, although this does mean one thing - an early blog post for a change!

The title of my post today is 'Two For One - Time Two' for two reasons: I am entering today's card into two challenges, and I also used two different flower sets to create my pattern. So, here is my card:

My card layout was inspired by this week's sketch challenge at Create with Connie and Mary CCMC285 - here is the sketch:

My colour combination was inspired by the current colour combination over at Dynamic Duos DD#85 - Summer Starfruit and Garden Green:

So here's a confession for you: I've had a Garden Green inkpad for 12 months and the first time I broke the seal on it was yesterday to make this card!! Whilst I use Garden Green card occasionally, I don't use Regals collection ink pads very often at all (Cherry Cobbler being the notable exception, of course). I have one other ink pad in this collection still in it's cellophane too; any guesses as to which one?! For a first time use, I quite like this colour combination. And for my other combination - did you spot which flower stamp sets my pattern came from? The yellow flower is from the 'Petal Parade' set that will be available during Sale-A-Bration at the end of the month and the green one is from 'Mixed Bunch'. I toyed with embellishing my flower centres, but decided against it, instead using three candy dots to 'anchor' my banner in place.

I'm off to replenish the tissue box and hopefully make a start on swaps for team training this weekend.

Back tomorrow with another card; until then, happy stampin'!


Stampin' Up! Supplies Used:

Table built using Stampin' Up! Product Table Builder from The Crafty Owl.


Tags: , , , , , , , ,

Cards | Stamping

True Love - Pals Paper Arts #187

by Joanne James13. January 2014 21:13

A busy day today: key highlights were getting to the bottom of the ironing basket (always worth celebrating!), finding Ben's mislaid PE training shoes at school and completing my card for this week's Pals Paper Arts Challenge. This week it's a colour challenge to incorporate the following colours:


I decided to stick with the Valentine's theme and use the contrasting colours to work up a card design that I've been wanting to have a go at for a while - here's my card:

I'm not sure what the term is for this angular layered design (or even if there is one!) but it's the perfect simple layout to highlight both the Eiffel Tower and 'True Love' sentiment from the 'Follow Your Heart' stamp set; I used my Stamp-a-ma-jig to ensure perfect placement. Lastly, I added a small punched red heart with a rhinestone on a dimensional for added interest. I love the simplicity of this card and the statement that the bold red colour makes against the white and soft sky.

I hope you like my card - there's lots more inspiration from the Design Team over at Paper Pal Arts using this colour combination if you fancy having a go.

Back tomorrow with another card; until then, happy stampin'!


Stampin' Up! Supplies Used:

Table built using Stampin' Up! Product Table Builder from The Crafty Owl.

DIY Wedding Stationery - It's Easier Than You Think!

by Joanne James12. January 2014 19:56

Good evening lovely blog readers - I hope you have all enjoyed a lovely weekend. Mine seems to have revolved around cooking for a change, with more time in the kitchen trying out new things. I blame Gordon Ramsey - I caught the last few episodes of his recent home cooking series on Channel 4 and just had to buy the accompanying book. The whole family pored over it yesterday morning and are now in a race to work our way through the delicious recipes within! Coupled with the fact that I seem to have passed my recent ailments to my daughter, such that she couldn't manage her swim squad training today as usual, it has felt like a less frantic weekend than is usually the case in the James household.

Anyway, today I thought I would share something different with you: wedding stationery. I recently wrote an article for the Winter Edition of a local wedding magazine called 'Local Wedding Connections' on just how easy it is to create the wedding stationery of your dreams, at a fraction of the cost of purchasing ready-made. You can read my article in full here, but I wanted to share more of the samples I created for this shoot in my post today. So here is the entire collection: 

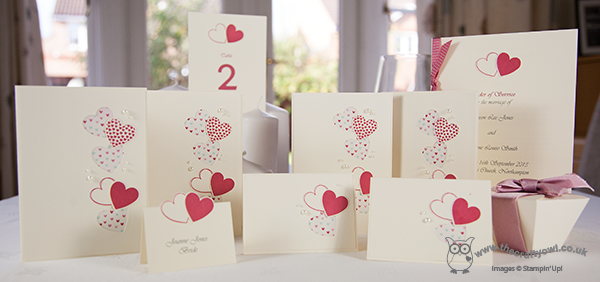
Creating your own wedding stationery can be not only cost-effective, but also means you can produce something that is unique and personal to you. I created the above range using the 'Hearts-A-Flutter' stamp set and matching framelits - here are some additional images that show some of the close-up design detail:

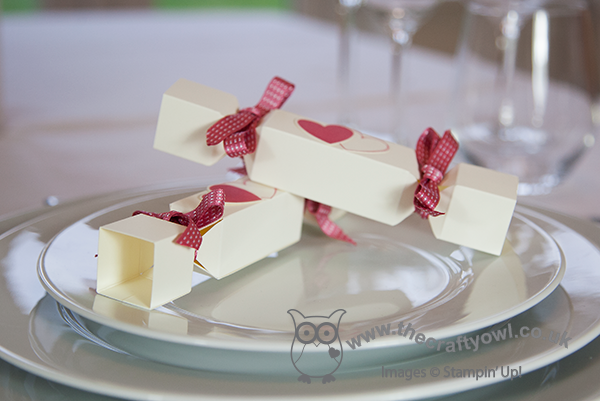
Wedding favour 'crackers' made using the Envelope Punch Board:

A dinner menu for the Reception dinner, where you can see the subtle layering of the design:

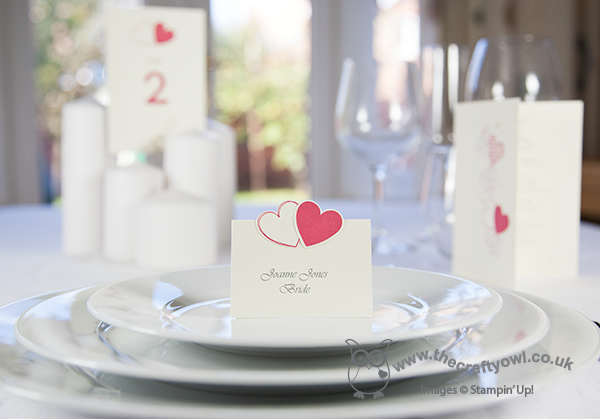
A place card, to denote the bride's place setting:

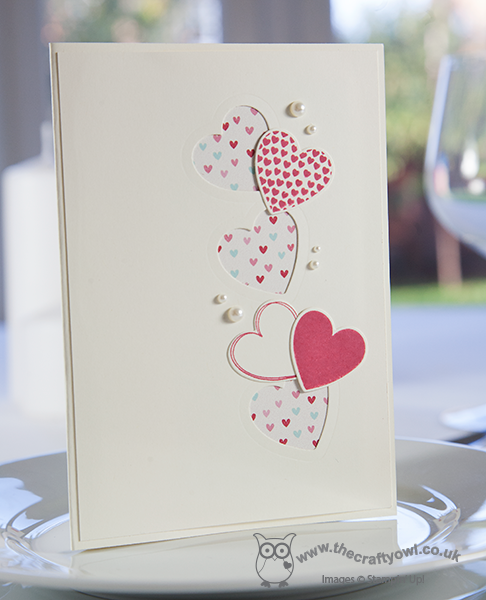
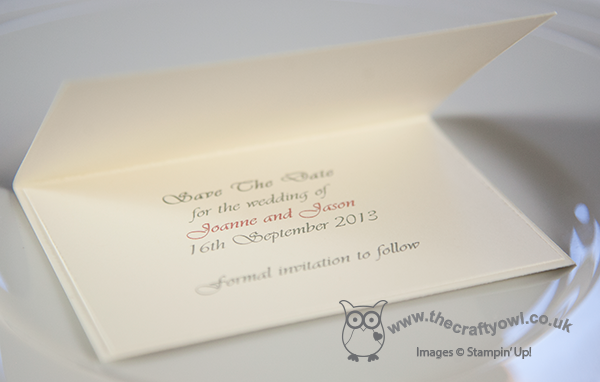
The inside of one of the 'Save The Date' cards:

You can go to my own website, www.thecraftyowl.co.uk for more information on the services I provide. As customers of mine that have made their own stationery will attest, if you choose a simple yet elegant design it is easier to produce large volumes of perfectly co-ordinating stationery than you might think. Best of all, Stampin' Up!'s extensive range of co-ordinating inks, papers, ribbons, embellishments and cardstock, alongside an extensive range of stamp designs, mean that pretty much anything is possible. That said, if making your own wedding stationery really isn't for you, I also offer a bespoke 'make to order' service - just contact me to discuss your requirements.

Christmas time is popular for engagements and many people will be making wedding plans at this time of year, so if you know someone who fits the bill do share my details with them - I can make a huge chunk of their wedding preparations easier! In addition, point them in the direction of the Local Wedding Connections website at www.localweddingconnections.co.uk; it contains lots of useful information, supplier details and general useful bits and pieces for anyone in the market for a wedding.

Back tomorrow with another project; until then, happy stampin'!


Stampin' Up! Supplies Used:

Table built using Stampin' Up! Product Table Builder from The Crafty Owl.


Tags: , , , , , , , ,

Cards | Stamping | Weddings

Petal Parade Pastels - Sale-A-Bration 'Sneak Peeks'

by Joanne James11. January 2014 20:54

As promised, I've a change of theme today - I've been having a play with my Sale-A-Bration pre-order and thought I would share one of the cards I made that features a  few of the products that will be available free when you spend £45 or more during the Sale-A-Bration 2014 promotion. Here is my card:

This card features three new products: the lovely Sweet Sorbet Designer Series Paper*, one of the stamps from the 'Petal Parade' stamp set* and the Crisp Cantaloupe cardstock has been embossed with the Decorative Dots Textured Impressions Embossing Folder*. All those layers, teamed with the fresh, pastel colours of the DSP and a simple sentiment, this is a perfect post-Christmas card, 'just because'.

More Sale-A-Bration ideas to come, but for now, start making that wish list! Back tomorrow with another project; until then, happy stampin'!


Stampin' Up! Supplies Used:

* All Sale-A-Bration items - available from 28 January - 31 March 2014

Table built using Stampin' Up! Product Table Builder from The Crafty Owl.


Flowerfull Heart Gift Card Holder

by Joanne James10. January 2014 19:45

Evening lovely blog readers! So big news of the day: my voice is (almost) back! Great news for me, not so great for my youngest when he announced he had lost his trainers following his PE lesson just 3 days into the new term - but that's a story for another time!

Today I'm going to share the last of this week's class projects: a gift card holder, once again made with the Envelope Punch Board. I've seen a few holders made in this way on the internet, but I adapted mine slightly to enable me to make it from half a sheet of A4, using metric measurements. So here is the finished gift card holder from the outside:

No apologies for once again using the Flowerfull Heart stamp (I still love it!), this time overlaid with 'love' cut from gold foil using the Expressions Thinlits die (don't forget these are only available to purchase until the 1st February). There's also another sneak peek of new product available in the Spring-Summer catalogue that launches on 28th January; did you spot it? Yes, it's the lovely gold washi tape which I paired here with Very Vanilla to make my pocket. There are lots of silver and gold items in the new catalogue, so if this is your thing, stay tuned - there will be more to come. The flap closure for the gift card holder is the bit you need the Envelope Punch Board for - it makes the two notches that enable the holder to stay closed and keep the gift card firmly in place.

When you unclasp the flap, this is what you see inside:

The insert is attached to the opening flap so that it slides out of the pocket as you open it and presents the gift card. I designed my gift card holder with a wedding or engagement gift in mind - vouchers or money seem very popular gifts these days, but you could easily adapt it for a birthday or other occasion. One thing is for sure - when it's as easy to make as this, there's really no excuse for a simply sticking a voucher in an envelope or worse still a carrier bag (believe me, it happens!!)

That's all the projects from my classes this week - I hope they've inspired you to go and be adventurous with your Envelope Punch Board. If you live local to me in Northampton and would like to attend any of my Stampin' Up! papercraft and card classes, you can find the current schedule of my card and project classes on my website here; please contact me for further information regarding location and any equipment you will need to bring. Classes must be booked at least 2 weeks in advance of the class date.

Back tomorrow with a Sale-A-Bration sneak peek; until then, happy stampin'!


Stampin' Up! Supplies Used:

Table built using Stampin' Up! Product Table Builder from The Crafty Owl.


Flowerfull Heart Notecard Holder

by Joanne James9. January 2014 21:37

Today I've another of this month's Envelope Punch Board class projects to share with you - a rectangular box notecard holder and a set of notecards. So here is the box, complete with belly band:

The box is made from Cherry Cobbler textured cardstock, which is great for boxes as it's really thick and has a lovely quality feel. In this photo I've finished with a belly band made from burlap and cotton ribbon; in class, we also made bows from Modern Medley paper using the Envelope Punch Board and created belly bands with bows on. Inside the box, we made a set of simple notelet cards, in co-ordinating vanilla and Cherry Cobbler and paired with Crumb Cake envelopes:

We used the Sweet Essentials sentiment stamps; this is a great set with sentiments to suit a variety of occasions. This set would make a lovely gift for someone and depending on the sentiment, it could be for a birthday or even created as a set of wedding thank you or acceptance cards.

The finished box base measures 5 3/4" x 4 3/8" and was made from a starter piece of 9" x 9" card stock. As with all boxes, whether square or rectangular, the piece of card you start with needs to be perfectly square; it's the points at which you punch and score that determine the finished dimensions of the box. To create this box, we punched and scored at 3 1/2" and 4 1/2".

Back tomorrow with another project; until then, happy stampin'!


Stampin' Up! Supplies Used:


Table built using Stampin' Up! Product Table Builder from The Crafty Owl.


Simple Square Envelope Punch Board Box

by Joanne James8. January 2014 15:26

So for my second post today, I wanted to share with you one of the quick makes from my January classes, which are being held this week. This month we are featuring the Envelope Punch Board. Lots of my customers either purchased one or received one as a Christmas gift, but weren't really sure what to do with it other than make basic envelopes. They were truly inspired by my Easiest Ever Envelope Punch Board Cracker Video that I posted before Christmas, so I was keen to show them the full extent of their boards and just what they could do.

We started off by making square boxes - here's my version of the one we made:

This is a simple 2" square box, made from a 6" x 6" square piece of paper, probably the easiest type of box to make. My class used the Modern Medley DSP for their boxes (there are some pictures over on my Facebook page if you would like to see them), but for my box here I thought I would give you another 'sneak peek' of product that will be available during this year's Sale-A-Bration promotion, starting 28th January. This is a sheet from the 'Sweet Sorbet' DSP collection - lovely fresh, spring colours with black (an unusual, but very workable colour combination). I finished my box with a small 'thanks' tag and some stretch ruffle trim in Crisp Cantaloupe to hold the box closed.

Back tomorrow with another of my class projects. until then, happy stampin'!


Stampin' Up! Supplies Used:

Table built using Stampin' Up! Product Table Builder from The Crafty Owl.


My Digital Studio: This Week's Downloads

by Joanne James8. January 2014 11:10

A quick blog post just to share this week's My Digital Studio downloads; I have inadvertently not been bringing these to your attention in recent weeks, so thought today was a good day to put that right, not least as it gives a 'sneak peek' of one of the DSP designs and embellishment sets that will be featuring in the new Spring-Summer seasonal catalogue that is out on the 28th January.

I've included the links to each of the items in an enlarged table below - just click on the links to go to my online store to purchase. Or if you prefer to wait for the pre-printed versions, just another 20 days to go!

Table built using Stampin' Up! Product Table Builder from The Crafty Owl.


Back later with today's creative post; until then, happy stampin'!

Tags: , , , , ,

My Digital Studio | Shop Online

CCMC 284 Love You!

by Joanne James7. January 2014 19:49

Today I am sticking with the 'love' theme, but no Flowerfull Heart today. I'm taking my colour scheme from the challenge palette over at Create with Connie and Mary this week, which requires a card made with the following colours:

I thought this was a great modern colour combination so decided to create a card with one of my other favourite products, the 'love' from the Expressions Thinlits Dies. Here's my card: 

I used the negative space from the thinlit cut out, rather than the word 'love' itself (don't worry, I didn't bin it - if you keep your eye out you'll see it appear on another card someday soon). I've done this before and like this effect almost as mush as the delicate cut out words that you get with these dies. I then contrasted the black top layer with the Strawberry Slush heart which I stamped in black with the word 'you' from the stamp I used on yesterday's card from the 'Follow My Heart' stamp set. Not necessarily the most romantic of colour combinations perhaps, but I think this card would definitely appeal to a trendy teenager. Don't forget, the Expressions Thinlits Dies feature in the Autumn-Winter seasonal catalogue and will only be available to order until the 1st February, so if they're still on your wishlist, don't leave it too late to order them; just click on the product link in the table below and hop on over to my online store.

So, my voice is still absent - the rest of the James household is loving it! It's good preparation for the children's return to school tomorrow, the first few days back always seem really quiet. Don't forget to hop on over to see what the designers at Create With Connie and Mary came up with in response to this week's colour challenge.

Back tomorrow with another card; until then, happy stampin'!


Stampin' Up! Supplies Used:

Table built using Stampin' Up! Product Table Builder from The Crafty Owl.


Mini Catalogue

BROWSE THE CATALOGUE

The mini catalogue is now live! Read and download your copy here.

Shop Online

Access my online shop 24 x 7, 365 days of the year:

Current April hostess code:

VDKNV7BH

Shop Online

Join My Team

It's always a great time to join Stampin’ Up! New team members can get £130 worth of products for only £99 + free business supplies + free shipping + all the fun being a part of Stampin’ Up! Stampin' Up! has something for everyone: join my growing team and benefit from my support to enjoy Stampin' Up! however you choose.

If you're interested, call me for a chat to understand how I can help you realise your goals. Alternatively, if you have already decided to sign up and you just can't wait, please click here for the link to the online form where you can sign up and order your starter kit right away! 

Latest Kit!

Stampin Cut and Emboss

The Rock Legend Kit has all you need to make 8 cards with coordinating envelopes. Along with the new Panda Friends Kit, both are available from January 4th for just £14 each - get yours here!

2023-24 Annual Catalogue

BROWSE THE CATALOGUE

Click on the catalogue for a full list of current SU! supplies - if you would like to order any of the items featured, please drop me a line at [email protected] or give me a call on 07773 421446 - I'd be happy to help.

New Online Exclusives

There are new products available exclusively in the online store from 5 March - check them out here.

About Me

Hi I'm Joanne and live in Northampton and when I'm not looking after my husband and two beautiful children, am an avid crafter with a passion for all things Stampin' Up!

I must confess that I have never been a big rubber stamper - until I discovered Stampin' Up! that is. I love the fact that I can get such great results with co-ordinating stamps, inks, papers and punches - the possibilities are endless! Join me on my stamping journey as I share the things I love and be inspired to create amazing things yourself!

Follow Me

Monthly Newsletter

Box Builder

Click the button above to use Box Buster to create your custom box design using the Envelope Punch Board!

Kits Collection Now Available!

Stampin Cut and Emboss

The new Kits Collection from Stampin' Up! is now available!

Click here to see the current kits available and order yours online today.

I Design For


Stampin' Up Stuff

This is my personal blog and is not endorsed by Stampin’ Up! I hope you find it a plentiful source of ideas and personal inspiration but please don't copy my designs for contest submission or use for classes, publication or sale without express permission.