Clearance Rack Blitz - Items up to 80% Off While Stocks Last!

by Joanne James10. December 2013 00:20


Just a quick reminder to let everyone know that the Clearance Rack has been updated and there are now lots of items available, some with as much as 80% off. There are packs of A4 cardstock from just £2.49, lots of ribbon and even the Holiday Stocking Bigz Die if you wanted to make some last minute Christmas stockings!

So, what are you waiting for - click here to go the clearance rack in my online store and grab a bargain whilst stocks last!


Tags: , , , ,

Promotions | Shop Online

Gift Bow Bigz Die Christmas Pudding Ornament and Video Tutorial

by Joanne James9. December 2013 21:00

So today is the start of the last week of school for the James' juniors, so there are lots of daily activities with Christmas in mind. I've just returned from watching my youngest in his Christmas school production, having given a stellar performance as the 'Bethlehem Census Man' (imagine town crier!) and delivered his one line with true dramatic style: "Hear ye, hear ye - census in Bethlehem! Your country needs you !" There's nothing like a Christmas production to make you feel like the festive season is upon us.

And so to today's creation with the Gift Bow Bigz Die: hot on the heels of yesterday's gift bow angel, a Christmas pudding tree ornament! Now, for my non-UK readers, you may not know that Christmas or plum puddings are a peculiarly British fayre, traditionally eaten after Christmas lunch on Christmas Day. They are eaten with either white sauce or brandy butter and are something of an acquired taste, or so my American friends told me after I sent them one for Christmas one year! So without further ado, here's a picture of the finished pudding: 

I made a few of these a while ago (tomorrow's post will explain all!) and I think they make another cute ornament for Christmas time. You could just follow the instructions to make a plain sphere out of patterned paper, but I decided mine needed dressing up, hence the Christmas pudding. I made a video showing you how easy they are to create using the Gift Bow Bigz Die from Stampin' Up!; the video also shares a handy technique for colouring your glimmer paper to match your product - did you know you can colour Stampin' Up!'s Glimmer Paper using your Stampin' Write markers? If not, watch the video to find out how:


I hope you like today's project - back tomorrow with something a little different, but still bow-related!

Until then, happy stampin'!


Stampin' Up! Supplies Used:

Table built using Stampin' Up! Product Table Builder from The Crafty Owl.


Gift Bow Bigz Die Angel Christmas Tree Ornament and Video Tutorial

by Joanne James8. December 2013 16:00

Another weekend of James family busy, busy. Yesterday: hairdressers, mad science parties and swimming gala on top of the usual homework and household chores. Today: swimming lessons, family lunch and decorating the house ready for Christmas. Finally I'm able to share today's post with a cute project: this adorable angel Christmas tree ornament made using the Stampin' Up! Gift Bow Bigz Die:

I've seen a few different examples of these angels on the internet; the first one I saw was on Tanya Bell's blog here which also included a great tip for getting even eyes. I'm not sure where the original idea came from, but as they are all a little different I thought I would share with you my version; I've been making lots of these to decorate the house this year and love that I can use my Gift Bow Die for so many more things than making bows. I made a video tutorial for you to show how I put these together; here it is:


The supplies and equipment you need to make an angel are listed below and the key measurements for the cardstock to make the main part which is the angel dress body are:

2 pieces cardstock: 10.5cm x 5cm

1 piece cardstock: 1.5cm x 8cm

These card sizes enable you to get three angels out of one sheet of A4 cardstock. Come back tomorrow for another project using the Gift Bow Bigz Die; until then, happy stampin'!


Stampin' Up! Supplies Used:

Table built using Stampin' Up! Product Table Builder from The Crafty Owl.


Season of Style Christmas Card Trio

by Joanne James6. December 2013 22:23

Another busy day today so a late post - I'm still putting the final touches to a couple of video tutorials that I've prepared to go with my next couple of posts, so meanwhile I'm going to share with you three of the Christmas cards that we made at this month's card class. Each one features the Season of Style paper and a variety of different stamps. So here is the first one: 

This card uses the 'Love and Joy' single stamp on a set of layered pieces cut with the Deco Labels framelits. This was our second card:

This card uses the 'Warmth and Wonder' hostess set and is a CASE of a card I fell in love with by Mary Fish, who created a similar card using the Winter Frost colour scheme; you can see her original card here. Here is the third card that we made:

This uses a similar layout to one of the cards featured in the seasonal catalogue that showcases the 'Wishing You' stamp set, but I incorporated a small bow made with the Gift Bow Bigz Die for added impact. The last card was the Midnight Muse circle thinlit card I made a while ago featuring a bauble and two ways to make labels using the mosaic punch; the ladies in my class loved this card when they first saw it and were keen to have a go at it themselves. If you missed this card and would like to see it, you can find it here.

I also made alternative non-Christmas cards that followed each of the above design layouts, as I had a customer who didn't want to make Christmas cards (far too organised!); I'll share these cards with you next week.

I hope you liked the above cards, especially the last one - I love my Gift Bow Die and I have some great projects to share with you over the next few days using this useful product. Until next time, happy stampin'!

Stampin' Up! Supplies Used:

Table built using Stampin' Up! Product Table Builder from The Crafty Owl.


Perfect Blend Coffee Cup Card and Gift Card Holder

by Joanne James5. December 2013 13:31

Where is this week going?! I am so busy and feeling like Christmas is getting nearer and nearer and I am sooo not ready! Didn't manage to squeeze a blog post in yesterday as there was so much going on, so thought I'd better do a quick one today over lunch as I'm out again later and won't get the opportunity. Which is a shame, as I've still so many lovely Christmas projects to share! Today is a super quick card and gift card holder set that was designed by my lovely upline's upline Monica Gale at a recent Convention team gathering. Both items feature the 'Perfect Blend' stamp set. Firstly, here's the card: 

This is one of those cards that requires some paper snipping, but it's not tricky and worth it for the overall effect. We also made a matching gift card holder, which is just the right size for the credit-sized card coffee gift cards available from some of the large coffee house chains:

How cute is this?! I love the colours here and the little bow clip use to secure the gift card holder shut. I have a few friends who love a nice cup of coffee, so I might have to make a few more of these - not least because I received some extra Season of Style washi tape in a parcel that arrived yesterday, one of the things I won in a recent Stampin' Up! competition for World Cardmaking Day back in October - you can see my winning card here.

That's it for today. As always, if you would like to have a go at making either of the above project, the links to purchase the items you will need are included in the table below. Back tomorrow with a special Christmas project; until then, happy stampin'!

Stampin' Up! Supplies Used:

Table built using Stampin' Up! Product Table Builder from The Crafty Owl.


Tags: , , , , , , ,

3D Projects | Cards | Stamping

My Digital Studio Keyrings and Downloads

by Joanne James3. December 2013 12:30

Today I have a quick post with the last of my Convention-related makes to share with you. One of the things we have to do for Convention is make a bag tag featuring our names. Why? Well, we are each given a Convention rucksack full of goodies and everything we will need to get us through the event. The rucksacks are great, but there's only one problem - they're all the same! So it's really important that we have a name tag that enables us to identify our bags, and each other, in the crowd. I made bag tags for each of the team members travelling with me that featured our team logo - The Crafty Owl:

Cute, eh?! I made these by printing onto shrink plastic at 250% of finished size, then cut out the shapes, punched a hole for the keyring and shrunk them in the oven. I was so pleased with the result, I made a few more for some of my good friends and members of my wider Stampin' Up! team, this time using My Digital Studio (my logo was created using alternative software when UK demos didn't have access to MDS). I used the butterfly stamp that comes as part of the Creative Elements stamp set, and coloured the sections individually using the brush tool, using various shades of greens and turquoise - here are a couple of them:

What do you think? These bag tags are really eye-catching and certainly helped my team stand out from the crowd - my friends loved theirs too, especially Michelle whose team is a called the Butterfly Belles - how appropriate! I just thought I would share to show how versatile MDS can be - it's not just for cards!

The MDS shop links are included below if you don't already have it; Creative Elements is part of the standard software version so there is no product link for this, however as today is Digital Downloads Weekly Release Day I've also included the links to all of this week's new MDS downloads - some lovely festive sets here.

Right, off to attend my son's Christingle service at school; I'm hoping for a nice photo or two for my December photo journal (another MDS project that I'll be sharing with you another day!) Back tomorrow with another project - I'm thinking we might need to get back to Christmas, it is the 3rd December after all! Until then, happy stampin'!


Stampin' Up! Supplies Used:

Table built using Stampin' Up! Product Table Builder from The Crafty Owl.


The Crafty Owl Launches Product Table Builder - The Tool Your Stampin' Up! Blog Has Been Waiting For!

by Joanne James1. December 2013 13:43

For my second post today I have something very exciting to share with you: if you're a Stampin' Up! demonstrator who, like me, enjoys writing a blog and sharing your creative ideas, read on! 

Since having had a DBWS online store earlier in the year, I've been listing the products used in my daily blog posts and linking them to the corresponding product in my online store. There are a few different ways in which you can do this, but if you do it manually 'the long way' it's very time consuming. I investigated other tools in the marketplace that are designed to make this job easier, but found them to be generally quite expensive.

So I set to work with my genius of a husband and created our very own Product Table Builder! The Product Table Builder from The Crafty Owl is designed specifically to build product links to a demonstrator's DBWS online store and feature the Stampin' Up! products you use in the projects you blog. The Stampin' Up! Product Table Builder from The Crafty Owl is highly customisable to provide you with the correct look and feel for your blog. You have complete control over the following aspects of your product table:

  • Include a border around the completed table to ensure if stands out in your blog post.
  • Include a border around each product so it looks more like a button.
  • Control the colour of the borders so that they fit your existing blog themes.
  • Change the size of the product images to use more or less space in your post.
  • Increase and decrease the number of table columns so your product table fills your blog post.
  • Advanced options also allow further customisation including border links, CSS inclusion and other advanced features.

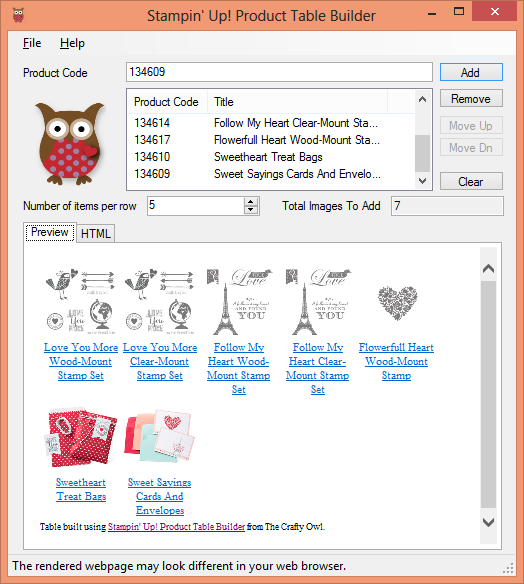
If you look at my earlier blog post, you will see two examples of tables that have been built using the Product Table Builder from The Crafty Owl - here's a screen shot of what it looks like on the screen:

 If you would like to see the Product Table Builder in action, please check out this video that shows exactly how it works, from the easy installation to using it to link the products you use in your blog posts to your DBWS online store:

 The Product Table Builder works in conjunction with your unique Stampin' Up! demonstrator ID and can be used with UK, US, European or South Pacific stores/catalogues. It has also been tested and proven to work with a wide range of the most common blog platforms.

I can honestly say that this little piece of software has totally revolutionised my blog, saving me a considerable amount of time in building product links into my Stampin' Up! blog posts. Today I am pleased to be able to offer The Product Table Builder from The Crafty Owl to you to purchase at an introductory price of £20 during the month of December. This is an introductory offer that is valid for the month of December 2013 only; from 1st January 2014 it will be on sale at the standard retail price of £35.

If you would like to purchase a copy of The Product Table Builder from The Crafty Owl, please click on the link below or the button on the right hand side of my blog to order yours:


The Product Table Builder from The Crafty Owl runs on Windows XP, Windows Vista, Windows 7 and Windows 8 (not Windows RT). It will not run on iPads, Mac Books or other Apple products. It will not run on Android Tablets or Windows RT devices, e.g. Windows Surface.

If you have any questions, please drop me a line at [email protected] or leave a comment below and I will be happy to answer them. As with all other content in my blog and on my website, this product has been developed by me independently of Stampin' Up! and is not endorsed by Stampin' Up! in any way - just wanted to make that clear!

Back tomorrow with another project; until then, happy stampin' (or product table building!)


Tags: , , , ,

Product Table Builder | Promotions | Shop Online

Love Is In The Air .... Already?!

by Joanne James1. December 2013 10:49

Good morning lovely readers - no blog post yesterday as I had some very important last-minute work to finish, but do not fear - today there will be (at least) two blog posts to make up for it!

So today we're having a short break from Christmas projects as it's the first of December and the launch of Stampin' Up's 'Whole Lot of Love' promotion - stamps and products designed with Valentine's Day in mind, but can be used for lots more besides. You may have noticed that Valentine's-themed projects didn't feature in the current seasonal catalogue, hence this special promotion to enable you to be prepared in good time for the big day. There are some great products in this set, ranging from cute (Monster Hugs - adorable! - available from 9th December) to practical (pre-cut card and envelope sets) and romantic (check out that Eiffel Tower!) to beautiful (the Flowerfull Heart - a keeper that would look just as beautiful on a birthday card for someone special). Here are the images for each set:

Aren't they great? I'll have some samples to share using a selection of these products in the not-too-distant future, but meanwhile in keeping with the theme I thought I would share this card with you that I made using the 'love' Thinlits die: 

If you're a fellow Stampin' Up! demonstrator and you attended our recent European Convention in Manchester, you may well have seen this card already. It was one of the projects I entered for the Convention Design Competition and whilst it didn't win, it was on the display boards for everyone to enjoy. My other project was 3D, but I chose this card as my second project as it's very clean and simple and typical of my papercrafting style. I am in love with these thinlits and also like how they can be used not only with the word itself, but you can use the relief too - no need to throw away this piece, a real two for one! I created an ombre background in the relief - I love this technique and think it looks great when done in inks with a brayer or sponged, but also like the clean look it gives with this kind of project. A few extra pieces and a small diamante just finish it off.

One of the funniest things that happened at Convention was that I attended an early Friday evening workshop and left my two downline team members who were attending Convention with me to browse the display boards. When I met up with them later, they both said to me 'You should come and see this card on the board - we love it and think you will too.' And the card? Without them knowing it was mine, they led me to this card! What can I say? Great minds clearly think alike! It did give me a lovely warm feeling inside though - love you, my little Crafty Owls!

Check out the product links below if you would like to have a go at either recreating my card or purchase any of the lovely new Valentine's products.

Back tomorrow with another creative project; check out today's other post though if you're a Stampin' Up! demonstrator - your life is just about to get a whole lot easier ....

Until then, happy stampin'!


Stampin' Up! Supplies Used (for love card):

Table built using Stampin' Up! Product Table Builder from The Crafty Owl.


Stampin' Up! Whole Lot of Love Products (Monster Hugs available from 9th December):

Table built using Stampin' Up! Product Table Builder from The Crafty Owl.


Mini Catalogue

BROWSE THE CATALOGUE

The mini catalogue is now live! Read and download your copy here.

Shop Online

Access my online shop 24 x 7, 365 days of the year:

Current April hostess code:

VDKNV7BH

Shop Online

Join My Team

It's always a great time to join Stampin’ Up! New team members can get £130 worth of products for only £99 + free business supplies + free shipping + all the fun being a part of Stampin’ Up! Stampin' Up! has something for everyone: join my growing team and benefit from my support to enjoy Stampin' Up! however you choose.

If you're interested, call me for a chat to understand how I can help you realise your goals. Alternatively, if you have already decided to sign up and you just can't wait, please click here for the link to the online form where you can sign up and order your starter kit right away! 

Latest Kit!

Stampin Cut and Emboss

The Rock Legend Kit has all you need to make 8 cards with coordinating envelopes. Along with the new Panda Friends Kit, both are available from January 4th for just £14 each - get yours here!

2023-24 Annual Catalogue

BROWSE THE CATALOGUE

Click on the catalogue for a full list of current SU! supplies - if you would like to order any of the items featured, please drop me a line at [email protected] or give me a call on 07773 421446 - I'd be happy to help.

New Online Exclusives

There are new products available exclusively in the online store from 5 March - check them out here.

About Me

Hi I'm Joanne and live in Northampton and when I'm not looking after my husband and two beautiful children, am an avid crafter with a passion for all things Stampin' Up!

I must confess that I have never been a big rubber stamper - until I discovered Stampin' Up! that is. I love the fact that I can get such great results with co-ordinating stamps, inks, papers and punches - the possibilities are endless! Join me on my stamping journey as I share the things I love and be inspired to create amazing things yourself!

Follow Me

Monthly Newsletter

Box Builder

Click the button above to use Box Buster to create your custom box design using the Envelope Punch Board!

Kits Collection Now Available!

Stampin Cut and Emboss

The new Kits Collection from Stampin' Up! is now available!

Click here to see the current kits available and order yours online today.

I Design For


Stampin' Up Stuff

This is my personal blog and is not endorsed by Stampin’ Up! I hope you find it a plentiful source of ideas and personal inspiration but please don't copy my designs for contest submission or use for classes, publication or sale without express permission.